Deploy SQL Server on Azure VMs with Premium SSD v2 storage in Azure portal (preview)
Applies to: ![]() SQL Server on Azure VM
SQL Server on Azure VM
This article teaches you to deploy SQL Server on Azure Virtual Machines (VMs) with Premium SSD v2 disks by using the Azure portal. Premium SSD v2 offers high performance, low latency, and granular scalability for applications that require submillisecond disk response times.
Note
Deploying SQL Server on Azure VMs with Premium SSD v2 disks in the Azure portal is currently in preview.
Overview
You can deploy your Ebdsv5 or Ebsv5 series SQL Server VMs with Premium SSD v2 storage by using the Azure portal. Premium SSD v2 is an advanced, new generation storage solution designed for IO-intensive enterprise workloads that require submillisecond disk latencies, high IOPS and throughput at a low cost. This storage solution is fast, flexible, and cost-effective for your cloud applications.
Premium SSD v2 allows for granular control over disk size, IOPS, and throughput without having to stripe your disks to meet most of your performance needs. The lower latency of Premium SSD v2 helps address some of the core issues that host-caching is designed to solve, so caching isn't necessary when using Premium SSD v2. If a storage pool is necessary for your performance, SQL Server on Azure VMs storage configuration simplifies the process of creating a storage pool by automatically creating the pool for you, taking into account the limitations of the selected virtual machine.
Premium SSD v2 offers the following key capabilities:
- Supports single disk sizes up to 34 TiB per region per subscription, though higher capacity is available by request.
- Supports up to 80,000 IOPS, and throughput up to 1,200 MB/s for a single disk.
- Scaling beyond single disk limits by using Premium SSD v2 disks in a striped storage pool.
- Allows you to customize the disk size, IOPS, and throughput to meet your specific needs.
- Dynamically adjust performance values without downtime.
Compared to Premium SSD, Premium SSD v2 offers higher performance at a lower overall cost, though the cost difference between Premium SSD, Premium SSD v2, and Ultra disks depends on a variety of factors, such as the selected region, disk size, IOPS, and throughput. Use the Azure pricing calculator to estimate the cost of each disk type based on your specific needs. For a comprehensive comparison of storage options in Azure, review disk type comparison.
If you're deploying your SQL Server VM by using the Azure portal and want to use Premium SSD v2, you're currently limited to the Ebdsv5 or Ebsv5 series virtual machines. However, if you manually create your VM with Premium SSD v2 storage and then manually install SQL Server to the VM, you configure Premium SSD v2 on any virtual machine that supports premium storage. Be sure to register your SQL Server VM with the SQL IaaS Agent extension so you can take advantage of all the benefits provided by the extension.
Storage configuration limits
When configuring Premium SSD v2 disks, consider the correlation between capacity, IOPS (input / output operations per second), and throughput. As you increase the storage capacity, IOPS scales up proportionally, which influences throughput.
When configuring your SQL Server VM to use Premium SSD v2 in the Azure portal, use the slider controls to easily adjust and optimize the capacity, IOPS, and throughput settings. Disks up to 6 GiB in size get a baseline of 3000 IOPS and 125 MB/s throughput for free. Likewise, for every disk you have as part of a storage pool, you get 3,000 IOPS and 125 MB/s free per disk, which affects the minimums for a storage pool. For example, a 4-disk storage pool gets a minimum free baseline of 12,000 IOPS.
After 6 GiB, maximum IOPS increases by 1 GiB disk size increments and maximum throughput increases based on the configured IOPS. Disks 160 GiB and larger can be configured up to the maximum of 80,000 IOPS and 1,200 MB/s throughput. The cumulative configured values across all the disks shouldn't exceed the maximum limits of the selected VM size.
For example, if you choose a 100-GiB disk, you are limited to 50,000 IOPS because a 100-GiB disk has 3000 + (500 * (100 - 6)) IOPS, so to increase IOPS, increase the disk size.
If you configure your 100-GiB disk to use only 3,000 IOPS, you are limited to 750 MB/s throughput because disks larger than 6 GiB have a maximum of 0.25 MB/s * configured IOPS up to 1,200 MB/s. If you need to increase throughput, increase IOPS.
The following table provides the scale of IOPS and throughput when using Premium SSD v2, up to the maximum configurable values:
| Disk Size | Maximum available IOPS | Maximum available throughput (MB/s) |
|---|---|---|
| 1 GiB-64 TiBs | 3,000-80,000 (Increases by 500 IOPS per GiB) | 125-1,200 (increases by 0.25 MB/s per set IOPS) |
Note
Currently, Premium SSD v2 offers up to 100 TiB per region per subscription by default, but supports higher capacity by request. To increase capacity, contact Azure Support to request a quota increase.
Determine workload requirements
Before you deploy SQL Server on Azure VMs using Premium SSD v2 disks, understand the workload of your application. Collect the IOPS and throughput requirements from your workload, obtain the storage size your databases are currently using, and add an extra 25% to your current storage utilization to allow for future capacity. This forward-thinking approach anticipates the changing demands of your environment, incorporating flexibility and foresight into your storage provisioning strategy.
Premium SSD v2 disk speeds depend on how much data you can read or write per second (throughput), and how many times you can read or write data per second (IOPS). For example, workloads that have a larger number reads and writes per second, such as ERP systems, tend to need higher amounts of IOPS. These workloads often involve many small read and write operations, so having higher IOPS can help improve the performance of these workloads.
Since you can't currently adjust the storage size of a Premium SSD v2 disk without detaching the disk or deallocating the VM, it's important to anticipate your size needs before you provision your SQL Server on Azure VMs.
Use the following Windows Performance Monitor (PerfMon) counters to determine your workload requirements:
- IOPS
- \LogicalDisk\Disk Reads/Sec
- \LogicalDisk\Disk Writes/Sec
- Throughput
- \LogicalDisk\Disk Read Bytes/Sec
- \LogicalDisk\Disk Write Bytes/Sec
- Storage size for the _Total instances
- \Databases\Data Files(s) Size (KB)
- \Databases\Log Files(s) Size (KB)
- \Databases\Log Files (s) Used Size (KB)
For more information, review Collect baseline.
If you're migrating to SQL Server on Azure VMs, consider size elements beyond just the database, such as SSIS / DTS packages, jobs, linked servers, Extended Events (XE) sessions, audits, and more. These components can significantly impact the storage requirements and should therefore be factored into capacity planning. For additional migration details, review SQL Server on Azure VMs migration guide
Create SQL Server VM with Premium SSD v2
Use Premium SSD v2 when you deploy your SQL Server on Azure VM to an Ebdsv5 or Ebsv5 virtual machine in the Azure portal. To do so, follow these steps:
Go to the Azure SQL page in the Azure portal.
Select + Create to go to the Select SQL deployment option page.
Under SQL virtual machines, use the dropdown to choose a SQL Server image, such as Free SQL Server License: SQL Server 2022 Developer on Windows Server 2022. Select Create to go to the Create a virtual machine page.
On the Basics tab, provide values for the Project and Instance details. For Availability options, choose Availability zones, as they're a prerequisite for using Premium SSD v2.
Under Size, select See all sizes to open the Select a VM size page. Type
bds_v5orbs_v5to filter the Ebdsv5 or Ebsv5 series virtual machines that currently support Premium SSD v2 with SQL Server on Azure VMs in the Azure portal. Choose the VM size that suits your needs and then use Select to navigate back to the Create a virtual machine page.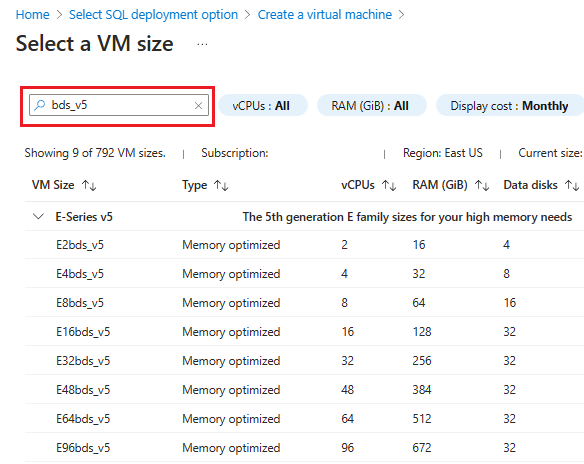
(Optional) By default, Premium SSD v2 uses SCSI-based storage, but you can configure NVMe storage instead. If you'd like to use NVMe storage, then on the Basics tab, under Security type, choose Standard from the dropdown. Go to Enable NVMe FAQs to learn more about the benefits of NVMe.
Fill out the rest of the values on the Basics tab, and then use Next to go to the following tabs. Leave the values as default, or modify them to suit your needs.
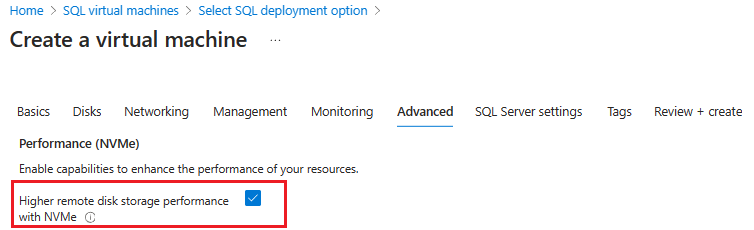
(Optional) If you want to use NVMe storage, then on the Advanced tab, check the box next to Higher remote disk storage performance with NVMe in the Performance (NVMe) section.
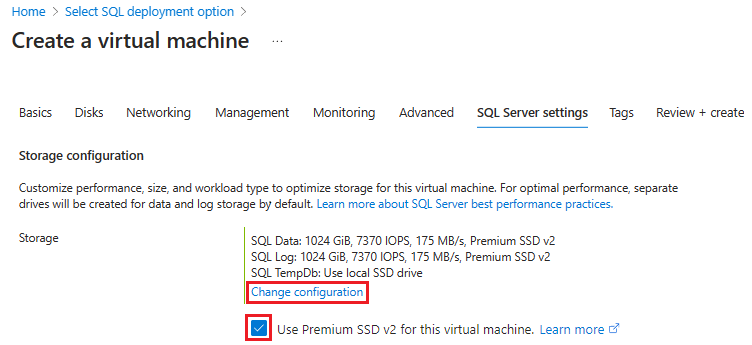
On the SQL Server settings tab, under Storage configuration, check the box next to Use Premium SSD v2 and then select Change configuration to open the Configure storage (preview) window. If the checkbox isn't available, then the chosen VM size doesn't support Premium SSD v2 with your SQL Server VM, or availability zones haven't been enabled. Go back to the Basics tab, select See all sizes and choose a supported VM size on the Select a VM size page, or make sure you've enabled availability zones. If you want to use UltraDisk, or Premium SSD disks, don't check the box.
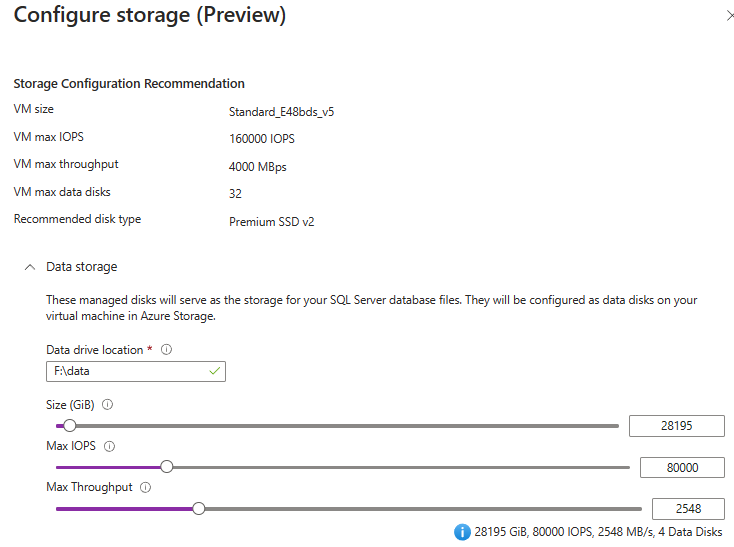
On the Configure storage (preview) window, expand the sections for your data, log, and tempdb storage, and then use the sliders or enter values in the text boxes to customize your disk size, IOPS, and throughput. If you enabled NVMe previously, the VM size name has a (NVMe) suffix.
Disk size can't be modified without taking the disk offline. You should add an extra 25% to your current storage utilization to allow for future capacity.
Use OK to save your settings and close the Configure storage window.
Important
By default, IOPS, throughput, and the number of disks are evenly distributed between all drives for the SQL Server VM. If the cumulative configured values exceed the max values for the selected VM size, you may experience capping and performance issues. A yellow warning appears if your configured values exceed the limits of the VM. Storage cost estimation is currently only available for pay-as-you-go (PAYG) subscriptions. Use the Azure Pricing Calculator to estimate storage costs for other subscriptions.
Change any remaining settings on the SQL Server settings and Tags tabs. Select Review + create to review your SQL Server VM settings, and then select Create to deploy your SQL Server VM.
The Deployment is in progress page opens automatically so you can monitor the status of your deployment and navigate to your resource group. You can also use the Notifications icon to check the progress of your deployment.
Adjust performance values
Making performance value adjustments (such as to IOPS or throughput) for your Premium SSD v2 disks can currently only be done with the Azure CLI or PowerShell. Review Adjust performance to learn more.
Note
Since making changes to Premium SSD v2 disks for SQL Server VMs in the Azure portal is not currently supported, the Storage Configuration page of the SQL virtual machines resource shows Not extendable for Premium SSD v2 disks.
If your Premium SSD v2 disks are in a storage pool, you can use PowerShell to adjust IOPS and throughput for all the disks in the pool.
Consider the following:
- Since there is no direct way to associate disks with a storage pool and the underlying disks, you have to make that association manually.
- To maintain balanced capacity and performance, when expanding a storage pool, expand by the number columns in a pool, which defines the number of disks striped in the first set. For example, if you start with 4 disks in a striped set, always add 4 disks at a time to that striped set.
- Column count is a multiplier fixed for the life of the storage pool, even if the disk type has been converted from Premium SSD to Premium SSD v2. For example, a storage pool of two P30s has a column count of
2, and has a column count of2if the two disks are converted to two P80s.
To make changes to your Premium SSD v2 disks in a storage pool, first define the variables:
# Define the resource group and VM name
$resourceGroupName = '<resource group name>'
$vmName = '<name of the VM>' # replace with your VM name
$diskNames = @('AzureSQLVMwithPSSDv2_DataDisk_0', 'AzureSQLVMwithPSSDv2_DataDisk_1')
To adjust the throughput, use the following PowerShell sample:
## This script updates the throughput for all the disks associated with the VM and RG:

# Get the VM
$vm = Get-AzVM -ResourceGroupName $resourceGroupName -Name $vmName

# Get all the disks attached to the VM
$disks = $vm.StorageProfile.DataDisks

# Loop through each disk and update the throughput
foreach ($disk in $disks) {
    # Update the disk
    $diskUpdateConfig = New-AzDiskUpdateConfig -DiskMBpsReadWrite 550
    Update-AzDisk -ResourceGroupName $resourceGroupName -DiskName $disk.Name -DiskUpdate $diskUpdateConfig
}

# Confirm the update
foreach ($disk in $disks) {
    # Get the updated disk
    $updatedDisk = Get-AzDisk -ResourceGroupName $resourceGroupName -DiskName $disk.Name

    # Output the updated IOPS
    Write-Output ("Disk '{0}' throughput: {1}" -f $updatedDisk.Name, $updatedDisk.DiskMBpsReadWrite)
}
To adjust the IOPS, use the following PowerShell sample:
## This script updates the IOPS for a set list of the disks associated with a RG:

# Loop through each disk and update the IOPS
foreach ($diskName in $diskNames) {
    # Get the disk
    $disk = Get-AzDisk -ResourceGroupName $resourceGroupName -DiskName $diskName

    # Update the disk
    $diskUpdateConfig = New-AzDiskUpdateConfig -DiskIOPSReadWrite 5000
    Update-AzDisk -ResourceGroupName $resourceGroupName -Disk $disk -DiskUpdate $diskUpdateConfig
}

# Confirm the update
foreach ($diskName in $diskNames) {
    # Get the updated disk
    $updatedDisk = Get-AzDisk -ResourceGroupName $resourceGroupName -DiskName $diskName

    # Output the updated IOPS
    Write-Output ("Disk '{0}' IOPS: {1}" -f $updatedDisk.Name, $updatedDisk.DiskIOPSReadWrite)
}
Limitations
When deploying SQL Server on Azure VMs in the Azure portal, Premium SSD v2 is only:
- Available to new SQL Server VMs. Existing SQL Server VMs can't change their storage to Premium SSD v2.
- Supported on the Ebdsv5 and Ebsv5 virtual machines series.
- Available when you deploy your SQL Server VM using the Azure portal. Using Premium SSD v2 isn't currently available when you deploy your SQL Server VM using the Azure CLI or PowerShell.
- Configurable with the Azure portal during provisioning. To make changes after the SQL Server VM is provisioned, use the Azure CLI or PowerShell. Review Adjust performance to learn more.
- Supported as the only storage solution. Mixing Premium SSD v2 with Premium SSD, Ultra Disk, and other managed storage solutions is not supported.
- Storage cost estimation on the Configure Storage (preview) window of the Create a virtual machine page in the Azure portal is currently only available for pay-as-you-go (PAYG) subscriptions. Use the Azure Pricing Calculator to estimate storage costs for other subscriptions.
The following limitations apply to Premium SSD v2:
- Premium SSD v2 disks can't be used as an OS disk.
- Currently, Premium SSD v2 disks are only available in select regions.
- Currently, Premium SSD v2 disks can only be attached to zonal VMs.
- Encryption at host is supported on Premium SSD v2 disks with some limitations and in select regions. For more information, see Encryption at host.
- Azure Disk Encryption (guest VM encryption via Bitlocker/DM-Crypt) isn't supported for VMs with Premium SSD v2 disks. We recommend you to use encryption at rest with platform-managed or customer-managed keys, which is supported for Premium SSD v2.
- Currently, Premium SSD v2 disks can't be attached to VMs in Availability Sets.
- Azure Site Recovery isn't supported for VMs with Premium SSD v2 disks.
- Azure Backup support for VMs with Premium SSD v2 disks is generally available.
- The size of a Premium SSD v2 can't be expanded without either deallocating the VM or detaching the disk.
- Premium SSDv2 doesn't support host caching.
Note
Premium SSD v2 is currently available in specific regions.
Related content
Feedback
Coming soon: Throughout 2024 we will be phasing out GitHub Issues as the feedback mechanism for content and replacing it with a new feedback system. For more information see: https://aka.ms/ContentUserFeedback.
Submit and view feedback for