Enable private access to Azure Digital Twins using Private Link
By using Azure Digital Twins together with Azure Private Link, you can enable private endpoints for your Azure Digital Twins instance, to eliminate public exposure and allow clients located in your virtual network to securely access the instance over Private Link. For more information about this security strategy for Azure Digital Twins, see Private Link with a private endpoint for an Azure Digital Twins instance.
Here are the steps that are covered in this article:
- Turn on Private Link and configure a private endpoint for an Azure Digital Twins instance.
- View, edit, or delete a private endpoint from an Azure Digital Twins instance.
- Disable or enable public network access flags, to restrict API access for an Azure Digital Twins to Private Link connections only.
This article also contains information for deploying Azure Digital Twins with Private Link using an ARM template, and troubleshooting the configuration.
Prerequisites
Before you can set up a private endpoint, you'll need an Azure Virtual Network (VNet) where the endpoint can be deployed. If you don't have a VNet already, you can follow one of the Azure Virtual Network quickstarts to set this up.
Add private endpoints to Azure Digital Twins
You can use either the Azure portal or the Azure CLI to turn on Private Link with a private endpoint for an Azure Digital Twins instance.
If you want to set up Private Link as part of the instance's initial setup, you'll need to use the Azure portal. Otherwise, if you want to enable Private Link on an instance after it's been created, you can use either the Azure portal or the Azure CLI. Any of these creation methods will give the same configuration options and the same end result for your instance.
Use the tabs in the sections below to select instructions for your preferred experience.
Tip
You can also set up a Private Link endpoint through the Private Link service, instead of through your Azure Digital Twins instance. This also gives the same configuration options and the same end result.
For more information on setting up Private Link resources, see Private Link documentation for the Azure portal, Azure CLI, Azure Resource Manager, or PowerShell.
Add a private endpoint during instance creation
In this section, you'll create a private endpoint with Private Link as part of the initial setup of an Azure Digital Twins instance. This action can only be done in the Azure portal.
This section describes how to turn on Private Link while setting up an Azure Digital Twins instance in the Azure portal.
The Private Link options are located in the Networking tab of instance setup.
Begin setting up an Azure Digital Twins instance in the Azure portal. For instructions, see Set up an instance and authentication.
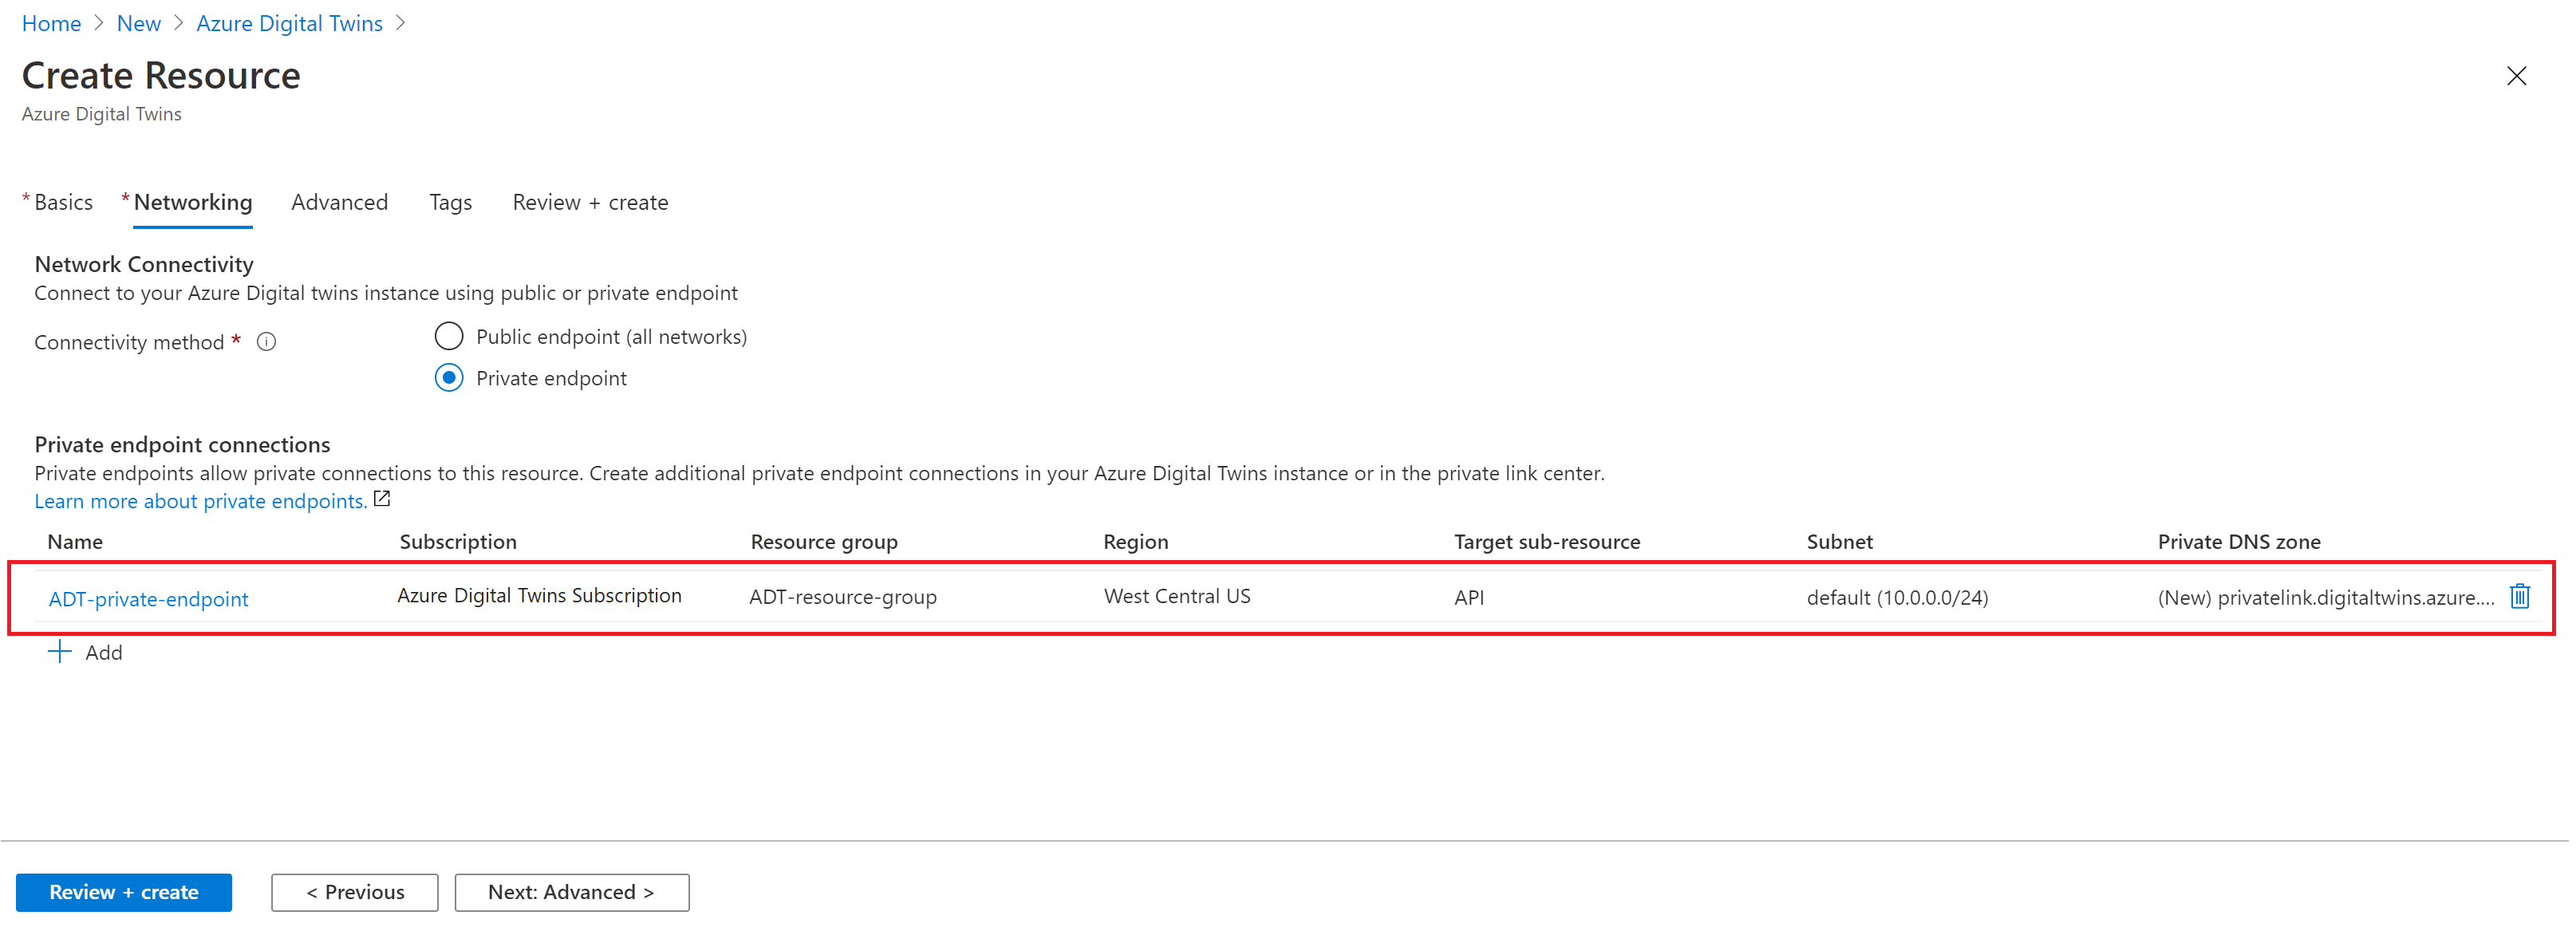
When you reach the Networking tab of instance setup, you can enable private endpoints by selecting the Private endpoint option for the Connectivity method.
Doing so will add a section called Private endpoint connections where you can configure the details of your private endpoint. Select the + Add button to continue.

In the Create private endpoint page that opens, enter the details of a new private endpoint.
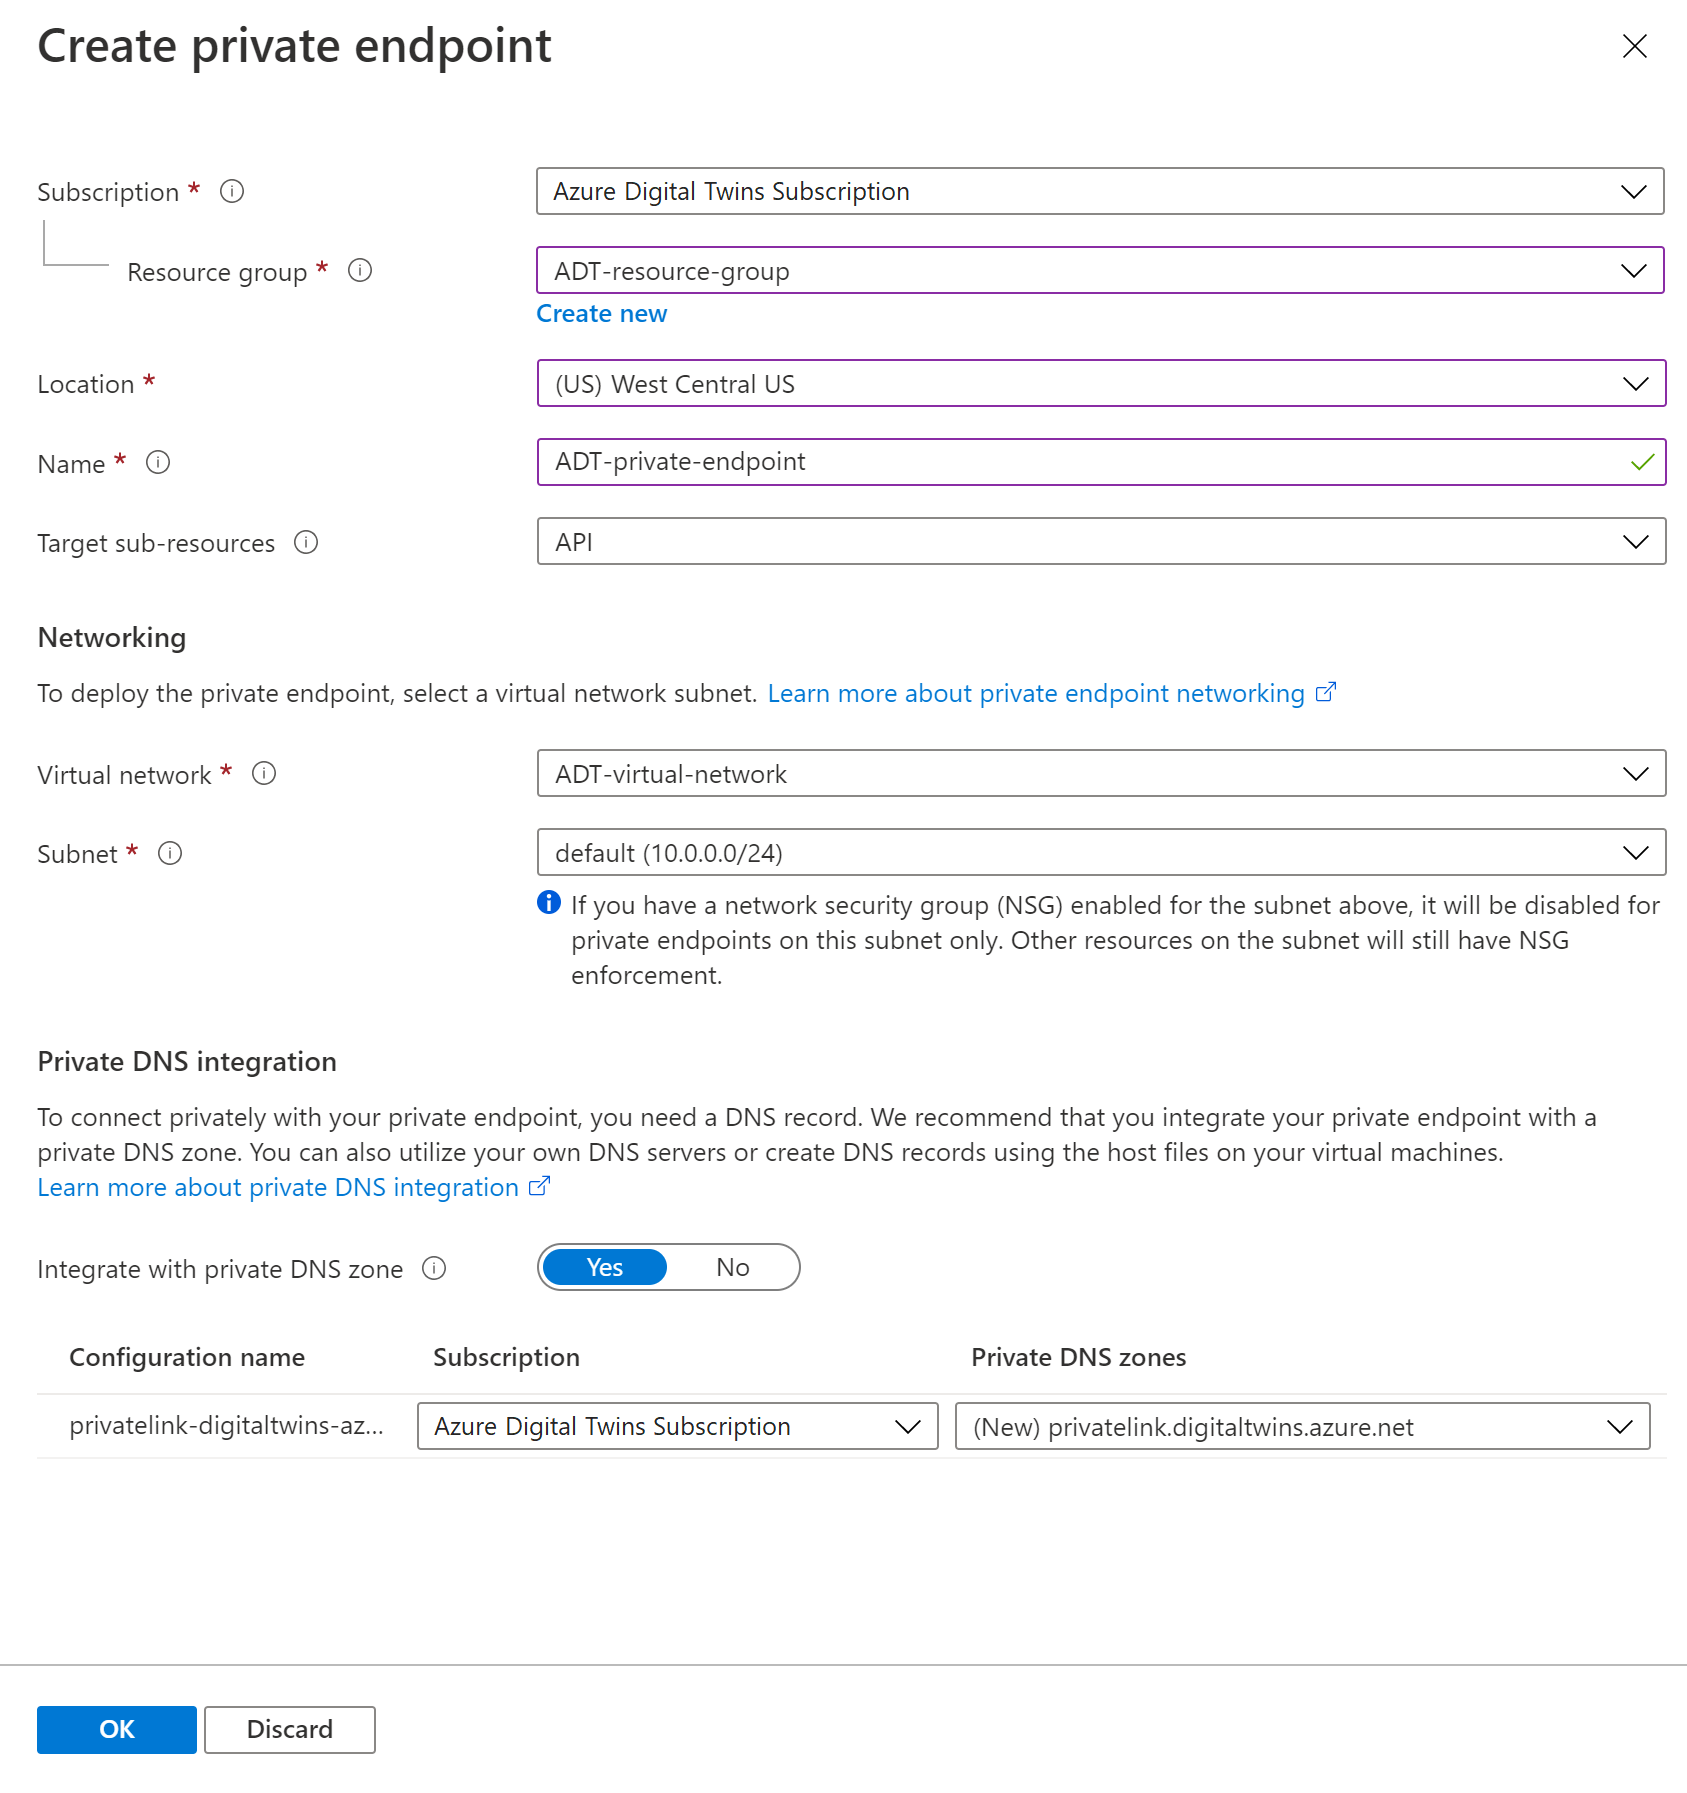
Fill in selections for your Subscription and Resource group. Set the Location to the same location as the VNet you'll be using. Choose a Name for the endpoint, and for Target sub-resources select API.
Next, select the Virtual network and Subnet you want to use to deploy the endpoint.
Lastly, select whether to Integrate with private DNS zone. You can use the default of Yes or, for help with this option, you can follow the link in the portal to learn more about private DNS integration.
After filling out the configuration options, select OK to finish.
Once you finish this process, the portal will return you to the Networking tab of the Azure Digital Twins instance setup. Verify that your new endpoint is visible under Private endpoint connections.
Use the bottom navigation buttons to continue with the rest of instance setup.


Add a private endpoint to an existing instance
In this section, you'll enable Private Link with a private endpoint for an Azure Digital Twins instance that already exists.
First, navigate to the Azure portal in a browser. Bring up your Azure Digital Twins instance by searching for its name in the portal search bar.
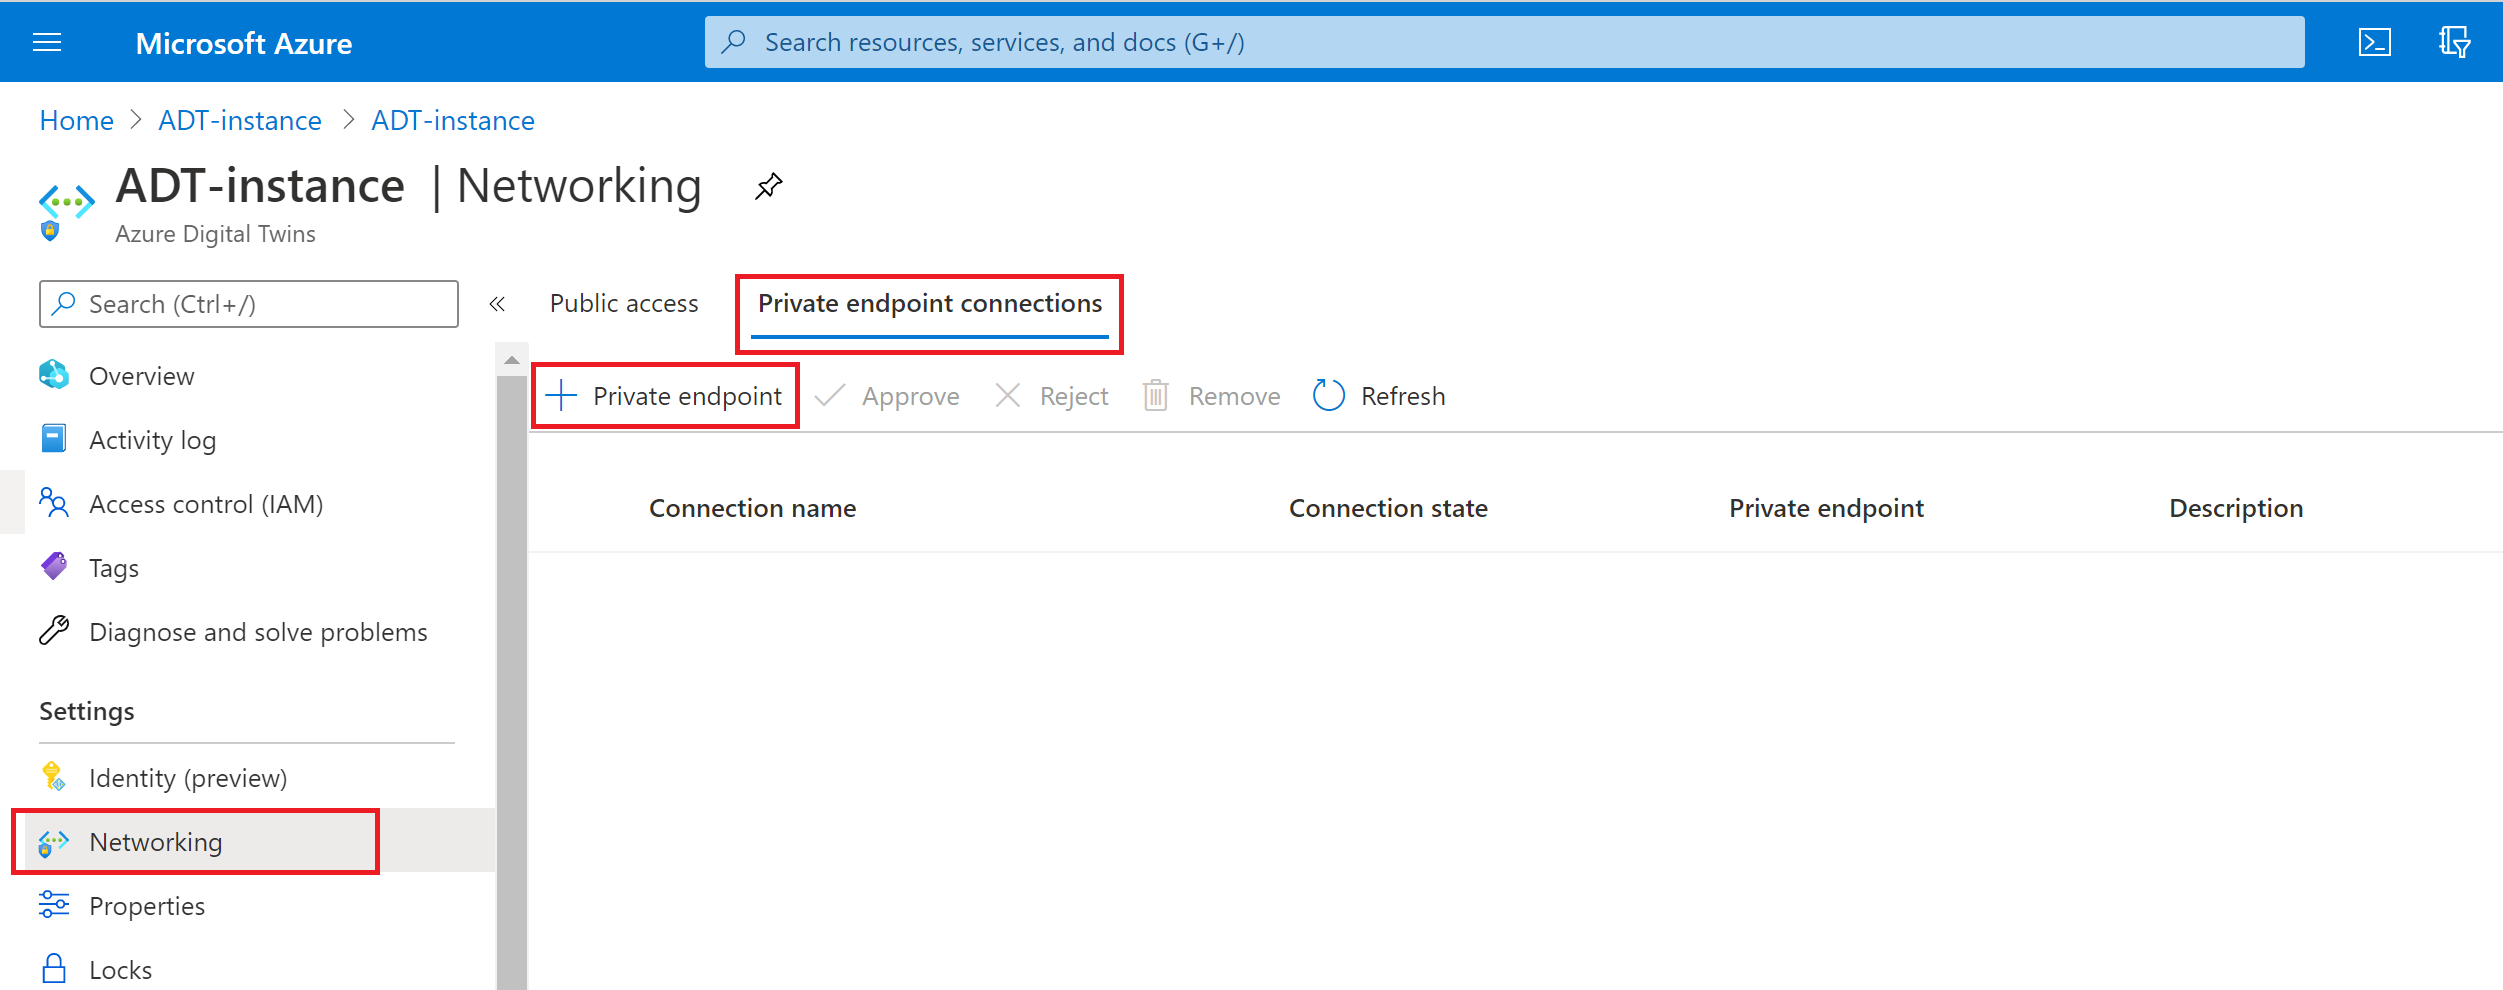
Select Networking in the left-hand menu.
Switch to the Private endpoint connections tab.
Select + Private endpoint to open the Create a private endpoint setup.
In the Basics tab, enter or select the Subscription and Resource group of your project, and a Name and Region for your endpoint. The region needs to be the same as the region for the VNet you're using.
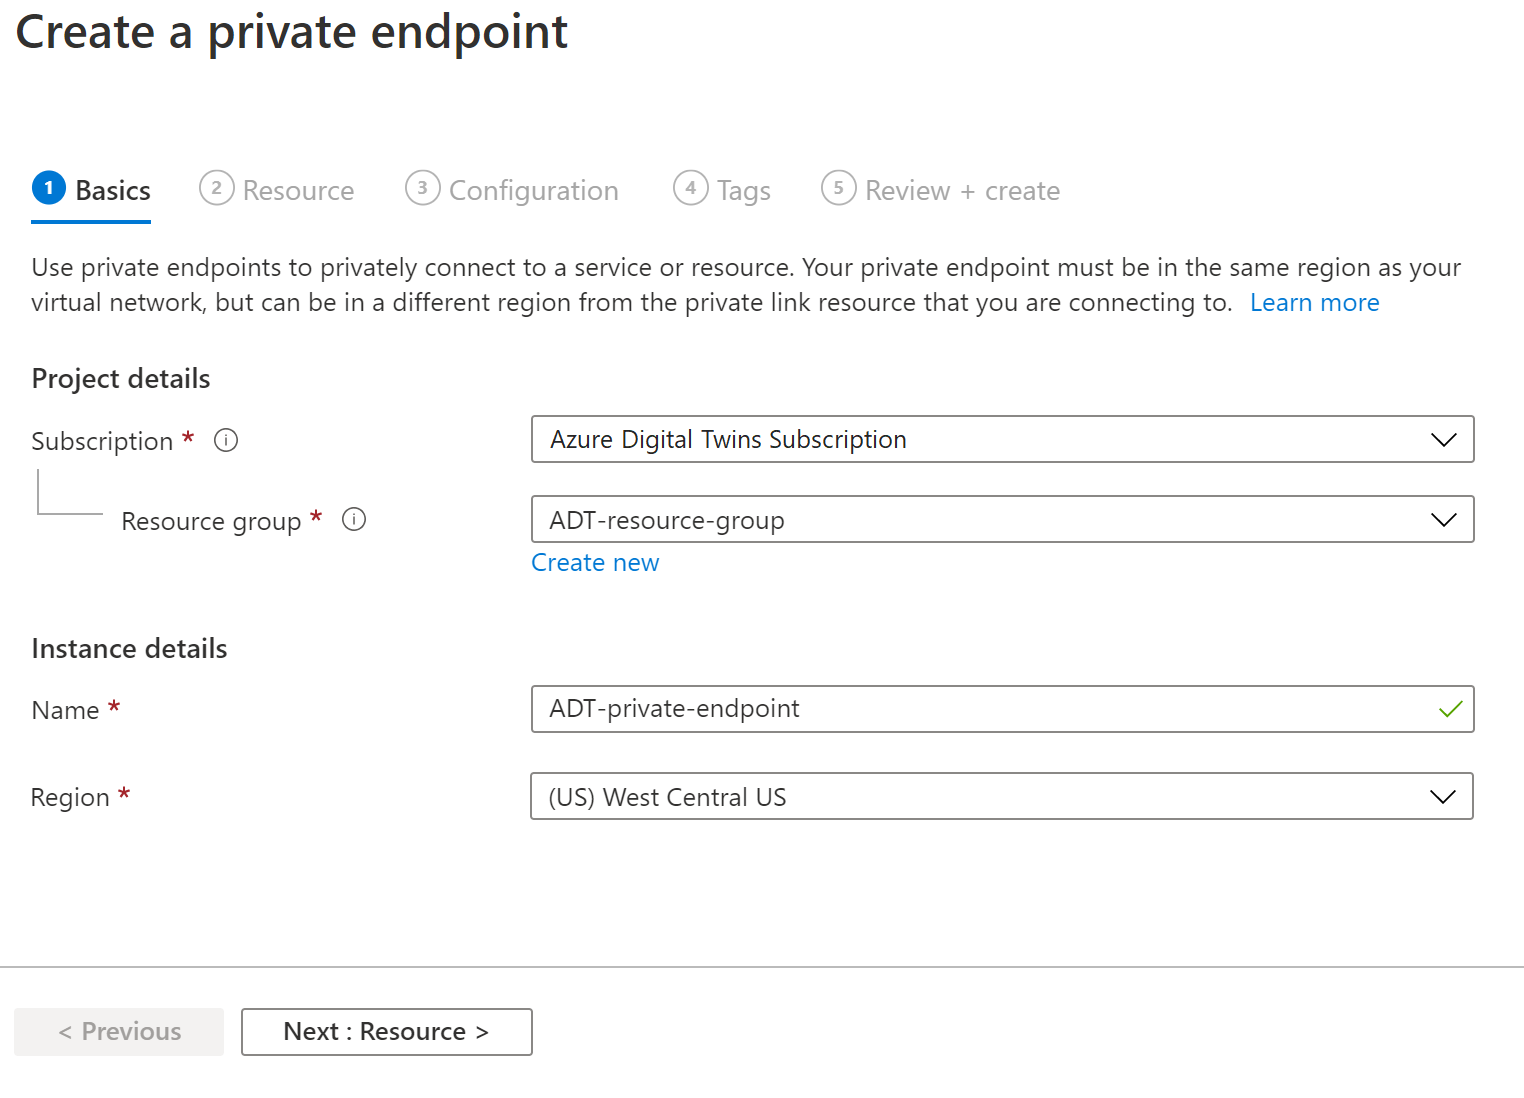
When you're finished, select the Next : Resource > button to go to the next tab.
In the Resource tab, enter or select this information:
- Connection method: Select Connect to an Azure resource in my directory to search for your Azure Digital Twins instance.
- Subscription: Enter your subscription.
- Resource type: Select Microsoft.DigitalTwins/digitalTwinsInstances
- Resource: Select the name of your Azure Digital Twins instance.
- Target sub-resource: Select API.
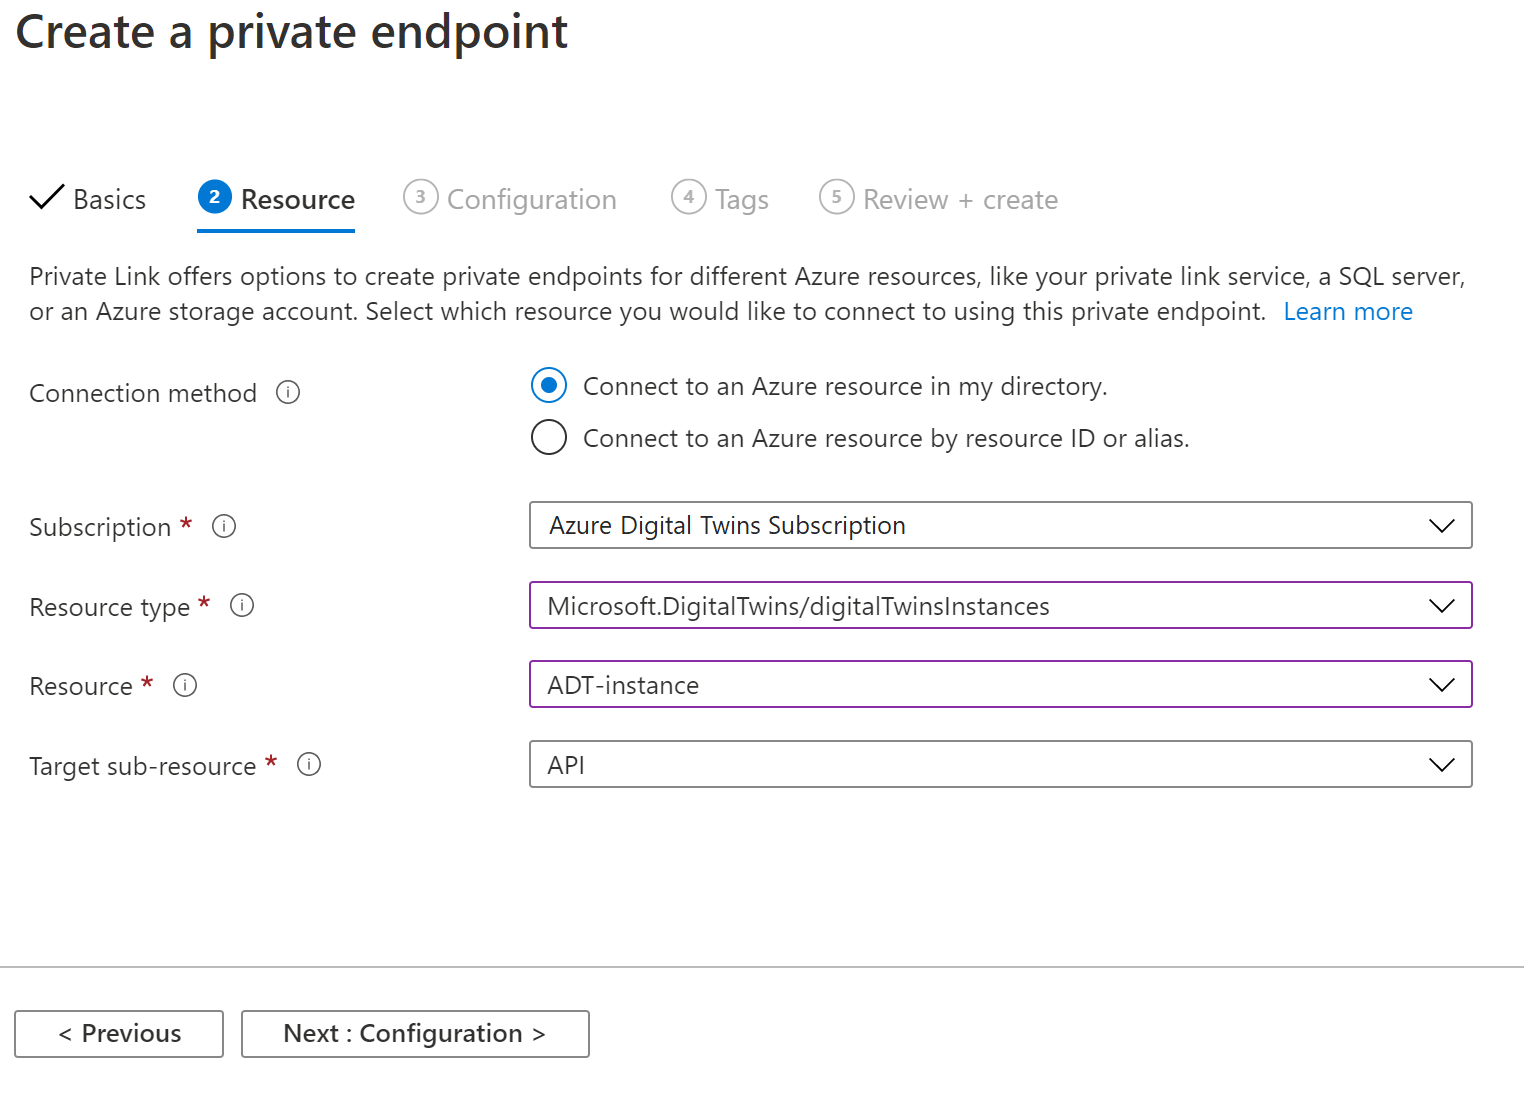
When you're finished, select the Next : Configuration > button to go to the next tab.
In the Configuration tab, enter or select this information:
- Virtual network: Select your virtual network.
- Subnet: Choose a subnet from your virtual network.
- Integrate with private DNS zone: Select whether to Integrate with private DNS zone. You can use the default of Yes or, for help with this option, you can follow the link in the portal to learn more about private DNS integration. If you select Yes, you can leave the default configuration information.
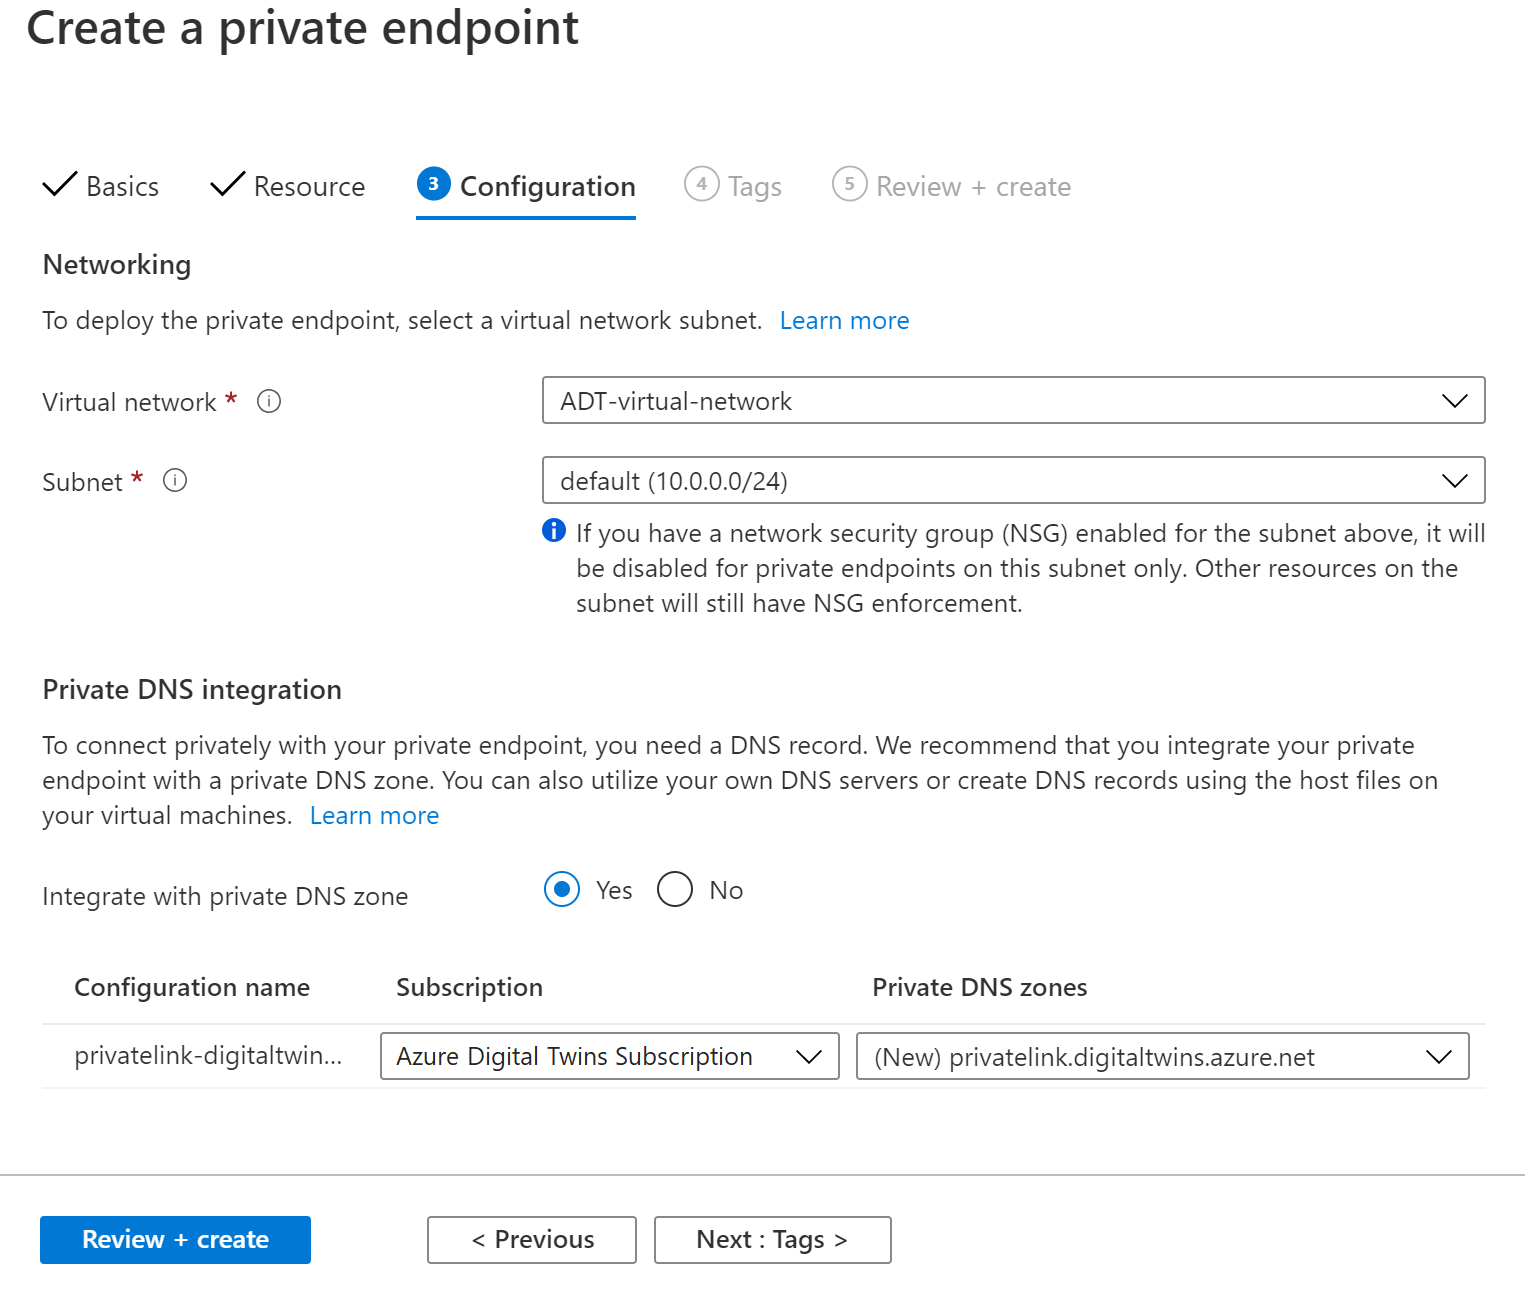
When you're finished, you can select the Review + create button to finish setup.
In the Review + create tab, review your selections and select the Create button.

When the endpoint is finished deploying, it should show up in the private endpoint connections for your Azure Digital Twins instance.
Manage private endpoints
In this section, you'll see how to view, edit, and delete a private endpoint after it's been created.
Once a private endpoint has been created for your Azure Digital Twins instance, you can view it in the Networking tab for your Azure Digital Twins instance. This page will show all the private endpoint connections associated with the instance.

Select the endpoint to view its information in detail, make changes to its configuration settings, or delete the connection.
Tip
The endpoint can also be viewed from the Private Link Center in the Azure portal.
Disable / enable public network access flags
You can configure your Azure Digital Twins instance to deny all public connections and allow only connections through private access endpoints to enhance the network security. This action is done with a public network access flag.
This policy allows you to restrict API access to Private Link connections only. When the public network access flag is set to disabled, all REST API calls to the Azure Digital Twins instance data plane from the public cloud will return 403, Unauthorized. Otherwise, when the policy is set to disabled and a request is made through a private endpoint, the API call will succeed.
You can update the value of the network flag using the Azure portal, Azure CLI, or ARMClient command tool.
To disable or enable public network access in the Azure portal, open the portal and navigate to your Azure Digital Twins instance.
Select Networking in the left-hand menu.
In the Public access tab, set Allow public network access to either Disabled or All networks.

Select Save.

Deploy with ARM templates
You can also set up Private Link with Azure Digital Twins using an ARM template.
For a sample template that allows an Azure function to connect to Azure Digital Twins through a Private Link endpoint, see Azure Digital Twins with Azure function and Private Link (ARM template).
This template creates an Azure Digital Twins instance, a virtual network, an Azure function connected to the virtual network, and a Private Link connection to make the Azure Digital Twins instance accessible to the Azure function through a private endpoint.
Troubleshoot
Here are some common issues that might arise when using Private Link with Azure Digital Twins.
Issue: When trying to access Azure Digital Twins APIs, you see an HTTP error code 403 with the following error in the response body:
{
    "statusCode": 403,
    "message": "Public network access disabled by policy."
}
Resolution: This error occurs when
publicNetworkAccesshas been disabled for the Azure Digital Twins instance and API requests are expected to come through Private Link, but the call was routed through the public network (possibly over a load balancer configured for a virtual network). Make sure that your API client is resolving the private IP for the private endpoint when trying to access the API through the endpoint hostname.To facilitate hostname resolution to the private IP of the private endpoint in a subnet, you can configure a private DNS zone. Verify that the private DNS zone is correctly linked to the virtual network and uses the right zone name, such as
privatelink.digitaltwins.azure.net.Issue: When trying to access Azure Digital Twins through a private endpoint, the connection times out.
Resolution: Verify that there are no network security group rules that prohibit the client from communicating to the private endpoint and its subnet. Communication on TCP port 443 must be permitted between the client's source IP address/subnet, and the private endpoint destination IP address/subnet.
For more Private Link troubleshooting suggestions, see Troubleshoot Azure Private Endpoint connectivity problems.
Next steps
Quickly set up a protected environment with Private Link using an ARM template: Azure Digital Twins with Azure function and Private Link.
Or, learn more about Private Link for Azure: What is Azure Private Link service?
Feedback
Coming soon: Throughout 2024 we will be phasing out GitHub Issues as the feedback mechanism for content and replacing it with a new feedback system. For more information see: https://aka.ms/ContentUserFeedback.
Submit and view feedback for