Tutorial: Configure Azure Information Protection to control oversharing of information using Outlook
Email is one of the most common methods by which users inappropriately share information—whether it's in the email message itself or in attachments. You might use data loss prevention (DLP) solutions that can identify known sensitive information and help prevent it from leaving your organization boundaries. However, you can also use the Azure Information Protection client with some advanced client settings to help prevent oversharing and also educate your users with interactive messages that provide feedback in real time.
This tutorial steps you through a basic configuration that uses just one label to illustrate the warn, justify, and block messages that users can see and respond to.
In this tutorial, you learn how to:
- Configure settings that implement warn, justify, or block popup messages in Outlook
- See your settings in action
- Review the logged user messages and actions in the Event Log
You can finish this tutorial in about 15 minutes.
Prerequisites
To complete this tutorial, you need:
A subscription that includes Azure Information Protection Plan 2.
If you don't have a subscription that includes this plan, you can create a free account for your organization.
The Azure Information Protection pane is added to the Azure portal and you have at least one label published in the Azure Information Protection global policy.
Although this tutorial uses the default label, General, you can substitute this label for another one if you prefer. If you need help adding the Azure Information Protection pane, or don't yet have any labels published to the global policy, see Quickstart: Add Azure Information Protection to the Azure portal and view the policy.
A computer running Windows (minimum of Windows 7 with Service Pack 1), and on this computer, you can sign in to Outlook. Be prepared to restart Outlook multiple times during this tutorial.
The Azure Information Protection classic client installed on your Windows computer (minimum of Windows 7 with Service Pack 1).
Tip
For a full list of prerequisites to use Azure Information Protection, see Requirements for Azure Information Protection.
Let's get started. Continue with Identify a label ID for testing.
Unified labeling client
If are using the unified labeling client instead of the classic client, see the following instructions that explain how to use PowerShell advanced settings for the equivalent configurations in this tutorial:
Admin guide instructions: Implement pop-up messages in Outlook that warn, justify, or block emails being sent
Video: Azure Information Protection Outlook Popup Configuration
Identify a label ID for testing
For this tutorial, we'll use just one label to see the resulting behavior for users. You can use any label, but a good example for testing is the default label named General, which is typically suitable for business data that is not intended for public consumption, and does not apply protection.
To specify your chosen label, you must know its ID, which you identify from the Azure portal:
Open a new browser window and sign in to the Azure portal as a global admin. Then navigate to Azure Information Protection.
For example, in the search box for resources, services, and docs: Start typing Information and select Azure Information Protection.
If you are not the global admin, use the following link for alternative roles: Signing in to the Azure portal
Select Classifications > Labels and then select the General label to open the Label: General pane.
Locate the label ID at the bottom of the pane:
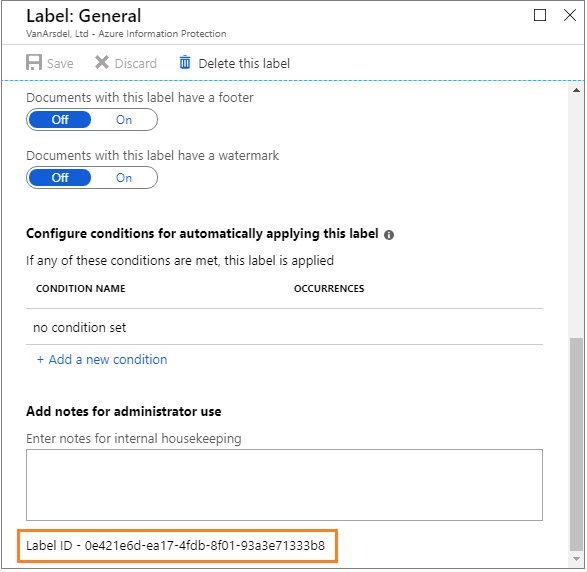
Copy and paste the label ID value into a temporary file so that this value can be easily copied for a later step. In our example, this label ID value is 0e421e6d-ea17-4fdb-8f01-93a3e71333b8.
Close the Label: General pane, but do not close the Azure portal.
Create a scoped policy to test the new advanced client settings
We'll create a new scoped policy so that the new advanced client settings will apply to just you, for testing.
On the Azure Information Protection - Policies pane, select Add a new policy. You then see the Policy pane that displays labels and settings from your existing global policy.
Specify the policy name of Oversharing tutorial and optionally, a description of Advanced client settings to control oversharing using Outlook.
Select Specify which users/groups get this policy, and using the subsequent panes, specify your own user account.
With your account name now displayed on the Policy pane, select Save without making additional changes to the labels or settings on this pane. You might be prompted to confirm your choice.
This scoped policy is now ready to add advanced client settings. Close the Policy: Oversharing tutorial pane, but do not close the Azure portal.
Configure and test advanced client settings to warn, prompt for justification, or block emails that have the General label
For this step of the tutorial, we'll specify the following advanced client settings, and test each in turn:
- OutlookWarnUntrustedCollaborationLabel
- OutlookJustifyUntrustedCollaborationLabel
- OutlookBlockUntrustedCollaborationLabel
Create the advanced client setting to warn users if an email or attachment has the General label
Using the newly created scoped policy, we'll add a new advanced client setting named OutlookWarnUntrustedCollaborationLabel with the ID of your General label:
Back on the Azure Information Protection - Policies pane, select the context menu (...) next to Oversharing tutorial. Then select Advanced settings.
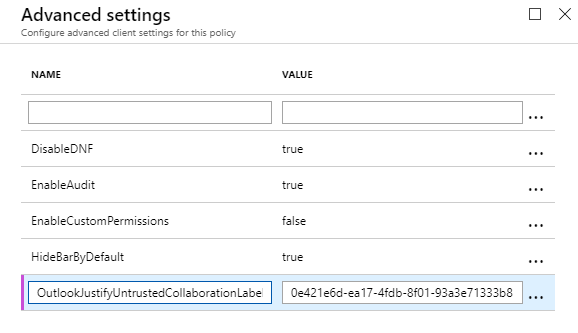
On the Advanced settings pane, type the advanced setting name, OutlookWarnUntrustedCollaborationLabel, and paste your own label ID for the value. Using our example label ID:

Select Save and close.
Do not close the Policies pane, or the Azure portal.
Test the advanced client setting to warn users if an email or attachment has the General label
On your client computer, we'll now see the results of configuring this advanced client setting.
On your client computer, open Outlook.
If Outlook is already open, restart it. The restart is needed to download the change we just made.
Create a new email message, and apply the General label. For example, from the File tab, select the Protect button, and then select General.
Specify your own email address for the To field, and for the subject, type Testing the General label for the Warn message. Then send the email.
As a result of the advanced client setting, you see the following warning, asking you to confirm before sending the email. For example:
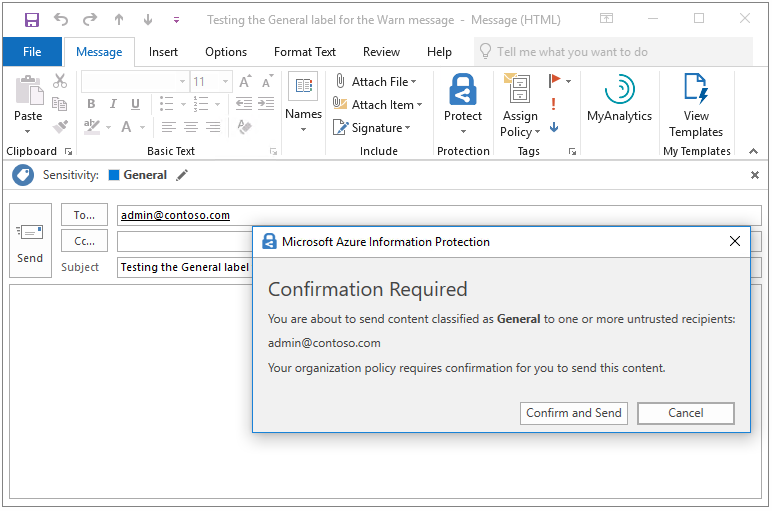
As if you are a user who has mistakenly tried to email something that was labeled General, select Cancel. You see that the email is not sent but the email message remains so you can make changes, such as change the content or the label.
Without making any changes, select Send again. This time, as if you are a user who acknowledges that the content is appropriate for sending, select Confirm and Send. The email is sent.
Change the advanced client setting to prompt users to justify if an email has the General label
We'll edit the existing advanced client setting to keep your General label ID, but change the name to OutlookJustifyUntrustedCollaborationLabel:
On the Azure Information Protection - Policies pane, select the context menu (...) next to Oversharing tutorial. Then select Advanced settings.
On the Advanced settings pane, replace the previous advanced setting name you created, OutlookWarnUntrustedCollaborationLabel, with the new name of OutlookJustifyUntrustedCollaborationLabel:
Select Save and close.
Do not close the Policies pane, or the Azure portal.
Test the advanced client setting to prompt users to justify if an email has the General label
On your client computer, we'll now see the results of this new advanced client setting.
On your client computer, restart Outlook to download the change we just made.
Create a new email message, and as before, apply the General label. For example, from the File tab, select the Protect button, and then select General.
Specify your own email address for the To field, and for the subject, type Testing the General label for the Justify message. Then send the email.
This time, you see the following message, asking you to provide justification before sending the email. For example:
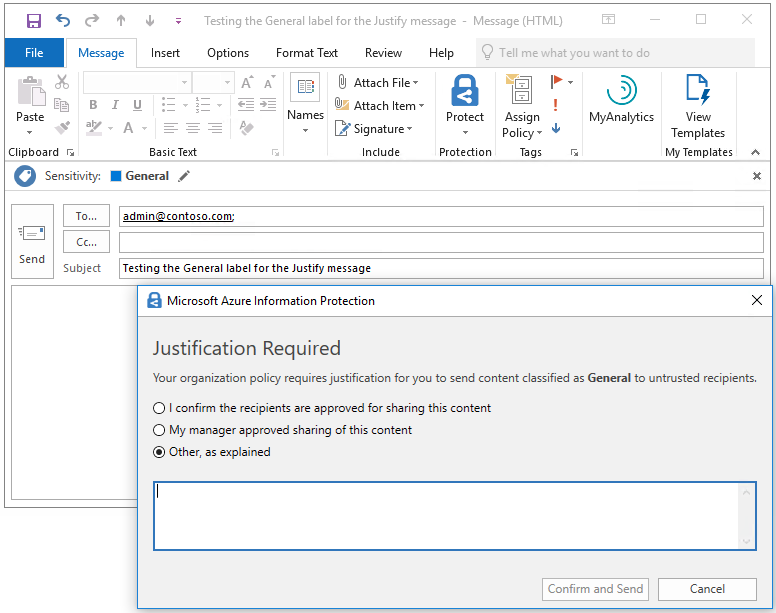
As if you are a user who has mistakenly tried to email something that was labeled as General, select Cancel. You see that the email is not sent but the email message itself remains so you can make changes, such as change the content or the label.
Without making any changes, select Send again. This time, select one of the justification options, such as I confirm the recipients are approved for sharing this content, and then select Confirm and Send. The email is sent.
Change the advanced client setting to block users from sending an email that has the General label
We'll edit the existing advanced client setting one more time, to keep your General label ID, but change the name to OutlookBlockUntrustedCollaborationLabel:
In the Azure portal, on the Azure Information Protection - Policies pane, select the context menu (...) next to Oversharing tutorial. Then select Advanced settings.
On the Advanced settings pane, replace the previous advanced setting name you created, OutlookJustifyUntrustedCollaborationLabel, with the new name of OutlookBlockUntrustedCollaborationLabel:
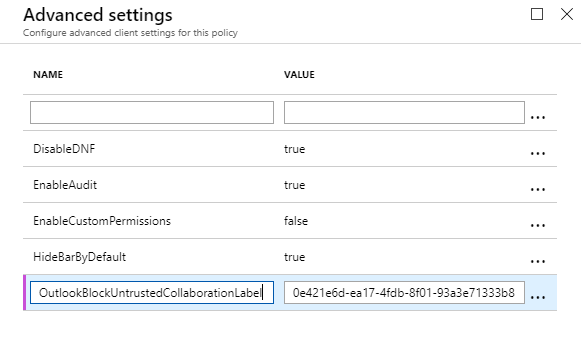
Select Save and close.
Do not close the Policies pane, or the Azure portal.
Test the advanced client setting to block users from sending an email that has the General label
On your client computer, we'll now see the results of this new advanced client setting.
On your client computer, restart Outlook to download the change we just made.
Create a new email message, and as before, apply the General label. For example, from the File tab, select the Protect button, and then select General.
Specify your own email address for the To field, and for the subject, type Testing the General label for the Block message. Then send the email.
This time, you see the following message that prevents the email from being sent. For example:
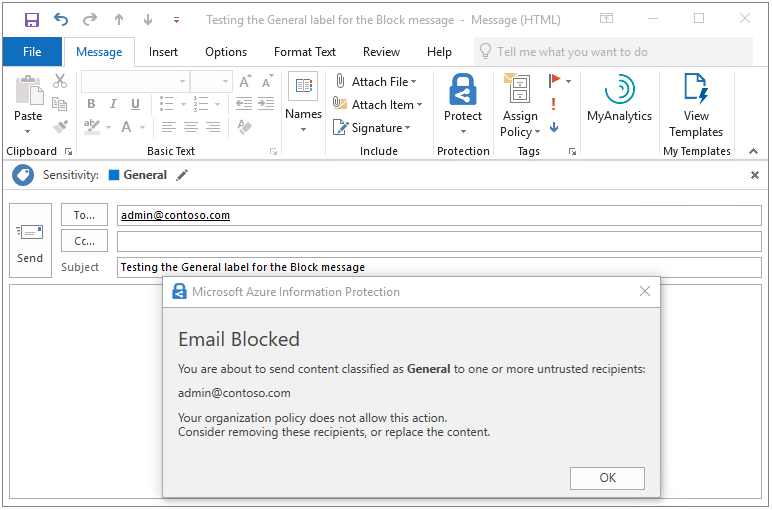
Acting as your user, you see the only option available is OK, which takes you back to the email message where you can make changes. Select OK, and cancel this email message.
Use Event Log to identify the messages and user actions for the General label
Before we move on to the next scenario for when an email or attachment doesn't have a label, start Event Viewer and navigate to Applications and Services Logs > Azure Information Protection.
For each of the tests that you did, information events are created to record both the message and the user response:
Warn messages: Information ID 301
Justify messages: Information ID 302
Block messages: Information ID 303
For example, the first test was to warn the user, and you selected Cancel, so the User Response displays Dismissed in the first Event 301. For example:
Client Version: 1.53.10.0
Client Policy ID: e5287fe6-f82c-447e-bf44-6fa8ff146ef4
Item Full Path: Testing the General label for the Warn message.msg
Item Name: Testing the General label for the Warn message
Process Name: OUTLOOK
Action: Warn
Label After Action: General
Label ID After Action: 0e421e6d-ea17-4fdb-8f01-93a3e71333b8
Action Source:
User Response: Dismissed
However, you then selected Confirm and Send, which is reflected in the next Event 301, where the User Response displays Confirmed:
Client Version: 1.53.10.0
Client Policy ID: e5287fe6-f82c-447e-bf44-6fa8ff146ef4
Item Full Path: Testing the General label for the Warn message.msg
Item Name: Testing the General label for the Warn message
Process Name: OUTLOOK
Action: Warn
Label After Action: General
Label ID After Action: 0e421e6d-ea17-4fdb-8f01-93a3e71333b8
Action Source:
User Response: Confirmed
The same pattern is repeated for the justify message, which has an Event 302. The first event has a User Response of Dismissed, and the second shows the justification that was selected. For example:
Client Version: 1.53.10.0
Client Policy ID: e5287fe6-f82c-447e-bf44-6fa8ff146ef4
Item Full Path: Testing the General label for the Justify message.msg
Item Name: Testing the General label for the Justify message
Process Name: OUTLOOK
Action: Justify
Label After Action: General
Label ID After Action: 0e421e6d-ea17-4fdb-8f01-93a3e71333b8
User Justification: I confirm the recipients are approved for sharing this content
Action Source:
User Response: Confirmed
At the top of the event log, you see the block message logged, which has an Event 303. For example:
Client Version: 1.53.10.0
Client Policy ID: e5287fe6-f82c-447e-bf44-6fa8ff146ef4
Item Full Path: Testing the General label for the Block message.msg
Item Name: Testing the General label for the Block message
Process Name: OUTLOOK
Action: Block
Label After Action: General
Label ID After Action: 0e421e6d-ea17-4fdb-8f01-93a3e71333b8
Action Source:
Optional: Create an additional advanced client setting to exempt these messages for internal recipients
You tested your warn, justify, and block messages by using your own email address as the recipient. In a production environment, you might choose to display these messages for your specified labels only if recipients are external to your organization. You might extend that exemption to partners that your organization regularly works with.
To illustrate how this works, we'll create an additional advanced client setting named OutlookBlockTrustedDomains and specify your own domain name from your email address. This will prevent the block message you saw previously from displaying for recipients that share your domain name in their email address, but will still be shown for other recipients. You can similarly create additional advanced client settings for OutlookWarnTrustedDomains and OutlookJustifyTrustedDomains.
In the Azure portal, on the Azure Information Protection - Policies pane, select the context menu (...) next to Oversharing tutorial. Then select Advanced settings.
On the Advanced settings pane, type the advanced setting name, OutlookBlockTrustedDomains, and paste your domain name from your email address for the value. For example:
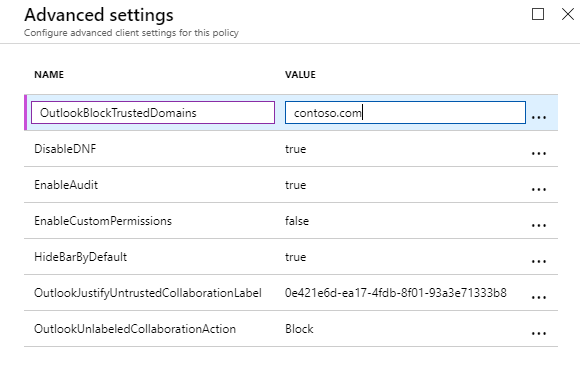
Select Save and close. Do not close the Policies pane, or the Azure portal.
Now repeat the previous test to block users from sending an email that has the General label, and you no longer see the block message when you use your own email address. The email is sent without interruption.
To confirm that the block message is still shown for external recipients, repeat the test one more time but specify a recipient from outside your organization. This time, you see the block message again, listing the new recipient address as untrusted.
Configure and test an advanced client setting to warn, prompt for justification, or block emails that don't have a label
For this step of the tutorial, we'll specify a new advanced client setting with different values, and test each in turn:
- OutlookUnlabeledCollaborationAction
Create the advanced client setting to warn users if an email doesn't have a label
This new advanced client setting named OutlookUnlabeledCollaborationAction doesn't need a label ID but specifies the action to take for unlabeled content:
In the Azure portal, back on the Azure Information Protection - Policies pane, select the context menu (...) next to Oversharing tutorial. Then select Advanced settings.
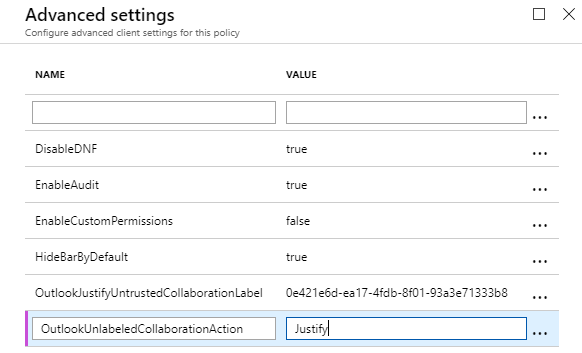
On the Advanced settings pane, type the advanced setting name, OutlookUnlabeledCollaborationAction, and for the value, specify Warn:
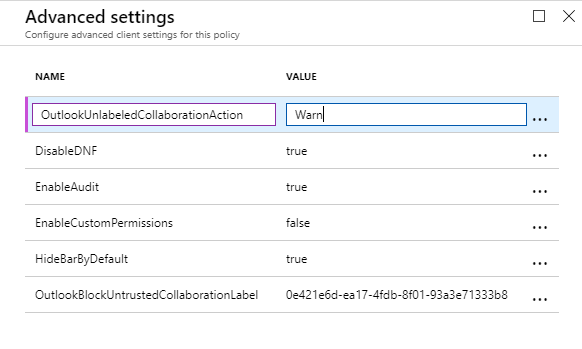
Select Save and close.
Do not close the Policies pane, or the Azure portal.
Test the advanced client setting to warn users if an email doesn't have a label
On your client computer, we'll now see the results of configuring this new advanced client setting for when content doesn't have a label:
On your client computer, restart Outlook to download the change we just made.
Create a new email message, and this time, do not apply a label.
Specify your own email address for the To field, and for the subject, type Testing send an email without a label for the Warn message. Then send the email.
This time, you see a Confirmation Required message that you can Confirm and Send or Cancel:

Select Confirm and Send.
Change the advanced client setting to prompt users to justify if an email is unlabeled
We'll edit the existing advanced client setting to keep the name of OutlookUnlabeledCollaborationAction, but change the value to Justify:
On the Azure Information Protection - Policies pane, select the context menu (...) next to Oversharing tutorial. Then select Advanced settings.
On the Advanced settings pane, locate the OutlookUnlabeledCollaborationAction setting and replace the previous value of Warn with new value Justify:
Select Save and close.
Do not close the Policies pane, or the Azure portal.
Test the advanced client setting to prompt users to justify if an email isn't labeled
On your client computer, we'll now see the results of changing the value for this advanced client setting.
On your client computer, restart Outlook to download the change we just made.
Create a new email message, and as before, do not apply a label.
Specify your own email address for the To field, and for the subject, type Testing send an email without a label for the Justify message. Then send the email.
This time, you see a Justification Required message with different options:

Select an option, such as My manager approved sharing of this content. Then select Confirm and Send.
Change the advanced client setting to block users from sending an email that isn't labeled
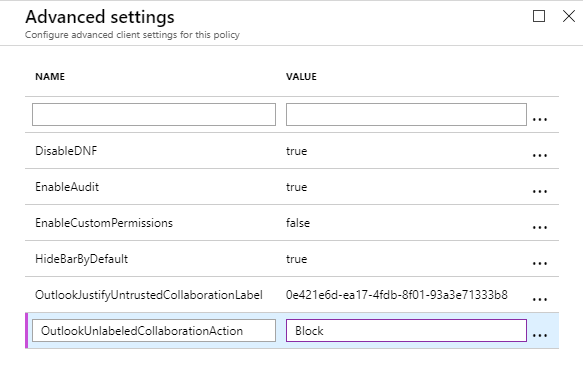
As before, we'll edit the existing advanced client setting to keep the name of OutlookUnlabeledCollaborationAction, but change the value to Block:
On the Azure Information Protection - Policies pane, select the context menu (...) next to Oversharing tutorial. Then select Advanced settings.
On the Advanced settings pane, locate the OutlookUnlabeledCollaborationAction setting and replace the previous value of Justify with the new value of Block:
Select Save and close.
Do not close the Policies pane, or the Azure portal.
Test the advanced client setting to block users from sending an email that isn't labeled
On your client computer, we'll now see the results of changing the value of this advanced client setting.
On your client computer, restart Outlook to download the change we just made.
Create a new email message, and as before, do not apply a label.
Specify your own email address for the To field, and for the subject, type Testing send an email without a label for the Block message. Then send the email.
This time, you see the following message that prevents the email from being sent, with an explanation for the user. For example:
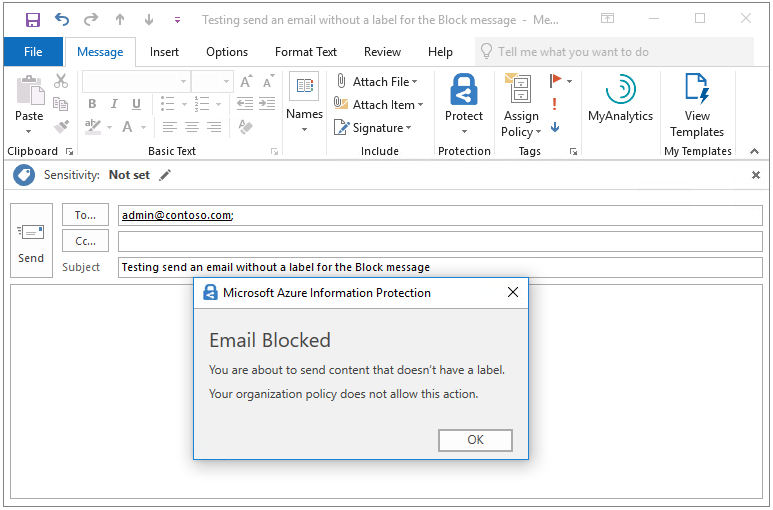
Acting as your user, you see the only option available is OK, which takes you back to the email message where you can select a label.
Select OK, and cancel this email message.
Use Event Log to identify the messages and user actions for the unlabeled email
As before, the messages and user responses are logged in Event Viewer, Applications and Services Logs > Azure Information Protection, with the same event IDs.
Warn messages: Information ID 301
Justify messages: Information ID 302
Block messages: Information ID 303
For example, the results of our justification prompt when the email didn't have a label:
Client Version: 1.53.10.0
Client Policy ID: e5287fe6-f82c-447e-bf44-6fa8ff146ef4
Item Full Path: Testing send an email without a label for the Justify message.msg
Item Name: Testing send an email without a label for the Justify message
Process Name: OUTLOOK
Action: Justify
User Justification: My manager approved sharing of this content
Action Source:
User Response: Confirmed
Clean up resources
Do the following if you don't want to keep the changes that you made in this tutorial:
In the Azure portal, on the Azure Information Protection - Policies pane, select the context menu (...) next to Oversharing tutorial. Then select Delete policy.
If you are prompted to confirm, select OK.
Restart Outlook so it's no longer configured for the settings we configured for this tutorial.
Next steps
For quicker testing, this tutorial used an email message to a single recipient, and without attachments. But you can apply the same method with multiple recipients, multiple labels, and also apply the same logic to email attachments whose labeling status is often less obvious to users. For example, the email message itself is labeled Public but the PowerPoint presentation attached is labeled General. For more information about the configuration options, see the following section from the admin guide: Implement pop-up messages in Outlook that warn, justify, or block emails being sent
The admin guide also contains information about other advanced client settings that you can use to customize the behavior of the client. For a full list, see Available advanced client settings.