Azure Information Protection unified labeling client administrator guide
Note
Are you looking for Microsoft Purview Information Protection, formerly Microsoft Information Protection (MIP)?
The Azure Information Protection add-in is retired and replaced with labels that are built in to your Microsoft 365 apps and services. Learn more about the support status of other Azure Information Protection components.
The new Microsoft Information Protection client (without the add-in) is currently in preview and scheduled for general availability.
Use the information in this guide if you are responsible for the Azure Information Protection unified labeling client on an enterprise network, or if you want more technical information than is in the Azure Information Protection unified labeling client user guide.
For example:
Understand the different components of this client and whether you should install it
How to install the client for users, with information about prerequisites, installation options and parameters, and verification checks
Locate the client files and usage logs
Identify the file types supported by the client
Use the client with PowerShell for command-line control
Have a question that's not addressed by this documentation? Visit our Azure Information Protection Yammer site.
Technical overview of the Azure Information Protection unified labeling client
The Azure Information Protection unified labeling client includes the following:
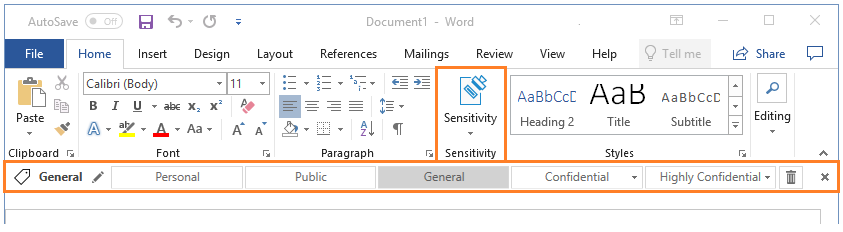
An Office add-in, that installs a Sensitivity button on the ribbon for users to select sensitivity labels, and an option to display the Azure Information Protection bar for better label visibility.
Windows File Explorer, right-click options for users to apply classification labels and protection to files.
A viewer to display protected files when a built-in application cannot open it.
A PowerShell module to discover sensitive information in files, and apply or remove classification labels and protection from files.
The client includes cmdlets to install and configure the Azure Information Protection scanner that runs as a service on Windows Server. This service lets you discover, classify, and protect files on data stores such as network shares and SharePoint Server libraries
The Rights Management client that communicates with the protection service (Azure Rights Management) to encrypt and protect files.
With the exception of the viewer, the Azure Information Protection unified labeling client cannot be used with applications and services that communicate directly with the protection service or Active Directory Rights Management Services.
If you have AD RMS and want to migrate to Azure Information Protection, see Migrating from AD RMS to Azure Information Protection.
Should you deploy the Azure Information Protection unified labeling client?
Deploy the Azure Information Protection unified labeling client if you are using sensitivity labels in Microsoft 365, and any of the following applies:
You want to classify (and optionally, protect) documents and email messages by selecting labels from within your Office apps (Word, Excel, PowerPoint, Outlook) on Windows computers.
You want to classify (and optionally, protect) files by using File Explorer, supporting additional file types than those supported by Office, multi-select, and folders.
You want to run scripts that classify (and optionally, protect) documents by using PowerShell commands.
You want to test a service that discovers, classifies (and optionally, protects) files that are stored on-premises.
You want to view protected documents when a built-in application to display the file is not installed or cannot open these documents.
Example showing the Office add-in for the Azure Information Protection unified labeling client, displaying the Sensitivity button on the ribbon and the optional Azure Information Protection bar:
Installing and supporting the Azure Information Protection unified labeling client
You can install the Azure Information Protection unified labeling client by using an executable or a Windows installer file. For more information about each choice, and instructions, see Install the Azure Information Protection unified labeling client for users.
Use the following sections for supporting information about installing the client.
Installation checks and troubleshooting
When the client is installed, use the Help and Feedback option to open the Microsoft Azure Information Protection dialog box:
From an Office application: On the Home tab, in the Sensitivity group, select Sensitivity, and then select Help and Feedback.
From File Explorer: Right-select a file, files, or folder, select Classify and protect, and then select Help and Feedback.
Help and Feedback section
The Tell me more link by default, goes to the Azure Information Protection website. You can configure your own URL link that goes to a custom help page as one of the policy settings in the Microsoft Purview compliance portal.
The Report an Issue link displays only if you specify an advanced setting. When you configure this setting, you specify an HTTP link such as the email address of your help desk.
The Export Logs automatically collects and attaches log files for the Azure Information Protection unified labeling client if you have been asked to send these to Microsoft Support. This option can also be used by end users to send these log files to your help desk. Alternatively, you could use the Export-AIPLogs PowerShell cmdlet.
The Reset Settings signs out the user, deletes the currently downloaded sensitivity labels and label policies, and resets the user settings for the Azure Rights Management service.
Note
If you have technical problems with the client, see Support options and community resources.
More information about the Reset Settings option
You do not have to be a local administrator to use this option and this action is not logged in the Event Viewer.
Unless files are locked, this action deletes all the files in the following locations. These files include client certificates, protection templates, sensitivity labels and policies from your labeling management center, and the cached user credentials. The client log files are not deleted.
%LocalAppData%\Microsoft\DRM
%LocalAppData%\Microsoft\MSIPC
%LocalAppData%\Microsoft\MSIP\mip\<ProcessName.exe>
%LocalAppData%\Microsoft\MSIP\AppDetails
%LocalAppData%\Microsoft\MSIP\TokenCache
The following registry keys and settings are deleted. If the settings for any of these registry keys have custom values, these must be reconfigured after you reset the client.
Typically for enterprise networks, these settings are configured by using group policy, in which case they are automatically reapplied when group policy is refreshed on the computer. However, there might be some settings that are configured one time with a script, or manually configured. In these cases, you must take additional steps to reconfigure these settings. As an example, computers might run a script one time to configure settings for redirection to Azure Information Protection because you are migrating from AD RMS and still have a Service Connection Point on your network. After resetting the client, the computer must run this script again.
HKEY_CURRENT_USER\SOFTWARE\Microsoft\Office\15.0\Common\Identity
HKEY_CURRENT_USER\SOFTWARE\Microsoft\Office\14.0\Common\DRM
HKEY_CURRENT_USER\SOFTWARE\Microsoft\Office\15.0\Common\DRM
HKEY_CURRENT_USER\SOFTWARE\Microsoft\Office\16.0\Common\DRM
HKEY_CURRENT_USER\SOFTWARE\Classes\Local Settings\Software\Microsoft\MSIPC
The currently signed in user is signed out.
Client status section
Use the Connected as value to confirm that the displayed user name identifies the account to be used for Azure Information Protection authentication. This user name must match an account used for Microsoft 365 or Microsoft Entra ID. The account must also belong to a Microsoft 365 tenant that is configured for sensitivity labels in your labeling management portal.
If you need to sign in as a different user to the one displayed, see the Sign in as a different user instructions.
Use the Version information to confirm which version of the client is installed. You can check whether this is the latest release version and the corresponding fixes and new features by reading the Version release information for the client.
Support for multiple languages
The Azure Information Protection unified labeling client supports the same languages that Office 365 supports. For a list of these languages, see the International availability page from Office.
For these languages, menu options, dialog boxes, and messages from the Azure Information Protection unified labeling client display in the user's language. There is a single installer that detects the language, so no additional configuration is required to install the Azure Information Protection unified labeling client for different languages.
However, label names and descriptions that you specify are not automatically translated when you configure labels in your labeling center. For users to see labels in their preferred language, provide your own translations and configure them for the labels by using by using Office 365 Security & Compliance PowerShell and the LocaleSettings parameter for Set-Label. Visual markings are not translated and do not support more than one language.
Post installation tasks
After you have installed the Azure Information Protection unified labeling client, make sure that you give users instructions for how to label their documents and emails, and guidance for which labels to choose for specific scenarios. For example,
Online user instructions: Azure Information Protection unified labeling user guide
Download a customizable user guide: Azure Information Protection End User Adoption Guide
Installing the Azure Information Protection scanner
The scanner for the unified labeling client is generally available. Install the current version of the unified labeling client, from the Microsoft Download Center.
If you are installing the scanner for the first time on a computer, download and install this client and then follow the instructions in Deploying the Azure Information Protection scanner to automatically classify and protect files.
If you are upgrading the scanner from a previous version of the unified labeling client, see the Upgrading the Azure Information Protection scanner section for instructions.
Upgrading and maintaining the Azure Information Protection unified labeling client
The Azure Information Protection team regularly updates the Azure Information Protection unified labeling client for new functionality and fixes. Announcements are posted to the team's Yammer site.
If you are using Windows Update, the Azure Information Protection unified labeling client automatically upgrades the general availability version of this client, irrespective of how the client was installed. New client releases are published to the catalog a few weeks after the release.
Alternatively, you can manually upgrade the client by downloading the new release from the Microsoft Download Center. Then install the new version to upgrade the client. You must use this method to upgrade preview versions and if you are upgrading from the Azure Information Protection classic client.
When you manually upgrade, uninstall the previous version first only if you're changing the installation method. For example, you change from the executable (.exe) version of the client to the Windows installer (.msi) version of the client. Or, if you need to install a previous version of the client. For example, you had a preview version installed for testing and now need to revert to the current general availability version.
Use the Version release history and support policy to understand the support policy for the Azure Information Protection unified labeling client, which versions are currently supported, and the content included in each of the supported releases.
Upgrading the Azure Information Protection scanner
Instructions for upgrading the scanner depend on whether you are upgrading from an earlier version of the scanner from the Azure Information Protection unified labeling client.
To upgrade the scanner from an earlier version of the unified labeling client
On the scanner computer, stop the scanner service, Azure Information Protection Scanner.
Upgrade the Azure Information Protection unified labeling client by downloading and installing the latest version of the unified labeling client from the Microsoft Download Center.
In a PowerShell session, run the Update-AIPScanner command with your scanner's profile. For example:
Update-AIPScanner –Profile EuropeRestart the Azure Information Protection Scanner service, Azure Information Protection Scanner.
You can now use the rest of the instructions in Deploying the Azure Information Protection scanner to automatically classify and protect files, omitting the step to install the scanner. Because the scanner is already installed, there's no reason to install it again.
Upgrading in a different order to the recommended steps
when you upgrade from a version earlier than 1.48.204.0 and you don't configure the scanner in the Azure portal before you run the Update-AIPScanner command, you won't have a profile name to specify that identifies your scanner configuration settings for the upgrade process.
In this scenario, when you configure the scanner in the Azure portal, you must specify exactly the same profile name that was used when you ran the Update-AIPScanner command. If the name doesn't match, the scanner will not be configured for your settings.
Tip
To identify scanners that have this misconfiguration, use the Azure Information Protection - Nodes pane in the Azure portal.
For scanners that have internet connectivity, they display their computer name with the GA version number of the Azure Information Protection client, but no profile name. Only scanners that have a version number 1.41.51.0 should display no profile name on this pane.
Uninstalling the Azure Information Protection unified labeling client
You can use any of the following options to uninstall the client:
Use Control Panel to uninstall a program: Click Microsoft Azure Information Protection > Uninstall
Rerun the executable (for example, AzInfoProtection_UL.exe), and from the Modify Setup page, click Uninstall.
Run the executable with /uninstall. For example:
AzInfoProtection_UL.exe /uninstall
Next steps
To install the client, see Install the Azure Information Protection unified labeling client for users.
If you've already installed the client, see the following for additional information that you might need to support this client:
Feedback
Coming soon: Throughout 2024 we will be phasing out GitHub Issues as the feedback mechanism for content and replacing it with a new feedback system. For more information see: https://aka.ms/ContentUserFeedback.
Submit and view feedback for