Customize and redeploy a microservice
This tutorial shows you how to edit one of the microservices in the Remote Monitoring solution, build an image of your microservice, deploy the image to your docker hub, and then use it in Remote Monitoring solution. To introduce this concept, the tutorial uses a basic scenario where you call a microservice API and change the status message from "Alive and Well" to "New Edits Made Here!"
Remote Monitoring solution uses microservices that are built using docker images that are pulled from a docker hub.
In this tutorial, you learn how to:
- Edit and build a microservice in the Remote Monitoring solution
- Build a docker image
- Push a docker image to your docker hub
- Pull the new docker image
- Visualize the changes
Prerequisites
To follow this tutorial, you need:
- Deploy the Remote Monitoring solution accelerator locally
- A Docker account
- Postman - Needed to view the API response
Call the API and view response status
In this part, you call the default IoT hub manager microservice API. The API returns a status message that you change later on by customizing the microservice.
Make sure the Remote Monitoring solution is running locally on your machine.
Locate where you downloaded Postman and open it.
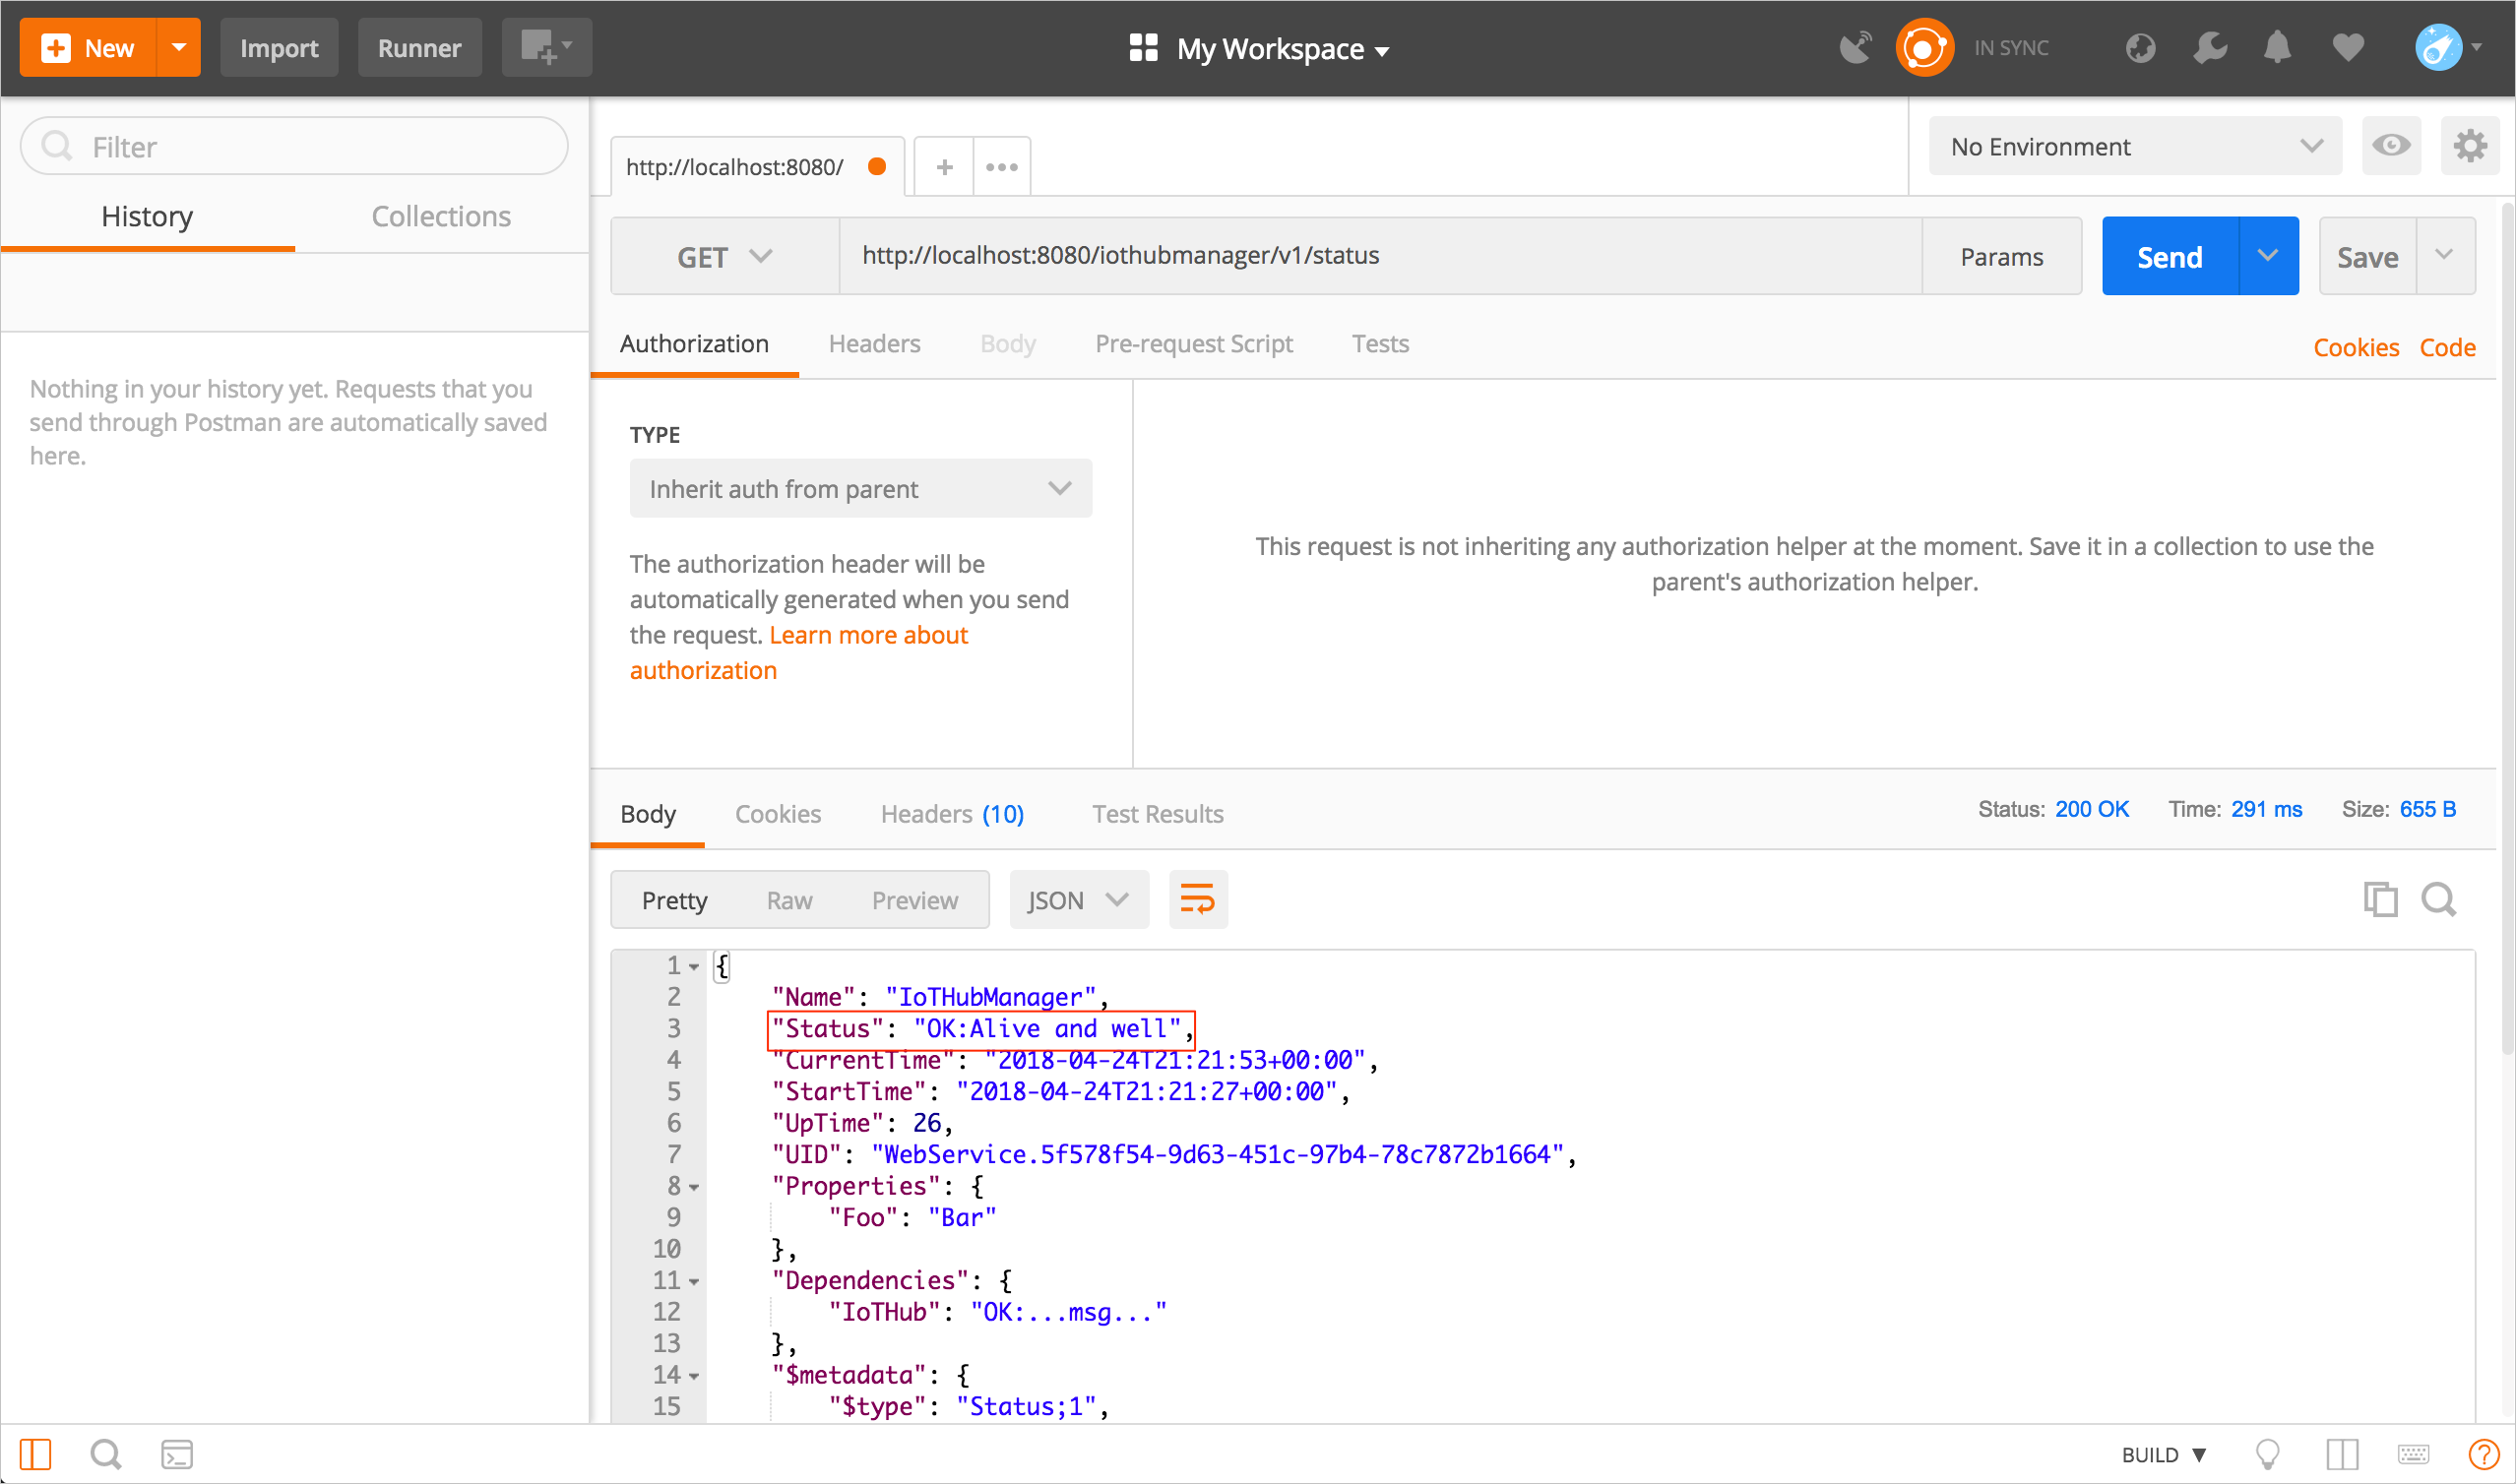
In Postman, enter the following in the GET:
https://localhost:8080/iothubmanager/v1/status.View the return and you should see, "Status": "OK:Alive and Well".
Change the status and build the image
Now change the status message of the Iot Hub Manager microservice to "New Edits Made Here!" and then rebuild the docker image with this new status. If you run into issues here, refer to our Troubleshooting section.
Make sure your terminal is open and change to the directory where you have cloned the Remote Monitoring solution.
Change your directory to "azure-iot-pcs-remote-monitoring-dotnet/services/iothub-manager/Services".
Open StatusService.cs in any text editor or IDE that you like.
Locate the following code:
var result = new StatusServiceModel(true, "Alive and well!");and change it to the code below and save it.
var result = new StatusServiceModel(true, "New Edits Made Here!");Go back to your terminal but now change to the following directory: "azure-iot-pcs-remote-monitoring-dotnet/services/iothub-manager/scripts/docker".
To build your new docker image, type
sh buildor on Windows:
./build.cmdTo verify your new image was successfully created, type
docker images
The repository should be "azureiotpcs/iothub-manager-dotnet".

Tag and push the image
Before you can push your new docker image to a docker hub, Docker expects your images to be tagged. If you run into issues here, refer to our Troubleshooting section.
Locate the Image ID of the docker image you created by typing:
docker imagesTo tag your image with "testing" type
docker tag [Image ID] [docker ID]/iothub-manager-dotnet:testingTo push your newly tagged image to your docker hub, type
docker push [docker ID]/iothub-manager-dotnet:testingOpen your internet browser and go to your docker hub and sign in.
You should now see your newly pushed docker image on your docker hub.
Update your Remote Monitoring solution
You now need to update your local docker-compose.yml to pull your new docker image from your docker hub. If you run into issues here, refer to our Troubleshooting section.
Go back to the terminal and change to the following directory: "azure-iot-pcs-remote-monitoring-dotnet/services/scripts/local".
Open docker-compose.yml in any text editor or IDE that you like.
Locate the following code:
image: azureiotpcs/iothub-manager-dotnet:testingand change it to look like the image below and save it.
image: [docker ID]/iothub-manager-dotnet:testing
View the new response status
Finish up by redeploying a local instance of the Remote Monitoring solution and viewing the new status response in Postman.
Go back to your terminal and change to the following directory: "azure-iot-pcs-remote-monitoring-dotnet/scripts/local".
Start your local instance of the Remote Monitoring solution by typing the following command into the terminal:
docker-compose upLocate where you downloaded Postman and open it.
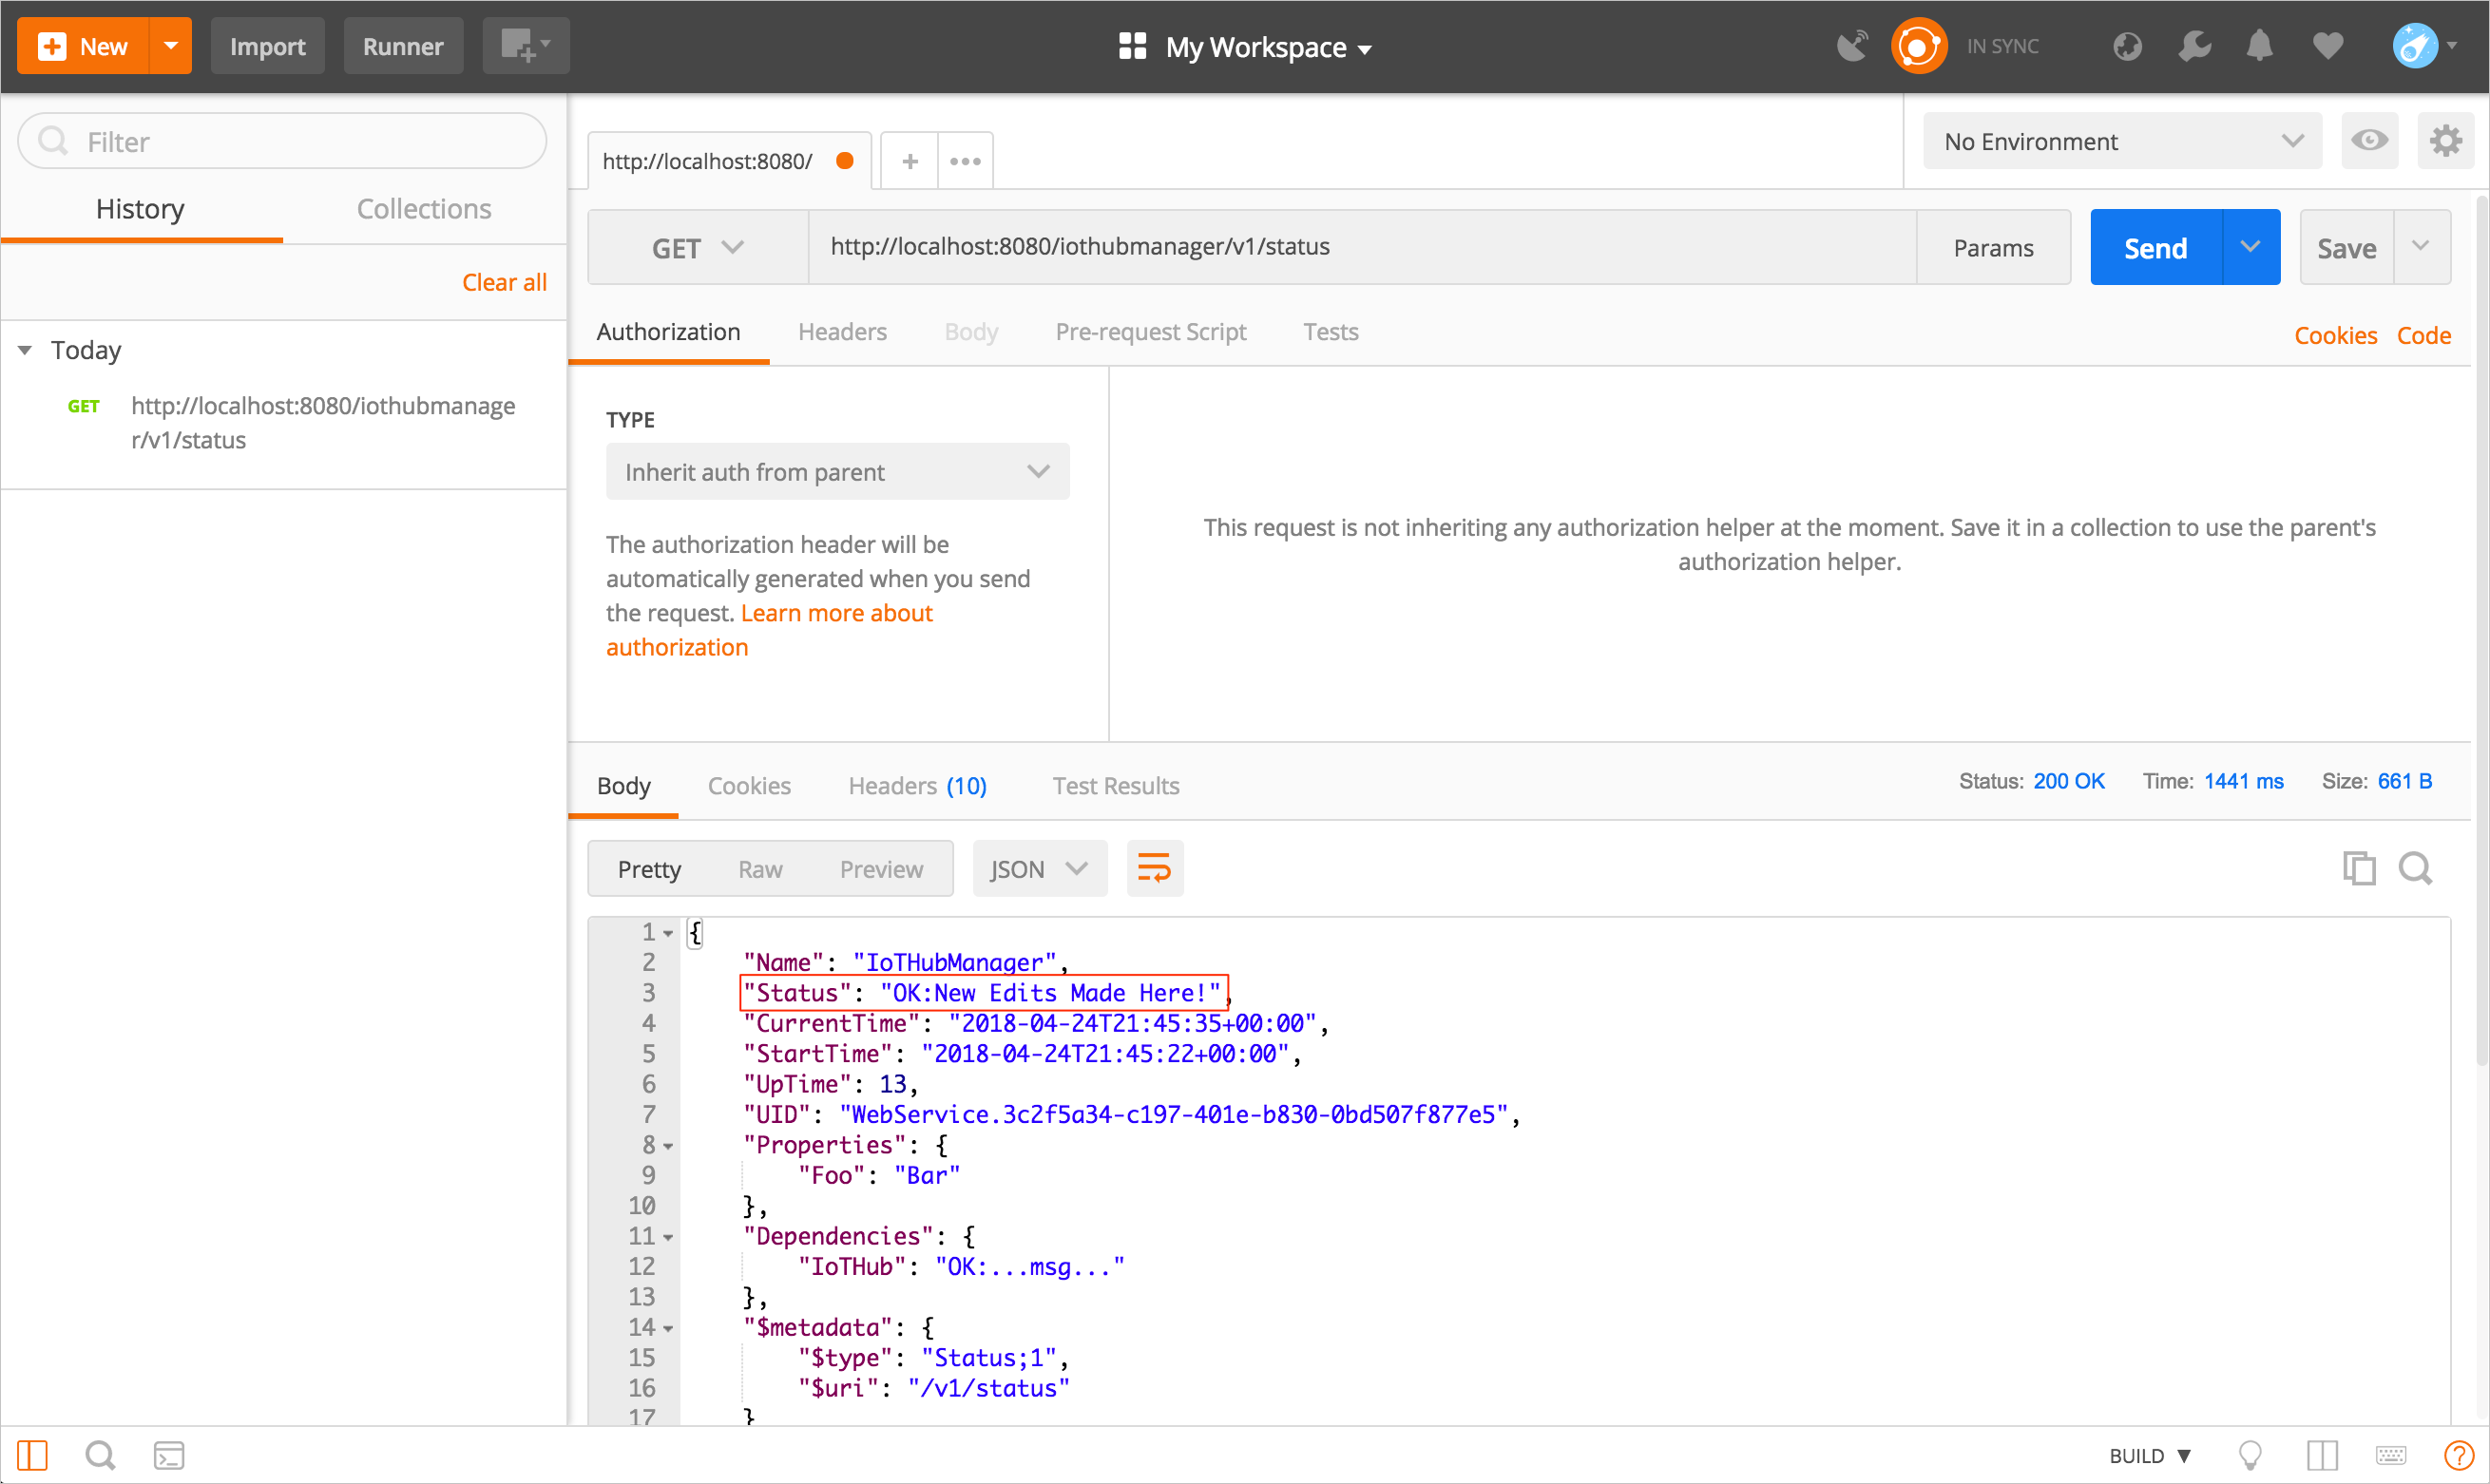
In Postman, enter the following request in the GET:
https://localhost:8080/iothubmanager/v1/status. You should now see, "Status": "OK: New Edits Made Here!".
Troubleshoot
If you're running into issues, try removing the docker images and containers on the local machine.
To remove all containers, you'll first need to stop all running containers. Open your terminal and type
docker stop $(docker ps -aq)
docker rm $(docker ps -aq)
To remove all images, open your terminal and type
docker rmi $(docker images -q)You can check if there are any containers on the machine by typing
docker ps -aqIf you successfully removed all containers, nothing should show up.
You can check if there are any images on the machine by typing
docker imagesIf you successfully removed all containers, nothing should show up.
Next steps
In this tutorial, you saw how to:
- Edit and build a microservice in the Remote Monitoring solution
- Build a docker image
- Push a docker image to your docker hub
- Pull the new docker image
- Visualize the changes
The next thing to try is customizing the device simulator microservice in the Remote Monitoring solution
For more developer information about the Remote Monitoring solution, see: