Azure Key Vault recovery management with soft delete and purge protection
Article
This article covers two recovery features of Azure Key Vault, soft delete and purge protection. This document provides an overview of these features, and shows you how to manage them through the Azure portal, Azure CLI, and Azure PowerShell.
Soft delete and purge protection are two different key vault recovery features.
Soft delete is designed to prevent accidental deletion of your key vault and keys, secrets, and certificates stored inside key vault. Think of soft-delete like a recycle bin. When you delete a key vault or a key vault object, it will remain recoverable for a user configurable retention period or a default of 90 days. Key vaults in the soft deleted state can also be purged which means they are permanently deleted. This allows you to recreate key vaults and key vault objects with the same name. Both recovering and deleting key vaults and objects require elevated access policy permissions. Once soft delete has been enabled, it cannot be disabled.
Important
You must enable soft-delete on your key vaults immediately. The ability to opt out of soft-delete is deprecated and will be removed in February 2025. See full details here
It is important to note that key vault names are globally unique, so you won't be able to create a key vault with the same name as a key vault in the soft deleted state. Similarly, the names of keys, secrets, and certificates are unique within a key vault. You won't be able to create a secret, key, or certificate with the same name as another in the soft deleted state.
Purge protection is designed to prevent the deletion of your key vault, keys, secrets, and certificates by a malicious insider. Think of this as a recycle bin with a time based lock. You can recover items at any point during the configurable retention period. You will not be able to permanently delete or purge a key vault until the retention period elapses. Once the retention period elapses the key vault or key vault object will be purged automatically.
Note
Purge Protection is designed so that no administrator role or permission can override, disable, or circumvent purge protection. Once purge protection is enabled, it cannot be disabled or overridden by anyone including Microsoft. This means you must recover a deleted key vault or wait for the retention period to elapse before reusing the key vault name.
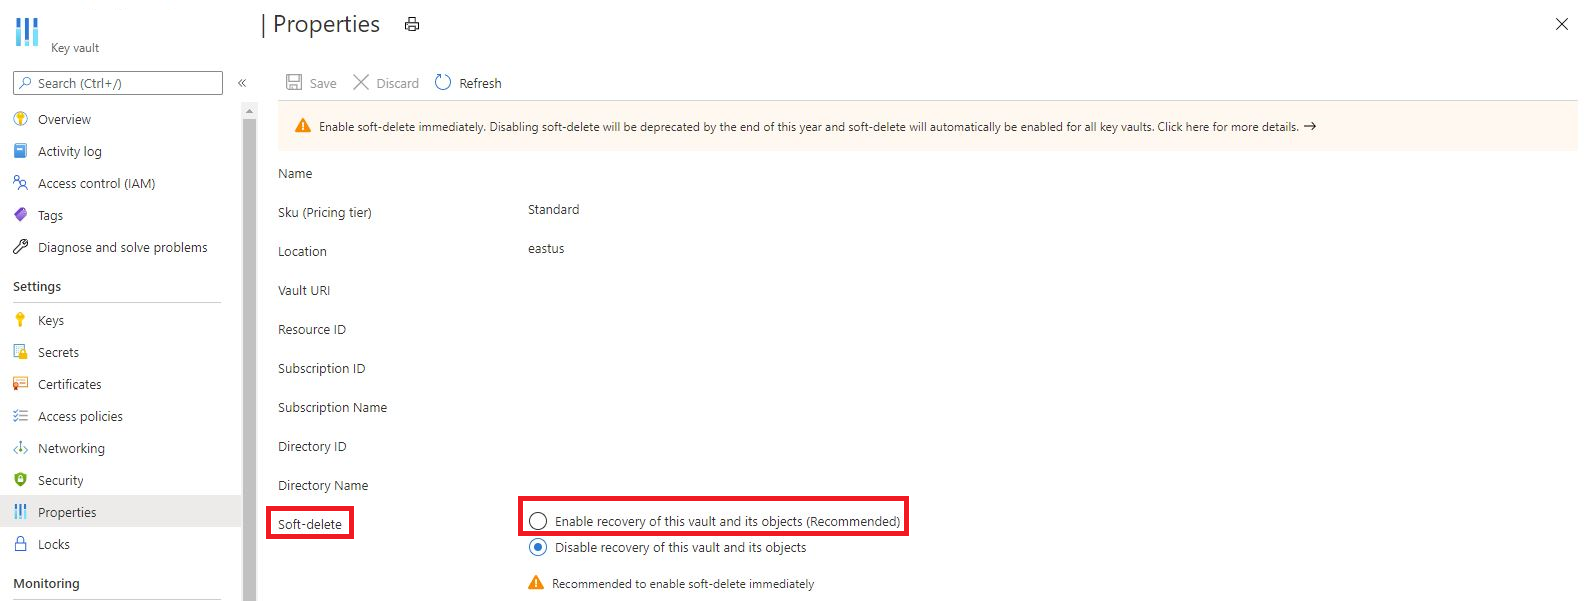
Verify if soft delete is enabled on a key vault and enable soft delete
Log in to the Azure portal.
Select your key vault.
Click on the "Properties" blade.
Verify if the radio button next to soft-delete is set to "Enable Recovery".
If soft-delete is not enabled on the key vault, click the radio button to enable soft delete and click "Save".
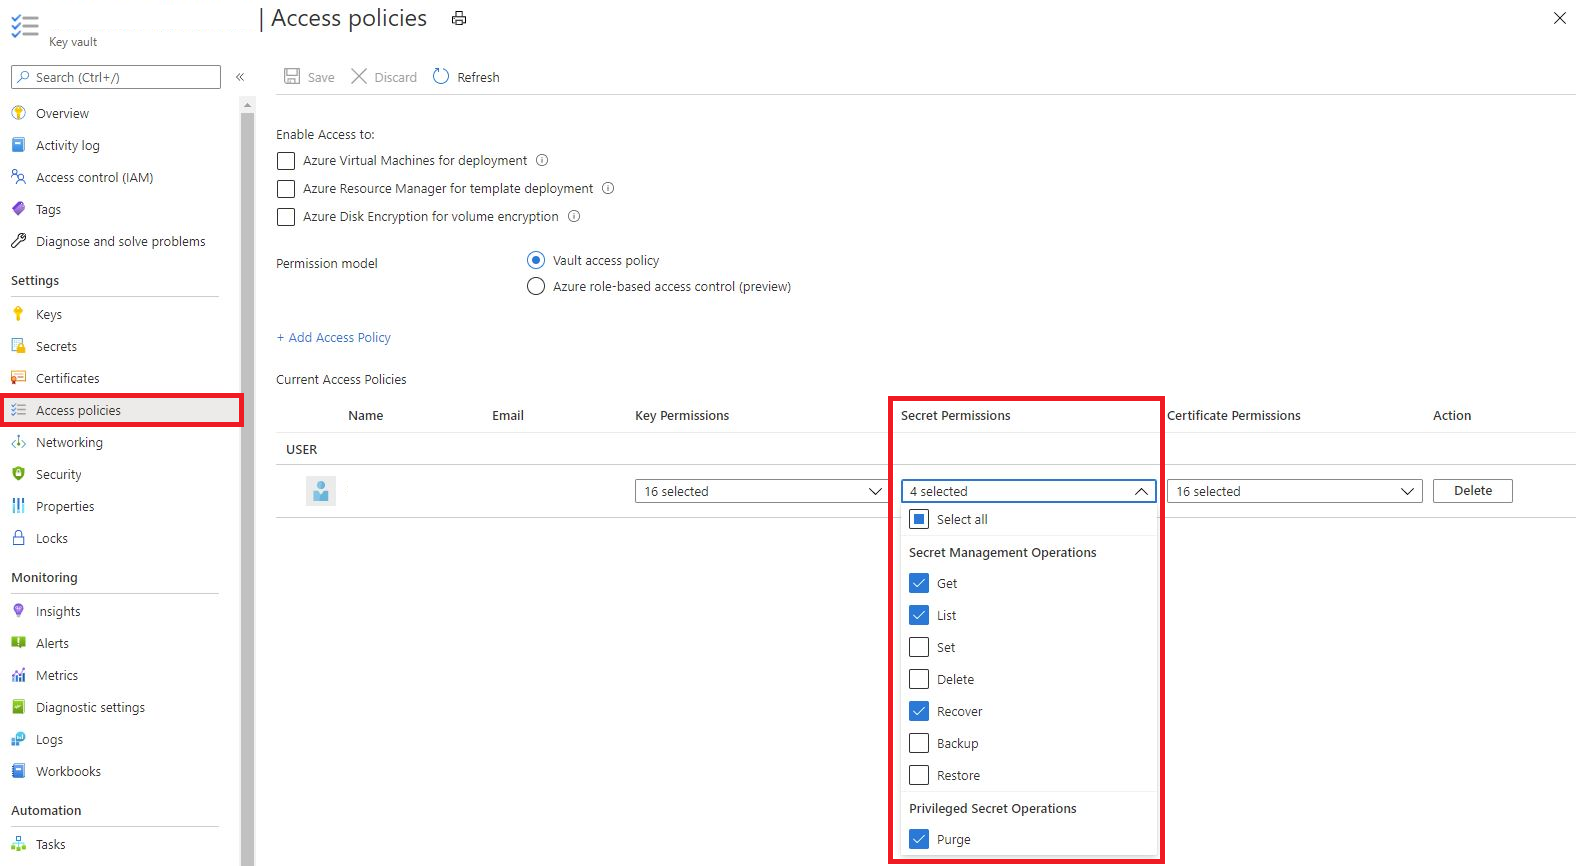
Grant access to a service principal to purge and recover deleted secrets
Log in to the Azure portal.
Select your key vault.
Click on the "Access Policy" blade.
In the table, find the row of the security principal you wish to grant access to (or add a new security principal).
Click the drop down for keys, certificates, and secrets.
Scroll to the bottom of the drop-down and click "Recover" and "Purge"
Security principals will also need get and list functionality to perform most operations.
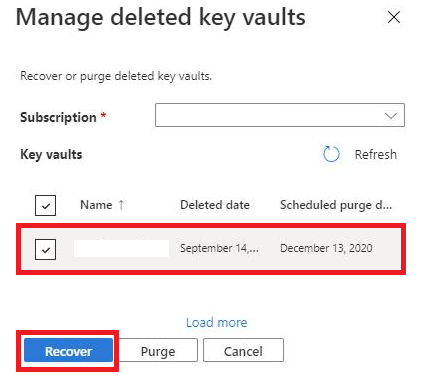
List, recover, or purge a soft-deleted key vault
Log in to the Azure portal.
Click on the search bar at the top of the page.
Search for the "Key Vault" service. Do not click an individual key vault.
At the top of the screen click the option to "Manage deleted vaults"
A context pane will open on the right side of your screen.
Select your subscription.
If your key vault has been soft deleted it will appear in the context pane on the right.
If there are too many vaults, you can either click "Load More" at the bottom of the context pane or use CLI or PowerShell to get the results.
Once you find the vault you wish to recover or purge, select the checkbox next to it.
Select the recover option at the bottom of the context pane if you would like to recover the key vault.
Select the purge option if you would like to permanently delete the key vault.
List, recover or purge soft deleted secrets, keys, and certificates
Log in to the Azure portal.
Select your key vault.
Select the blade corresponding to the secret type you want to manage (keys, secrets, or certificates).
At the top of the screen, click on "Manage deleted (keys, secrets, or certificates)
A context pane will appear on the right side of your screen.
If your secret, key, or certificate does not appear in the list, it is not in the soft-deleted state.
Select the secret, key, or certificate you would like to manage.
Select the option to recover or purge at the bottom of the context pane.
Key Vault (CLI)
Verify if a key-vault has soft-delete enabled
az keyvault show --subscription {SUBSCRIPTION ID} -g {RESOURCE GROUP} -n {VAULT NAME}
Enable soft-delete on key-vault
All new key vaults have soft delete enabled by default. If you currently have a key vault that does not have soft delete enabled, use the following command to enable soft delete.
Coming soon: Throughout 2024 we will be phasing out GitHub Issues as the feedback mechanism for content and replacing it with a new feedback system. For more information see: https://aka.ms/ContentUserFeedback.