Quickstart: Create an internal load balancer to load balance VMs using Azure PowerShell
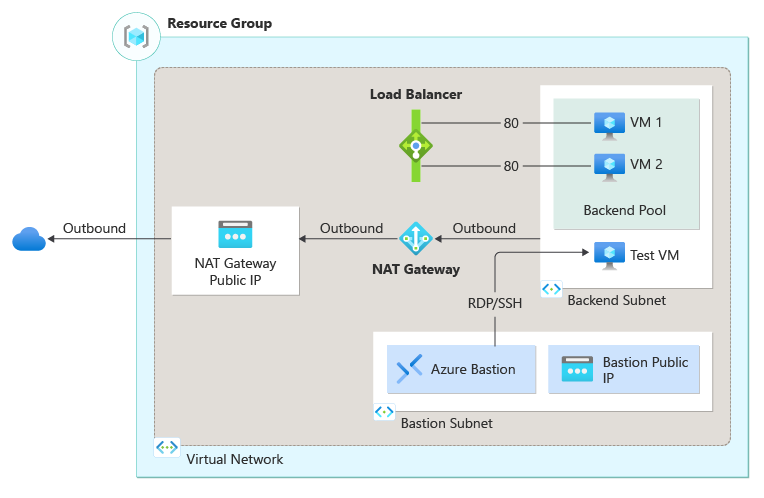
Get started with Azure Load Balancer by using Azure PowerShell to create an internal load balancer and two virtual machines.Additional resources include Azure Bastion, NAT Gateway, a virtual network, and the required subnets.
Prerequisites
An Azure account with an active subscription. Create an account for free
Azure PowerShell installed locally or Azure Cloud Shell
If you choose to install and use PowerShell locally, this article requires the Azure PowerShell module version 5.4.1 or later. Run Get-Module -ListAvailable Az to find the installed version. If you need to upgrade, see Install Azure PowerShell module. If you're running PowerShell locally, you also need to run Connect-AzAccount to create a connection with Azure.
Create a resource group
An Azure resource group is a logical container into which Azure resources are deployed and managed.
Create a resource group with New-AzResourceGroup.
New-AzResourceGroup -Name 'CreateIntLBQS-rg' -Location 'eastus'
Configure virtual network
When you create an internal load balancer, a virtual network is configured as the network for the load balancer. Before you deploy VMs and test your load balancer, create the supporting virtual network resources.
Create a public IP for the NAT gateway
Create a virtual network for the backend virtual machines
Create a network security group to define inbound connections to your virtual network
Create an Azure Bastion host to securely manage the virtual machines in the backend pool
Create a public IP address
Use New-AzPublicIpAddress to create a public IP address for the NAT gateway.
## Create public IP address for NAT gateway and place IP in variable ##
$gwpublicip = @{
    Name = 'myNATgatewayIP'
    ResourceGroupName = 'CreateIntLBQS-rg'
    Location = 'eastus'
    Sku = 'Standard'
    AllocationMethod = 'static'
    Zone = 1,2,3
}
$gwpublicip = New-AzPublicIpAddress @gwpublicip
To create a zonal public IP address in zone 1, use the following command:
## Create a zonal public IP address for NAT gateway and place IP in variable ##
$gwpublicip = @{
    Name = 'myNATgatewayIP'
    ResourceGroupName = 'CreateIntLBQS-rg'
    Location = 'eastus'
    Sku = 'Standard'
    AllocationMethod = 'static'
    Zone = 1
}
$gwpublicip = New-AzPublicIpAddress @gwpublicip
Note
The public IP address is used by the NAT gateway to provide outbound connectivity for the virtual machines in the backend pool. This is recommended when you create an internal load balancer and need the backend pool resources to have outbound connectivity. For more information, see NAT gateway.
Create virtual network, network security group, bastion host, and NAT gateway
Create a virtual network with New-AzVirtualNetwork
Create a network security group rule with New-AzNetworkSecurityRuleConfig
Create an Azure Bastion host with New-AzBastion
Create the NAT gateway resource with New-AzNatGateway
Use New-AzVirtualNetworkSubnetConfig to associate the NAT gateway to the subnet of the virtual network
Important
Hourly pricing starts from the moment that Bastion is deployed, regardless of outbound data usage. For more information, see Pricing and SKUs. If you're deploying Bastion as part of a tutorial or test, we recommend that you delete this resource after you finish using it.
## Create NAT gateway resource ##
$nat = @{
    ResourceGroupName = 'CreateIntLBQS-rg'
    Name = 'myNATgateway'
    IdleTimeoutInMinutes = '10'
    Sku = 'Standard'
    Location = 'eastus'
    PublicIpAddress = $gwpublicip
}
$natGateway = New-AzNatGateway @nat

## Create backend subnet config ##
$subnet = @{
    Name = 'myBackendSubnet'
    AddressPrefix = '10.1.0.0/24'
    NatGateway = $natGateway
}
$subnetConfig = New-AzVirtualNetworkSubnetConfig @subnet

## Create Azure Bastion subnet. ##
$bastsubnet = @{
    Name = 'AzureBastionSubnet'
    AddressPrefix = '10.1.1.0/24'
}
$bastsubnetConfig = New-AzVirtualNetworkSubnetConfig @bastsubnet

## Create the virtual network ##
$net = @{
    Name = 'myVNet'
    ResourceGroupName = 'CreateIntLBQS-rg'
    Location = 'eastus'
    AddressPrefix = '10.1.0.0/16'
    Subnet = $subnetConfig,$bastsubnetConfig
}
$vnet = New-AzVirtualNetwork @net

## Create public IP address for bastion host. ##
$bastionip = @{
    Name = 'myBastionIP'
    ResourceGroupName = 'CreateIntLBQS-rg'
    Location = 'eastus'
    Sku = 'Standard'
    AllocationMethod = 'Static'
}
$bastionip = New-AzPublicIpAddress @bastionip

## Create bastion host ##
$bastion = @{
    ResourceGroupName = 'CreateIntLBQS-rg'
    Name = 'myBastion'
    PublicIpAddress = $bastionip
    VirtualNetwork = $vnet
}
New-AzBastion @bastion -AsJob

## Create rule for network security group and place in variable. ##
$nsgrule = @{
    Name = 'myNSGRuleHTTP'
    Description = 'Allow HTTP'
    Protocol = '*'
    SourcePortRange = '*'
    DestinationPortRange = '80'
    SourceAddressPrefix = 'Internet'
    DestinationAddressPrefix = '*'
    Access = 'Allow'
    Priority = '2000'
    Direction = 'Inbound'
}
$rule1 = New-AzNetworkSecurityRuleConfig @nsgrule

## Create network security group ##
$nsg = @{
    Name = 'myNSG'
    ResourceGroupName = 'CreateIntLBQS-rg'
    Location = 'eastus'
    SecurityRules = $rule1
}
New-AzNetworkSecurityGroup @nsg
Create load balancer
This section details how you can create and configure the following components of the load balancer:
Create a frontend IP with New-AzLoadBalancerFrontendIpConfig for the frontend IP pool. This IP receives the incoming traffic on the load balancer
Create a backend address pool with New-AzLoadBalancerBackendAddressPoolConfig for traffic sent from the frontend of the load balancer
Create a health probe with Add-AzLoadBalancerProbeConfig that determines the health of the backend VM instances
Create a load balancer rule with Add-AzLoadBalancerRuleConfig that defines how traffic is distributed to the VMs
Create a public load balancer with New-AzLoadBalancer
## Place virtual network created in previous step into a variable. ##
$net = @{
    Name = 'myVNet'
    ResourceGroupName = 'CreateIntLBQS-rg'
}
$vnet = Get-AzVirtualNetwork @net

## Create load balancer frontend configuration and place in variable. ##
$lbip = @{
    Name = 'myFrontEnd'
    PrivateIpAddress = '10.1.0.4'
    SubnetId = $vnet.subnets[0].Id
}
$feip = New-AzLoadBalancerFrontendIpConfig @lbip

## Create backend address pool configuration and place in variable. ##
$bepool = New-AzLoadBalancerBackendAddressPoolConfig -Name 'myBackEndPool'

## Create the health probe and place in variable. ##
$probe = @{
    Name = 'myHealthProbe'
    Protocol = 'tcp'
    Port = '80'
    IntervalInSeconds = '360'
    ProbeCount = '5'
}
$healthprobe = New-AzLoadBalancerProbeConfig @probe

## Create the load balancer rule and place in variable. ##
$lbrule = @{
    Name = 'myHTTPRule'
    Protocol = 'tcp'
    FrontendPort = '80'
    BackendPort = '80'
    IdleTimeoutInMinutes = '15'
    FrontendIpConfiguration = $feip
    BackendAddressPool = $bePool
}
$rule = New-AzLoadBalancerRuleConfig @lbrule -EnableTcpReset

## Create the load balancer resource. ##
$loadbalancer = @{
    ResourceGroupName = 'CreateIntLBQS-rg'
    Name = 'myLoadBalancer'
    Location = 'eastus'
    Sku = 'Standard'
    FrontendIpConfiguration = $feip
    BackendAddressPool = $bePool
    LoadBalancingRule = $rule
    Probe = $healthprobe
}
New-AzLoadBalancer @loadbalancer
Create virtual machines
In this section, you create the two virtual machines for the backend pool of the load balancer.
Create three network interfaces with New-AzNetworkInterface
Set an administrator username and password for the VMs with Get-Credential
Create the virtual machines with:
# Set the administrator and password for the VMs. ##
$cred = Get-Credential

## Place virtual network created in previous step into a variable. ##
$net = @{
    Name = 'myVNet'
    ResourceGroupName = 'CreateIntLBQS-rg'
}
$vnet = Get-AzVirtualNetwork @net

## Place the load balancer into a variable. ##
$lb = @{
    Name = 'myLoadBalancer'
    ResourceGroupName = 'CreateIntLBQS-rg'
}
$bepool = Get-AzLoadBalancer @lb  | Get-AzLoadBalancerBackendAddressPoolConfig

## Place the network security group into a variable. ##
$sg = {
    Name = 'myNSG'
    ResourceGroupName = 'CreateIntLBQS-rg' @sg
}
$nsg = Get-AzNetworkSecurityGroup

## For loop with variable to create virtual machines for load balancer backend pool. ##
for ($i=1; $i -le 2; $i++)
{
    ## Command to create network interface for VMs ##
    $nic = @{
    Name = "myNicVM$i"
    ResourceGroupName = 'CreateIntLBQS-rg'
    Location = 'eastus'
    Subnet = $vnet.Subnets[0]
    NetworkSecurityGroup = $nsg
    LoadBalancerBackendAddressPool = $bepool
    }
    $nicVM = New-AzNetworkInterface @nic

    ## Create a virtual machine configuration for VMs ##
    $vmsz = @{
        VMName = "myVM$i"
        VMSize = 'Standard_DS1_v2'
    }
    $vmos = @{
        ComputerName = "myVM$i"
        Credential = $cred
    }
    $vmimage = @{
        PublisherName = 'MicrosoftWindowsServer'
        Offer = 'WindowsServer'
        Skus = '2019-Datacenter'
        Version = 'latest'
    }
    $vmConfig = New-AzVMConfig @vmsz `
        | Set-AzVMOperatingSystem @vmos -Windows `
        | Set-AzVMSourceImage @vmimage `
        | Add-AzVMNetworkInterface -Id $nicVM.Id

    ## Create the virtual machine for VMs ##
    $vm = @{
        ResourceGroupName = 'CreateIntLBQS-rg'
        Location = 'eastus'
        VM = $vmConfig
        Zone = "$i"
    }
}
New-AzVM @vm -asjob
The deployments of the virtual machines and bastion host are submitted as PowerShell jobs. To view the status of the jobs, use Get-Job:
Get-Job

Id     Name            PSJobTypeName   State         HasMoreData     Location             Command
--     ----            -------------   -----         -----------     --------             -------
1      Long Running O… AzureLongRunni… Completed     True            localhost            New-AzBastion
2      Long Running O… AzureLongRunni… Completed     True            localhost            New-AzVM
3      Long Running O… AzureLongRunni… Completed     True            localhost            New-AzVM
Note
Azure provides a default outbound access IP for VMs that either aren't assigned a public IP address or are in the backend pool of an internal basic Azure load balancer. The default outbound access IP mechanism provides an outbound IP address that isn't configurable.
The default outbound access IP is disabled when one of the following events happens:
- A public IP address is assigned to the VM.
- The VM is placed in the backend pool of a standard load balancer, with or without outbound rules.
- An Azure NAT Gateway resource is assigned to the subnet of the VM.
VMs that you create by using virtual machine scale sets in flexible orchestration mode don't have default outbound access.
For more information about outbound connections in Azure, see Default outbound access in Azure and Use Source Network Address Translation (SNAT) for outbound connections.
Install IIS
Use Set-AzVMExtension to install the Custom Script Extension.
The extension runs PowerShell Add-WindowsFeature Web-Server to install the IIS webserver and then updates the Default.htm page to show the hostname of the VM:
Important
Ensure the virtual machine deployments have completed from the previous steps before proceeding. Use Get-Job to check the status of the virtual machine deployment jobs.
## For loop with variable to install custom script extension on virtual machines. ##
for ($i=1; $i -le 2; $i++)
{
    $ext = @{
        Publisher = 'Microsoft.Compute'
        ExtensionType = 'CustomScriptExtension'
        ExtensionName = 'IIS'
        ResourceGroupName = 'CreateIntLBQS-rg'
        VMName = "myVM$i"
        Location = 'eastus'
        TypeHandlerVersion = '1.8'
        SettingString = '{"commandToExecute":"powershell Add-WindowsFeature Web-Server; powershell Add-Content -Path \"C:\\inetpub\\wwwroot\\Default.htm\" -Value $($env:computername)"}'
    }
    Set-AzVMExtension @ext -AsJob
}
The extensions are deployed as PowerShell jobs. To view the status of the installation jobs, use Get-Job:
Get-Job

Id     Name            PSJobTypeName   State         HasMoreData     Location             Command
--     ----            -------------   -----         -----------     --------             -------
8      Long Running O… AzureLongRunni… Running       True            localhost            Set-AzVMExtension
9      Long Running O… AzureLongRunni… Running       True            localhost            Set-AzVMExtension
Create the test virtual machine
Create the virtual machine with:
# Set the administrator and password for the VM. ##
$cred = Get-Credential

## Place the virtual network into a variable. ##
$net = @{
    Name = 'myVNet'
    ResourceGroupName = 'CreateIntLBQS-rg'
}
$vnet = Get-AzVirtualNetwork @net

## Place the network security group into a variable. ##
$sg = {
    Name = 'myNSG'
    ResourceGroupName = 'CreateIntLBQS-rg' @sg
}
$nsg = Get-AzNetworkSecurityGroup

## Command to create network interface for VM ##
$nic = @{
    Name = "myNicTestVM"
    ResourceGroupName = 'CreateIntLBQS-rg'
    Location = 'eastus'
    Subnet = $vnet.Subnets[0]
    NetworkSecurityGroup = $nsg
}
$nicVM = New-AzNetworkInterface @nic

## Create a virtual machine configuration for VMs ##
$vmsz = @{
    VMName = "myTestVM"
    VMSize = 'Standard_DS1_v2'
}
$vmos = @{
    ComputerName = "myTestVM"
    Credential = $cred
}
$vmimage = @{
    PublisherName = 'MicrosoftWindowsServer'
    Offer = 'WindowsServer'
    Skus = '2019-Datacenter'
    Version = 'latest'
}
$vmConfig = New-AzVMConfig @vmsz `
    | Set-AzVMOperatingSystem @vmos -Windows `
    | Set-AzVMSourceImage @vmimage `
    | Add-AzVMNetworkInterface -Id $nicVM.Id

## Create the virtual machine for VMs ##
$vm = @{
    ResourceGroupName = 'CreateIntLBQS-rg'
    Location = 'eastus'
    VM = $vmConfig
}
New-AzVM @vm
Test the load balancer
Sign in to the Azure portal.
Find the private IP address for the load balancer on the Overview screen. Select All services in the left-hand menu, select All resources, and then select myLoadBalancer.
Make note or copy the address next to Private IP Address in the Overview of myLoadBalancer.
Select All services in the left-hand menu, select All resources, and then from the resources list, select myTestVM that is located in the CreateIntLBQS-rg resource group.
On the Overview page, select Connect, then Bastion.
Enter the username and password entered during VM creation.
Open Internet Explorer on myTestVM.
Enter the IP address from the previous step into the address bar of the browser. The custom IIS Web server page is displayed.
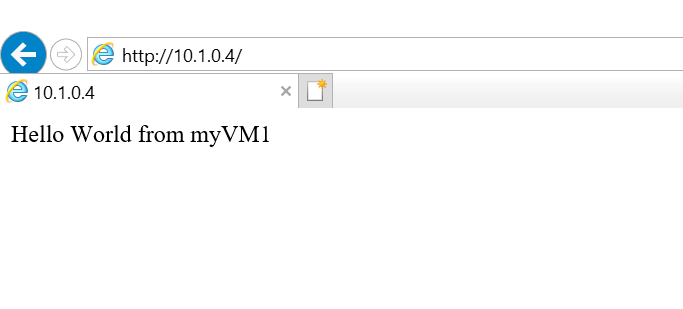
To see the load balancer distribute traffic across all three VMs, you can force-refresh your web browser from the test machine.
Clean up resources
When no longer needed, you can use the Remove-AzResourceGroup command to remove the resource group, load balancer, and the remaining resources.
Remove-AzResourceGroup -Name 'CreateIntLBQS-rg'
Next steps
In this quickstart:
You created an internal load balancer
Attached virtual machines
Configured the load balancer traffic rule and health probe
Tested the load balancer
To learn more about Azure Load Balancer, continue to:
Feedback
Coming soon: Throughout 2024 we will be phasing out GitHub Issues as the feedback mechanism for content and replacing it with a new feedback system. For more information see: https://aka.ms/ContentUserFeedback.
Submit and view feedback for