Manage logic app workflows in the Azure portal
Applies to: Azure Logic Apps (Consumption + Standard)
This guide shows how to manage Standard or Consumption logic app workflows through the Azure portal and perform tasks such as edit, disable, enable, and delete workflows. You can also manage Consumption logic apps in Visual Studio.
Prerequisites
An Azure account and subscription. If you don't have an Azure subscription, sign up for a free Azure account.
An existing Standard or Consumption logic app workflow
Find and open a logic app resource
In the Azure portal search box, enter logic apps, and select Logic apps.
From the logic apps list, find your logic app resource by either browsing or filtering the list.
To open your logic app resource, select the app that you want to manage.
View logic app properties
In the Azure portal, find and open your logic app resource.
From your logic app's menu, under Settings, select Properties.
On the Properties pane, you can view and copy the following information about your logic app resource, for example:
Standard
- Status
- URL
- Virtual IP address
- Mode
- Outbound IP address
- Additional Outbound IP Addresses
- FTP/deployment user
- FTP host name
- FTP diagnostic logs
- FTP host name
- FTPS diagnostic logs
- Resource ID
- Location
- Resource Group
- Subscription name
- Subscription ID
Consumption
- Name
- Resource ID
- Resource group
- Location
- Type
- Subscription Name
- Subscription ID
- Access Endpoint
- Runtime outgoing IP addresses
- Access endpoint IP addresses
- Connector outgoing IP addresses
View connections
When you create connections in a workflow using connectors managed by Microsoft, these connections are actually separate Azure resources with their own resource definitions and are hosted in global, multitenant Azure. Standard logic app workflows can also use built-in service provider connectors that natively run and are powered by the single-tenant Azure Logic Apps runtime. To view and manage these connections, follow these steps, based on the logic app resource type:
In the Azure portal, find and open your logic app resource.
From the logic app menu, under Workflows, select Connections.
Based on the connection type that you want to view, select one of the following options:
Option Description API Connections Connections created by globally hosted, multitenant Azure connectors. To view the underlying connection resource definition, select JSON View. Service Provider Connections Connections created by built-in, service provider connectors, based on the service provider interface implementation. To view more information about a specific connection instance, in the View Details column, select the eye icon. To view the selected connection's underlying resource definition, select JSON View. Function Connections Connections to functions in an associated function app. To view more information about a function, in the View Details column, select the eye icon. JSON View The underlying resource definitions for all connections across workflows in the logic app resource
Disable or enable logic app resources
While a Standard logic app resource can have multiple workflows, a Consumption logic app has only one workflow. So, both logic app resource types have different ways to disable and enable their activity.
You can stop or start a single or multiple Standard logic app. You can also restart a single logic app without first stopping. Your single-tenant based logic app can include multiple workflows, so you can either stop the entire logic app or disable only Standard workflows.
Note
The stop logic app and disable workflow operations have different effects. For more information, review Considerations for stopping Standard logic apps and considerations for disabling Standard workflows.
Considerations for stopping Standard logic apps
Stopping a Standard logic app at the resource level affects workflow instances in the following ways:
Single-tenant Azure Logic Apps cancels all in-progress and pending runs immediately.
Single-tenant Azure Logic Apps doesn't create or run new workflow instances.
Triggers won't fire the next time that their conditions are met. However, trigger states remember the points where the logic app was stopped. So, if you restart the logic app, the triggers fire for all unprocessed items since the last run.
To stop each workflow from triggering on unprocessed items since the last run, clear the trigger state before you restart the logic app by following these steps:
- In the Azure portal, open your logic app.
- On the logic app menu, under Workflows, select Workflows.
- Open a workflow, and edit any part of that workflow's trigger.
- Save your changes. This step resets the trigger's current state.
- Repeat for each workflow.
- When you're done, restart your Standard logic app.
Disable or enable Standard logic apps
You can stop or start multiple Standard logic apps at the same time, but you can't restart multiple Standard logic apps without stopping them first.
In the Azure portal search box, enter logic apps, and select Logic apps.
On the Logic apps page, view only the Standard logic apps using the Plan filter.
View only the Enabled or Disabled logic apps using the Status filter, which you can add if necessary.
In the checkbox column, select the logic apps that you want to stop or start.
- To stop the selected running logic apps, select Disable/Stop. Confirm your selection.
- To start the selected stopped logic apps, select Enable/Start.
To confirm whether your operation succeeded or failed, on main Azure toolbar, open the Notifications list (bell icon).
Restart a Standard logic app without stopping
You can restart a Standard logic app anytime.
In the Azure portal, open your Standard logic app resource.
On the logic app menu, select Overview.
On the Overview page toolbar, select Restart.
To confirm whether your operation succeeded or failed, on main Azure toolbar, open the Notifications list (bell icon).
Stop or start Standard workflows
To stop the trigger from firing the next time when the trigger condition is met, disable your workflow.
Note
The disable workflow and stop logic app operations have different effects. For more information, review Considerations for stopping Standard logic apps and Considerations for disabling a Standard workflow.
Considerations for disabling a Standard workflow
Disabling a workflow affects workflow instances in the following ways:
Single-tenant Azure Logic Apps continues all in-progress and pending workflow runs until they finish. Based on the volume or backlog, this process might take time to complete.
Tip
To reduce costs resulting from resources and workflow instances that might otherwise take longer to scale down in nonproduction environments for load and performance testing, you can manually stop a workflow. This action cancels in-progress and pending workflow instances. For this task, you have to add the following settings to your Standard logic app resource's host settings.
Important: Make sure to use the following settings only in nonproduction environments. Follow each workflow ID with a colon (:), and separate workflow IDs with a semicolon (;):
"Jobs.SuspendedJobPartitionPrefixes": "<workflow-ID>:;<workflow-ID>:","Jobs.CleanupJobPartitionPrefixes": "<workflow-ID>:;<workflow-ID>:"For more information, see Edit host and app settings for Standard logic apps.
Single-tenant Azure Logic Apps doesn't create or run new workflow instances.
The trigger won't fire the next time that its conditions are met. However, the trigger state remembers the point at which the workflow was disabled. So, if you re-enable the workflow, the trigger fires for all the unprocessed items since the last run.
To stop the trigger from firing on unprocessed items since the last run, clear the trigger's state before you reactivate the workflow:
- In the workflow, edit any part of the workflow's trigger.
- Save your changes. This step resets your trigger's current state.
- Reactivate your workflow.
When a workflow is disabled, you can still resubmit runs.
Disable or enable Standard workflows
In the Azure portal, open your Standard logic app resource.
On the logic app menu, under Workflows, select Workflows.
In the checkbox column, select the workflow to disable or enable.
On the Workflows pane toolbar, select Disable or Enable.
To confirm whether your operation succeeded or failed, on main Azure toolbar, open the Notifications list (bell icon).
Delete logic apps
You can delete a single or multiple Standard logic apps at the same time. Your single-tenant based logic app can include multiple workflows, so you can either delete the entire logic app or delete only workflows.
Delete Standard logic apps
Deleting a Standard logic app resource cancels in-progress and pending runs immediately, but doesn't run cleanup tasks on the storage used by the app.
Note
Although you can manually recover deleted Standard logic apps, using source control to manage your Standard logic apps makes recovery and redeployment much easier.
In the Azure portal search box, enter logic apps, and select Logic apps.
On the Logic apps page, view only the Standard logic apps using the Plan filter.
In the checkbox column, select a single or multiple logic apps to delete. On the toolbar, select Delete.
When the confirmation box appears, enter yes, and select Delete.
To confirm whether your operation succeeded or failed, on main Azure toolbar, open the Notifications list (bell icon).
Delete Standard workflows
Deleting a Standard workflow affects workflow instances in the following ways:
Azure Logic Apps cancels in-progress and pending runs immediately, but runs cleanup tasks on the storage used by the workflow.
Azure Logic Apps doesn't create or run new workflow instances.
If you delete a workflow and then recreate the same workflow, the recreated workflow won't have the same metadata as the deleted workflow. To refresh the metadata, you have to resave any workflow that called the deleted workflow. That way, the caller gets the correct information for the recreated workflow. Otherwise, calls to the recreated workflow fail with an Unauthorized error. This behavior also applies to workflows that use artifacts in integration accounts and workflows that call Azure functions.
In the Azure portal, open your Standard logic app resource.
On the logic app menu, under Workflows, select Workflows. In the checkbox column, select a single or multiple workflows to delete.
On the toolbar, select Delete.
To confirm whether your operation succeeded or failed, on main Azure toolbar, open the Notifications list (bell icon).
Recover deleted Standard logic apps
If you use source control, you can seamlessly redeploy a deleted Standard logic app resource to single-tenant Azure Logic Apps. If you're not using source control, try the following steps to recover your deleted logic app:
Before you try to recover your deleted logic app, review the following considerations:
You can recover only deleted Standard logic app resources that use the Workflow Standard hosting plan.
The run history from the deleted logic app is unavailable in the recovered logic app.
If your workflow starts with the Request trigger, the callback URL for the recovered logic app differs from the URL for the deleted logic app.
Confirm that your logic app's storage account still exists. If the storage account was deleted, you have to first recover the deleted storage account.
On the storage account menu, under Security + networking, select Access keys.
On the Access keys page, copy the account's primary connection string, and save for later use, for example:
DefaultEndpointsProtocol=https;AccountName=<storage-account-name>;AccountKey=<access-key>;EndpointSuffix=core.windows.net
On the storage account menu, under Data storage, select File shares, copy the name for the file share associated with your logic app, and save for later use.
Create a new Standard logic app resource using the same hosting plan and pricing tier. You can either use a new name or reuse the name from the deleted logic app.
Before you continue, stop the logic app. From the logic app menu, select Overview. On the Overview page toolbar, select Stop.
From the logic app menu, under Settings, select Configuration.
On the Configuration page, update the following application setting values, and remember to save your changes when finished.
App setting Replacement value AzureWebJobsStorage Replace the existing value with the previously copied connection string from your storage account. WEBSITE_CONTENTAZUREFILECONNECTIONSTRING Replace the existing value with the previously copied string from your storage account. WEBSITE_CONTENTSHARE Replace the existing value with the previously copied file share name. On your logic app menu, under Workflows, select Connections.
Open each connection and under Settings, select Access policies.
Delete the access policy for the deleted logic app, and then add a new access policy for the replacement logic app.
Return to the logic app's Configuration page, and add any custom settings that existed on the deleted logic app.
When you're done, restart your logic app.
Manage logic app versions
For Consumption logic apps, you can use the Azure portal for version control. For example, you can find your logic app's version history and publish previous versions, if any exist.
Find and view previous versions
In the Azure portal, open your Consumption logic app.
In the logic app menu, under Development Tools, select Versions.
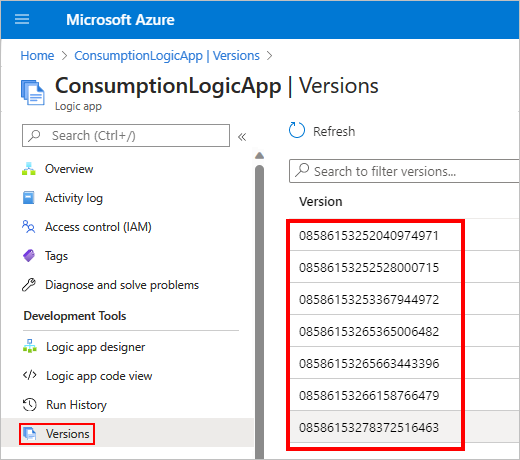
From the Version list, select the logic app version to manage.
To filter the list, in the Versions page search bar, enter the version ID.
The History version page shows the previous version's details in read-only mode. You can select between designer view and code view.
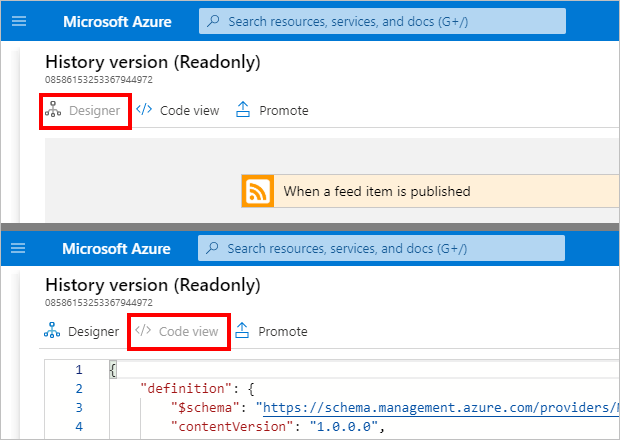
Promote previous versions
To publish a previous version of your Consumption logic app, you can promote that version over the current version.
In your logic app's version history, find and select the version that you want to promote.
On the History version page, select Promote.

After the workflow designer opens, make any necessary edits to the version that you want to promote.
You can switch between Designer and Code view modes. You can also update Parameters, Templates, and Connectors.
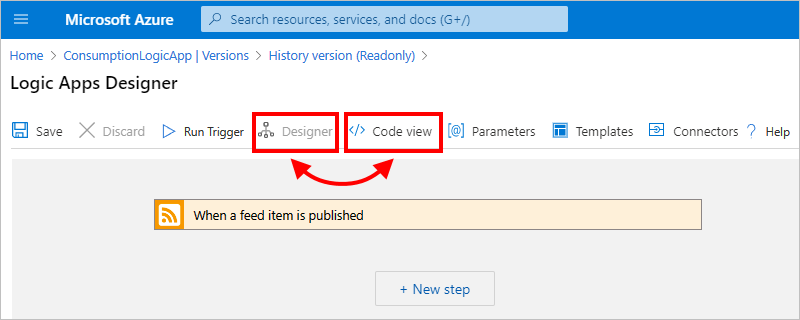
To save any updates and finish promotion, on the designer toolbar, select Save. To cancel your changes, select Discard.
When you next view your logic app's version history, the promoted version appears at the top of the list and has a new identifier.
Next steps
Feedback
Coming soon: Throughout 2024 we will be phasing out GitHub Issues as the feedback mechanism for content and replacing it with a new feedback system. For more information see: https://aka.ms/ContentUserFeedback.
Submit and view feedback for