Work in VS Code remotely connected to a compute instance (preview)
In this article, learn specifics of working within a VS Code remote connection to an Azure Machine Learning compute instance. Use VS Code as your full-featured integrated development environment (IDE) with the power of Azure Machine Learning resources. You can work with a remote connection to your compute instance in the browser with VS Code for the Web, or the VS Code desktop application.
- We recommend VS Code for the Web, as you can do all your machine learning work directly from the browser, and without any required installations or dependencies.
Important
This feature is currently in public preview. This preview version is provided without a service-level agreement, and we don't recommend it for production workloads. Certain features might not be supported or might have constrained capabilities.
For more information, see Supplemental Terms of Use for Microsoft Azure Previews.
Important
To connect to a compute instance behind a firewall, see Configure inbound and outbound network traffic.
Prerequisites
Before you get started, you will need:
- An Azure Machine Learning workspace and compute instance. Complete Create resources you need to get started to create them both.
Set up your remotely connected IDE
VS Code has multiple extensions that can help you achieve your machine learning goals. Use the Azure extension to connect and work with your Azure subscription. Use the Azure Machine Learning extension to view, update and create workspace assets like computes, data, environments, jobs and more.
When you use VS Code for the Web, the latest versions of these extensions are automatically available to you. If you use the desktop application, you may need to install them.
When you launch VS Code connected to a compute instance for the first time, make sure you follow these steps and take a few moments to orient yourself to the tools in your integrated development environment.
Locate the Azure extension and sign in
Once your subscriptions are listed, you can filter to the ones you use frequently. You can also pin workspaces you use most often within the subscriptions.

The workspace you launched the VS Code remote connection from (the workspace the compute instance is in) should be automatically set as the default. You can update the default workspace from the VS Code status bar.

If you plan to use the Azure Machine Learning CLI, open a terminal from the menu, and sign in to the Azure Machine Learning CLI using
az login --identity.
Subsequent times you connect to this compute instance, you shouldn't have to repeat these steps.
Connect to a kernel
There are a few ways to connect to a Jupyter kernel from VS Code. It's important to understand the differences in behavior, and the benefits of the different approaches.
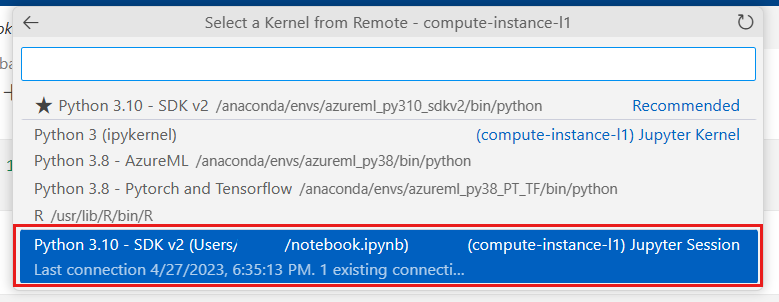
If you have already opened this notebook in Azure Machine Learning, we recommend you connect to an existing session on the compute instance. This action reconnects to an existing session you had for this notebook in Azure Machine Learning.
Locate the kernel picker in the upper right-hand corner of your notebook and select it

Choose the 'Azure Machine Learning compute instance' option, and then the 'Remote' if you've connected before

Select a notebook session with an existing connection
If your notebook didn't have an existing session, you can pick from the kernels available in that list to create a new one. This action creates a VS Code-specific kernel session. These VS Code-specific sessions are usable only within VS Code and must be managed there. You can manage these sessions by installing the Jupyter PowerToys extension.
While there are a few ways to connect and manage kernels in VS Code, connecting to an existing kernel session is the recommended way to enable a seamless transition from the Azure Machine Learning studio to VS Code. If you plan to mostly work within VS Code, you can make use of any kernel connection approach that works for you.
Transition between Azure Machine Learning and VS Code
We recommend not trying to work on the same files in both applications at the same time as you may have conflicts you need to resolve. We'll save your current file in the studio before navigating to VS Code. You can execute many of the actions provided in the Azure Machine Learning studio in VS Code instead, using a YAML-first approach. You may find you prefer to do certain actions (for example, editing and debugging files) in VS Code, and other actions (for example, Creating a training job) in the Azure Machine Learning studio. You should find you can seamlessly navigate back and forth between the two.
Next steps
For more information on managing Jupyter kernels in VS Code, see Jupyter kernel management.
Feedback
Coming soon: Throughout 2024 we will be phasing out GitHub Issues as the feedback mechanism for content and replacing it with a new feedback system. For more information see: https://aka.ms/ContentUserFeedback.
Submit and view feedback for