Request payment in the v3 C# SDK
APPLIES TO: SDK v3
Note
The Payment service referred to in this article will be deprecated on December 1, 2019.
If your bot enables users to purchase items, it can request payment by including a special type of button within a rich card. This article describes how to send a payment request using the Bot Framework SDK for .NET.
Before you can send a payment request using the Bot Framework SDK for .NET, you must complete these prerequisite tasks.
Update your bot's Web.config file to set MicrosoftAppId and MicrosoftAppPassword to the app ID and password values that were generated for your bot during the registration process.
Note
To find your bot's AppID and AppPassword, see MicrosoftAppID and MicrosoftAppPassword.
Create and activate a Stripe account if you don't have one already.
Within Seller Center, connect your account with Stripe.
Within Seller Center, navigate to the Dashboard and copy the value of MerchantID.
Update your bot's Web.config file to set
MerchantIdto the value that you copied from the Seller Center Dashboard.
The payment process comprises three distinct parts:
The bot sends a payment request.
The user signs in with a Microsoft account to provide payment, shipping, and contact information. Callbacks are sent to the bot to indicate when the bot needs to perform certain operations (update shipping address, update shipping option, complete payment).
The bot processes the callbacks that it receives, including shipping address update, shipping option update, and payment complete.
Your bot must implement only step one and step three of this process; step two takes place outside the context of your bot.
The Payment Bot sample provides an example of a bot that sends a payment request using .NET. To see this sample bot in action, you can try it out in web chat, add it as a Skype contact or download the payment bot sample and run it locally using the Bot Framework Emulator.
Note
To complete the end-to-end payment process using the Payment Bot sample in web chat or Skype,
you must specify a valid credit card or debit card within your Microsoft account
(i.e., a valid card from a U.S. card issuer).
Your card will not be charged and the card's CVV will not be verified,
because the Payment Bot sample runs in test mode (i.e., LiveMode is set to false in Web.config).
The next few sections of this article describe the three parts of the payment process, in the context of the Payment Bot sample.
Your bot can request payment from a user by sending a message that contains a
rich card attachment with a button that specifies
CardAction.Type of "payment".
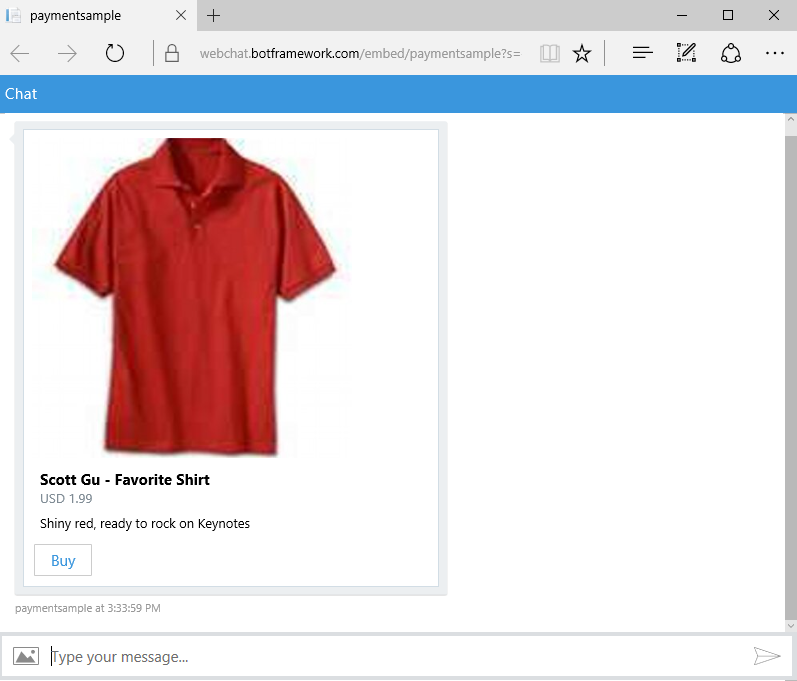
This code snippet from the Payment Bot sample creates a message that contains a Hero card with a Buy button that the user can click (or tap) to initiate the payment process.
var replyMessage = context.MakeMessage();

replyMessage.Attachments = new List<Attachment>();

var displayedItem = await new CatalogService().GetRandomItemAsync();

var cartId = displayedItem.Id.ToString();
context.ConversationData.SetValue(CART_KEY, cartId);
context.ConversationData.SetValue(cartId, context.Activity.From.Id);

var heroCard = new HeroCard
{
    Title = displayedItem.Title,
    Subtitle = $"{displayedItem.Currency} {displayedItem.Price.ToString("F")}",
    Text = displayedItem.Description,
    Images = new List<CardImage>
    {
        new CardImage
        {
            Url = displayedItem.ImageUrl
        }
    },
    Buttons = new List<CardAction>
    {
        new CardAction
        {
            Title = "Buy",
            Type = PaymentRequest.PaymentActionType,
            Value = BuildPaymentRequest(cartId, displayedItem, MethodData)
        }
    }
};

replyMessage.Attachments.Add(heroCard.ToAttachment());

await context.PostAsync(replyMessage);
In this example, the button's type is specified as PaymentRequest.PaymentActionType, which
the Bot Builder library defines as "payment".
The button's value is populated by the BuildPaymentRequest method, which returns
a PaymentRequest object that contains information about supported payment methods, details,
and options.
For more information about implementation details, see Dialogs/RootDialog.cs within the
Payment Bot sample.
This screenshot shows the Hero card (with Buy button) that's generated by the code snippet above.
Important
Any user that has access to the Buy button may use it to initiate the payment process. Within the context of a group conversation, it is not possible to designate a button for use by only a specific user.
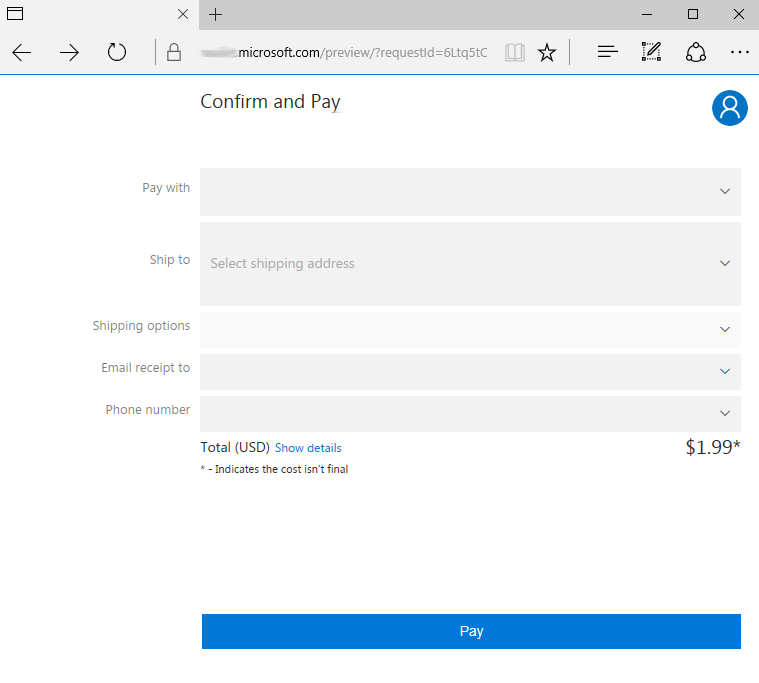
When a user clicks the Buy button, he or she is directed to a payment web experience to provide all required payment, shipping, and contact information via their Microsoft account.
HTTP callbacks will be sent to your bot to indicate that it should perform certain operations. Each callback will be an activity that contains these property values:
| Property | Value |
|---|---|
Activity.Type |
invoke |
Activity.Name |
Indicates the type of operation that the bot should perform (e.g., shipping address update, shipping option update, payment complete). |
Activity.Value |
The request payload in JSON format. |
Activity.RelatesTo |
Describes the channel and user that are associated with the payment request. |
Note
invoke is a special activity type that is reserved for use by the Microsoft Bot Framework.
The sender of an invoke activity will expect your bot to acknowledge the callback by sending an HTTP response.
When your bot receives a callback, it should verify that the information specified in the callback is valid and acknowledge the callback by sending an HTTP response.
When receiving a Shipping Address Update or a Shipping Option Update callback,
your bot will be provided with the current state of the payment details from the client in the Activity.Value property.
As a merchant, you should treat these callbacks as static, given input payment details you will calculate some output payment details and
fail if the input state provided by the client is invalid for any reason.
If the bot determines the given information is valid as-is, simply send HTTP status code 200 OK along with the unmodified payment
details. Alternatively, the bot may send HTTP status code 200 OK along with an updated payment details that should be applied before the order can be processed.
In some cases, your bot may determine that the updated information is invalid and the
order cannot be processed as-is. For example, the user's shipping address may specify a country to which the
product supplier does not ship. In that case, the bot may send HTTP status code 200 OK and a message populating the error property of the payment details object.
Sending any HTTP status code in the 400 or 500 range to will result in a generic error for the customer.
When receiving a Payment Complete callback, your bot will be provided with a copy of the initial, unmodified payment request as
well as the payment response objects in the Activity.Value property. The payment response object will contain the final selections
made by the customer along with a payment token. Your bot should take the opportunity to recalculate the final payment request based on
the initial payment request and the customer's final selections. Assuming the customer's selections are determined to be valid, the bot
should verify the amount and currency in the payment token header to ensure that they match the final payment request. If the bot
decides to charge the customer it should only charge the amount in the payment token header as this is the price the customer confirmed.
If there is a mismatch between the values that the bot expects and the values that it received in the Payment Complete callback, it can
fail the payment request by sending HTTP status code 200 OK along with setting the result field to failure.
In addition to verifying payment details, the bot should also verify that the order can be fulfilled, before it initiates payment
processing. For example, it may want to verify that the item(s) being purchased are still available in stock.
If the values are correct and your payment processor has successfully charged the payment token, then the bot should respond with HTTP
status code 200 OK along with setting the result field to success in order for the payment web experience to display the payment
confirmation. The payment token that the bot receives can only be used once, by the merchant that requested it, and must be submitted to
Stripe (the only payment processor that the Bot Framework currently supports). Sending any HTTP status code in the 400 or 500 range
to will result in a generic error for the customer.
The OnInvoke method in the Payment Bot sample processes the callbacks that the bot receives.
[MethodBind]
[ScorableGroup(1)]
private async Task OnInvoke(IInvokeActivity invoke, IConnectorClient connectorClient, IStateClient stateClient, HttpResponseMessage response, CancellationToken token)
{
    MicrosoftAppCredentials.TrustServiceUrl(invoke.RelatesTo.ServiceUrl);

    var jobject = invoke.Value as JObject;
    if (jobject == null)
    {
        throw new ArgumentException("Request payload must be a valid json object.");
    }

    // This is a temporary workaround for the issue that the channelId for "webchat" is mapped to "directline" in the incoming RelatesTo object
    invoke.RelatesTo.ChannelId = (invoke.RelatesTo.ChannelId == "directline") ? "webchat" : invoke.RelatesTo.ChannelId;

    if (invoke.RelatesTo.User == null)
    {
        // Bot keeps the userId in context.ConversationData[cartId]
        var conversationData = await stateClient.BotState.GetConversationDataAsync(invoke.RelatesTo.ChannelId, invoke.RelatesTo.Conversation.Id, token);
        var cartId = conversationData.GetProperty<string>(RootDialog.CARTKEY);

        if (!string.IsNullOrEmpty(cartId))
        {
            invoke.RelatesTo.User = new ChannelAccount
            {
                Id = conversationData.GetProperty<string>(cartId)
            };
        }
    }

    var updateResponse = default(object);

    switch (invoke.Name)
    {
        case PaymentOperations.UpdateShippingAddressOperationName:
            updateResponse = await ProcessShippingAddressUpdate(jobject.ToObject<PaymentRequestUpdate>(), token);
            break;

        case PaymentOperations.UpdateShippingOptionOperationName:
            updateResponse = await ProcessShippingOptionUpdate(jobject.ToObject<PaymentRequestUpdate>(), token);
            break;

        case PaymentOperations.PaymentCompleteOperationName:
            updateResponse = await ProcessPaymentComplete(invoke, jobject.ToObject<PaymentRequestComplete>(), token);
            break;

        default:
            throw new ArgumentException("Invoke activity name is not a supported request type.");
    }

    response.Content = new ObjectContent<object>(
        updateResponse,
        this.Configuration.Formatters.JsonFormatter,
        JsonMediaTypeFormatter.DefaultMediaType);

    response.StatusCode = HttpStatusCode.OK;
}
In this example, the bot examines the Name property of the incoming activity to identify the type of
operation it needs to perform, and then calls the appropriate method to process the callback.
For more information about implementation details, see Controllers/MessagesControllers.cs
within the Payment Bot sample.
To fully test a bot that requests payment, configure it to run on channels that support Bot Framework payments, like Web Chat. Alternatively, you can test your bot locally using the Bot Framework Emulator.
Tip
Callbacks are sent to your bot when a user changes data or clicks Pay during the payment web experience. Therefore, you can test your bot's ability to receive and process callbacks by interacting with the payment web experience yourself.
In the Payment Bot sample, the LiveMode configuration setting in Web.config determines whether
Payment Complete callbacks will contain emulated payment tokens or real payment tokens. If LiveMode is set to false, a header is added to the bot's outbound payment request to indicate that the bot is in test mode, and the Payment Complete callback will contain an emulated payment token that cannot be charged. If LiveMode is set to true, the header which indicates that the bot is in test mode is omitted from the bot's outbound payment request, and the Payment Complete callback will contain a real payment token that the bot will submit to Stripe for payment processing. This will be a real transaction that results in charges to the specified payment instrument.