Outbound Warehouse Processes
Outbound processes in warehouses start when you release a source document to take items out of a warehouse location. For example, either to ship the items somewhere or to move them to another company location. You can ship physical and non-inventory items. To learn more about receiving non-inventory items, go to Post non-inventory items.
In principle, the process of shipping outbound orders consists of two activities:
- Picking items from the shelves.
- Shipping items out of the warehouse.
The source documents for outbound warehouse flow are:
- Sales order
- Outbound transfer order
- Purchase return order
- Service order
Note
Production and assembly orders with component needs also represent outbound source documents. Production and assembly orders are a little different because they're typically internal processes that don't involve shipping. Instead, they're used to put-away produced items or move the components needed to assemble an item to an assembly area. Learn more about these processes at Design Details: Internal Warehouse Flows.
In Business Central, you pick and ship items using one of four methods, as described in the following table.
| Method | Outbound Process | Require Pick | Require Shipment | Complexity Level (Learn more at Warehouse Management Overview) |
|---|---|---|---|---|
| A | Post the pick and shipment from the order line | No dedicated warehouse activity. | ||
| B | Post the pick and shipment from an inventory pick document | Turned on | Basic: Order-by-order. | |
| C | Post the pick and shipment from a warehouse shipment document | Turned on | Basic: Consolidated receive/ship posting for multiple orders. | |
| D | Post the pick from a warehouse pick document, and post the shipment from a warehouse shipment document | Turned on | Turned on | Advanced |
The approach to choose depends on your warehouse practices and level of organisational complexity. The following are some examples that might help you decide.
- In an order-by-order environment with straightforward processes and a simple bin structure, method A, picking and shipping from the order line is appropriate.
- If items for an order line come from more than one bin, or if warehouse workers can't work with order documents, the use of separate pick documents is appropriate, method B.
- If your picking and shipping processes involve multiple orders and require greater control and overview, you might choose to use a warehouse shipment document and warehouse pick document to separate the picking and shipping tasks, methods C and D.
In methods A, B, and C, picking and shipping activities are combined in one step when posting the document as shipped. In method D, you first register the pick, and then post the shipment later from a different document.
Note
While warehouse picks and inventory picks sound similar, they're different documents and are used in different processes.
- The inventory pick used in method B, together with registering picking information, also posts the shipment of the source document.
- The warehouse pick used in method D can't be posted and only registers the pick. The registration makes the items available for the warehouse shipment but doesn't post the shipment. In the outbound flow, the warehouse pick requires a warehouse shipment.
No dedicated warehouse activity
The following articles provide information about how to process receipts for source documents if you don't have dedicated warehouse activities.
Basic warehouse configurations
The following diagram illustrates the outbound warehouse processes for different types of documents in basic warehouse configurations. The numbers in the diagram correspond with the steps in the sections following the diagram.
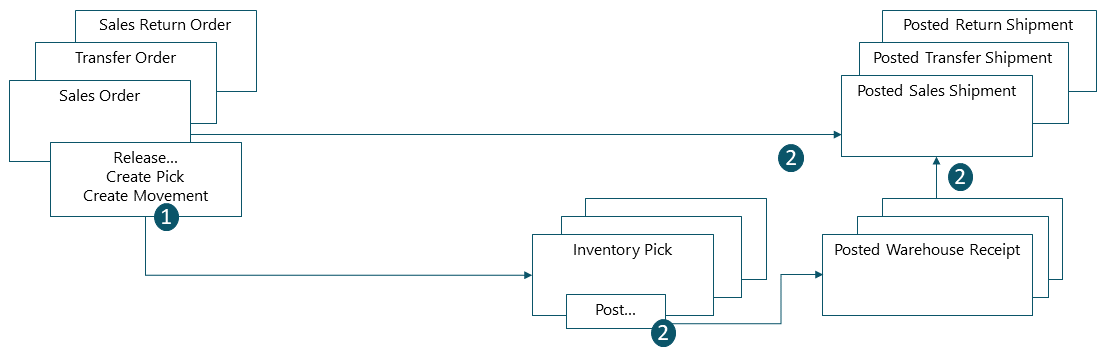
1: Release a source document
When you use the Release action on a source document, such as a sales or transfer order, the items on the document are ready to be handled in the warehouse. For example, picked and put in the bin specified on the document. Alternatively, you can create inventory pick documents for individual lines on orders, in a push fashion, based on specified bins and quantities to handle.
2: Create an inventory pick
On the Inventory Pick page, the warehouse worker retrieves, in a pull fashion, the source document lines. Alternatively, the inventory pick lines are already created, in a push fashion, by the user who is responsible for the source document.
3: Post an inventory pick
On each line for items that have been picked or moved, partially or fully, fill in the Quantity field, and then post the inventory pick. Source documents related to the inventory pick are posted as shipped or consumed.
For inventory picks, negative item ledger entries are created, warehouse entries are created, and the pick request is deleted, if fully handled. For example, the Quantity Shipped field on the outbound source document line is updated. A posted shipment document is created that reflects the sales order, for example, and the shipped items.
Advanced warehouse configurations
The following diagram illustrates the outbound warehouse processes for different types of documents in advanced warehouse configurations. The numbers in the diagram correspond with the steps in the sections following the diagram.

1: Release a source document
Releasing a source document in advanced configurations does the same thing as for basic configurations. The items become available for handling in the warehouse. For example, they can be included in a shipment.
2: Create a warehouse shipment
On the Warehouse Shipment page, get the lines from the released source document. You can combine lines from several source document in one warehouse shipment.
3: Create a warehouse pick
On the Warehouse Shipment page, create warehouse pick activities for warehouse shipments in one of two ways:
- In a push fashion, where you use the Create Pick action. Select the lines to be picked and prepare the picks by specifying, for example, which bins to take from and place in, and how many units to handle. The bins can be predefined for the warehouse location or resource.
- In a pull fashion, where you use the Release action. On the Pick Worksheet page, warehouse workers can use the Get Warehouse Documents action to get their assigned picks. When the warehouse picks are fully registered, the lines in the Pick Worksheet are deleted.
4: Register a warehouse pick
On the Warehouse Pick page, a warehouse worker fills in the Quantity field for each line that they've fully or partially picked, and then registers the pick.
Warehouse entries are created, and the warehouse pick lines are deleted if the full quantity was picked. The warehouse pick document remains open until the full quantity of the warehouse shipment is registered. The Qty. Picked field on the warehouse shipment lines is updated accordingly.
5: Post the warehouse shipment
When all items on the warehouse shipment document are registered as picked, the warehouse worker posts the shipment. Posting updates the item ledger entries to reflect the reduction in inventory. For example, the Quantity Shipped field on the outbound source document line is updated.
Post non-inventory items
Warehouse employees can ship and receive non-inventory items along with physical goods on sales and purchase orders. Non-inventory items are intangibles, such as insurance or extra costs.
Sales and purchase orders often have various types of things on their lines. For example, orders might include general ledger items, accounts, and fixed assets. If you use warehouse documents to handle physical items, you can also post some types of non-inventory items. The following are examples of warehouse documents:
- Inventory put-aways
- Warehouse receipts
- Inventory picks
- Warehouse shipments
To enable warehouse workers to ship and receive non-inventory items, fill in the Auto Post Non-Invt. via Whse. field on the Sales & Receivables Setup and Purchases & Payables Setup pages. The field provides the following options:
| Option | Description |
|---|---|
| None | Do not ship or receive non-inventory items. |
| Attached/Assigned | Post item charges and other non-inventory item lines that are assigned or attached to physical items. To attach non-inventory lines to physical items, use the Attach to inventory line action. |
| All | Post all non-inventory lines on the source document as soon as at least one item is posted by the warehouse document. |
Note
The Complete option in the Shipping Advice field of the sales order has priority over the selection in the Auto Post Non-Invt. via Whse. field on the Sales & Receivables Setup page.
See also
Feedback
Coming soon: Throughout 2024 we will be phasing out GitHub Issues as the feedback mechanism for content and replacing it with a new feedback system. For more information see: https://aka.ms/ContentUserFeedback.
Submit and view feedback for