Create or edit a business process flow
This topic applies to Dynamics 365 Customer Engagement (on-premises). If you are an online user, see Create a business process flow to standardize processes in the Power Automate docs.
This topic shows how to create a business process flow with Dynamics 365 Customer Engagement (on-premises). To learn more about why you use business process flows, see Business process flows overview. For information on creating a mobile task flow, see Create a mobile task flow.
When a user starts a business process flow, the stages and steps of the process are displayed in the process bar at the top of a form:

Dynamics 365 Customer Engagement (on-premises) comes with several ready-to-use business process flows for common business scenarios. Add them to your system and use as is, or modify them to fit your business needs. To find out how to add ready-to-use business process flows, see Add ready-to-use business processes.
Create a business process flow
Make sure that you have the System Administrator or System Customizer security role or equivalent permissions.
Open solution explorer.
On the left navigation pane, select Processes.
On the Actions toolbar, select New.
In the Create Process dialog box, complete the required fields:
Enter a process name. The name of the process doesn’t need to be unique, but it should be meaningful for people who need to choose a process. You can change this later.
In the Category list, select Business Process Flow.
You cannot change the category after you create the process.
In the Entity list, select the entity you want to base the process on.
The entity you select affects the fields available for steps that can be added to the first stage of the process flow. If you don’t find the entity you want, make sure the entity has the Business process flows (fields will be created) option set in the entity definition. You cannot change this after you save the process.
Choose OK.
The new process is created, and the business process flow designer opens with a single stage already created for you.

Add stages. If your users will progress from one business stage to another in the process:
Drag a Stage component from the Components tab and drop it on a + sign in the designer.

To set the properties for a stage, select the stage, and then set the properties in the Properties tab on the right side of the screen:
Enter a display name.
If desired, select a category for the stage. The category (such as Qualify or Develop) appears as a chevron in the process bar.

When you're done changing properties, select the Apply button.
Add steps to a stage. To see the steps in a stage, select Details in the lower-right corner of the stage. To add more steps:
Drag the Step component to the stage from the Components tab.

Select the step, and then set properties in the Properties tab:
Enter a display name for the step.
If you want users to enter data to complete a step, select the appropriate field from the drop-down list.
Select Required if people must fill in the field to complete the step before moving to the next stage of the process.
Select Apply when you're done.
Add a branch (condition) to the process. To add a branching condition:
Drag the Condition component from the Components tab to a + sign between two stages.

Select the condition, and then set properties in the Properties tab. For more information on branching properties, see Enhance business process flows with branching. When you're finished setting properties for the condition, select Apply.
Add a workflow. To invoke a workflow:
Drag a Workflow component from the Components tab to a stage or to the Global Workflow item in the designer. Which one you add it to depends on the following:
Drag it to a stage when you want to trigger the workflow on entry or exit of the stage. The workflow component must be based on the same primary entity as the stage.
Drag it to the Global Workflow item when you want to trigger the workflow when the process is activated or when the process is archived (when the status changes to Completed or Abandoned). The workflow component must be based on the same primary entity as the process.
Select the workflow, and then set properties in the Properties tab:
Enter a display name.
Select when the workflow should be triggered.
Search for an existing on-demand active workflow that matches the stage entity or create a new workflow by selecting New.
Select Apply when you're done.
For more information on workflows, see Workflow processes.
To validate the business process flow, select Validate on the action bar.
To save the process as a draft while you continue to work on it, select Save in the action bar.
Important
As long as a process is a draft, people won’t be able to use it.
To activate the process and make it available to your team, select Activate on the action bar.
To provide control over who can create, read, update, or delete the business process flow instance, select Edit Security Roles on the command bar of the designer. For example, for service-related processes, you could provide full access for customer service reps to change the business process flow instance, but provide read-only access to the instance for sales reps so they can monitor post-sales activities for their customers.
In the Security Roles screen, select the name of a role to open the security role information page. Select the Business Process Flows tab, and then assign appropriate privileges on the business process flow for a security role.
Note
The System Administrator and System Customizer security roles have access to new business process flows by default.
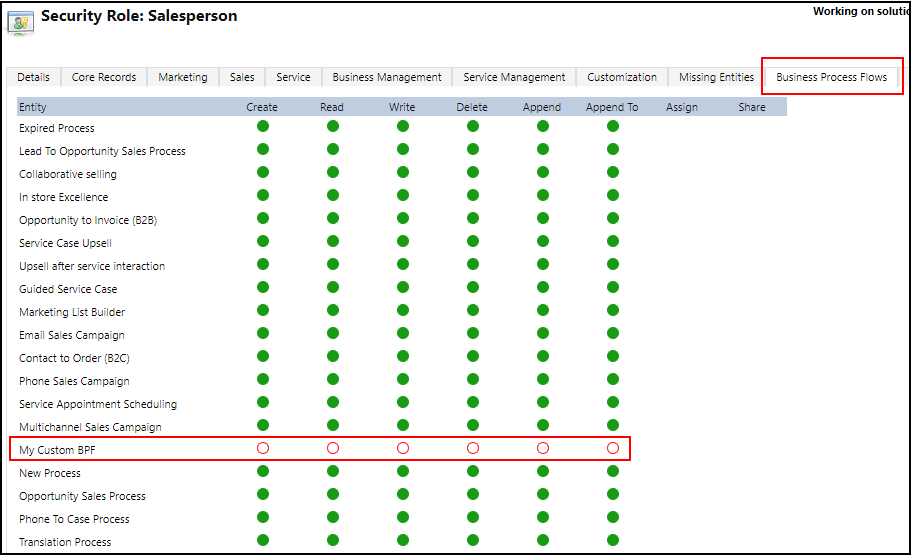
Specify privileges by selecting the appropriate radio buttons, and click Save. For more information about privileges, see Business process flow privileges.
Next, don't forget to assign the security role to appropriate users in your organization.
Tip
Here are a few tips to keep in mind as you work on your task flow in the designer window:
- To take a snapshot of everything in the business process flow window, select Snapshot on the action bar. This is useful, for example, if you want to share and get comments on the process from a team member.
- Use the mini-map to navigate quickly to different parts of the process. This is useful when you have a complicated process that scrolls off the screen.
- To add a description for the business process, select Details under the process name in the left corner of the business process flow window. You can use up to 2000 characters.
Edit a business process flow
To edit business process flows, open solution explorer, select Processes, and then select the Business Process Flow from the list of processes that you want to edit.
When you select the name of the business process flow you want to edit from the list of processes, it opens in the designer, where you can make any updates you want. Expand Details under the name of the process to rename it or add a description, and view additional information.

Other things to know about business process flows
Edit Stages
Business process flows can have up to 30 stages.
You can add or change the following properties of a stage:
Stage Name
Entity. You can change the entity for any stage except the first one.
Stage Category. A category lets you group stages by a type of action. It is useful for reports that will group records by the stage they are in. The options for the stage category come from the Stage Category global option set. You can add additional options to this global option set and change the labels of existing options if you want. You can also delete these options if you wish, but we recommend that you keep the existing options. You won’t be able to add the exact same option back if you delete it. If you don’t want them to be used, change the label to ”Do not use”.
Relationship. Enter a relationship when the preceding stage in the process is based on a different entity. For the stage currently being defined, choose Select relationships to identify a relationship to use when moving between the two stages. It is recommended you select a relationship for the following benefits:
Relationships often have attribute maps defined that automatically carry over data between records, minimizing data entry.
When you select Next Stage on the process bar for a record, any records that use the relationship will be listed in the process flow, thereby promoting reuse of records in the process. In addition, you can use workflows to automate creation of records so that the user simply selects it instead of creating one to further streamline the process.
Edit Steps
Each stage can have up to 30 steps.
Add branch
To learn about adding a branch to a stage, see Enhance business process flows with branching.
To make a business process flow available for people to use, you must order the process flow, activate it, and specify business process flow privileges for a security role and then assign the security role to appropriate users.
Set Process Flow Order
When you have more than one business process flow for an entity (record type), you’ll need to set which process is automatically assigned to new records.. In the command bar, select Order Process Flow. For new records or records that do not already have a process flow associated with them, the first business process flow that a user has access to is the one that will be used.
Activate
Before anyone can use the business process flow, you must activate it. In the command bar, select Activate. After you confirm the activation, the business process flow is ready to use. If a business process flow has errors, you will not be able to activate it until the errors are corrected.
Edit Security Roles
Users have access to a business process flow depending on the privilege defined on the business process flow in the security role assigned to the user.
By default, only the System Administrator and System Customizer security roles can access a new business process flow.
To specify privileges on a business process flow, open the business process flow definition for editing, and then select Edit Security Roles in the command bar of the business process flow designer. See Step 14 earlier in the topic for more details.
Add an on-demand action to a business process flow
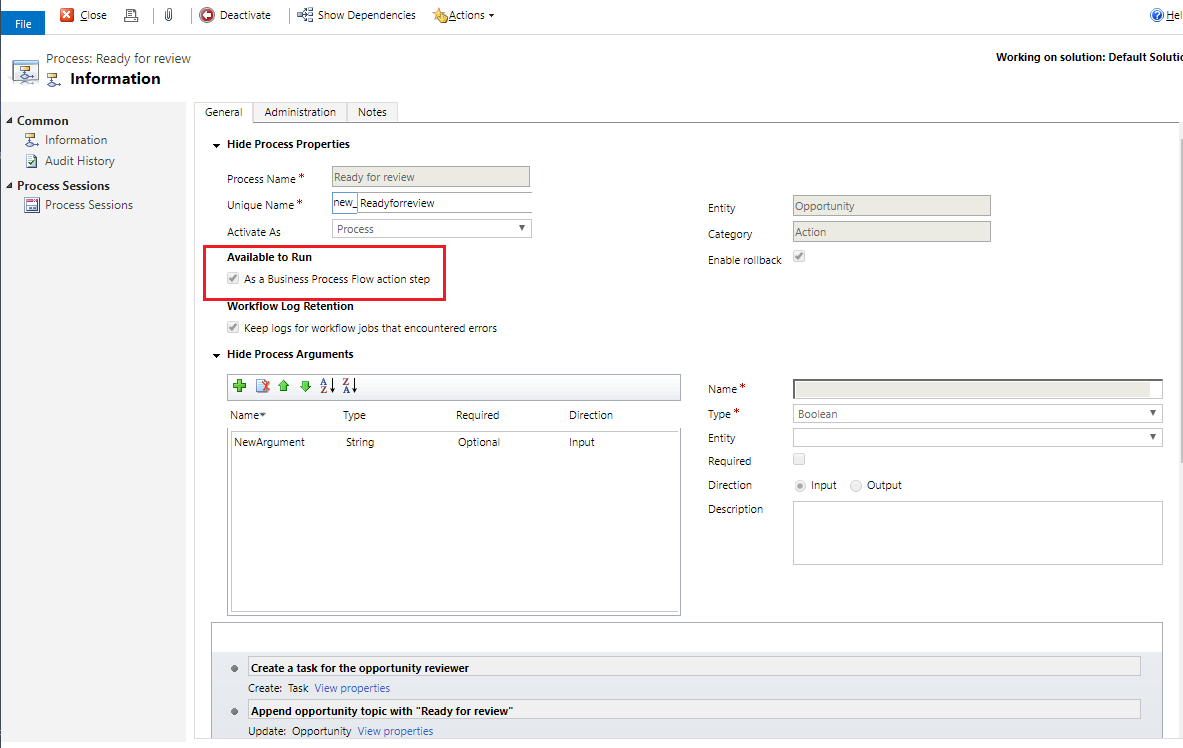
The Dynamics 365 Customer Engagement (on-premises) update introduces a business process flow feature: business process flow automation with Action Steps. You can add a button to a business process flow that will trigger an action or workflow.
Add on-demand workflows or actions using an Action Step
Suppose that, as part of the opportunity qualification process, the Contoso organization requires all opportunities to be reviewed by a designated reviewer. Subsequently, the Contoso organization created an action that:
- Creates a task record that is assigned to the opportunity reviewer.
- Appends “Ready for review” to the opportunity topic.
Additionally, Contoso needs to be able to run these actions on demand. To integrate these tasks into the opportunity qualification process, the actions must appear on the opportunity business process flow. To enable this functionality, select As a Business Process Flow action step.
Next, the Action Step is added to Contoso’s opportunity business process flow. Then the process flow is validated and updated.
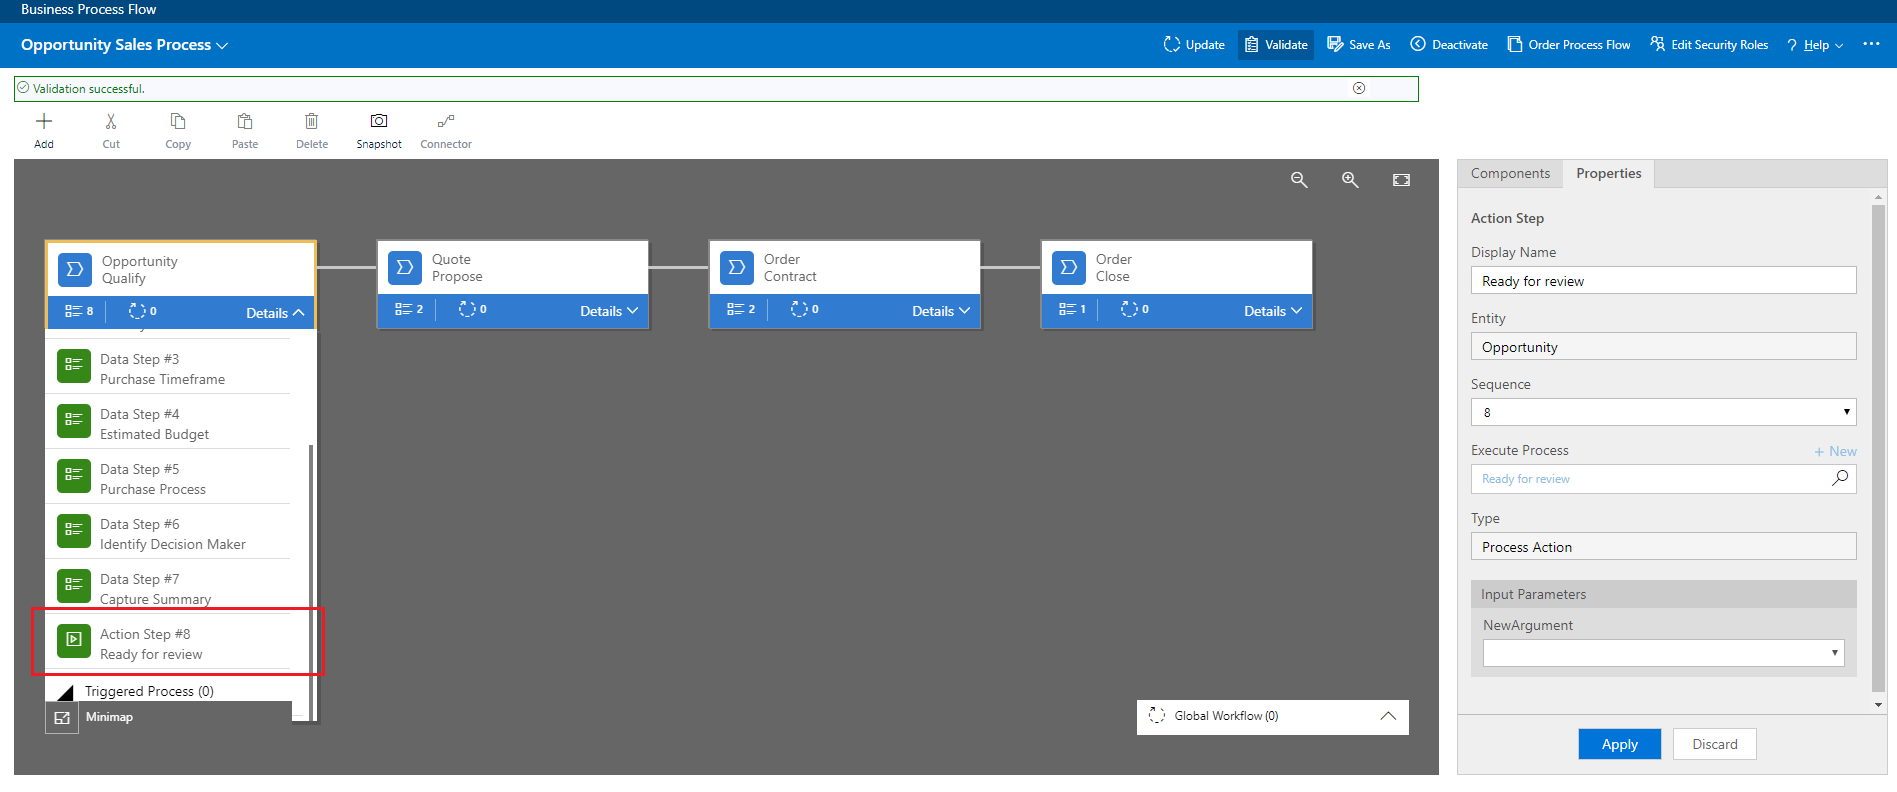
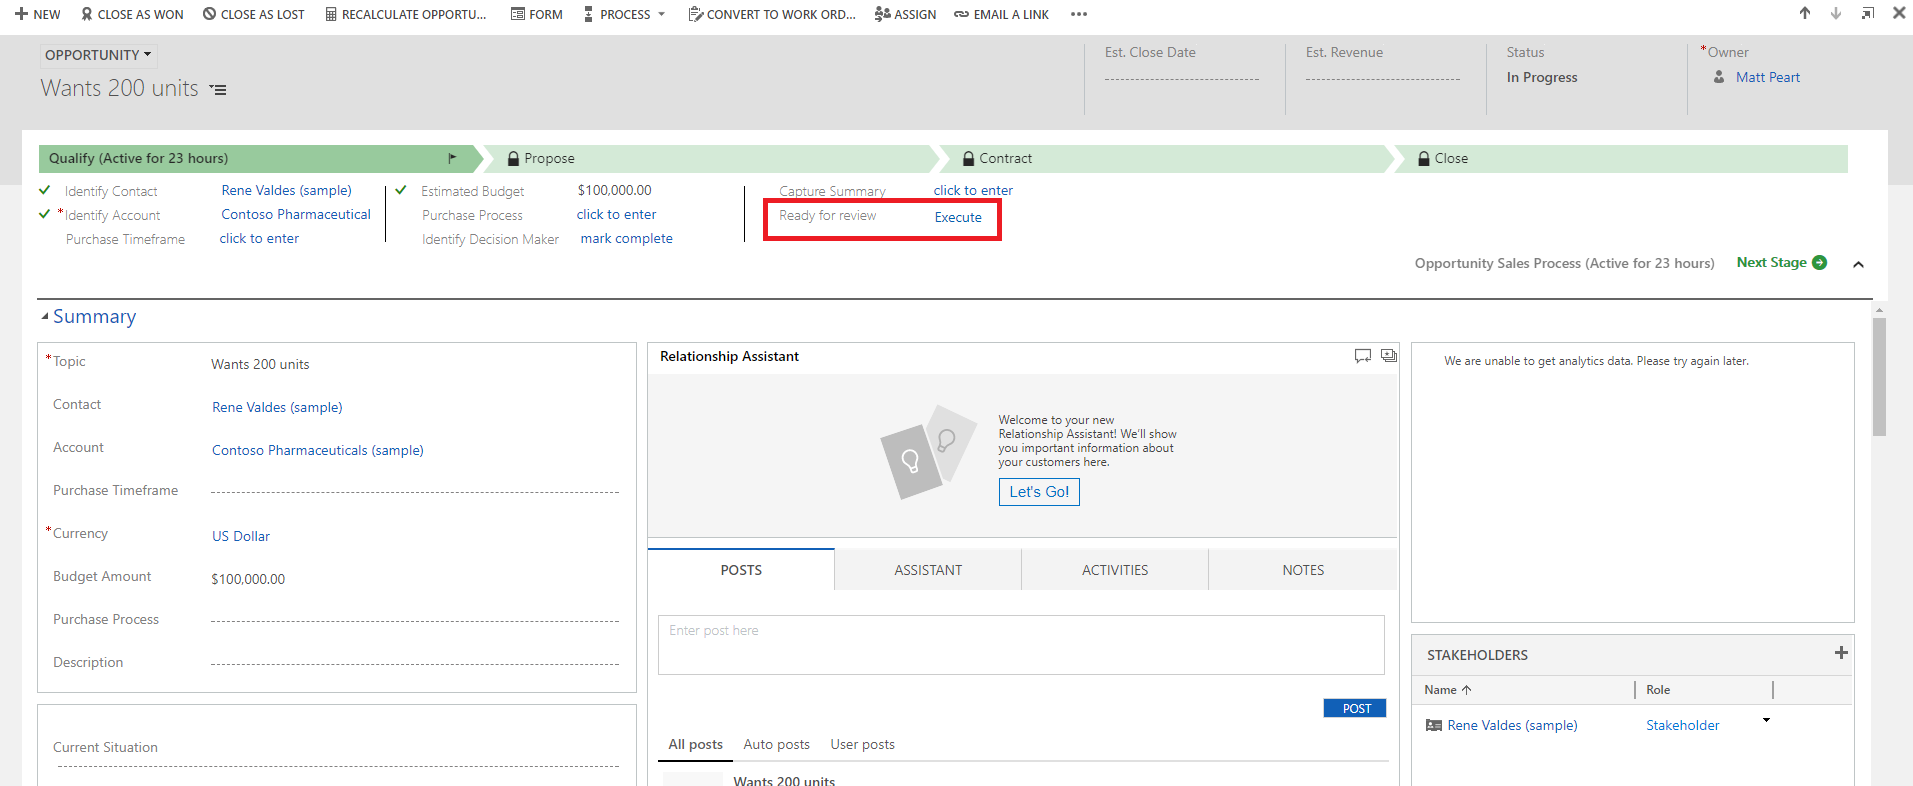
Now, members of Contoso’s salesforce can kick-off the action from the Opportunity Qualify business process step, on demand, by selecting Execute.
Important
- To be able to execute an action or workflow on demand, the business process flow must include an Action Step. If the Action Step runs a workflow, the workflow must be configured to run on demand.
- The entity associated with the action or workflow must be the same as the entity associated with the business process flow.
Limitation of using Action Steps in a business process flow
- Actions are not available as Action Steps if the input or output parameters are Entity, EntityCollection, or OptionSet (Picklist) types. Actions with more than one EntityReference output parameter or any number of EntityReference input parameters are not available as Action Steps. Actions not associated with a primary entity (global action) are not available as Action Steps.
See also
Business process flows overview
Enhance business process flows with branching
Create a mobile task flow
Add ready-to-use business processes
Create business rules and recommendations to apply logic in a form
Create custom business logic with processes
Workflow processes
Feedback
Coming soon: Throughout 2024 we will be phasing out GitHub Issues as the feedback mechanism for content and replacing it with a new feedback system. For more information see: https://aka.ms/ContentUserFeedback.
Submit and view feedback for