Third party miscellaneous charges
This article explains how to handle services that are purchased though a separate invoice as miscellaneous charges. The cost of these services can be included in the cost price of the purchased goods or written off as a cost, like the miscellaneous charges that are defined in the invoice for the purchase of goods. Additionally, the debt on these services can be redrawn to third parties, such as customers or vendors. In this case, a facture is created that won't be included in the sales book or purchase book.
You must purchase an item of the Service type to do the accounting as a miscellaneous charge that you will allocate later. You must also specify item-related parameters for the miscellaneous charges code.
There are three modes of miscellaneous charges allocation:
- Include to the cost price – Allocate miscellaneous charges to other item invoices, so that the allocations can be included in an item's cost price. The allocation base is the invoice lines. The allocation causes the item's cost to be adjusted.
- Redraw debt – Allocate miscellaneous charges to redraw debt to third parties. The allocation base is the counteragent (customer or vendor) that the debt is reissued on. The allocation causes the system to create invoices for payment and factures for the selected counteragent.
- Write-off to cost – Allocate miscellaneous charges to the ledger account. The allocation base is the ledger account. The allocation causes the charges amount to be written off to the selected account.
Setup
Set up a charges code
Go to Accounts payable > Charges setup > Charges code.
Select New to create a charges code.
In the Charges code field, enter a code for the charges.
In the Description field, enter a description of the charges.
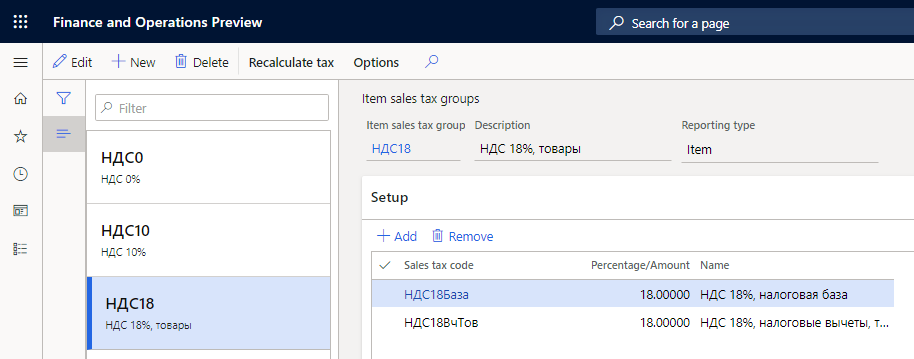
Optional: In the Item sales tax group field, select an item sales tax group.
In the Maximum amount field, enter the maximum amount that is allowed for this charges code. This field is used to validate charges for vendor invoices.
Note
To turn on the functionality for validating charges, on the Accounts payable parameters page, on the Invoice validation tab, set the Enable invoice matching validation option to Yes.
On the Posting FastTab, in the Debit section, follow these steps:
a. In the Type field, select Ledger account to post the purchased service as a miscellaneous charge.
b. In the Posting field, select Allocation as the posting type for the debit account.
c. In the Account field, select the account number that the amount on the purchase order or invoice journal line should be debited to.
In the Credit section, in the Type field, select Customer/Vendor.
Select Save.

Create a released product for a service item
- Go to Product information management > Products > Released products to open the Released product details page.
- Create a product.
- In the Product type field, select Service.
- In the Item model group field, select the item model group for non-stocked items, and in the Item group field, select the item group for services.
- In the Tracking dimension group field, select a dimension group.
- In the Charges code field, select the charges code that you created earlier.

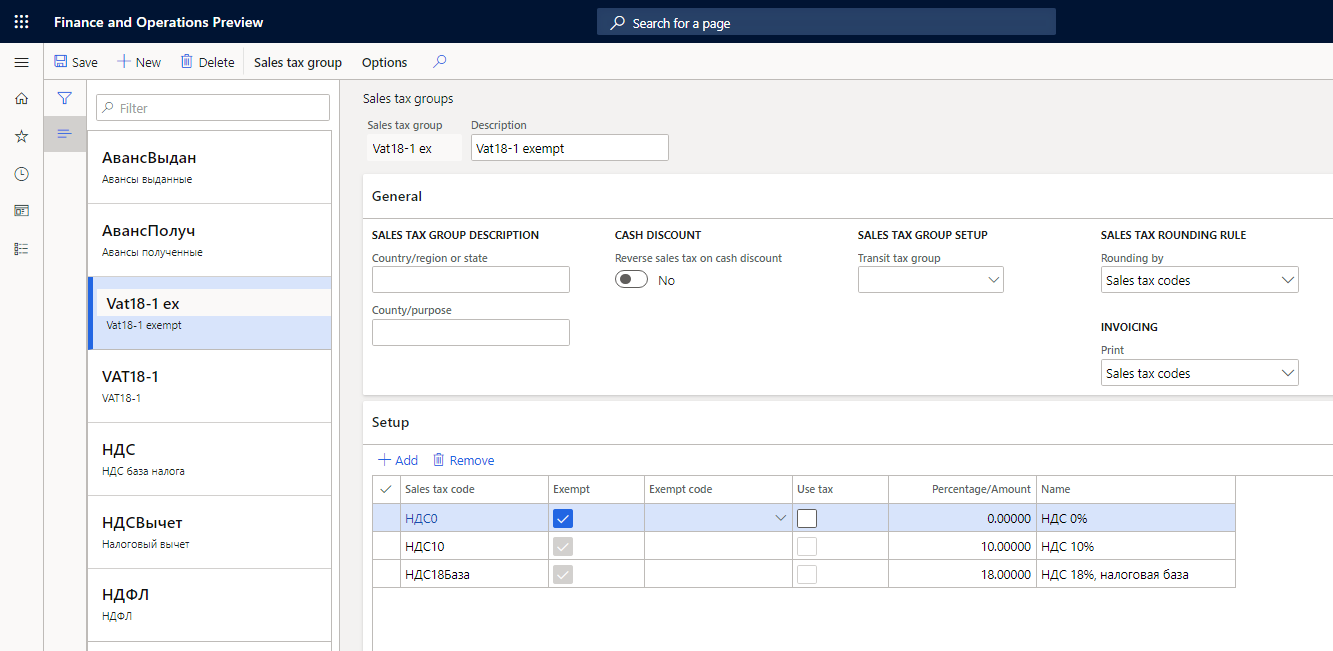
Set up a sales tax group that has exempt tax codes
If you must redraw debt for services that are provided to a third party, you can create a facture for redrawn amounts that isn't reflected in the purchase book or sales book. Set up the sales tax group so that it has the sales tax codes, and make sure that the Exempt check boxes are selected. After you complete this setup, the system won't generate ledger transactions for tax. However, the appropriate tax rate must be specified for the sales tax codes, to help guarantee that the printed form of the reissued invoice will reflect the tax.
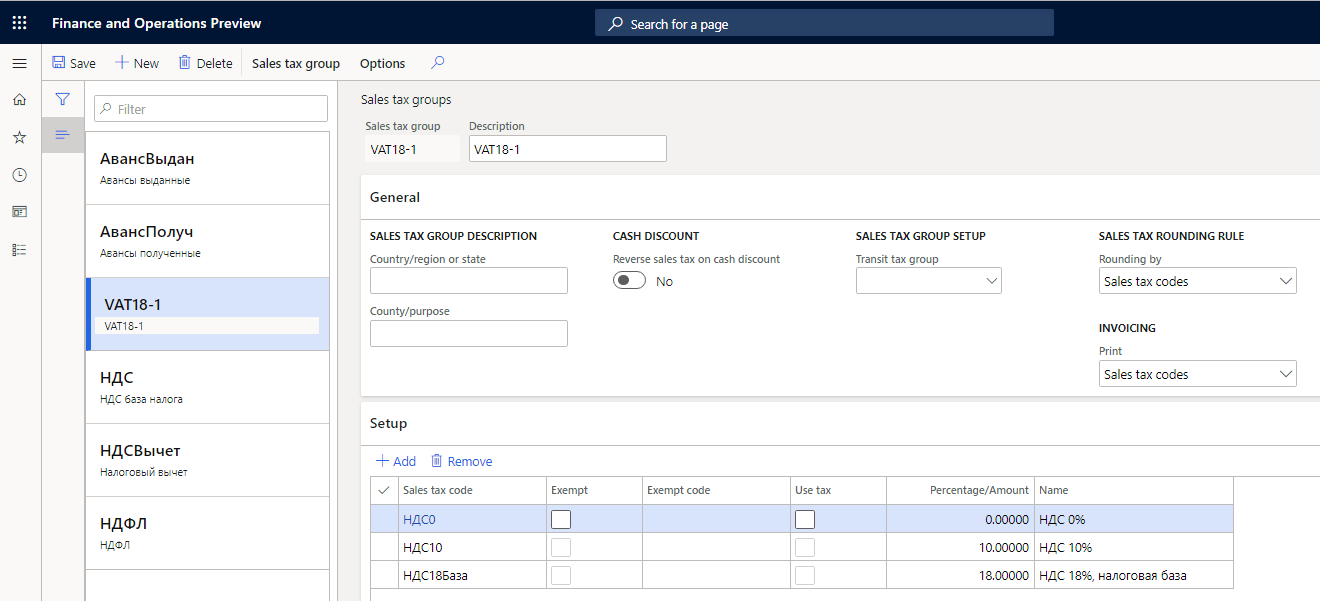
- Go to Tax > Sales tax > Sales tax groups.
- Create a sales tax group.
- On the Setup FastTab, in the Sales tax code field, select the sales tax codes for all value-added tax (VAT) rates.
- For each sales tax code, select the Exempt check box to indicate that sales tax isn't calculated.
- Select Save.

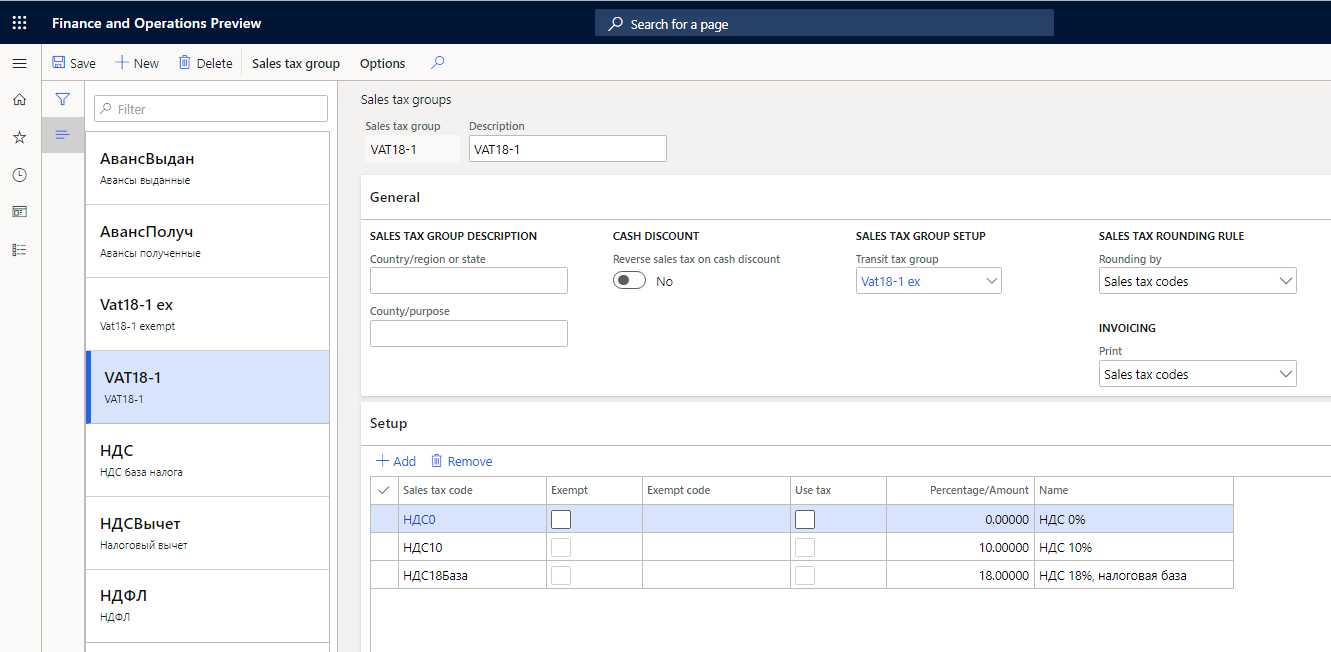
Define a transit tax group for a sales tax group
The transit tax group is used in the invoice that is created during the redraw debt transaction.
- Go to Tax > Sales tax > Sales tax groups.
- Create a sales tax group.
- On the General FastTab, in the Transit tax group field, select the sales tax group that has an exempt tax code that is used to redraw the charges.
- On the Setup FastTab, in the Sales tax code field, select the sales tax code.
- Select Save.

Set up a transit account
The transit general ledger account is the account that will be credited when transactions are redrawn to the third party. You must set up the ledger account to redraw charges to third parties.
- Go to Accounts payable > Setup > Accounts payable parameters.
- On the General tab, in the Transit account field, select the transit general ledger account to use during the redraw debt transaction.
- On the Number sequence tab, in the Number sequence code field, select a number sequence code for the Charges voucher, Allocation transaction, External vendor invoice, and Invoice for payment references.
Purchase services (charges) for allocation
You can purchase services for allocation either from the invoice journal or through a purchase order.
Purchase services (charges) from the invoice journal
Go to Accounts payable > Invoices > Invoice journal.
Create an invoice journal.
Select Lines, and create a line.
On the General tab, follow these steps:
a. In the Sales tax section, select a sales tax group and an item sales tax group.
Note
If you redraw debt to third parties, you might want to select the sales tax group that has exempt tax codes.
b. In the Charges section, in the Charges code field, select the charges code that you created in the Set up a charges code section.

- Specify other details, and then post the journal.
Purchase services (charges) through a purchase order
Create a purchase order.
On the purchase order lines, select the service that you created earlier.
On the Setup tab, follow these steps:
a. In the Sales tax section, select an item sales tax group and the sales tax group that you created earlier.
Note
If you redraw debt to third parties, you might want to select the sales tax group that has exempt sales tax codes.
b. In the Charges section, in the Charges code field, verify that the charges code that you created earlier is selected.
c. In the Posting section, in the Ledger account field, verify that the debit account that you specified for the charges code that you created earlier is selected.

- On the Product tab, in the Inventory profile field, select an inventory profile.

- Specify other purchase order details, and post the invoice.
Allocate charges
You can allocate miscellaneous charges on the Charges allocation page. This page has three parts:
- The Allocation source section shows the invoice lines that will be allocated.
- In the Allocation base section, you can select the invoice lines that miscellaneous charges from the Allocation source section will be allocated to.
- The lower-right part shows the result of the allocation of source lines amounts on the base line.
Allocate miscellaneous charges to the item cost price
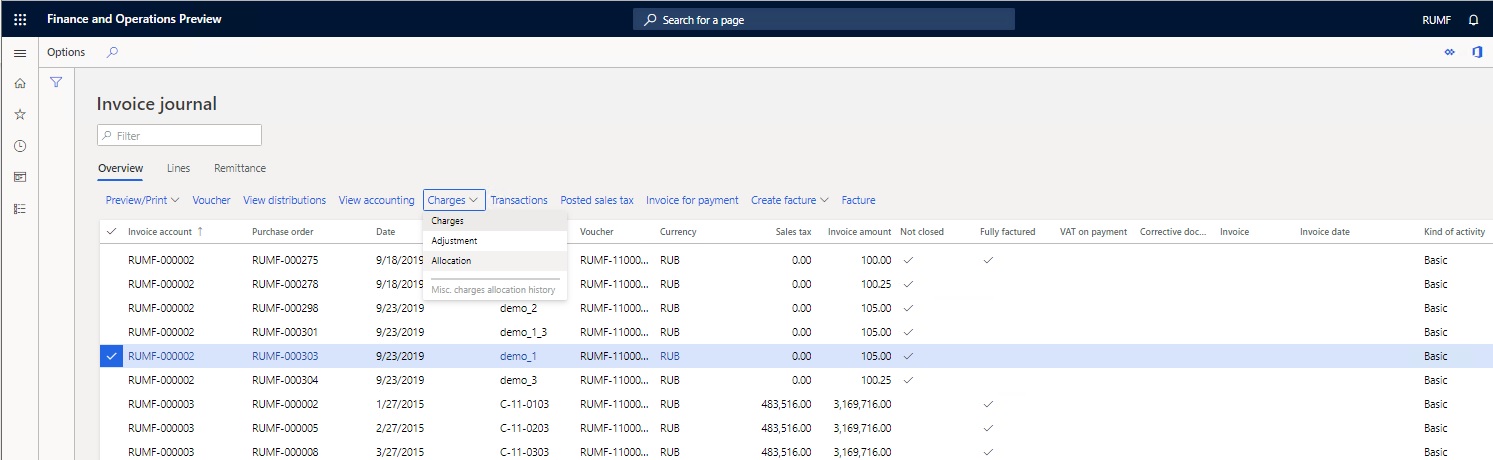
Go to Accounts payable > Inquiries and reports > Invoice > Invoice journal.
Select the invoice for the purchase order that you created earlier that includes the service. Then select Charges > Allocation.
On the Charges allocation page, select Edit.

In the Charges allocation field, select one of the following methods for allocating miscellaneous charges:
- Net amount – Charges are allocated according to each line amount, relative to the total net amount of the service invoice.
- Quantity – Charges are allocated according to the number of units for each line, relative to the total number of units for the service invoice.
- Gross weight – Charges are allocated equally, according to the gross weight of the items that are received.
- Volume – Charges are allocated equally, according to the volume of the items that are received.
In the Posting date field, select the posting date.
In the Allocation mode field, select one of the three modes of miscellaneous charges allocation:
- Include to the cost price
- Redraw debt
- Write-off to cost
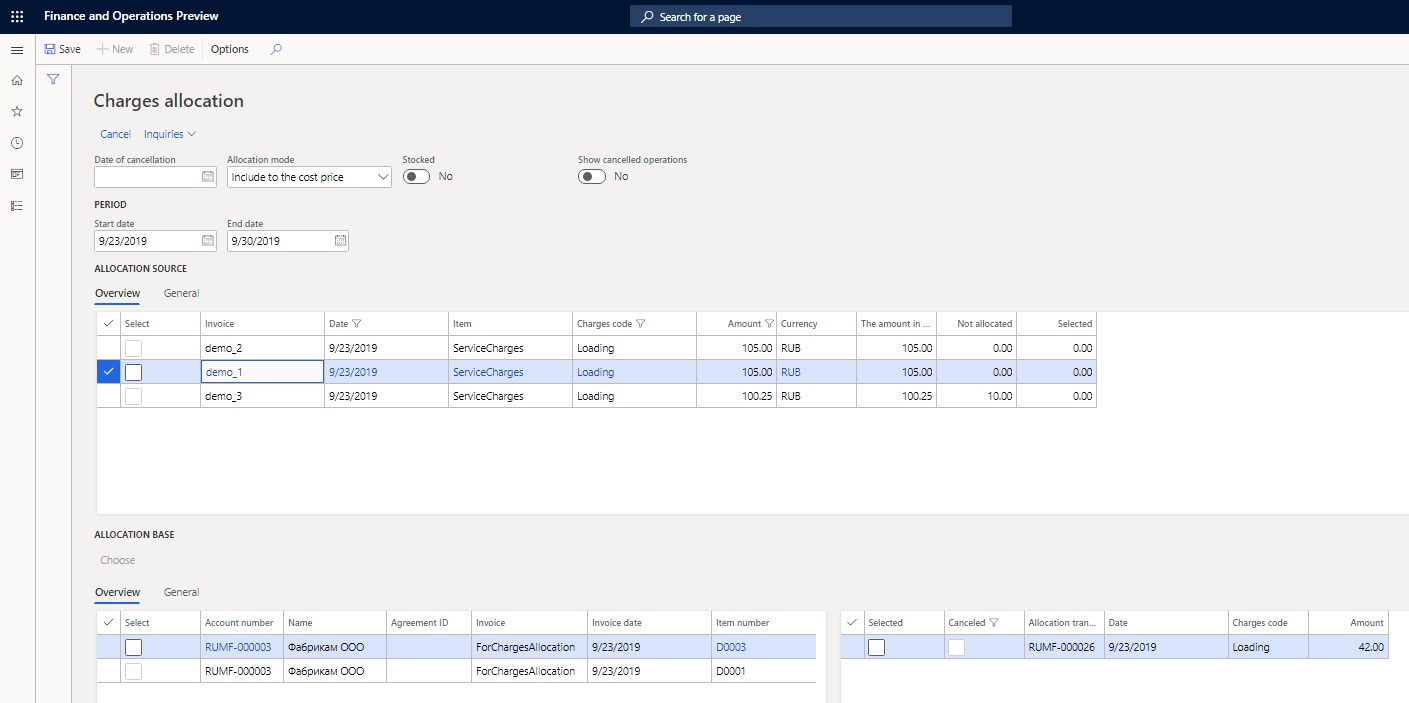
To allocate charges to the cost price of the products, select Include to the cost price.
In the Allocation base section, select Choose to specify the selection criteria that are used to transfer the invoice lines to the allocation base.
In the Choose dialog box, select Add to add a line, and enter the following line details:
- In the Table field, select a value.
- In the Field field, select the field that you're specifying the criteria for. In the Criteria field, enter the criteria.
Select OK. The allocation base lines are created.
In the Allocation source section, select the Select check box for a posted miscellaneous charges invoice. In the Available for allocation field, you can change the amount that is available for allocation.
In the Allocation base section, select the Select check box for the invoice lines that the miscellaneous charges should be allocated to.
Select Allocation to allocate the miscellaneous charges. The amounts on the selected source lines are allocated to all the selected base lines. You can view the result of the allocation in the lower-right part of the page. For every line from the allocation base, the allocation amount and the miscellaneous charges code are shown.
Note
- You can change the method of allocation in the Allocation method field as you require. You will then receive a message that prompts you to recalculate the lines of the allocation result. Select Yes to recalculate the result.
- You can manually adjust the allocation result in the Amount field in the lower-right part of the page. If the value that you enter exceeds the total amount that is available for allocation, you receive an informational message.
Select Post to post the allocation transaction.
Select Inquiries > Voucher to view the transactions that are created because of allocation.


Allocate miscellaneous charges to redraw debt to third parties
On the Invoice journal page, select the invoice for the purchase order that you created earlier that includes the service. Then select Charges > Allocation.

In the Charges allocation field, select a method for allocating miscellaneous charges.
In the Posting date field, select the posting date.
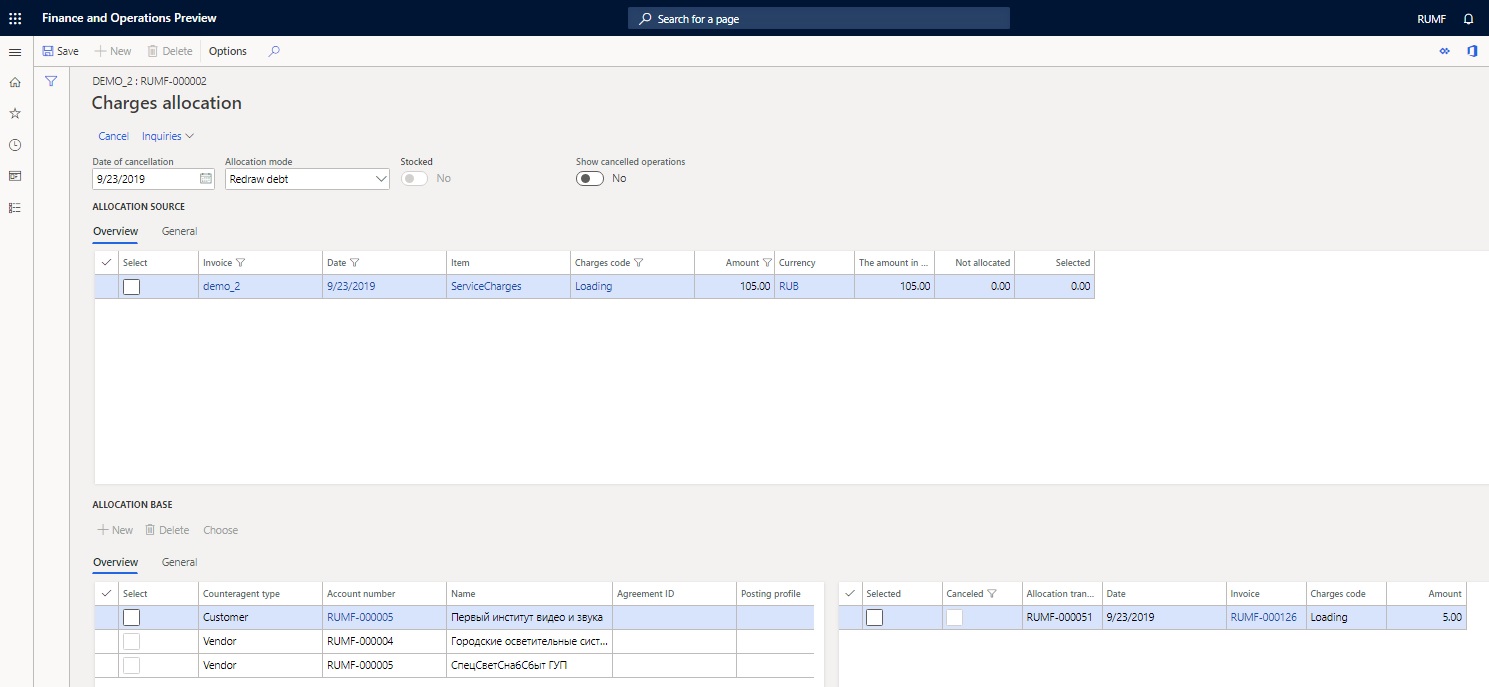
In the Allocation mode field, select Redraw debt.
In the Allocation base section, specify whether the customers or vendors can redraw debts automatically or manually:
a. Automatic: Select Choose, specify the selection criteria, and then select OK. The allocation base lines are automatically created.
Note
Allocation base lines are grouped by the Counteragent type, Agreement ID, and Posting profile fields. If there are invoices for one counteragent, but the values of these parameters differ, there will be several lines for that counteragent in the allocation base.
b. Manual: To manually create allocation base lines, select New. In the Counteragent type field, select Customer or Vendor. In the Account number field, select the number of counteragent account. You can also select values in the Agreement ID and Posting profile fields.
Select the source and base lines for the allocation, and then edit the Available for allocation field as you require.
Select Allocation to allocate the miscellaneous charges. The amounts on the selected source lines are allocated to all the selected base lines. You can view the result of the allocation in the lower-right part of the page. For every line from the allocation base, the allocation amount and the miscellaneous charges code are shown.
Note
- For manually created allocation base lines, the result of the allocation is 0 (zero). In this case, you must manually enter the miscellaneous charges amounts in the Amount field in the lower-right part of the page. You can also change the amounts for automatically created allocation base lines. If the value that you enter exceeds the total amount that is available for allocation, you will receive an informational message.
- You can change the method of allocation in the Charges allocation field. For automatically created allocation base lines, the amounts will be recalculated. For manually created allocation base lines, the amounts that you entered will be set to 0 (zero).
Select Post to post the allocation transaction.
In the Posting dialog box, follow these steps:
a. Set the Credit correction option to Yes to post the allocation as a storno transaction. Otherwise, the allocation will be created as a reverse transaction.
b. Set the Create invoice for payment option to Yes to create an invoice for payment when the allocation is posted.
c. Select OK. The operation for reissuing debt to counteragents is performed. Transactions will be created for all selected lines in the allocation result.
Because of posting, one of the following events occur, depending on whether the invoice that includes the service for allocation was created from the vendor invoice journal or through a purchase order:

If the invoice was created from the vendor invoice journal:
If you redraw debt to vendors, the invoice journals are automatically created and posted. If you set the Create invoice for payment option to Yes, the invoice for payment will automatically be posted.
If you redraw debt to customers, free text invoices are automatically created. The invoices for sales orders and payments are automatically posted.
If the invoice was created through a purchase order:
If you redraw debt to vendors, the purchase orders that invoices will be posted on are automatically created. If you set the Create invoice for payment option to Yes, the invoice for payment will automatically be posted,
If you redraw debt to customers, sales orders are automatically created. The invoices for sales orders and payments will automatically be posted.
- Select Inquiries > Voucher to view the transactions that are created because of allocation.
Example
Create a sales tax group that is named VAT18-1 and that has sales tax code VAT18.
Create an exempt sales tax group that has standard sales tax code VAT18, and select the Exempt check box.
For the sales tax group, in the Transit tax group field, specify the exempt sales tax group.
Create an item sales tax group that has sales tax code VAT18.
Set up transit account 76.511. For instructions, see the Set up a transit account section.
Set up the following two charges codes. For instructions, see the Set up a charges code section.
Charges code Account Loading 76.511 Unloading 26.1 Create two released products that have the same names as the charges codes that you created in the previous step. For each released product, in the Charges code field, specify the charges code that has the same name.
Create a purchase order for services (miscellaneous charges) that has the following two lines.
Item number Quantity Unit price Sales tax group Item sales tax group Loading 1 1,000 Unloading 1 2,000 VAT18-1 VAT18 Post the invoice for the service (miscellaneous charges) purchase, where the total amount is 3,360 Russian rubles (RUB). This amount includes a VAT amount of 360 RUB. The following transactions are generated on the invoice.
Ledger account Corr. Account Currency Amount in transaction currency Amount Date 76.511 60.11 RUB 1,000 1,000 10/18/2019 26.1 60.11 RUB 2,000 2,000 10/18/2019 19.3 60.11 RUB 360 360 10/18/2019 On the Invoice journal page, select Charges > Allocation.
On the Charges allocation page, in the Posting date field, specify 10/18/2019.
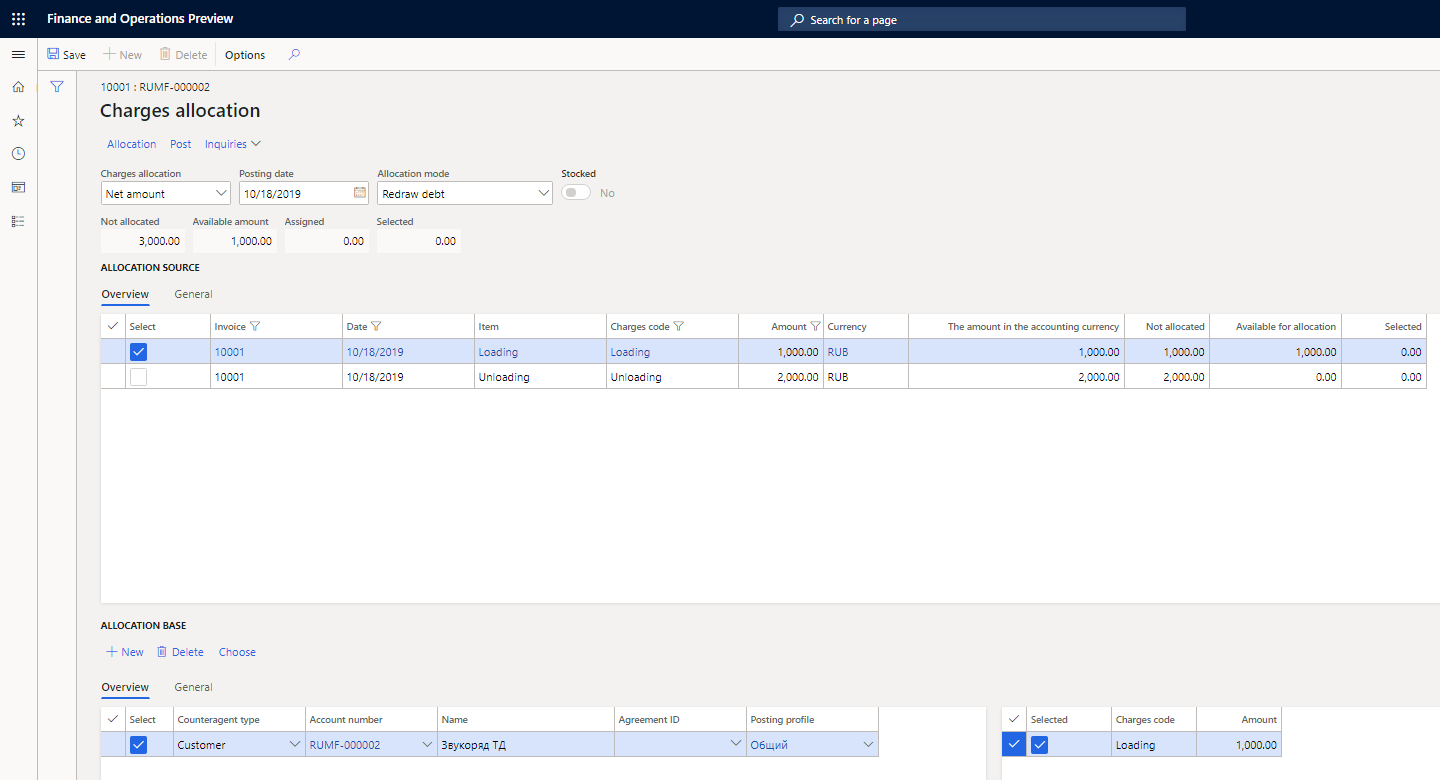
In the Allocation mode field, select Redraw debt.
In the Allocation base section, manually create the following line.
Counteragent type Account number Name Posting profile Customer RUF-000002 Звукоряд ТД Общий Select the source line that has the Loading reference in the Item field, select the base line for the allocation, and then select Allocation.
In the lower-right part of the page, in the Amount field, enter 1000 for allocation for charges code Loading.
Select Post.
In the Posting dialog box, follow these steps:
a. Set the Credit correction option to No.
b. Set the Create invoice for payment option to Yes.
c. Select OK.
After the allocation is posted, you receive a message that contains information about the sales order that was created for the customer. You can then open the sales order to view the invoice transactions that were generated and the following voucher.
Date Ledger account Corr. Account Currency Amount in transaction currency Amount 10/18/2019 62.11 76.511 RUB 1,000.00 1,000.00 Because of posting, the corrective invoice for the amount of redrawn debt was created. This invoice isn't included in the sales book.
To view the information about the allocation of debt, on the Invoice journal page, select Charges > Misc. charges allocation history. Then, in the Allocation mode field, select Redraw debt.


Allocate miscellaneous charges to the ledger account
On the Invoice journal page, select the invoice for the purchase order that you created earlier that includes the service. Then select Charges > Allocation.
In the Charges allocation field, select a method for allocating miscellaneous charges.
In the Posting date field, select the posting date.
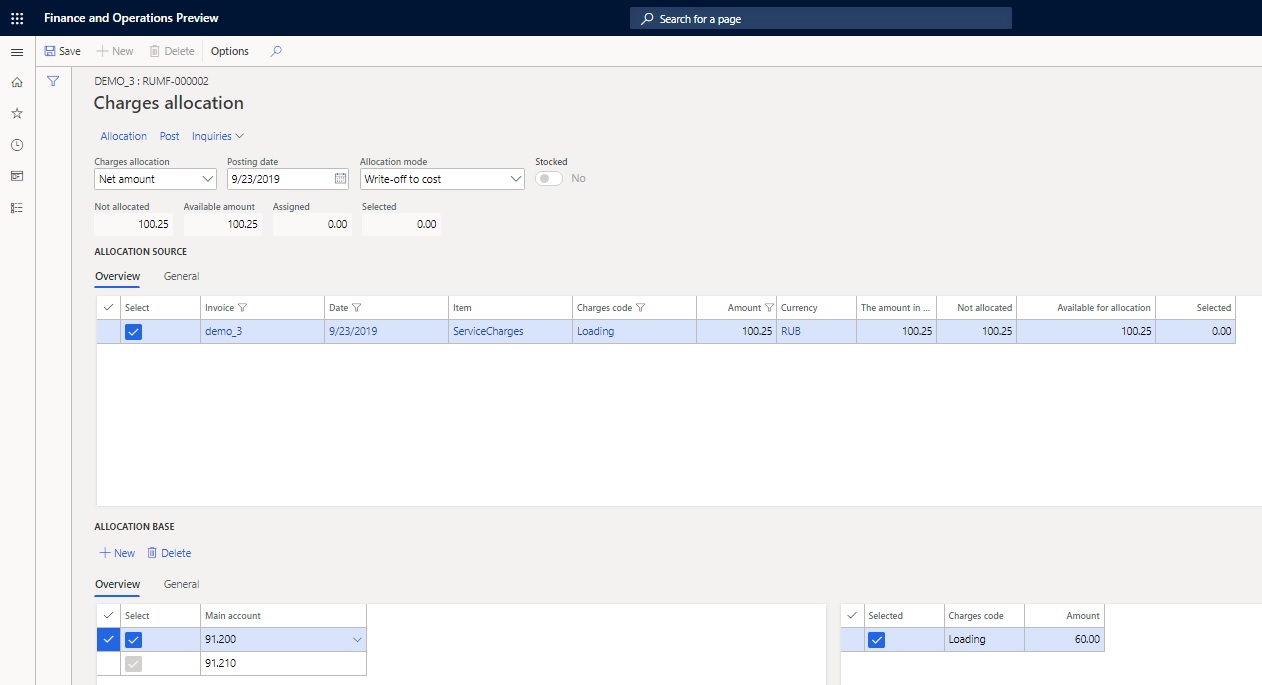
In the Allocation mode field, select Write-off to cost.
In the Allocation base section, specify the ledger accounts that miscellaneous charges will be written off on.
Select New to create the allocation base line.
In the Main account field, select a main account.
Select the source and base lines for the allocation, and then edit the Available for allocation field as you require.
Select Allocation to allocate the miscellaneous charges. The system creates lines where the amount is 0 (zero). For each selected allocation base line, in the Amount field in the lower-right part of the page, enter the amount of the miscellaneous charges.
Note
If the value that you enter exceeds the total amount that is available for allocation, you will receive an informational message.
Select Post to post the allocation transaction. The operation for writing off miscellaneous charges to the ledger account is performed. Transactions are created for all selected lines in the allocation result.
Select Inquiries > Voucher to view the transactions that are created because of allocation.

View the miscellaneous charges that are allocated to the item's cost price
The cost price of an item can be adjusted many times by using the functionality for miscellaneous charges allocation. You can view the transactions that adjust the cost of an item on the Settlements and Cost explorer pages. A warehouse closing operation must be done first.
Go to Product information management > Products > Released products to open the Released product details page.
Select an item, and then, on the Action Pane, on the Manage Costs tab, in the Cost transactions group, select Transactions to open the Inventory transactions page.
Select the transaction on the receipt item that you want to explore the cost structure for.
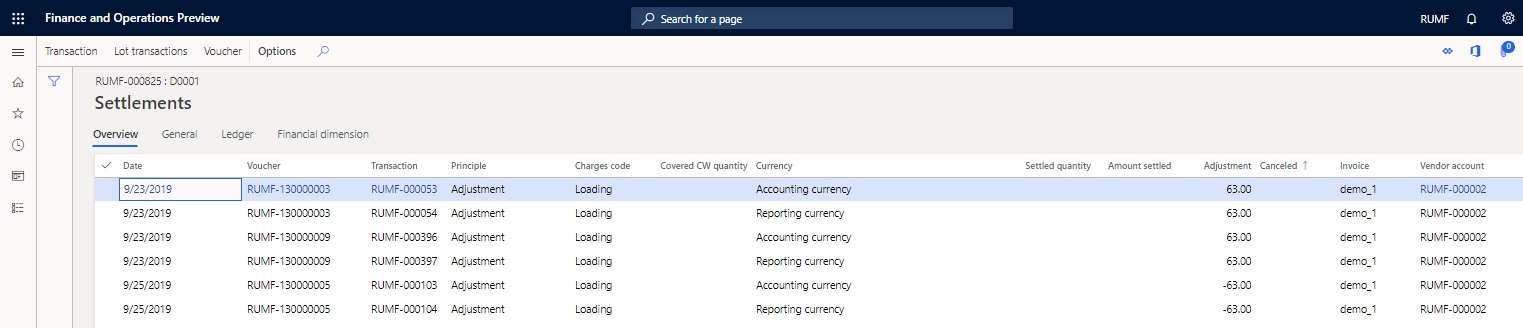
To view inventory cost adjustment transactions, on the Action Pane, on the Inventory tab, in the Costing group, select Settlements. The Settlements page includes the following fields:
- Charges code – The miscellaneous charges code that has been allocated to the item receipt transaction.
- Vendor account – The account of the vendor that the miscellaneous charges were purchased from.
- Invoice – The invoice number of the miscellaneous charges purchase.
Note
If the Vendor account and Invoice fields aren't filled in, the cost adjustment operation was done by the standard method for miscellaneous charges allocation.
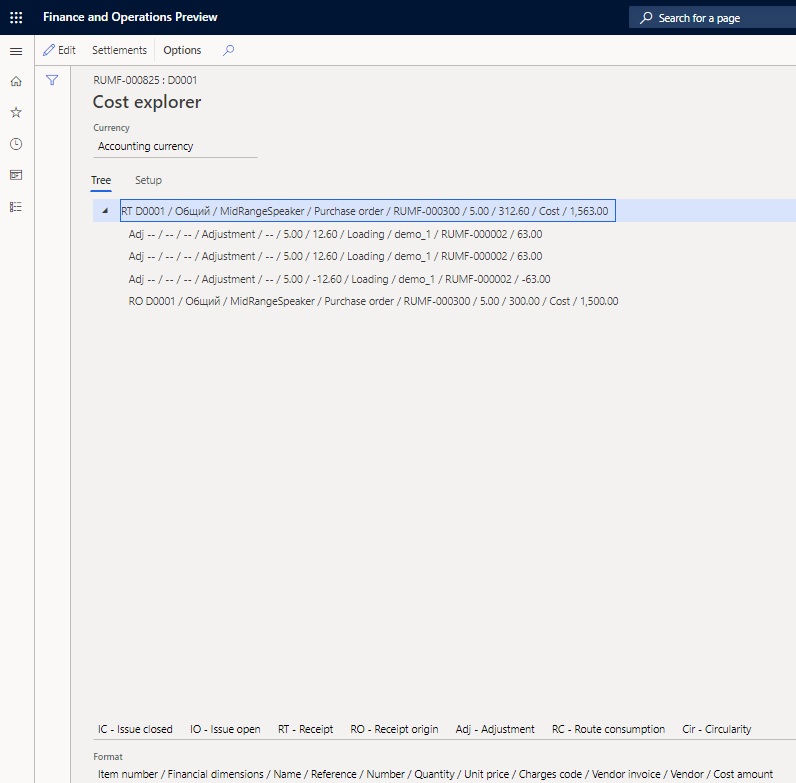
To view more information about the list and the amounts of miscellaneous charges that have been included in the cost price of the posted item, on the Inventory transactions page, on the Action Pane, on the Inventory tab, in the Costing group, select Cost explorer.


View the allocation history for miscellaneous charges
View the allocation history from the invoice journal
On the Invoice journal page, select purchase invoice that you created earlier that includes the service.
Select Charges > Misc. charges allocation history to open the Charges allocation page. The Allocation base section shows the allocation base and allocation result, depending on the value in the Allocation mode field. To change the allocation mode, select Edit, and then, in the Allocation mode field, select a new value.
On the header of the Charges allocation page, set the Show cancelled operations option to Yes to show the miscellaneous charges allocation transactions that have been canceled and the transactions that adjust them.
Select Inquiries > Voucher to view the transactions that were created because of allocation.

View the allocation history
The allocation history can be shown either for a specific invoice or for all invoices that the miscellaneous charges allocation operation was performed on.
Go to Accounts payable > Inquiries and reports > Misc. charges allocation history.
Select Edit, and then, in the Start date and End date fields, specify a period to filter the invoices for the purchase of miscellaneous charges.
The Allocation source section shows the source lines for all invoices from the period. The Allocation base section shows the allocation base and allocation result.

Cancel miscellaneous charges allocation
Go to Accounts payable > Inquiries and reports > Misc. charges allocation history. Alternatively, on the Invoice journal page, select Charges > Misc. charges allocation history.
In the Allocation mode field, select the allocation mode to cancel the allocation for.
Select the lines to cancel.
Note
Lines that were created by one allocation operation can't be partially canceled. If you select one line from an allocation operation, all lines from that operation are automatically selected.
In the Date of cancellation field, enter the date of cancellation.

Select Cancel.
Note
- If the date of cancellation is before the date of at least one transaction that is marked for cancellation, the operation won't be performed, and you will receive an error message.
- If the redrawing of debt is being canceled, you will receive an informational message that contains links to the documents that were created for customers or vendors.
Select Inquiries > Voucher to view the transactions that were created because of allocation cancellation.

Feedback
Coming soon: Throughout 2024 we will be phasing out GitHub Issues as the feedback mechanism for content and replacing it with a new feedback system. For more information see: https://aka.ms/ContentUserFeedback.
Submit and view feedback for