Exercise - Create your Azure SQL database
Your transportation company wants to set itself apart from other companies without breaking the bank. To provide the best service while controlling costs, you must have a good handle on how to set up the database.
Here, you learn what to consider when creating an Azure SQL database, including:
- How a logical server acts as an administrative container for your databases.
- The differences between purchasing models.
- How elastic pools enable you to share processing power among databases.
- How collation rules affect how data is compared and sorted.
- How to bring up Azure SQL Database from the Azure portal.
- How to add firewall rules so that your database is accessible from only trusted sources.
One server, many databases
When you create your first Azure SQL database, you also create an Azure SQL logical server. Think of a logical server as an administrative container for your databases. You can control logins, firewall rules, and security policies through the logical server. You can also override these policies on each database within the logical server.
For now, you need just one database, but a logical server lets you add more at a later time and tune performance among all your databases.
Choose performance: DTUs versus vCores
Azure SQL Database has two purchasing models: DTU and vCore.
What are DTUs?
DTU stands for Database Transaction Unit, and is a combined measure of compute, storage, and I/O resources. Think of the DTU model as a simple, preconfigured purchase option.
Because your logical server can hold more than one database, you might also consider eDTUs, or elastic Database Transaction Units. This option allows you to choose one price, but allows each database in the pool to consume fewer or more resources depending on the current load.
What are vCores?
vCores stands for Virtual cores, which give you greater control over the compute and storage resources that you create and pay for.
Unlike the DTU model, which provides fixed configurations for compute, storage, and I/O resources, the vCore model lets you configure each of these resources independently. For example, with the vCore model, you can increase storage capacity but keep the existing amount of compute and I/O throughput.
Your transportation and logistics prototype needs only one database. You decide to use the DTU option because it provides the best balance of compute, storage, and I/O performance. It's also less expensive to use while you build your prototype.
What are SQL elastic pools?
When you create your Azure SQL database, you can create a SQL elastic pool.
SQL elastic pools relate to eDTUs. They allow you to buy a set of compute and storage resources that are shared among all the databases in the pool. Each database can use the resources they need within the limits you set, depending on current load.
For your prototype, you don't need a SQL elastic pool because you need only one SQL database.
What is collation?
Collation refers to the rules that sort and compare data. Collation helps you define sorting rules when case sensitivity, accent marks, and other language characteristics are important. Sorting rules allow you to arrange data in an ordered sequence.
Let's take a moment to consider what the default collation, SQL_Latin1_General_CP1_CI_AS, means:
- Latin1_General refers to the family of Western European languages.
- CP1 refers to code page 1252, a popular character encoding of the Latin alphabet.
- CI means that comparisons are case insensitive. For example, "HELLO" compares equally to "hello".
- AS means that comparisons are accent sensitive. For example, "résumé" doesn't compare equally to "resume".
Because you don't have specific requirements for how data is sorted and compared, choose the default collation.
Create your Azure SQL database
Here, you set up your database, which includes creating your logical server, and choosing settings that support your transportation-logistics application. In practice, you choose settings that support the kind of app you're building.
Over time, if you realize you need more compute power to keep up with demand, you can adjust performance options or even switch between the DTU and vCore performance models.
Note
This exercise requires you to use your own Azure subscription. To make sure you don't incur extra charges, clean up any resources you create after you finish this module.
Sign in to the Azure portal.
From Home, or in Azure Services, select Create a resource. The Create a resource pane appears.
Under Categories, select Databases and in the results, select SQL Database.
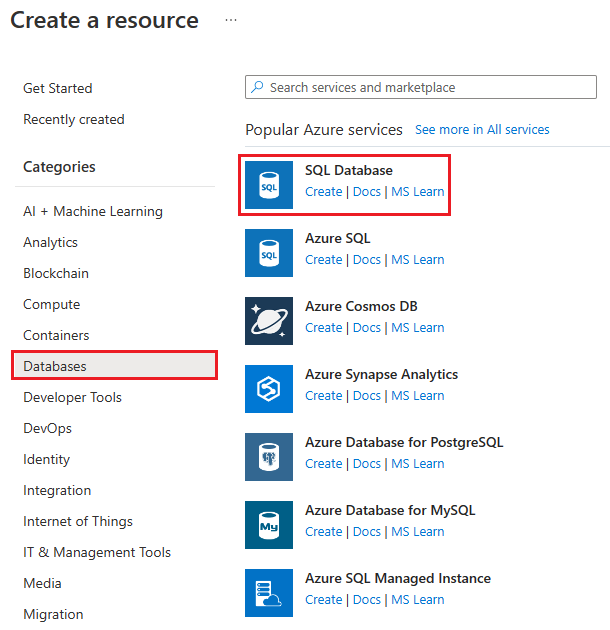
The Create SQL Database pane appears.
Note
You may see the Want to try Azure SQL Database for free? banner at the top of the page if your subscription is eligible. Select Apply offer to take advantage of this offer. You can use this Azure SQL Database offer, free for the life of your subscription, as part of this exercise but your subscription can only have one free offer database at a time. For more information, see Try Azure SQL Database free of charge.
On the Basics tab, enter the following values for each setting.
Setting Value Project details Subscription Select your subscription Resource group Select an existing resource group or select Create new Database details Database name LogisticsServer [See step 5] Want to use SQL elastic pool? No Compute + storage [See step 6] Backup storage redundancy Backup storage redundancy Geo-redundant backup storage (default) Under Server, select Create new. The Create SQL Database Server pane appears. Enter the following values for each setting:
Setting Value Server name Enter a globally unique server name Location Select a region near you Authentication Method Use SQL Authentication. Server admin login Choose a unique admin login that serves as your primary administrator login ID Password The password of your choice must have eight or more characters from three of these categories: uppercase, lowercase, numbers, and nonalphanumeric Select OK. The Server field updates with the name of the server you created.
In the Database details section, for Compute + storage, select Configure database. The Configure pane appears. Enter the following values for each setting:
Setting Value Service and compute tier Service tier If you used the free Azure SQL Database offer, leave the default settings.
If not, in the dropdown list, under DTU-based purchasing model, select Basic.
You can scale up or down the service and compute tier of your database at any time in the future.Behavior when free limit reached If you used the free Azure SQL Database offer, leave this set to Auto-pause the database until next month for now. You can configure this setting later. Remaining settings Accept defaults Select Apply.
Select the Additional settings tab at the top of the screen, and enter or confirm the following values for each setting.
Setting Value Data source Use existing data None Database Collation Collation SQL_Latin1_General_CP1_CI_AS Maintenance window Maintenance window System default (5pm to 8am) Select Review + create to validate your entries, and then select Create to create your Azure SQL database.
Important
Remember your server name, admin login, and password for later.
While deployment is in progress, Deployment details displays the resources that are created. When deployment completes, optionally, select Pin to dashboard, then select Go to resource. The Overview pane for your SQL database server appears.

Your Logistics SQL database has a unique name based on your server name and login credentials.
Set the server firewall
Your Azure SQL database is now up and running. There are many options that you can use to configure, secure, monitor, and troubleshoot your database. You can specify which systems are allowed to access your database through the firewall. Initially, the firewall prevents all access to your database server from outside of Azure. For the prototype, you only need access to the database from your local computer. Later, you can add more systems, such as your mobile app. For now, let's enable your computer to access the database through the firewall.
On the command bar, select Set server firewall. The Networking pane appears.

Choose Selected networks and then select Add your client IP4 address. This action automatically adds the IP address for your computer.
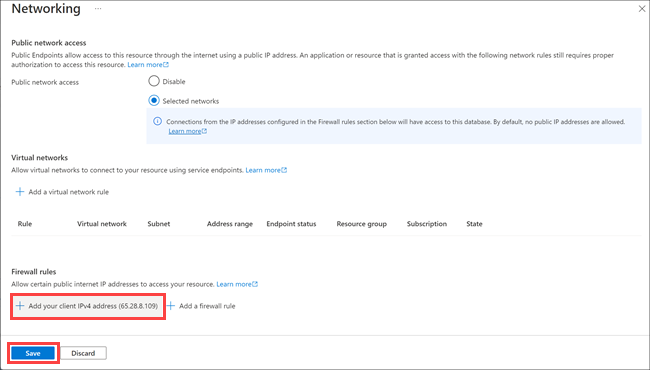
Select Save.
Now you can get some hands-on practice with your new database and with Azure Cloud Shell. In the next unit, you connect to the database, create a table, add some sample data, and execute a few SQL statements.