Configure R Server to operationalize analytics (Enterprise)
Applies to: Microsoft R Server 9.x (Looking for the Machine Learning Server article)
This article explains how to configure R Server after installation to act as a deployment server and to host analytic web services for operationalization. This article describes how to perform an enterprise configuration of these features.
With an enterprise configuration, you can work with your production-grade data within a scalable, multi-machine setup, and benefit from enterprise-grade security.
Enterprise architecture
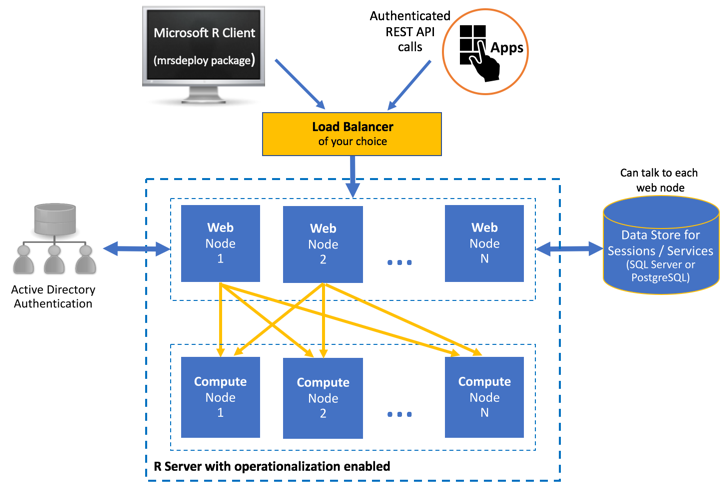
This configuration includes one or more web nodes, one or more compute nodes, and a database.
Web nodes act as HTTP REST endpoints with which users can interact directly to make API calls. These nodes also access the data in the database and send requests to the compute node for processing. Web nodes are stateless, and therefore, session persistence ("stickiness") is not required. A single web node can route multiple requests simultaneously. However, you must have multiple web nodes to load balance your requests across multiple compute nodes.
Compute nodes are used to execute R code as a session or service. Each compute node has its own pool of R shells and can therefore execute multiple requests at the same time. Scaling up compute nodes enables you to have more R execution shells and benefit from load balancing across these compute nodes.
The database. While an SQLite 3.7+ database is installed by default, we strongly recommend that you set up a SQL Server (Windows) or PostgreSQL (Linux) database instead.
In an enterprise configuration, these nodes can be scaled independently. Scaling up web nodes enables an active-active configuration that allows you to load balance the incoming API requests. Additionally, if you have multiple web nodes, you must use a SQL Server or PostgreSQL database to share data and web services across web node services.
For added security, you can configure SSL and authenticate against Active Directory (LDAP) or Azure Active Directory.
Another configuration, referred to as "one-box", consists of a single web node and a single compute node installed on the same machine. Learn more about this configuration, here.
Supported platforms
The web nodes and compute nodes are supported on:
- Windows Server 2012 R2, Windows Server 2016
- Ubuntu 14.04, Ubuntu 16.04,
- CentOS/RHEL 7.x
How to upgrade
To replace an older version, you can uninstall the older distribution before installing the new version (there is no in-place upgrade). Carefully review the following steps:
Upgrade a compute node
Important
Before you begin, back up the appsettings.json file on each node. You can use this backup if there is an issue during the upgrade.
Uninstall Microsoft R Server 9.0 using the instructions in the article Uninstall Microsoft R Server to upgrade to a newer version. The uninstall process stashes away a copy of your 9.0 configuration files under this directory so you can seamlessly upgrade to R Server 9.1 in the next step:
On Windows:
C:\Users\Default\AppData\Local\DeployR\currentOn Linux:
/etc/deployr/current
Install Microsoft R Server:
On Windows: follow these instructions Installation steps | Offline steps
Important
For SQL Server Machine Learning Services, you must also:
- Manually install .NET Core 2.0.
- Add a registry key called
H_KEY_LOCAL_MACHINE\SOFTWARE\R Server\Pathwith a value of the parent path to theR_SERVERfolder (for example,C:\Program Files\Microsoft SQL Server\140).
On Linux: follow these instructions Installation steps | Offline steps
Launch the administration utility with administrator privileges. The utility checks for any 9.0 configuration files present under the
currentfolder mentioned previously.From the main menu, choose the option to Configure server (or in previously releases, Configure R Server for Operationalization).
From the submenu, choose the option to Configure a compute node.
When the script asks you if you'd like to upgrade, enter
y. The node is automatically set up using the configuration you had for R Server 9.0. The compute node is now configured.Repeat these steps for each compute node.
Upgrade a web node
Important
Before you begin, back up the appsettings.json file on each node. You can use this backup if there is an issue during the upgrade.
Uninstall Microsoft R Server 9.0 using the instructions in the article Uninstall Microsoft R Server to upgrade to a newer version. The uninstall process stashes away a copy of your 9.0 configuration files under this directory so you can seamlessly upgrade to R Server 9.1 in the next step:
On Windows:
C:\Users\Default\AppData\Local\DeployR\currentOn Linux:
/etc/deployr/current
Install Microsoft R Server:
On Windows: follow these instructions Installation steps | Offline steps
Important
For SQL Server Machine Learning Services, manually install .NET Core 2.0 and add a registry key called
H_KEY_LOCAL_MACHINE\SOFTWARE\R Server\Pathwith a value of the parent path to theR_SERVERfolder, such asC:\Program Files\Microsoft SQL Server\140.On Linux: follow these instructions Installation steps | Offline steps
Launch the administration utility with administrator privileges. The utility checks to see if any 9.0 configuration files are present under the
currentfolder mentioned previously.From the main menu, choose the option to Configure server (or in previously releases, Configure R Server for Operationalization).
From the submenu, choose the option to Configure a web node.
When the script asks you if you'd like to upgrade, enter
y. The node is automatically set up using the configuration you had for R Server 9.0. Note: You can safely ignore the Python warning during upgrade.From the main menu, choose the option to Run Diagnostic Tests to test the configuration.
Exit the utility. Your web node is now configured.
Repeat these steps for each web node.
How to configure for the enterprise
Important
For your convenience, Azure Resource Management templates are available to quickly deploy and configure Microsoft R Server for operationalization in Azure.
Get one of these templates on GitHub. Then, learn how to use it with this blog post.
1. Configure a database
By default, the web node configuration sets up a local SQLite database. We strongly recommend that you use a SQL Server or PostgreSQL database for this configuration to achieve higher availability. In fact, you cannot use SQLite database at all if you have multiple web nodes or need a remote database.
To configure that database, follow these instructions.
If you intend to configure multiple web nodes, then you must set up a SQL Server or PostgreSQL database so that data can be shared across web node services.
Warning
Choose and configure your database now. If you configure a different database later, all data in your current database is lost.
2. Configure compute nodes
Note
Side-by-side installations of R Server web nodes and compute nodes are not supported.
In an enterprise configuration, you can set up one or more compute nodes.
Important
We highly recommend that you configure each node (compute or web) on its own machine for higher availability.
Install Microsoft R Server and its dependencies:
On WindowsFollow these instructions: R Server installation steps | Offline steps
Important
For SQL Server Machine Learning Services, you must manually install .NET Core 2.0 and add a registry key called
H_KEY_LOCAL_MACHINE\SOFTWARE\R Server\Pathwith a value of the parent path to theR_SERVERfolder, such asC:\Program Files\Microsoft SQL Server\140.
On LinuxFollow these instructions: R Server installation steps | Offline steps
Additional dependencies for R Server on Linux 9.0.1. If you have installed R Server 9.0.1 on Linux, you must add a few symlinks:
R Server 9.0.1
LinuxCentOS 7.x Ubuntu 14.04 Ubuntu 16.04 Symlinks cd /usr/lib64
sudo ln -s libpcre.so.1 libpcre.so.0
sudo ln -s libicui18n.so.50 libicui18n.so.36
sudo ln -s libicuuc.so.50 libicuuc.so.36
sudo ln -s libicudata.so.50 libicudata.so.36sudo apt-get install libicu-dev
cd /lib/x86_64-linux-gnu
ln -s libpcre.so.3 libpcre.so.0
ln -s liblzma.so.5 liblzma.so.0
cd /usr/lib/x86_64-linux-gnu
ln -s libicui18n.so.52 libicui18n.so.36
ln -s libicuuc.so.52 libicuuc.so.36
ln -s libicudata.so.52 libicudata.so.36cd /lib/x86_64-linux-gnu
ln -s libpcre.so.3 libpcre.so.0
ln -s liblzma.so.5 liblzma.so.0
cd /usr/lib/x86_64-linux-gnu
ln -s libicui18n.so.55 libicui18n.so.36
ln -s libicuuc.so.55 libicuuc.so.36
ln -s libicudata.so.55 libicudata.so.36Note: If there are issues with starting the compute node, see here.
Launch the administration utility with administrator privileges.
Note
You can bypass the interactive configuration steps of the node using the argument
-silentcomputenodeinstallwhen launching the administration utility. If you choose this method, you can skip the next two steps. For R Server 9.1 on Windows, for example, the syntax might be:dotnet Microsoft.RServer.Utils.AdminUtil\Microsoft.RServer.Utils.AdminUtil.dll -silentcomputenodeinstall. Learn about all command-line switches for this script, here.From the main menu, choose the option to Configure R Server for Operationalization.
From the submenu, choose the option to Configure a compute node.
When the configuration utility is finished, open port 12805:
On Windows: Add an exception to your firewall to open port 12805. And, for additional security, you can also restrict communication for a private network or domain using a profile.
On Linux: If using IPTABLES or equivalent firewall service on Linux, then open port 12805 using
iptablesor the equivalent command.
From the main utility menu, choose the option Stop and start services and restart the compute node to define it as a service.
The compute node is now configured. Repeat these steps for each compute node you want to add.
3. Configure web nodes
In an enterprise configuration, you can set up one or more web nodes. Note that it is possible to run the web node service from within IIS.
Important
We highly recommend that you configure each node (compute or web) on its own machine for higher availability.
On each machine, install the same R Server version you installed on the compute node.
On Windows: follow these instructions Installation steps | Offline steps
Important
For SQL Server Machine Learning Services, you must also:
- Manually install .NET Core 2.0.
- Add a registry key called
H_KEY_LOCAL_MACHINE\SOFTWARE\R Server\Pathwith a value of the parent path to theR_SERVERfolder (for example,C:\Program Files\Microsoft SQL Server\140).
On Linux: follow these instructions Installation steps | Offline steps
Declare the IP addresses of every compute node with each web node.
Open the configuration file, <server-home>/Microsoft.RServer.WebNode/appsettings.json. (Find <server-home> for your version.)
In the file, search for the section starting with
"BackEndConfiguration": {.Update the
"Uris": {properties to declare each compute node.In R Server 9.1, you must specify the Uri for each compute node individually using the
Valuesproperty and/or specify port ranges (or IP octets) using theRangesproperty.For example, both of the following snippets result in the same specification of four compute nodes:
"Uris": {
   "Values": [
     “http://10.1.1.1:12805”,
     “http://10.0.0.1:12805”,
     “http://10.0.0.2:12805”,
     “http://10.0.0.3:12805”
   ]
}
"Uris": { "Values": [“http://10.1.1.1:12805”], "Ranges": [“http://10.0.0.1-3:12805”] }In R Server 9.0, you must specify the Uri for each compute node individually using the
Valuesproperty. For example, this snippet results in four compute nodes:"Uris": { "Values": [ “http://10.1.1.1:12805”, “http://10.0.0.1:12805”, “http://10.0.0.2:12805”, “http://10.0.0.3:12805” ] }
Do not update any other properties in this file at this point. These other properties are updated during the compute node configuration.
Close and save the file.
Repeat these steps on each web node to declare each compute node.
Launch the administration utility with administrator privileges:
Note
You can bypass the interactive configuration steps of the node using the argument
-silentwebnodeinstalland by defining a password for the local 'admin' account when you launch the administration utility. If you choose this method, you can skip the next three steps. For R Server 9.1 on Windows, for example, the syntax might be:dotnet Microsoft.RServer.Utils.AdminUtil\Microsoft.RServer.Utils.AdminUtil.dll -silentwebnodeinstall my-password. Learn about all command-line switches for this script, here.From the main menu, choose the option to Configure R Server for Operationalization.
From the submenu, choose the option to Configure a web node.
When prompted, provide a password for the built-in, local operationalization administrator account called 'admin'. Later, you can configure R Server to authenticate against Active Directory (LDAP) or Azure Active Directory.
From the main menu, choose the option to Run Diagnostic Tests. Verify the configuration by running diagnostic test on each web node.
From the main utility menu, choose the option Stop and start services and restart the web node to define it as a service.
Exit the utility.
For IPTABLES firewall or equivalent service on Linux, allow remote machines to access the web node's public IP using
iptables(or the equivalent command) to open port 12800.
Your web node is now configured. Repeat these steps for each web node you want to add.
Important
R Server uses Kestrel as the web server for its operationalization web nodes. Therefore, if you expose your application to the Internet, we recommend that you review the guidelines for Kestrel regarding reverse proxy setup.
4. Setup enterprise-grade security
In production environments, we strongly recommend the following approaches:
Configure SSL/TLS and install the necessary certificates.
Authenticate against Active Directory (LDAP) or Azure Active Directory.
For added security, restrict the list of IPs that can access the machine hosting the compute node.
5. Provision on the cloud
If you are provisioning on a cloud service, then you must also create inbound security rule for port 12800 in Azure or open the port through the AWS console. This endpoint allows clients to communicate with the R Server's operationalization server.
6. Set up a load balancer
You can set up the load balancer of your choosing.
Keep in mind that web nodes are stateless. Therefore, session persistence ("stickiness") is NOT required.
For proper access token signing and verification across your configuration, ensure that the JWT certificate settings are exactly the same for every web node. These JWT settings are defined on each web node in the configuration file, appsetting.json. Learn more...
7. Post configuration steps
Update service ports, if needed.
Evaluate the configuration's capacity.