Take action on advanced hunting query results
Note
Want to experience Microsoft Defender XDR? Learn more about how you can evaluate and pilot Microsoft Defender XDR.
Applies to:
- Microsoft Defender XDR
Important
Some information relates to prereleased product which may be substantially modified before it's commercially released. Microsoft makes no warranties, express or implied, with respect to the information provided here.
You can quickly contain threats or address compromised assets that you find in advanced hunting using powerful and comprehensive action options. With these options, you can:
- Take various actions on devices
- Quarantine files
Required permissions
To take action on devices through advanced hunting, you need a role in Microsoft Defender for Endpoint with permissions to submit remediation actions on devices. If you can't take action, contact a global administrator about getting the following permission:
Active remediation actions > Threat and vulnerability management - Remediation handling
To take action on emails through advanced hunting, you need a role in Microsoft Defender for Office 365 to search and purge emails.
Take various actions on devices
You can take the following actions on devices identified by the DeviceId column in your query results:
- Isolate affected devices to contain an infection or prevent attacks from moving laterally
- Collect investigation package to obtain more forensic information
- Run an antivirus scan to find and remove threats using the latest security intelligence updates
- Initiate an automated investigation to check and remediate threats on the device and possibly other affected devices
- Restrict app execution to only Microsoft-signed executable files, preventing subsequent threat activity through malware or other untrusted executables
To learn more about how these response actions are performed through Microsoft Defender for Endpoint, read about response actions on devices.
Quarantine files
You can deploy the quarantine action on files so that they are automatically quarantined when encountered. When selecting this action, you can choose between the following columns to identify which files in your query results to quarantine:
SHA1: In most advanced hunting tables, this column refers to the SHA-1 of the file that was affected by the recorded action. For example, if a file was copied, this affected file would be the copied file.InitiatingProcessSHA1: In most advanced hunting tables, this column refers to the file responsible for initiating the recorded action. For example, if a child process was launched, this initiator file would be part of the parent process.SHA256: This column is the SHA-256 equivalent of the file identified by theSHA1column.InitiatingProcessSHA256: This column is the SHA-256 equivalent of the file identified by theInitiatingProcessSHA1column.
To learn more about how quarantine actions are taken and how files can be restored, read about response actions on files.
Note
To locate files and quarantine them, the query results should also include DeviceId values as device identifiers.
To take any of the described actions, select one or more records in your query results and then select Take actions. A wizard will guide you through the process of selecting and then submitting your preferred actions.

Take various actions on emails
Apart from device-focused remediation steps, you can also take some actions on emails from your query results. Select the records you want to take action on, select Take actions, then under Choose actions, select your choice from the following:
Move to mailbox folder- select this to move the email messages to Junk, Inbox, or Deleted items folder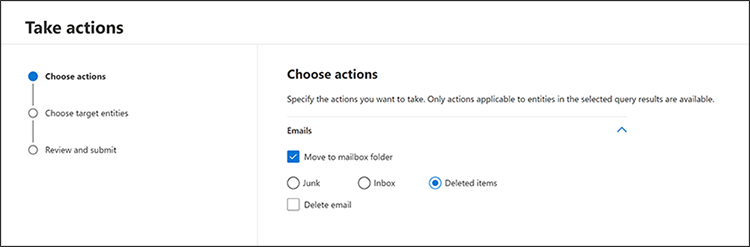
Delete email- select this to move email messages to the Deleted items folder (Soft delete) or delete them permanently (Hard delete)


You can also provide a remediation name and a short description of the action taken to easily track it in the action center history. You can also use the Approval ID to filter for these actions in the action center. This ID is provided at the end of the wizard:

These email actions are applicable to custom detections as well.
Review actions taken
Each action is individually recorded in the action center under Action center > History (security.microsoft.com/action-center/history). Go to the action center to check the status of each action.
Note
Some tables in this article might not be available in Microsoft Defender for Endpoint. Turn on Microsoft Defender XDR to hunt for threats using more data sources. You can move your advanced hunting workflows from Microsoft Defender for Endpoint to Microsoft Defender XDR by following the steps in Migrate advanced hunting queries from Microsoft Defender for Endpoint.
Related topics
- Advanced hunting overview
- Learn the query language
- Work with query results
- Understand the schema
- Action center overview
Tip
Do you want to learn more? Engage with the Microsoft Security community in our Tech Community: Microsoft Defender XDR Tech Community.
Feedback
Coming soon: Throughout 2024 we will be phasing out GitHub Issues as the feedback mechanism for content and replacing it with a new feedback system. For more information see: https://aka.ms/ContentUserFeedback.
Submit and view feedback for