Set up pay-as-you-go
In order to set up pay-as-you-go billing for an environment, you first need an active Azure subscription that you can link to that environment. You can do so in the Power Platform admin center or within Power Apps.
Who can set it up?
The following table describes the permissions of who can create a billing policy in order to link an environment to an Azure subscription. These permissions apply to both the Power Apps and Power Platform admin center experiences.
| Role | Create a billing policy? | Edit a billing policy? | Link environments to a billing policy? |
|---|---|---|---|
| Environment admin | Yes | Yes, for billing policies the admin created | Yes, for billing policies the admin created and for environments in which they are admins |
| Power Platform admin | Yes | Yes, for all billing policies in the tenant | Yes, for all environments in the tenant |
| Global admin | Yes | Yes, for all billing policies in the tenant | Yes, for all environments in the tenant |
| Dynamics Admin | Yes | Yes, for all billing policies in the tenant | Yes, for all environments in the tenant |
Get started
First, procure or create an Azure subscription you can use
If you don't already have an Azure subscription in your tenant, work through the standard process in your organization to obtain one or create a new one here. You'll need to have permissions to create new resources and register resource providers in the subscription (or have the ability to work with another user who has these permissions). Most users will have these permissions if they are owners or contributors for the subscription. For more information, contact your Azure administrator or see Azure subscriptions.
Second, link an Azure subscription to an environment
Pay-as-you-go can be set up via the Power Platform admin center or within Power Apps. Pay-as-you-go is available for production and sandbox environments.
In the Power Platform admin center
Follow these steps to create a billing policy, link environments to it, and add Azure subscription details for billing:
Navigate to https://admin.powerplatform.microsoft.com/azurebilling.
This page will show you a list of previously created billing policies and allow you to create a new one. Select New billing policy.

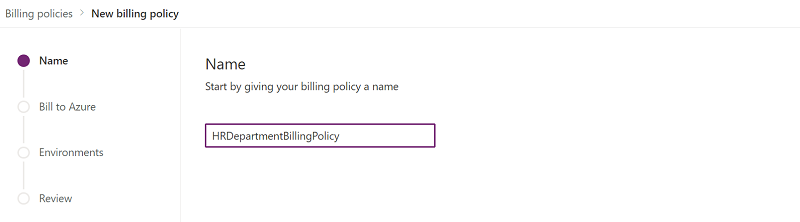
Provide a name for your new billing policy, and then select Next.
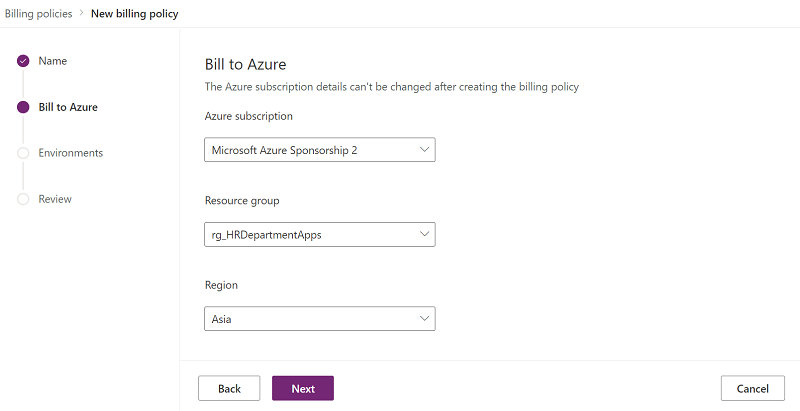
Add Azure subscription details.
Choose the Azure subscription you'd like to bill from the drop-down list, which will show all the Azure subscriptions in your tenant which you have sufficient permissions for. If you don't see a subscription you expect to be listed, or if you receive a permission error at any point, contact the owner of that subscription or your Azure administrator and ensure you have the right permissions as outlined in First, procure or create an Azure subscription you can use.
Specify a resource group with that subscription. The Power Platform account resource that will be associated with this billing policy will be created in this resource group. If there are no resource groups in the specified subscription, you'll need to create one in the Azure portal before proceeding. To learn more about Azure resources, go to What is Azure Resource Manager?
Specify a region by choosing from the list of available regions. Note that any environments you add to the billing policy in the following step can only be in this region.
Select Next.
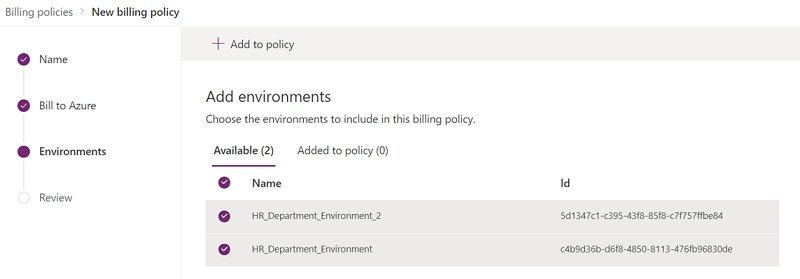
Choose environments to link to the new billing policy.
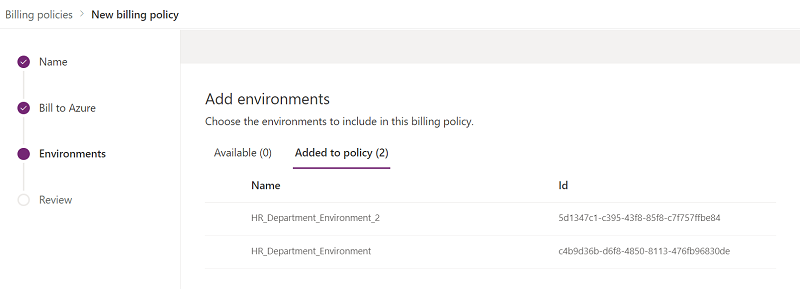
Select one or more environments from the list of environments, then select Add to policy at the top of the screen. These environments will then appear on the Added to policy list. Select Next to continue.
Note
An environment can only be linked to one billing policy at a time. If you attempt to add an environment to your new policy that has already been linked to another policy, you'll receive a message asking you to confirm that you'd like to change which billing policy that environment is linked to.
The list of environments will be filtered to only show the environments whose region matches the region that was selected in the prior step.
Only production or sandbox environments are available to add to billing policies at this time. Trial environments, developer environments, Dataverse for Teams environments, and default environments cannot be added.
Environments with policy added
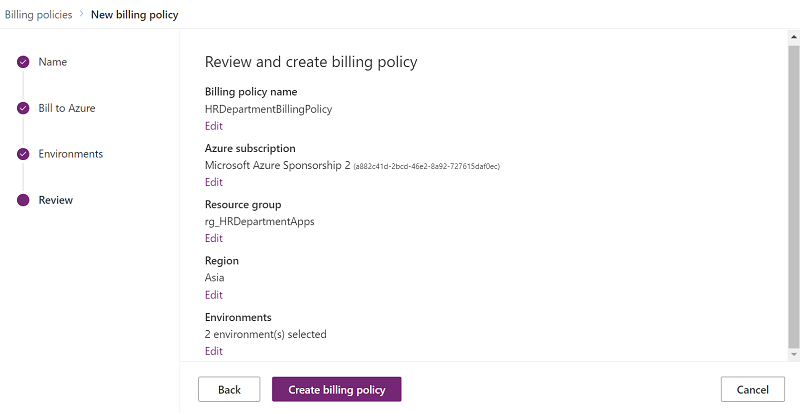
Review and confirm.
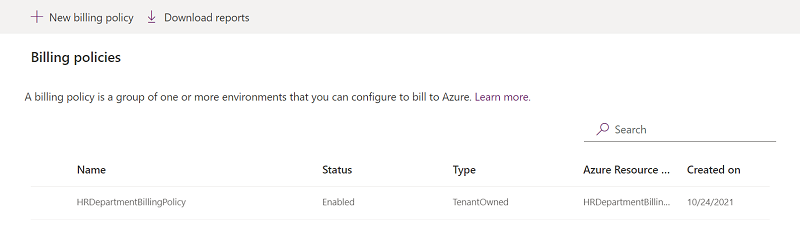
Review and confirm the options, then select Create billing policy. The billing policy will now appear in the list of billing policies shown on http://admin.powerplatform.com/azurebilling.
List of billing policies
Optional: View the billing policy's Power Platform account resource in the Azure Portal.
When a billing policy is created, a corresponding Power Platform account resource is created in the Azure subscription that's specified by the billing policy. All Azure meters for Power Platform products will be billed to this resource. To view this resource, navigate to the Azure portal, and select the subscription and resource group you specified when you created the billing policy. Select View hidden types above the resource list. You'll see a Power Platform account resource with the same name as the billing policy you created.
You can optionally tag this resource just like you would any other Azure resource.
In the Azure portal

In Power Apps
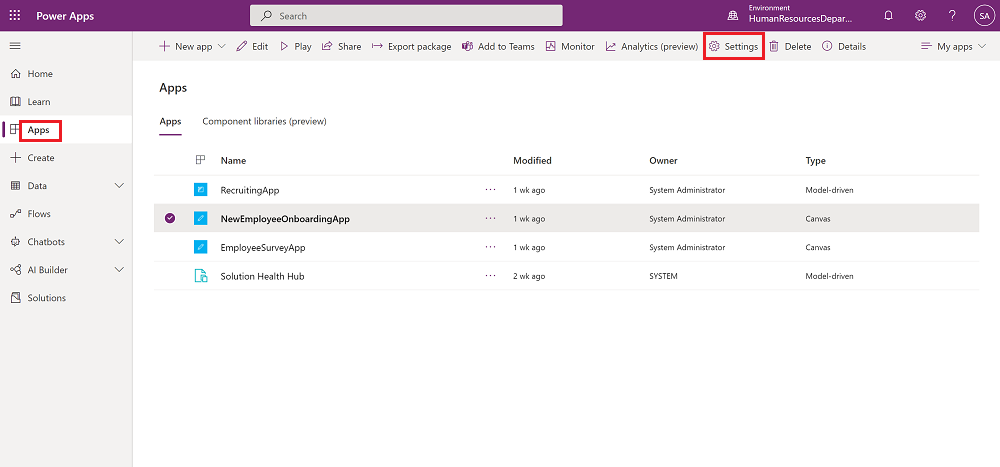
You can set up pay-as-you-go for your environment right from your app's setting for both canvas and model-driven apps, without needing to go to the admin center. Once set up, you can easily add new environments to the same Azure subscription in the Power Platform admin center.
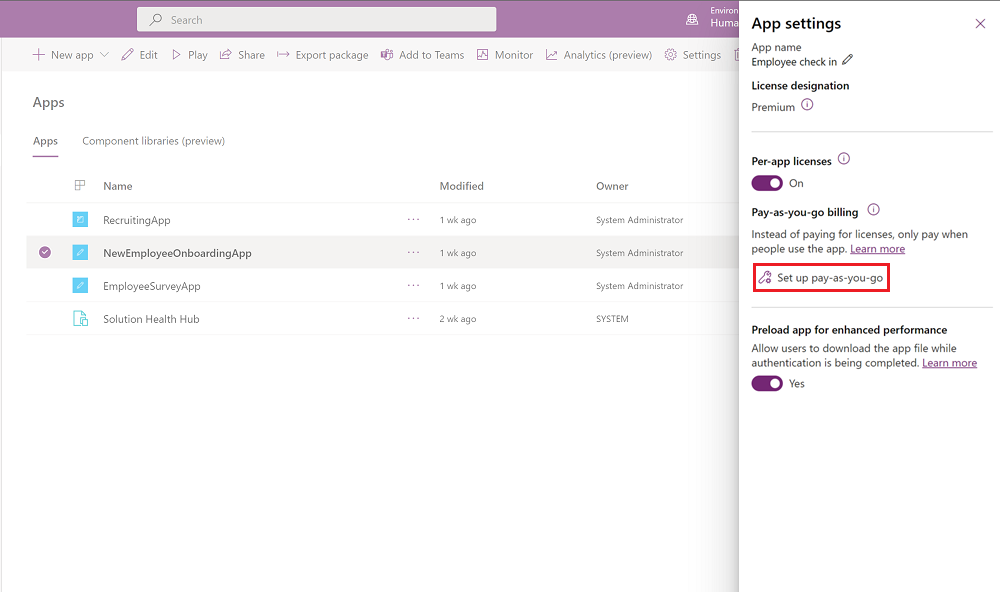
Sign in to Power Apps and navigate to Apps. Select your app, and then select Settings. Make sure that you have the right environment selected.
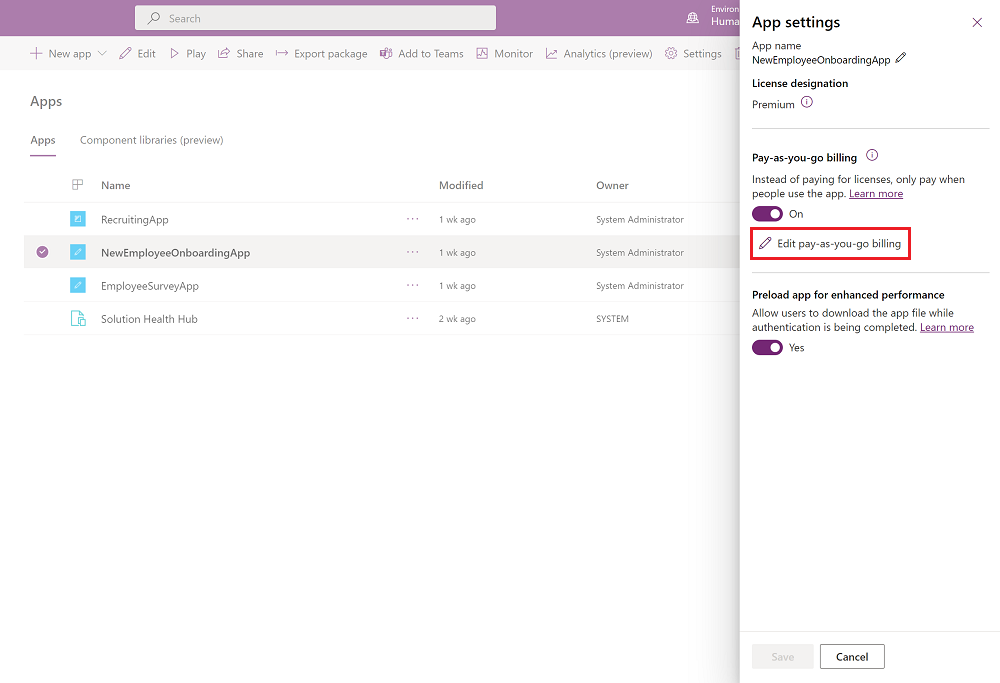
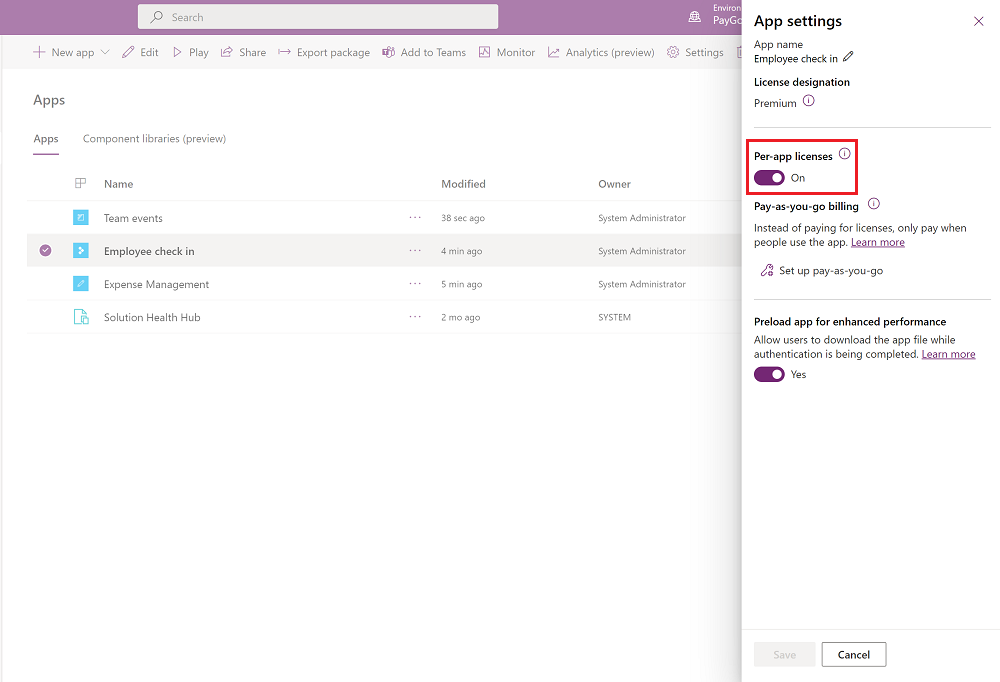
If pay-as-you-go is already enabled for an environment via the Power Platform admin center, you'll see the following experience. You can opt your app out of using an Azure subscription by turning the toggle off in the app settings. Once turned off, users will need Power Apps user licenses to access the app. You can turn it back on at any time. You can also view and edit the subscription details by selecting Edit pay-as-you-go billing, which will direct you to the Power Platform admin center.
Note
If app passes are already available for this environment, they are ignored and not consumed. Instead, Azure subscription is used for accessing the apps.
If pay-as-you-go is not enabled for an environment and you have the right permissions (shared under the Billing policy section), you'll see the following experience and can easily set up pay-as-you-go using the steps below.
Select Set up pay-as-you-go to connect your Azure subscription to this environment.
Note
Connecting an Azure subscription to an environment turns on pay-as-you-go billing for all apps within that environment.
Enter a billing policy name and your Azure subscription details. Once entered, select Connect subscription to complete the setup.
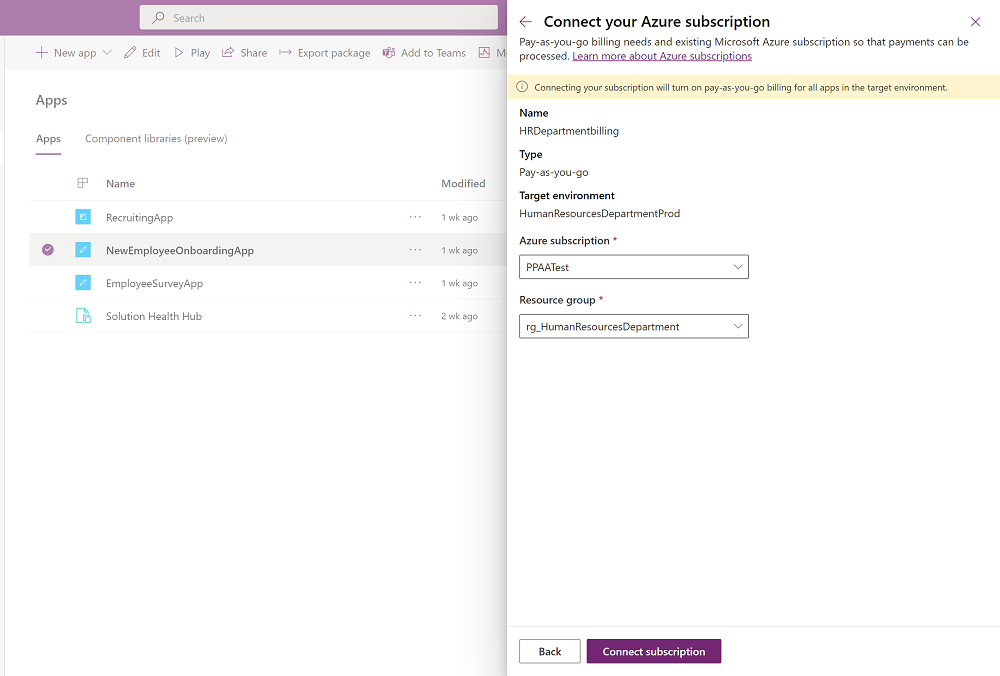
Choose the Azure subscription you'd like to bill from the drop-down list, which will show all the Azure subscriptions in your tenant which you have sufficient permissions for. If you don't see a subscription you expect to be listed, or if you receive a permission error at any point, contact the owner of that subscription or your Azure administrator and ensure you have the right permissions as outlined in First, procure or create an Azure subscription you can use.
Specify a resource group with that subscription. The Power Platform account resource that will be associated with this billing policy will be created in this resource group. If there are no resource groups in the specified subscription, you'll need to create one in the Azure portal before proceeding. To learn more about Azure resources, go to What is Azure Resource Manager?
If you don't have an Azure subscription, procure one within your organization or create a new one.
Enter billing policy name
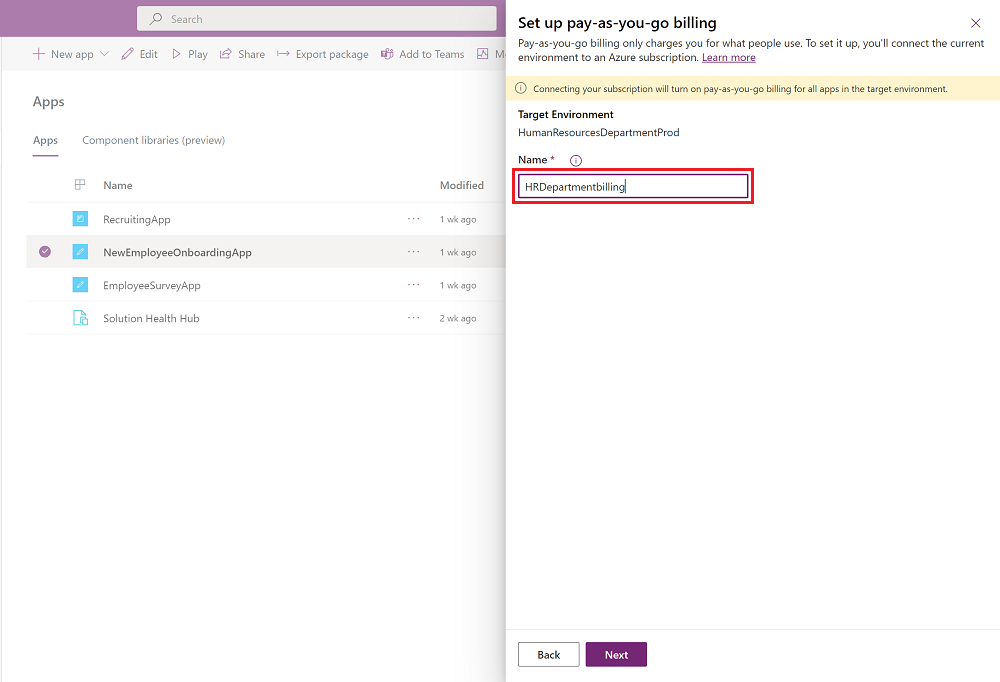
Enter Azure subscription details
Once an Azure subscription is successfully linked to your environment, you'll land back on the app settings page and see the following experience.

If you have app passes available for your environment and still want to set up pay-as-you-go, you can use Steps 2–4 to set it up. Once pay-as-you-go is set up, app passes are not consumed.
Turning off pay-as-you-go
You can turn off pay-as-you-go for an environment at any time by doing either of the following:
- Remove the environment from a billing policy by going to the Power Platform admin center > Billing policies page and editing the billing policy.
OR
Delete the environment's billing policy.
As soon as you take either action above, the environment will cease to be pay-as-you-go and will go back to functioning as a regular environment. Any usage that was already incurred up to this point will be billed to your Azure subscription, but no further usage will be charged.
Note
Deleting the billing policy in the Power Platform admin center will not automatically delete its corresponding Power Platform account resource. You can delete this resource in the Azure portal.
Next step
Feedback
Coming soon: Throughout 2024 we will be phasing out GitHub Issues as the feedback mechanism for content and replacing it with a new feedback system. For more information see: https://aka.ms/ContentUserFeedback.
Submit and view feedback for