Build a progressive web app
[This topic is pre-release documentation and is subject to change.]
Use Power Pages design studio to configure your progressive web app (PWA). You can enable or disable PWA capability, customize PWA settings, and prepare to create an app package to publish to respective device stores if you choose.
Go to Power Pages.
Choose your site and select Edit.
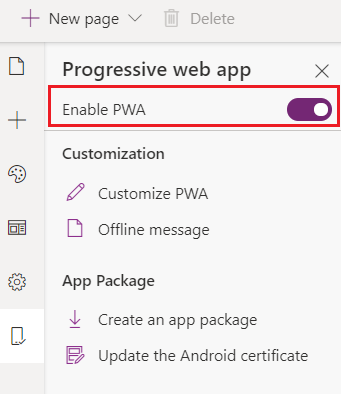
In the design studio, select Set up workspace and then select Progressive web application.

Select Enable PWA.
Brand your app
You can create your own branded PWA by using the customization options to change the app name, starting page, color, and more.
Note
On iOS devices, icons for the PWA will be shown as thumbnails and the customized splash screen won't be displayed.
In the design studio, select Progressive web app.
Update the following PWA settings for your site.
Setting Description Title The name of the portal PWA that will appear on the mobile device and in the app store. Description The description of the PWA that will appear on the mobile device and in the app store. Starting page of the app The start page for the site when it's opened through the PWA. Splash screen background The background color for the splash screen when the PWA is loaded. App icon The icon for the app that will appear on the mobile device and in the app store.
Note: Supports .jpg, .jpeg, .png formats with a maximum upload size of 5 mb. Size of icon must be 512 × 512 pixels.Note
Depending on your browser, it might take few moments for you to see your changes to reflect. After customizing the PWA, select Preview to clear the cache of your site.
Define offline behavior
PWA offers support for a smooth navigation experience when the device being used is offline or disconnected from the internet. You can choose the pages within your site that will be available offline (read-only), and a message page for the rest of the portal capabilities that haven't been enabled for offline access.
Configure offline pages for the portal PWA
In the design studio in the Set up workspace, select Progressive web application.
Under More settings, select Define offline pages.

Select the pages that you want to enable users to access when they use the PWA offline.

Note
When configuring offline access for PWA pages, be sure to consider the storage limitations for user devices. When the storage requirement for offline PWA access exceeds the available storage on the device, the entire portal will be unavailable for offline access. We recommend that you test the user experience of offline access and only cache the pages that will be most helpful and important to your users. Remember that offline pages can only show information; pages that are connected to Microsoft Dataverse that contain forms to fill out or run queries won't work while offline.
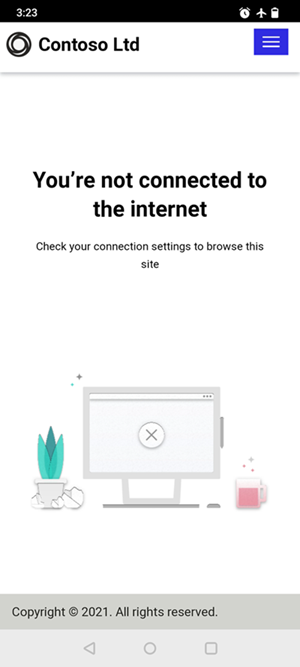
Set up an offline message page
When a device is offline, the page you configure as the offline message page appears when users try to access pages that haven't been enabled for offline access.
In the design studio, select Pages workspace.
Select Default offline page
Customize the page.
Note
- You can't change the Title or Partial URL ("/default-offline-page") fields for the offline page. A default offline page will be shown to users if the offline page is missing.
- Depending on your browser, it might take few moments for you to see your changes to reflect. After customizing the offline PWA experience, select Preview to clear the cache of your site.
Test your site in offline mode
After you've enabled offline pages, you can now use a mobile device in offline mode and browse through different pages that have been enabled for offline access.
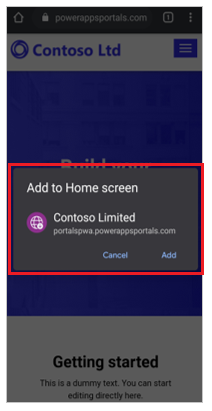
Browse to your site by using a web browser on your mobile device in online mode.
Select Add to Home screen or a similar option. For example, on an Android device, the option might be + Add to > App screen.
Note
This action downloads portal pages that have been enabled for offline browsing. This might take a while, depending on network bandwidth and the size of the pages that were selected for offline browsing.
Enable offline mode in your mobile device.
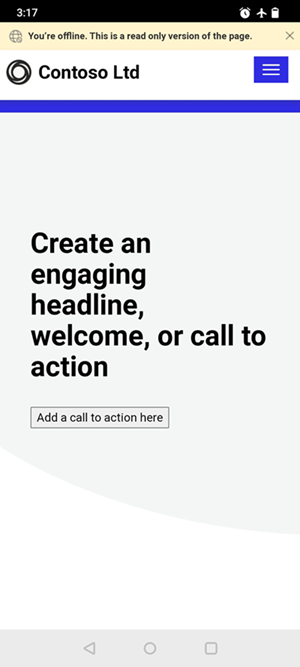
Open your portal from the home screen. You'll see a notification at the top reminding you that you're browsing in offline mode. If you select any pages that haven't been enabled for offline browsing, the offline message appears.
Distribute your app
You can distribute your app either by using a browser or through an app store.
Distribute your app by using a browser
After your portal is enabled as a PWA, your users can pin the Power Pages site as an app to the home screen on their device. This is supported on all platforms (Android, iOS, Chromebook, and Windows) in addition to all form factors (mobile, desktop, and tablet).
Distribute your app through an app store
You can create an app package for your PWA site and publish the package to different app stores such as Microsoft Store and Google Play.
To create an app package, go to the Set up workspace in the design studio. Under App package, select Create app package.
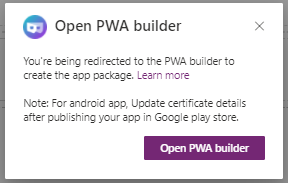
You'll be taken to the PWA Builder website where you can create an app package for various app stores. The package you create by using PWA Builder contains:
An app package for the PWA to be used in its respective app store.
A step-by-step document about publishing the app.
For more details, go to the PWA resource hub.
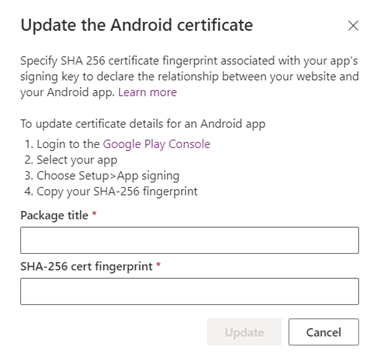
Other considerations for Android
For the Android platform, you can also update the Android certificate with the Update android certificate option.

Update the title and the SHA-256 certificate fingerprint to update the digital asset links file (assetlinks.json) that proves ownership of your PWA.
See also
Overview of portals as progressive web apps Overview of Progressive Web Apps (PWAs)
Feedback
Coming soon: Throughout 2024 we will be phasing out GitHub Issues as the feedback mechanism for content and replacing it with a new feedback system. For more information see: https://aka.ms/ContentUserFeedback.
Submit and view feedback for