Debugging techniques and tools to help you write better code
Applies to: ![]() Visual Studio
Visual Studio ![]() Visual Studio for Mac
Visual Studio for Mac
Note
This article applies to Visual Studio 2017. If you're looking for the latest Visual Studio documentation, see Visual Studio documentation. We recommend upgrading to the latest version of Visual Studio. Download it here
Fixing bugs and errors in your code can be a time-consuming--and sometimes frustrating--task. It takes time to learn how to debug effectively, but a powerful IDE like Visual Studio can make your job a lot easier. An IDE can help you fix errors and debug your code more quickly, and not just that, but it can also help you write better code with fewer bugs. Our aim in this article is to give you a holistic view of the "bug-fixing" process, so you will know when to use the code analyzer, when to use the debugger, how to fix exceptions, and how to code for intent. If you already know you need to use the debugger, see First look at the debugger.
In this article, we talk about leveraging the IDE to make your coding sessions more productive. We touch on several tasks, such as:
Prepare your code for debugging by leveraging the IDE's code analyzer
How to fix exceptions (run-time errors)
How to minimize bugs by coding for intent (using assert)
When to use the debugger
To demonstrate these tasks, we show a few of the most common types of errors and bugs that you'll encounter when trying to debug your apps. Although the sample code is C#, the conceptual information is generally applicable to C++, Visual Basic, JavaScript, and other languages supported by Visual Studio (except where noted). The screenshots are in C#.
Create a sample app with some bugs and errors in it
The following code has some bugs that you can fix using the Visual Studio IDE. The app here is a simple app that simulates getting JSON data from some operation, deserializing the data to an object, and updating a simple list with the new data.
To create the app:
You must have Visual Studio installed and the .NET Core cross platform development workload installed.
If you haven't already installed Visual Studio, go to the Visual Studio downloads page to install it for free.
If you need to install the workload but already have Visual Studio, click Tools > Get Tools and Features. The Visual Studio Installer launches. Choose the .NET Core cross platform development workload, then choose Modify.
Open Visual Studio.
From the top menu bar, choose File > New > Project. In the left pane of the New project dialog box, under Visual C#, choose Console App, and then in the middle pane choose Console App (.NET Core). Type a name like Console_Parse_JSON and click OK.
If you don't see the Console App (.NET Core) project template, go to Tools > Get Tools and Features, which opens the Visual Studio Installer. Choose the .NET Core cross platform development workload, then choose Modify.
Visual Studio creates the console project, which appears in Solution Explorer in the right pane.
Replace the default code in the project's Program.cs file with the sample code below.
using System;
using System.Collections.Generic;
using System.Runtime.Serialization.Json;
using System.Runtime.Serialization;
using System.IO;

namespace Console_Parse_JSON
{
    class Program
    {
        static void Main(string[] args)
        {
            var localDB = LoadRecords();
            string data = GetJsonData();

            User[] users = ReadToObject(data);

            UpdateRecords(localDB, users);

            for (int i = 0; i < users.Length; i++)
            {
                List<User> result = localDB.FindAll(delegate (User u) {
                    return u.lastname == users[i].lastname;
                    });
                foreach (var item in result)
                {
                    Console.WriteLine($"Matching Record, got name={item.firstname}, lastname={item.lastname}, age={item.totalpoints}");
                }
            }

            Console.ReadKey();
        }

        // Deserialize a JSON stream to a User object.
        public static User[] ReadToObject(string json)
        {
            User deserializedUser = new User();
            User[] users = { };
            MemoryStream ms = new MemoryStream(Encoding.UTF8.GetBytes(json));
            DataContractJsonSerializer ser = new DataContractJsonSerializer(users.GetType());

            users = ser.ReadObject(ms) as User[];

            ms.Close();
            return users;
        }

        // Simulated operation that returns JSON data.
        public static string GetJsonData()
        {
            string str = "[{ \"points\":4o,\"firstname\":\"Fred\",\"lastname\":\"Smith\"},{\"lastName\":\"Jackson\"}]";
            return str;
        }

        public static List<User> LoadRecords()
        {
            var db = new List<User> { };
            User user1 = new User();
            user1.firstname = "Joe";
            user1.lastname = "Smith";
            user1.totalpoints = 41;

            db.Add(user1);

            User user2 = new User();
            user2.firstname = "Pete";
            user2.lastname = "Peterson";
            user2.totalpoints = 30;

            db.Add(user2);

            return db;
        }
        public static void UpdateRecords(List<User> db, User[] users)
        {
            bool existingUser = false;

            for (int i = 0; i < users.Length; i++)
            {
                foreach (var item in db)
                {
                    if (item.lastname == users[i].lastname && item.firstname == users[i].firstname)
                    {
                        existingUser = true;
                        item.totalpoints += users[i].points;

                    }
                }
                if (existingUser == false)
                {
                    User user = new User();
                    user.firstname = users[i].firstname;
                    user.lastname = users[i].lastname;
                    user.totalpoints = users[i].points;

                    db.Add(user);
                }
            }
        }
    }

    [DataContract]
    internal class User
    {
        [DataMember]
        internal string firstname;

        [DataMember]
        internal string lastname;

        [DataMember]
        // internal double points;
        internal string points;

        [DataMember]
        internal int totalpoints;
    }
}
Find the red and green squiggles!
Before you try to start the sample app and run the debugger, check the code in the code editor for red and green squiggles. These represent errors and warnings that are identified by the IDE's code analyzer. The red squiggles are compile-time errors, which you must fix before you can run the code. The green squiggles are warnings. Although you can often run your app without fixing the warnings, they can be a source of bugs and you often save yourself time and trouble by investigating them. These warnings and errors also show up in the Error List window, if you prefer a list view.
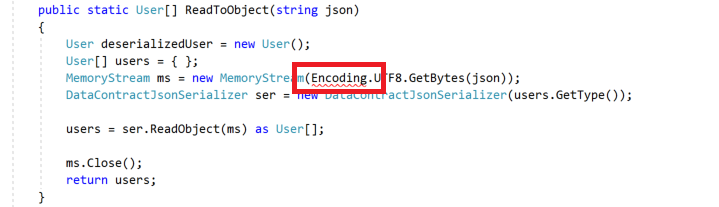
In the sample app, you see several red squiggles that you need to fix, and one green one that you'll look at. Here is the first error.
To fix this error, you'll look at another feature of the IDE, represented by the light bulb icon.
Check the light bulb!
The first red squiggle represents a compile-time error. Hover over it and you see the message The name `Encoding` does not exist in the current context.
Notice that this error shows a light bulb icon to the lower left. Along with the screwdriver icon ![]() , the light bulb icon
, the light bulb icon ![]() represents Quick Actions that can help you fix or refactor code inline. The light bulb represents issues that you should fix. The screwdriver is for issues that you might choose to fix. Use the first suggested fix to resolve this error by clicking using System.Text on the left.
represents Quick Actions that can help you fix or refactor code inline. The light bulb represents issues that you should fix. The screwdriver is for issues that you might choose to fix. Use the first suggested fix to resolve this error by clicking using System.Text on the left.
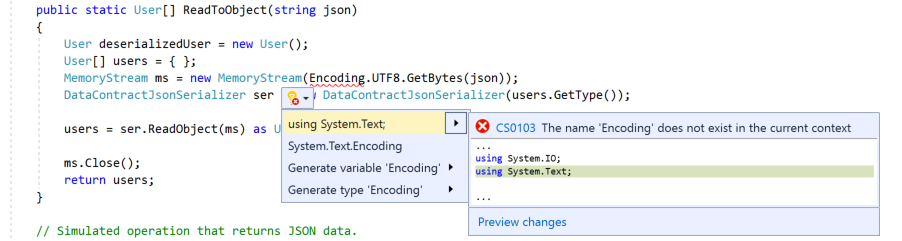
When you click this item, Visual Studio adds the using System.Text statement at the top of the Program.cs file, and the red squiggle disappears. (When you're not sure what a suggested fix will do, choose the Preview changes link on the right before applying the fix.)
The preceding error is a common one that you usually fix by adding a new using statement to your code. There are several common, similar errors to this one such as The type or namespace `Name` cannot be found. These kinds of errors may indicate a missing assembly reference (right-click the project, choose Add > Reference), a misspelled name, or a missing library that you need to add (for C#, right-click the project and choose Manage NuGet Packages).
Fix the remaining errors and warnings
There are a few more squiggles to look at in this code. Here, you see a common type conversion error. When you hover over the squiggle, you see that the code is trying to convert a string to an int, which is not supported unless you add explicit code to make the conversion.
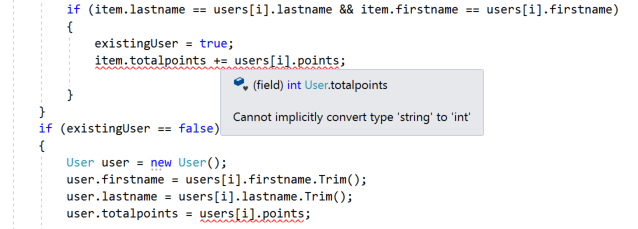
Because the code analyzer can't guess your intent, there are no light bulbs to help you out this time. To fix this error, you need to know the intent of the code. In this example, it's not too hard to see that points should be a numeric (integer) value, since you are trying to add points to totalpoints.
To fix this error, change the points member of the User class from this:
[DataMember]
internal string points;
to this:
[DataMember]
internal int points;
The red squiggly lines in the code editor go away.
Next, hover over the green squiggle in the declaration of the points data member. The code analyzer tells you the variable is never assigned a value.

Typically, this represents a problem that needs to be fixed. However, in the sample app you are in fact storing data in the points variable during the deserialization process, and then adding that value to the totalpoints data member. In this example, you know the intent of the code and can safely ignore the warning. However, if you want to eliminate the warning, you can replace the following code:
item.totalpoints = users[i].points;
with this:
item.points = users[i].points;
item.totalpoints += users[i].points;
The green squiggle goes away.
Fix an exception
When you have fixed all the red squiggles and resolved--or at least investigated--all the green squiggles, you are ready to start the debugger and run the app.
Press F5 (Debug > Start Debugging) or the Start Debugging button  in the Debug toolbar.
At this point, the sample app throws a SerializationException exception (a runtime error). That is, the app chokes on the data that it is trying to serialize. Because you started the app in debug mode (debugger attached), the debugger's Exception Helper takes you right to the code that threw the exception and gives you a helpful error message.
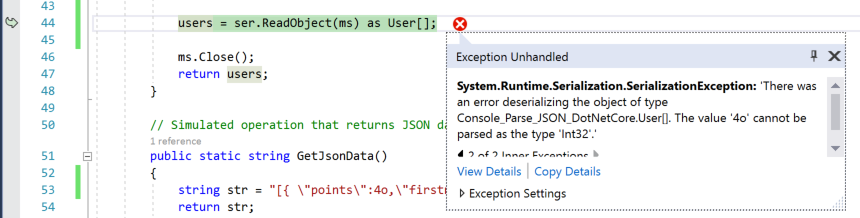
The error message instructs you that the value 4o cannot be parsed as an integer. So, in this example, you know the data is bad: 4o should be 40. However, if you are not in control of the data in a real scenario (say you are getting it from a web service), what do you do about it? How do you fix this?
When you hit an exception, you need to ask (and answer) a couple of questions:
Is this exception just a bug that you can fix? Or,
Is this exception something that your users might encounter?
If it's the former, fix the bug. (In the sample app, that means fix the bad data.) If it's the latter, you might need to handle the exception in your code using a try/catch block (we look at other possible strategies in the next section). In the sample app, replace the following code:
users = ser.ReadObject(ms) as User[];
with this code:
try
{
    users = ser.ReadObject(ms) as User[];
}
catch (SerializationException)
{
    Console.WriteLine("Give user some info or instructions, if necessary");
    // Take appropriate action for your app
}
A try/catch block has some performance cost, so you'll only want to use them when you really need them, that is, where (a) they might occur in the release version of the app, and where (b) the documentation for the method indicates that you should check for the exception (assuming the documentation is complete!). In many cases, you can handle an exception appropriately and the user will never need to know about it.
Here are a couple of important tips for exception handling:
Avoid using an empty catch block, like
catch (Exception) {}, which does not take appropriate action to expose or handle an error. An empty or non-informative catch block can hide exceptions and can make your code more difficult to debug instead of easier.Use the
try/catchblock around the specific function that throws the exception (ReadObject, in the sample app). If you use it around a larger chunk of code, you end up hiding the location of the error. For example, don't use thetry/catchblock around the call to the parent functionReadToObject, shown here, or you won't know exactly where the exception occurred.// Don't do this try { User[] users = ReadToObject(data); } catch (SerializationException) { }For unfamiliar functions that you include in your app, especially those interacting with external data (such as a web request), check the documentation to see what exceptions the function is likely to throw. This can be critical information for proper error handling and for debugging your app.
For the sample app, fix the SerializationException in the GetJsonData method by changing 4o to 40.
Clarify your code intent by using assert
Click the Restart  button in the Debug Toolbar (Ctrl + Shift + F5). This restarts the app in fewer steps. You see the following output in the console window.

You can see something in this output that is not quite right. name and lastname for the third record are blank!
This is a good time to talk about a helpful coding practice, often underutilized, which is to use assert statements in your functions. By adding the following code, you include a runtime check to make sure that firstname and lastname are not null. Replace the following code in the UpdateRecords method:
if (existingUser == false)
{
    User user = new User();
    user.firstname = users[i].firstname;
    user.lastname = users[i].lastname;
with this:
// Also, add a using statement for System.Diagnostics at the start of the file.
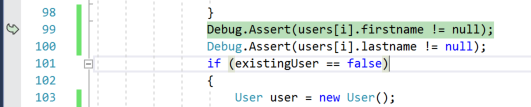
Debug.Assert(users[i].firstname != null);
Debug.Assert(users[i].lastname != null);
if (existingUser == false)
{
User user = new User();
user.firstname = users[i].firstname;
user.lastname = users[i].lastname;
By adding assert statements like this to your functions during the development process, you can help specify the intent of your code. In the preceding example, we specify the following:
- A valid string is required for the first name
- A valid string is required for the last name
By specifying intent in this way, you enforce your requirements. This is a simple and handy method that you can use to surface bugs during development. (assert statements are also used as the main element in unit tests.)
Click the Restart button in the Debug Toolbar (Ctrl + Shift + F5).
Note
The assert code is active only in a Debug build.
When you restart, the debugger pauses on the assert statement, because the expression users[i].firstname != null evaluates to false instead of true.
The assert error tells you that there's a problem that you need to investigate. assert can cover many scenarios where you don't necessarily see an exception. In this example, the user won't see an exception, and a null value gets added as firstname in your list of records. This may cause problems later on (such as you see in the console output) and might be harder to debug.
Note
In scenarios where you call a method on the null value, a NullReferenceException results. You normally want to avoid using a try/catch block for a general exception, that is, an exception that is not tied to the specific library function. Any object can throw a NullReferenceException. Check the documentation for the library function if you are not sure.
During the debugging process, it's good to keep a particular assert statement until you know you need to replace it with an actual code fix. Let's say you decide that the user might encounter the exception in a release build of the app. In that case, you must refactor code to make sure that your app doesn't throw a fatal exception or result in some other error. So, to fix this code, replace the following code:
if (existingUser == false)
{
    User user = new User();
with this code:
if (existingUser == false && users[i].firstname != null && users[i].lastname != null)
{
    User user = new User();
By using this code, you fulfill your code requirements and make sure that a record with a firstname or lastname value of null is not added to the data.
In this example, we added the two assert statements inside of a loop. Typically, when using assert, it's best to add assert statements at the entry point (beginning) of a function or method. You are currently looking at the UpdateRecords method in the sample app. In this method, you know you are in trouble if either of the method arguments is null, so check them both with an assert statement at the function's entry point.
public static void UpdateRecords(List<User> db, User[] users)
{
    Debug.Assert(db != null);
    Debug.Assert(users != null);
For the preceding statements, your intent is that you load existing data (db) and retrieve new data (users) before updating anything.
You can use assert with any kind of expression that resolves to true or false. So, for example, you could add an assert statement like this.
Debug.Assert(users[0].points > 0);
The preceding code is useful if you want to specify the following intent: a new point value greater than zero (0) is required to update the user's record.
Inspect your code in the debugger
OK, now that you've fixed everything critical that's wrong with the sample app, you can move onto other important stuff!
We showed you the debugger's Exception Helper, but the debugger is a much more powerful tool that also lets you do other things like step through your code and inspect its variables. These more powerful capabilities are useful in many scenarios, especially the following:
You are trying to isolate a runtime bug in your code, but are unable to do it using methods and tools previously discussed.
You want to validate your code, that is, watch it while it runs to make sure it is behaving in the way you expect and doing what you want it to.
It is instructive to watch your code while it runs. You can learn more about your code this way and can often identify bugs before they manifest any obvious symptoms.
To learn how to use the essential features of the debugger, see Debugging for absolute beginners.
Fix performance issues
Bugs of another kind include inefficient code that causes your app to run slowly or to use too much memory. Generally, optimizing performance is something you do later in your app development. However, you can run into performance issues early (for example, you see that some part of your app is running slow), and you may need to test your app with the profiling tools early on. For more information about profiling tools such as the CPU Usage tool and the Memory Analyzer, see First look at the profiling tools.
Next steps
In this article, you've learned how to avoid and fix many common bugs in your code and when to use the debugger. Next, learn more about using the Visual Studio debugger to fix bugs.