How to: Customize menus and toolbars in Visual Studio
Applies to: ![]() Visual Studio
Visual Studio ![]() Visual Studio for Mac
Visual Studio for Mac
Note
This article applies to Visual Studio 2017. If you're looking for the latest Visual Studio documentation, see Visual Studio documentation. We recommend upgrading to the latest version of Visual Studio. Download it here
You can customize Visual Studio not only by adding and removing toolbars and menus on the menu bar, but also by adding and removing commands on any given toolbar or menu.
Tip
To learn more about how to personalize the toolbar so that you can make it yours, see our recent blog post, Optimizing toolbars for your workflow.
Add, remove, or move a menu on the menu bar
On the menu bar, choose Tools > Customize.
The Customize dialog box opens.
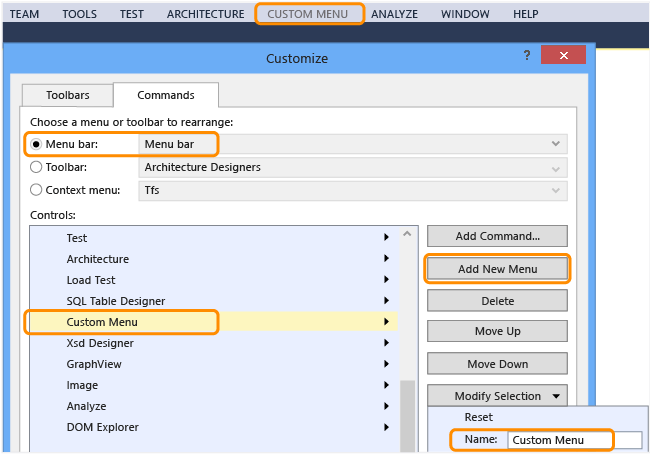
On the Commands tab, leave the Menu bar option button selected, leave Menu Bar selected in the list next to that option, and then perform one of the following sets of steps:
To add a menu, choose the Add New Menu button, choose the Modify Selection button, and then name the menu that you want to add.
To remove a menu, choose it in the Controls list, and then choose the Delete button.
To move a menu within the menu bar, choose the menu in the Controls list, and then choose the Move Up or Move Down button.
Add, remove, or move a toolbar
On the menu bar, choose Tools > Customize.
The Customize dialog box opens.
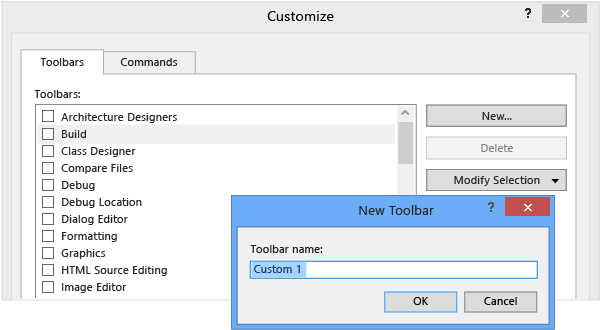
On the Toolbar tab, perform one of the following sets of steps:
To add a toolbar, choose the New button, specify a name for the toolbar that you want to add, and then choose the OK button.
To remove a custom toolbar, choose it in the Toolbars list, and then choose the Delete button.
Important
You can delete toolbars that you create but not default toolbars.
To move a toolbar to a different docking location, choose it in the Toolbars list, choose the Modify Selection button, and then choose a location in the list that appears.
You can also drag a toolbar by its left edge to move it anywhere in the main docking area.
Note
For more information about how to improve the usability and accessibility of toolbars, see How to: Set IDE accessibility options.
Customize a menu or a toolbar
Warning
After you customize a toolbar or menu, make sure that its check box remains selected in the Customize dialog box. Otherwise, your changes won't persist after you close and reopen Visual Studio.
On the menu bar, choose Tools > Customize.
The Customize dialog box opens.
On the Commands tab, choose the option button for the type of element that you want to customize.
In the list for that type of element, choose the menu or toolbar that you want to customize, and then perform one of the following sets of steps:
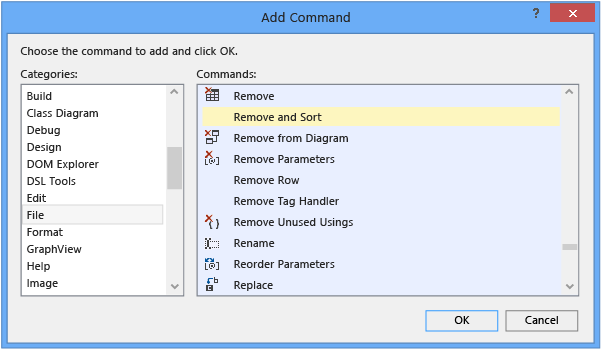
To add a command, choose the Add Command button.
In the Add Command dialog box, choose an item in the Categories list, choose an item in the Commands list, and then choose the OK button.
To delete a command, choose it in the Controls list, and then choose the Delete button.
To reorder commands, choose a command in the Controls list, and then choose the Move Up or Move Down button.
To group commands under a horizontal line, choose the first command in the Controls list, choose the Modify Selection button, and then choose Begin a Group in the menu that appears.
Reset a menu or a toolbar
On the menu bar, choose Tools > Customize.
The Customize dialog box opens.
On the Commands tab, choose the option button for the type of element that you want to reset.
In the list for that type of element, choose the menu or toolbar that you want to reset.
Choose the Modify Selection button, and then choose Reset in the menu that appears.
You can also reset all menus and toolbars by choosing the Reset All button.