Share a project and join a collaboration session in Visual Studio
After installing and signing in to Visual Studio Live Share, share a project and start a collaboration session with your team.
Share a project
Follow these steps to start a collaboration session and invite a colleague to work with you.
Sign in
Now that you're signed in, you're ready to start your own collaboration session. Not signed in? For more information, see sign in.
Open a solution, project, or folder
Use your normal workflow to open a folder, project, or solution you would like to share with your guests.
[Optional] Update hidden or excluded files
By default, Live Share hides any files or folders referenced in .gitignore files in your project from guests. Hiding a file prevents it from appearing in the file tree, while excluding it stops it from being transmitted even during operations like debugging. If you want to hide or exclude different files, a .vsls.json file can be added to your project with these settings. See controlling file access and visibility for details.
Start a collaboration session
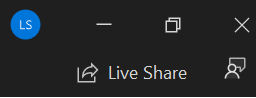
Select the Live Share button in the upper right-hand corner to start a Live Share session. A shareable link to your collaboration session is automatically copied to your clipboard.
When you start your collaboration session for the first time, you'll see a Live Share tool window. Make sure you dock this window to ensure it shows up the next time you start a Live Share session.

Note
You might be asked by your desktop firewall software to allow the Live Share agent to open a port the first time you share. Accepting this is entirely optional but enables a secured direct mode to improve performance when the person you're working with is on the same network as you are. See changing the connection mode for details.
[Optional] Enable read-only mode
Once you start your collaboration session, you can set the session to be read-only. This mode prevents guests from making edits to the code you're sharing.
After sharing, you'll get a notification that the invite link has been copied to your clipboard. You can then select the option to make the session read-only.

Send someone the link
Send the link over e-mail, Teams, Slack, Skype, or another communication app to anyone you want to invite. Given the level of access Live Share sessions can provide to guests, you should only share with people you trust. Think carefully about the implications of what you're sharing.
Tip
Want to understand the security implications of some of Live Share's features? Check out the security article.
If the guest you invited has questions, the Quickstart: Join your first session article provides more information on getting up and running as a guest.
[Optional] Approve the guest
Guests automatically join your collaboration session by default, and you'll be notified when they're ready to work with you. This notification gives you the option to remove them from the session. However, you can also require an explicit approval for anyone joining.
Go to Tools > Options > Live Share >, then change Require guest approval to True to enable the feature. Once you turn on this setting, a notification prompts you to approve the guest before they can join.

For more information about invitation security considerations, see invitations and join access.
Manage your Live Share session
After your guest opens the link to your shared session in Visual Studio Code or Visual Studio, you'll see them listed under participants in the Live Share tool window. You're now able to see which file your guest is currently in next to their name.
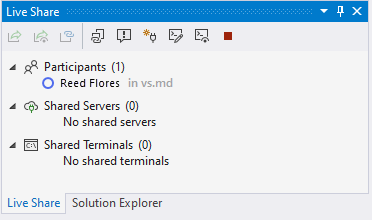
The Live Share tool window allows you to access all key features to manage your session in one place.
Tip
Can't see the Live Share tool window anymore during your sessions? You can always select Sharing > View Live Share Window to open it!
End the collaboration session
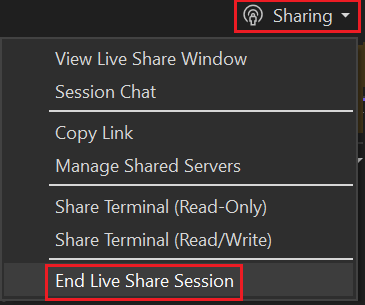
As a host, you can stop sharing completely and end the collaboration session by selecting the Sharing button in the upper right-hand corner and selecting End Live Share Session.
All guests are notified the session has ended. After the session has ended, guests can no longer access the content and any temp files are automatically cleaned up.
Having issues with sharing? Check out troubleshooting.
Join a collaboration session
After downloading and installing Visual Studio Live Share, guests only need to take a couple of steps to join a hosted collaboration session. There are two ways to join: via the browser or manually.
Tip
As a guest joining a collaboration session, it's important to understand that hosts might restrict your access to certain files or features. Want to understand the security implications of some of Live Share's features and settings? For more information, see the security article.
Join via the browser
The easiest way to join a collaboration session is to open the invite link in a web browser. Here's what you can expect when you follow this flow.
Sign in
After installing the Live Share extension, you'll want to sign in to let other collaborators know who you are. Visual Studio uses your personalization account by default, so you might skip this step.
For more information, see sign in.
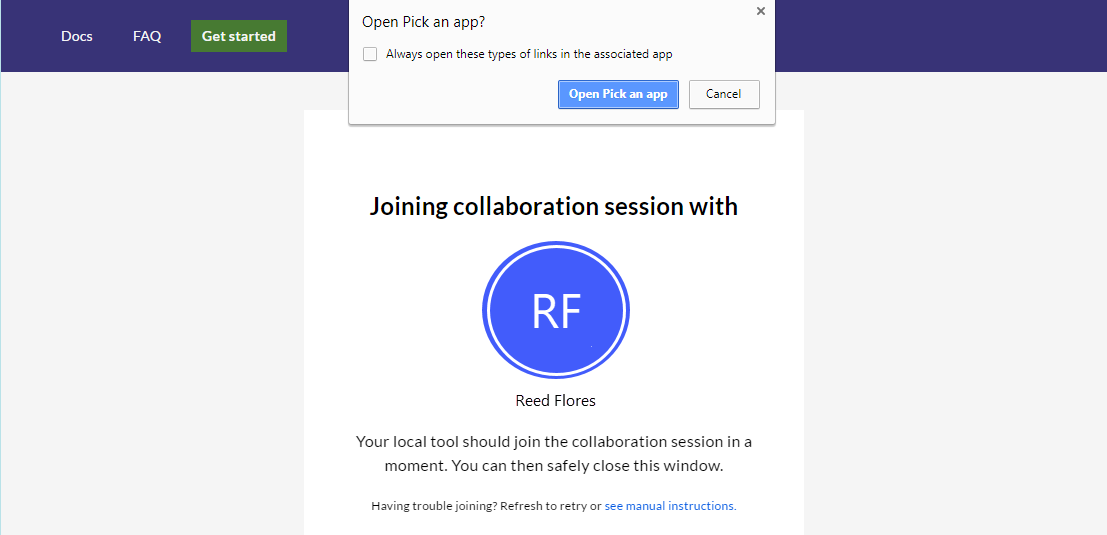
Click on the invite link or open the invite in your browser
Open, or reopen, the invite link in a browser.
Note
If you haven't installed the Live Share extension, you're presented with links to the extension marketplace. Install the extension, restart your tool, and retry.
You'll be notified that the browser wants to launch a Live Share enabled tool. If you let it launch your selected tool, you'll be connected to the collaboration session once it starts.
If the host is offline, you'll be notified at this point instead. You can contact the host and ask them to share again.
Note
Still having trouble? For more information, see join manually.
Collaborate
That's it! In a few moments, you'll be connected and you can start collaborating.
You'll see the Live Share button transition to convey a Session State. See session state information below for what the button looks like.
You're automatically taken to the file the host is currently editing once the join is complete.
Join manually
You can manually join without using a web browser. Manual join is useful in situations where the tool you want to use is already running. Use manual joining if you want to use a different tool than you usually do. You can also use it if you're having trouble with getting invite links to work for some reason.
Sign in
After installing the Live Share extension, you'll want to sign in to let other collaborators know who you are. Visual Studio uses your personalization account by default, so you might skip this step entirely.
For more information, see sign in.
Use the join command
Go to File > Join Live Share Session.
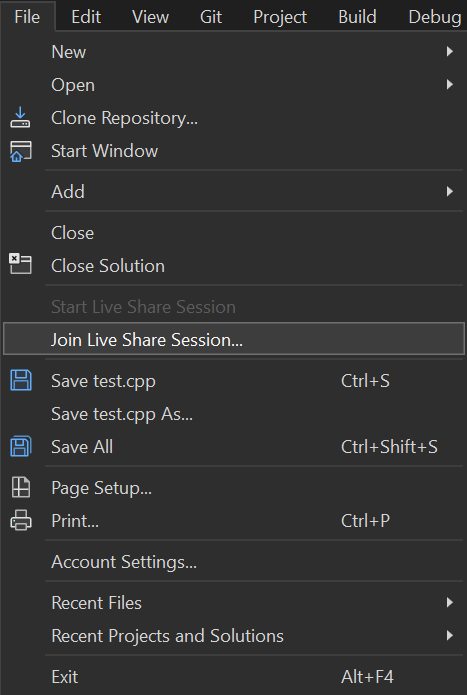
Paste the invite link
Paste in the invite URL and confirm.
Collaborate
That's it! You should be connected to the collaboration session momentarily.
You'll see the Live Share button transition to convey a Session State. For more information about what the button looks like, see session state.
You're automatically taken to where the host is currently editing once the join has completed.
Leave the collaboration session
As a guest, you can leave the collaboration session without ending it for others by closing the tool.
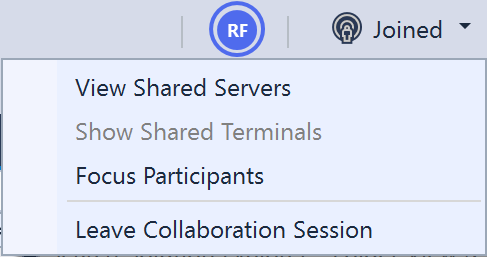
Or you can leave the session by clicking the Sharing button and selecting Leave Live Share Session.
Any temp files are automatically cleaned up so no further action is needed.
Having issues with joining? Check out troubleshooting.
Session states
After you've started or joined a collaboration session and have access to shared content, the Live Share button in the upper right-hand corner updates its appearance to reflect the state of the active collaboration session.
The following are the states you'll typically see:
| State | Button | Description |
|---|---|---|
| Inactive |  |
No active collaboration session and nothing is shared. |
| Host: Sharing In-Progress |  |
A collaboration session is starting and content sharing will begin shortly. |
| Host: Sharing |  |
A collaboration session is active and content is shared. |
| Host: Sharing Read-only |  |
Sharing a read-only collaboration session. |
| Guest: Joining Session |  |
Joining an existing collaboration session. |
| Guest: Joined |  |
Joined and connected to an active collaboration session and receiving shared content. |
| Guest: Joined Read-only |  |
Joined and connected to an active read-only collaboration session. |
Next steps
Feedback
Coming soon: Throughout 2024 we will be phasing out GitHub Issues as the feedback mechanism for content and replacing it with a new feedback system. For more information see: https://aka.ms/ContentUserFeedback.
Submit and view feedback for