HoloLens (1st gen) and Azure 311 - Microsoft Graph
Note
The Mixed Reality Academy tutorials were designed with HoloLens (1st gen) and Mixed Reality Immersive Headsets in mind. As such, we feel it is important to leave these tutorials in place for developers who are still looking for guidance in developing for those devices. These tutorials will not be updated with the latest toolsets or interactions being used for HoloLens 2. They will be maintained to continue working on the supported devices. There will be a new series of tutorials that will be posted in the future that will demonstrate how to develop for HoloLens 2. This notice will be updated with a link to those tutorials when they are posted.
In this course, you will learn how to use Microsoft Graph to log in into your Microsoft account using secure authentication within a mixed reality application. You will then retrieve and display your scheduled meetings in the application interface.
Microsoft Graph is a set of APIs designed to enable access to many of Microsoft's services. Microsoft describes Microsoft Graph as being a matrix of resources connected by relationships, meaning it allows an application to access all sorts of connected user data. For more information, visit the Microsoft Graph page.
Development will include the creation of an app where the user will be instructed to gaze at and then tap a sphere, which will prompt the user to log in safely to a Microsoft account. Once logged in to their account, the user will be able to see a list of meetings scheduled for the day.
Having completed this course, you will have a mixed reality HoloLens application, which will be able to do the following:
- Using the Tap gesture, tap on an object, which will prompt the user to log into a Microsoft Account (moving out of the app to log in, and then back into the app again).
- View a list of meetings scheduled for the day.
In your application, it is up to you as to how you will integrate the results with your design. This course is designed to teach you how to integrate an Azure Service with your Unity project. It is your job to use the knowledge you gain from this course to enhance your mixed reality application.
Device support
| Course | HoloLens | Immersive headsets |
|---|---|---|
| MR and Azure 311: Microsoft Graph | ✔️ |
Prerequisites
Note
This tutorial is designed for developers who have basic experience with Unity and C#. Please also be aware that the prerequisites and written instructions within this document represent what has been tested and verified at the time of writing (July 2018). You are free to use the latest software, as listed within the install the tools article, though it should not be assumed that the information in this course will perfectly match what you will find in newer software than what is listed below.
We recommend the following hardware and software for this course:
- A development PC
- Windows 10 Fall Creators Update (or later) with Developer mode enabled
- The latest Windows 10 SDK
- Unity 2017.4
- Visual Studio 2017
- A Microsoft HoloLens with Developer mode enabled
- Internet access for Azure setup and Microsoft Graph data retrieval
- A valid Microsoft Account (either personal or work/school)
- A few meetings scheduled for the current day, using the same Microsoft Account
Before you start
- To avoid encountering issues building this project, it is strongly suggested that you create the project mentioned in this tutorial in a root or near-root folder (long folder paths can cause issues at build-time).
- Set up and test your HoloLens. If you need support setting up your HoloLens, make sure to visit the HoloLens setup article.
- It is a good idea to perform Calibration and Sensor Tuning when beginning developing a new HoloLens App (sometimes it can help to perform those tasks for each user).
For help on Calibration, please follow this link to the HoloLens Calibration article.
For help on Sensor Tuning, please follow this link to the HoloLens Sensor Tuning article.
Chapter 1 - Create your app in the Application Registration Portal
To begin with, you will need to create and register your application in the Application Registration Portal.
In this Chapter you will also find the Service Key that will allow you to make calls to Microsoft Graph to access your account content.
Navigate to the Microsoft Application Registration Portal and login with your Microsoft Account. Once you have logged in, you will be redirected to the Application Registration Portal.
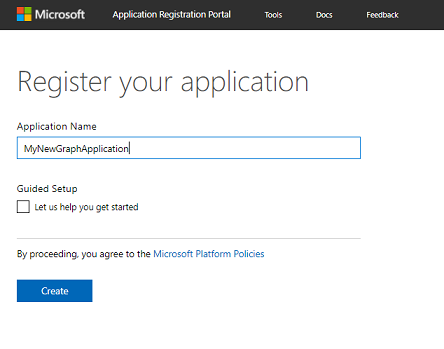
In the My applications section, click on the button Add an app.

Important
The Application Registration Portal can look different, depending on whether you have previously worked with Microsoft Graph. The below screenshots display these different versions.
Add a name for your application and click Create.
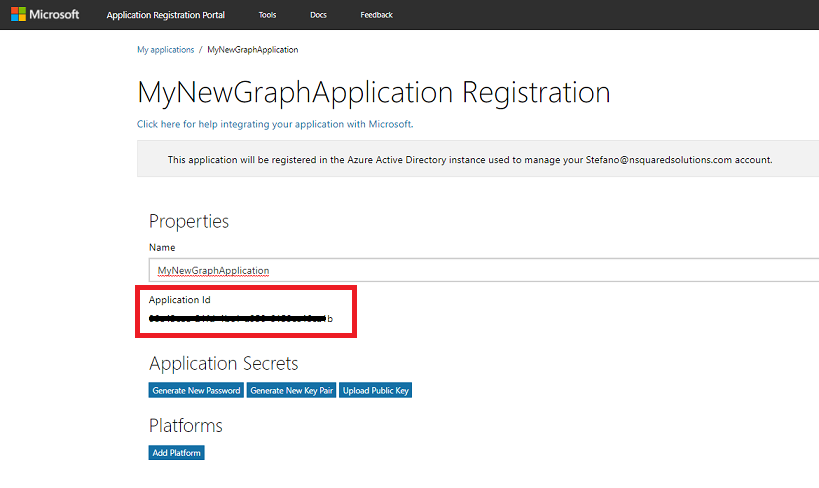
Once the application has been created, you will be redirected to the application main page. Copy the Application Id and make sure to note this value somewhere safe, you will use it soon in your code.
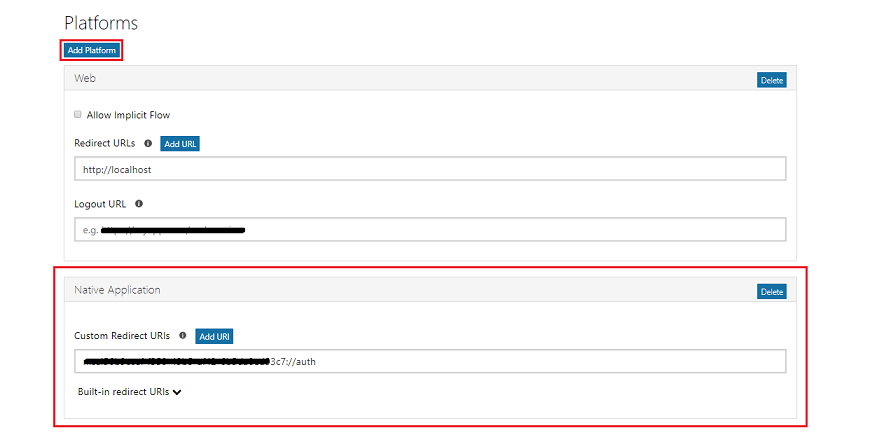
In the Platforms section, make sure Native Application is displayed. If not click on Add Platform and select Native Application.
Scroll down in the same page and in the section called Microsoft Graph Permissions you will need to add additional permissions for the application. Click on Add next to Delegated Permissions.
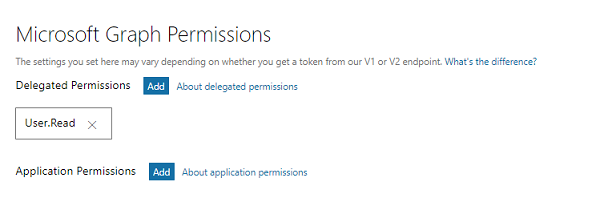
Since you want your application to access the user's Calendar, check the box called Calendars.Read and click OK.

Scroll to the bottom and click the Save button.
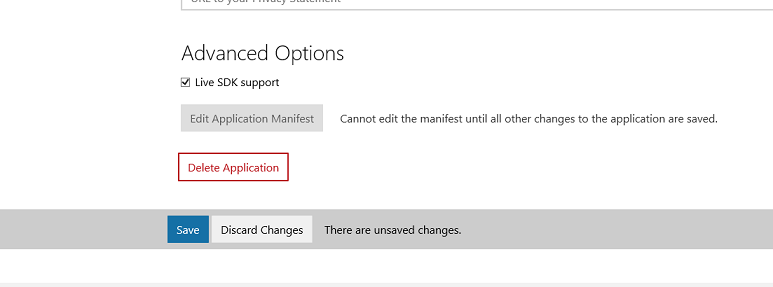
Your save will be confirmed, and you can log out from the Application Registration Portal.
Chapter 2 - Set up the Unity project
The following is a typical set up for developing with mixed reality, and as such, is a good template for other projects.
Open Unity and click New.
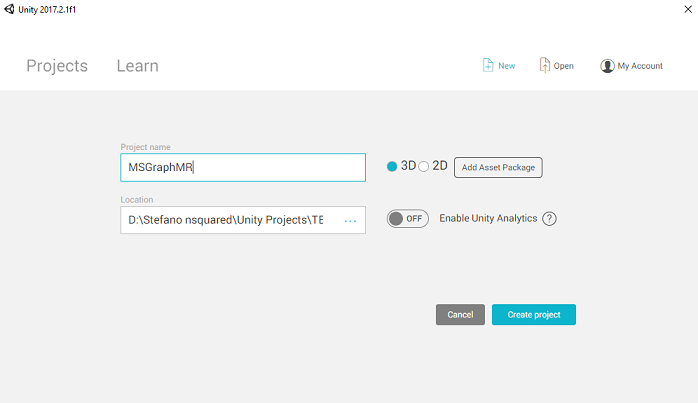
You need to provide a Unity project name. Insert MSGraphMR. Make sure the project template is set to 3D. Set the Location to somewhere appropriate for you (remember, closer to root directories is better). Then, click Create project.
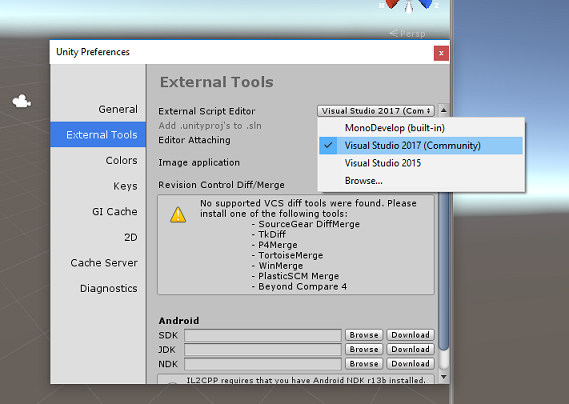
With Unity open, it is worth checking the default Script Editor is set to Visual Studio. Go to Edit > Preferences and then from the new window, navigate to External Tools. Change External Script Editor to Visual Studio 2017. Close the Preferences window.
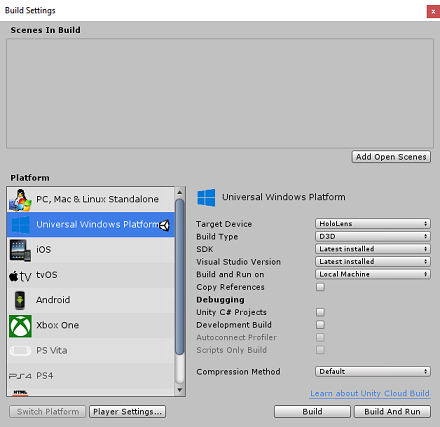
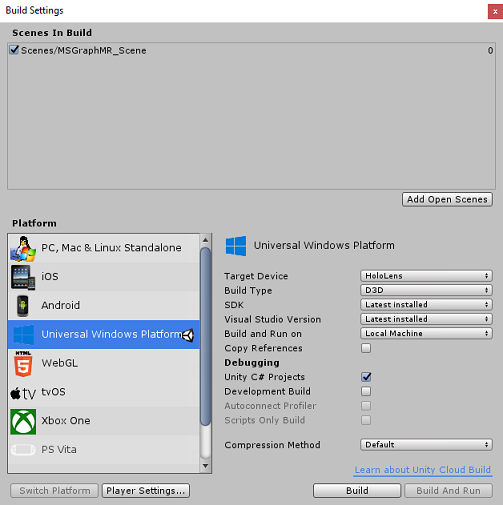
Go to File > Build Settings and select Universal Windows Platform, then click on the Switch Platform button to apply your selection.
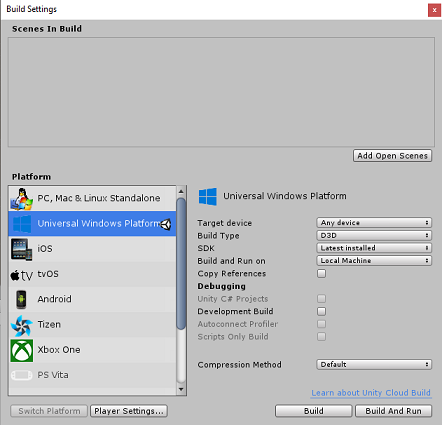
While still in File > Build Settings, make sure that:
Target Device is set to HoloLens
Build Type is set to D3D
SDK is set to Latest installed
Visual Studio Version is set to Latest installed
Build and Run is set to Local Machine
Save the scene and add it to the build.
Do this by selecting Add Open Scenes. A save window will appear.
Create a new folder for this, and any future, scene. Select the New folder button, to create a new folder, name it Scenes.
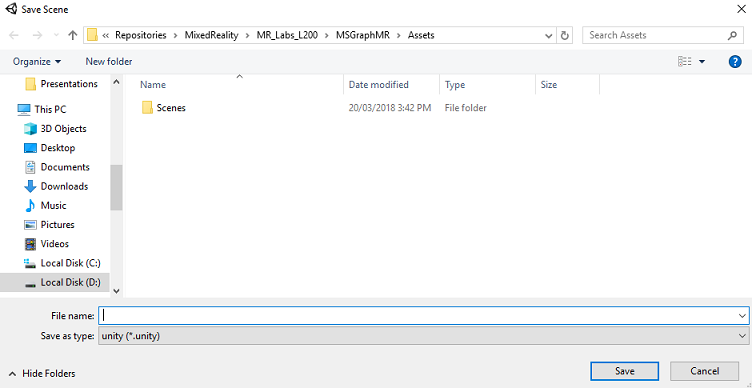
Open your newly created Scenes folder, and then in the File name: text field, type MR_ComputerVisionScene, then click Save.
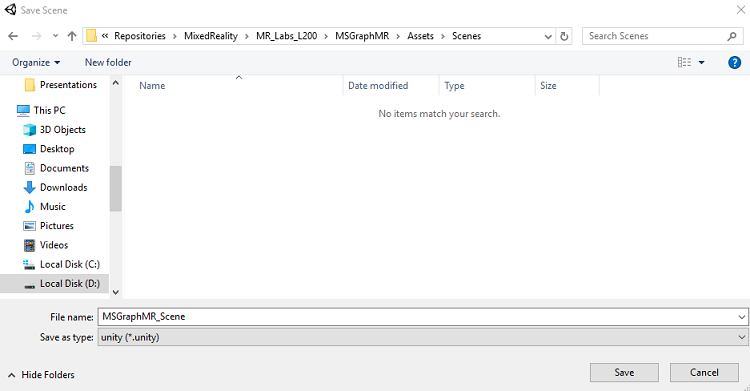
Important
Be aware, you must save your Unity scenes within the Assets folder, as they must be associated with the Unity project. Creating the scenes folder (and other similar folders) is a typical way of structuring a Unity project.
The remaining settings, in Build Settings, should be left as default for now.
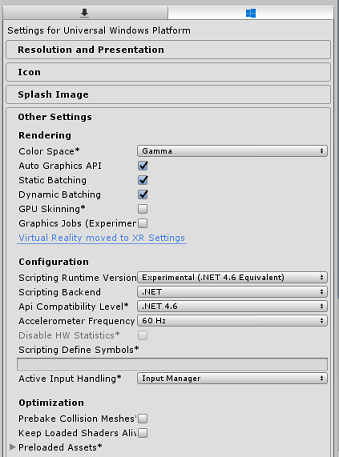
In the Build Settings window, click on the Player Settings button, this will open the related panel in the space where the Inspector is located.

In this panel, a few settings need to be verified:
In the Other Settings tab:
Scripting Runtime Version should be Experimental (.NET 4.6 Equivalent), which will trigger a need to restart the Editor.
Scripting Backend should be .NET
API Compatibility Level should be .NET 4.6
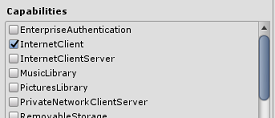
Within the Publishing Settings tab, under Capabilities, check:
InternetClient
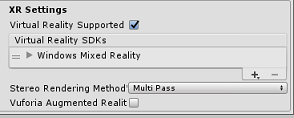
Further down the panel, in XR Settings (found below Publish Settings), check Virtual Reality Supported, make sure the Windows Mixed Reality SDK is added.
Back in Build Settings, Unity C# Projects is no longer greyed out; check the checkbox next to this.
Close the Build Settings window.
Save your scene and project (FILE > SAVE SCENES / FILE > SAVE PROJECT).
Chapter 3 - Import Libraries in Unity
Important
If you wish to skip the Unity Set up component of this course, and continue straight into code, feel free to download this Azure-MR-311.unitypackage, import it into your project as a Custom Package, and then continue from Chapter 5.
To use Microsoft Graph within Unity you need to make use of the Microsoft.Identity.Client DLL. It is possible to use the Microsoft Graph SDK, however, it will require the addition of a NuGet package after you build the Unity project (meaning editing the project post-build). It is considered simpler to import the required DLLs directly into Unity.
Note
There is currently a known issue in Unity which requires plugins to be reconfigured after import. These steps (4 - 7 in this section) will no longer be required after the bug has been resolved.
To import Microsoft Graph into your own project, download the MSGraph_LabPlugins.zip file. This package has been created with versions of the libraries that have been tested.
If you wish to know more about how to add custom DLLs to your Unity project, follow this link.
To import the package:
Add the Unity Package to Unity by using the Assets > Import Package > Custom Package menu option. Select the package you just downloaded.
In the Import Unity Package box that pops up, ensure everything under (and including) Plugins is selected.
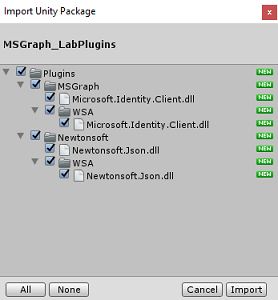
Click the Import button to add the items to your project.
Go to the MSGraph folder under Plugins in the Project Panel and select the plugin called Microsoft.Identity.Client.
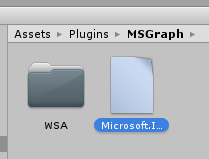
With the plugin selected, ensure that Any Platform is unchecked, then ensure that WSAPlayer is also unchecked, then click Apply. This is just to confirm that the files are configured correctly.
Note
Marking these plugins configures them to only be used in the Unity Editor. There are a different set of DLLs in the WSA folder which will be used after the project is exported from Unity as a Universal Windows Application.
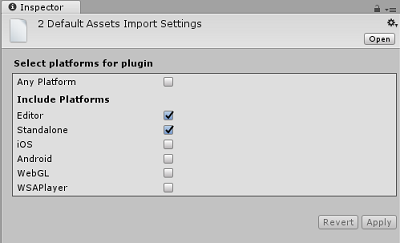
Next, you need to open the WSA folder, within the MSGraph folder. You will see a copy of the same file you just configured. Select the file, and then in the inspector:
ensure that Any Platform is unchecked, and that only WSAPlayer is checked.
Ensure SDK is set to UWP, and Scripting Backend is set to Dot Net
Ensure that Don't process is checked.

Click Apply.
Chapter 4 - Camera Setup
During this Chapter you will set up the Main Camera of your scene:
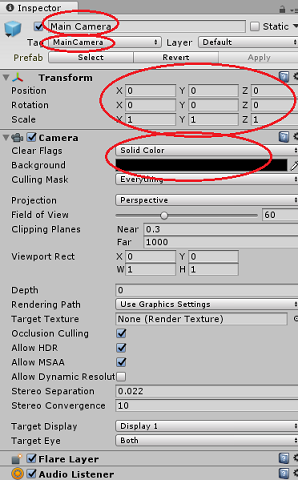
In the Hierarchy Panel, select the Main Camera.
Once selected, you will be able to see all the components of the Main Camera in the Inspector panel.
The Camera object must be named Main Camera (note the spelling!)
The Main Camera Tag must be set to MainCamera (note the spelling!)
Make sure the Transform Position is set to 0, 0, 0
Set Clear Flags to Solid Color
Set the Background Color of the Camera Component to Black, Alpha 0 (Hex Code: #00000000)
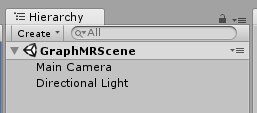
The final object structure in the Hierarchy Panel should be like the one shown in the image below:
Chapter 5 - Create MeetingsUI class
The first script you need to create is MeetingsUI, which is responsible for hosting and populating the UI of the application (welcome message, instructions and the meetings details).
To create this class:
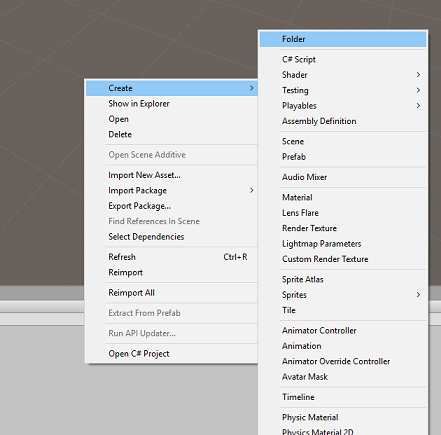
Right-click on the Assets folder in the Project Panel, then select Create > Folder. Name the folder Scripts.
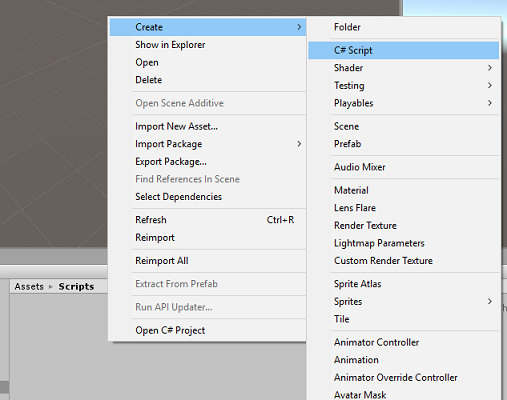
Open the Scripts folder then, within that folder, right-click, Create > C# Script. Name the script MeetingsUI.
Double-click on the new MeetingsUI script to open it with Visual Studio.
Insert the following namespaces:
using System;
using UnityEngine;
Inside the class insert the following variables:
    /// <summary>
    /// Allows this class to behave like a singleton
    /// </summary>
    public static MeetingsUI Instance;

    /// <summary>
    /// The 3D text of the scene
    /// </summary>
    private TextMesh _meetingDisplayTextMesh;
Then replace the Start() method and add an Awake() method. These will be called when the class initializes:
    /// <summary>
    /// Called on initialization
    /// </summary>
    void Awake()
    {
        Instance = this;
    }

    /// <summary>
    /// Called on initialization, after Awake
    /// </summary>
    void Start ()
    {
        // Creating the text mesh within the scene
        _meetingDisplayTextMesh = CreateMeetingsDisplay();
    }
Add the methods responsible for creating the Meetings UI and populate it with the current meetings when requested:
    /// <summary>
    /// Set the welcome message for the user
    /// </summary>
    internal void WelcomeUser(string userName)
    {
        if(!string.IsNullOrEmpty(userName))
        {
            _meetingDisplayTextMesh.text = $"Welcome {userName}";
        }
        else
        {
            _meetingDisplayTextMesh.text = "Welcome";
        }
    }

    /// <summary>
    /// Set up the parameters for the UI text
    /// </summary>
    /// <returns>Returns the 3D text in the scene</returns>
    private TextMesh CreateMeetingsDisplay()
    {
        GameObject display = new GameObject();
        display.transform.localScale = new Vector3(0.03f, 0.03f, 0.03f);
        display.transform.position = new Vector3(-3.5f, 2f, 9f);
        TextMesh textMesh = display.AddComponent<TextMesh>();
        textMesh.anchor = TextAnchor.MiddleLeft;
        textMesh.alignment = TextAlignment.Left;
        textMesh.fontSize = 80;
        textMesh.text = "Welcome! \nPlease gaze at the button" +
            "\nand use the Tap Gesture to display your meetings";

        return textMesh;
    }

    /// <summary>
    /// Adds a new Meeting in the UI by chaining the existing UI text
    /// </summary>
    internal void AddMeeting(string subject, DateTime dateTime, string location)
    {
        string newText = $"\n{_meetingDisplayTextMesh.text}\n\n Meeting,\nSubject: {subject},\nToday at {dateTime},\nLocation: {location}";

        _meetingDisplayTextMesh.text = newText;
    }
Delete the Update() method, and save your changes in Visual Studio before returning to Unity.
Chapter 6 - Create the Graph class
The next script to create is the Graph script. This script is responsible for making the calls to authenticate the user and retrieve the scheduled meetings for the current day from the user's calendar.
To create this class:
Double-click on the Scripts folder, to open it.
Right-click inside the Scripts folder, click Create > C# Script. Name the script Graph.
Double-click on the script to open it with Visual Studio.
Insert the following namespaces:
using System.Collections.Generic;
using UnityEngine;
using Microsoft.Identity.Client;
using System;
using System.Threading.Tasks;

#if !UNITY_EDITOR && UNITY_WSA
using System.Net.Http;
using System.Net.Http.Headers;
using Windows.Storage;
#endif
Important
You will notice that parts of the code in this script are wrapped around Precompile Directives, this is to avoid issues with the libraries when building the Visual Studio Solution.
Delete the Start() and Update() methods, as they will not be used.
Outside the Graph class, insert the following objects, which are necessary to deserialize the JSON object representing the daily scheduled meetings:
/// <summary>
/// The object hosting the scheduled meetings
/// </summary>
[Serializable]
public class Rootobject
{
    public List<Value> value;
}

[Serializable]
public class Value
{
    public string subject { get; set; }
    public StartTime start { get; set; }
    public Location location { get; set; }
}

[Serializable]
public class StartTime
{
    public string dateTime;

    private DateTime? _startDateTime;
    public DateTime StartDateTime
    {
        get
        {
            if (_startDateTime != null)
                return _startDateTime.Value;
            DateTime dt;
            DateTime.TryParse(dateTime, out dt);
            _startDateTime = dt;
            return _startDateTime.Value;
        }
    }
}

[Serializable]
public class Location
{
    public string displayName { get; set; }
}
Inside the Graph class, add the following variables:
    /// <summary>
    /// Insert your Application Id here
    /// </summary>
    private string _appId = "-- Insert your Application Id here --";

    /// <summary>
    /// Application scopes, determine Microsoft Graph accessibility level to user account
    /// </summary>
    private IEnumerable<string> _scopes = new List<string>() { "User.Read", "Calendars.Read" };

    /// <summary>
    /// Microsoft Graph API, user reference
    /// </summary>
    private PublicClientApplication _client;

    /// <summary>
    /// Microsoft Graph API, authentication
    /// </summary>
    private AuthenticationResult _authResult;
Note
Change the appId value to be the App Id that you have noted in Chapter 1, step 4. This value should be the same as that displayed in the Application Registration Portal, in your application registration page.
Within the Graph class, add the methods SignInAsync() and AquireTokenAsync(), that will prompt the user to insert the log-in credentials.
    /// <summary>
    /// Begin the Sign In process using Microsoft Graph Library
    /// </summary>
    internal async void SignInAsync()
    {
#if !UNITY_EDITOR && UNITY_WSA
        // Set up Grap user settings, determine if needs auth
        ApplicationDataContainer localSettings = ApplicationData.Current.LocalSettings;
        string userId = localSettings.Values["UserId"] as string;
        _client = new PublicClientApplication(_appId);

        // Attempt authentication
        _authResult = await AcquireTokenAsync(_client, _scopes, userId);

        // If authentication is successful, retrieve the meetings
        if (!string.IsNullOrEmpty(_authResult.AccessToken))
        {
            // Once Auth as been completed, find the meetings for the day
            await ListMeetingsAsync(_authResult.AccessToken);
        }
#endif
    }

    /// <summary>
    /// Attempt to retrieve the Access Token by either retrieving
    /// previously stored credentials or by prompting user to Login
    /// </summary>
    private async Task<AuthenticationResult> AcquireTokenAsync(
        IPublicClientApplication app, IEnumerable<string> scopes, string userId)
    {
        IUser user = !string.IsNullOrEmpty(userId) ? app.GetUser(userId) : null;
        string userName = user != null ? user.Name : "null";

        // Once the User name is found, display it as a welcome message
        MeetingsUI.Instance.WelcomeUser(userName);

        // Attempt to Log In the user with a pre-stored token. Only happens
        // in case the user Logged In with this app on this device previously
        try
        {
            _authResult = await app.AcquireTokenSilentAsync(scopes, user);
        }
        catch (MsalUiRequiredException)
        {
            // Pre-stored token not found, prompt the user to log-in
            try
            {
                _authResult = await app.AcquireTokenAsync(scopes);
            }
            catch (MsalException msalex)
            {
                Debug.Log($"Error Acquiring Token: {msalex.Message}");
                return _authResult;
            }
        }

        MeetingsUI.Instance.WelcomeUser(_authResult.User.Name);

#if !UNITY_EDITOR && UNITY_WSA
        ApplicationData.Current.LocalSettings.Values["UserId"] =
        _authResult.User.Identifier;
#endif
        return _authResult;
    }
Add the following two methods:
BuildTodayCalendarEndpoint(), which builds the URI specifying the day, and time span, in which the scheduled meetings are retrieved.
ListMeetingsAsync(), which requests the scheduled meetings from Microsoft Graph.
    /// <summary>
    /// Build the endpoint to retrieve the meetings for the current day.
    /// </summary>
    /// <returns>Returns the Calendar Endpoint</returns>
    public string BuildTodayCalendarEndpoint()
    {
        DateTime startOfTheDay = DateTime.Today.AddDays(0);
        DateTime endOfTheDay = DateTime.Today.AddDays(1);
        DateTime startOfTheDayUTC = startOfTheDay.ToUniversalTime();
        DateTime endOfTheDayUTC = endOfTheDay.ToUniversalTime();

        string todayDate = startOfTheDayUTC.ToString("o");
        string tomorrowDate = endOfTheDayUTC.ToString("o");
        string todayCalendarEndpoint = string.Format(
            "https://graph.microsoft.com/v1.0/me/calendarview?startdatetime={0}&enddatetime={1}",
            todayDate,
            tomorrowDate);

        return todayCalendarEndpoint;
    }

    /// <summary>
    /// Request all the scheduled meetings for the current day.
    /// </summary>
    private async Task ListMeetingsAsync(string accessToken)
    {
#if !UNITY_EDITOR && UNITY_WSA
        var http = new HttpClient();

        http.DefaultRequestHeaders.Authorization =
        new AuthenticationHeaderValue("Bearer", accessToken);
        var response = await http.GetAsync(BuildTodayCalendarEndpoint());

        var jsonResponse = await response.Content.ReadAsStringAsync();

        Rootobject rootObject = new Rootobject();
        try
        {
            // Parse the JSON response.
            rootObject = JsonUtility.FromJson<Rootobject>(jsonResponse);

            // Sort the meeting list by starting time.
            rootObject.value.Sort((x, y) => DateTime.Compare(x.start.StartDateTime, y.start.StartDateTime));

            // Populate the UI with the meetings.
            for (int i = 0; i < rootObject.value.Count; i++)
            {
                MeetingsUI.Instance.AddMeeting(rootObject.value[i].subject,
                                            rootObject.value[i].start.StartDateTime.ToLocalTime(),
                                            rootObject.value[i].location.displayName);
            }
        }
        catch (Exception ex)
        {
            Debug.Log($"Error = {ex.Message}");
            return;
        }
#endif
    }
You have now completed the Graph script. Save your changes in Visual Studio before returning to Unity.
Chapter 7 - Create the GazeInput script
You will now create the GazeInput. This class handles and keeps track of the user's gaze, using a Raycast coming from the Main Camera, projecting forward.
To create the script:
Double-click on the Scripts folder, to open it.
Right-click inside the Scripts folder, click Create > C# Script. Name the script GazeInput.
Double-click on the script to open it with Visual Studio.
Change the namespaces code to match the one below, along with adding the '[System.Serializable]' tag above your GazeInput class, so that it can be serialized:
using UnityEngine;

/// <summary>
/// Class responsible for the User's Gaze interactions
/// </summary>
[System.Serializable]
public class GazeInput : MonoBehaviour
{
Inside the GazeInput class, add the following variables:
    [Tooltip("Used to compare whether an object is to be interacted with.")]
    internal string InteractibleTag = "SignInButton";

    /// <summary>
    /// Length of the gaze
    /// </summary>
    internal float GazeMaxDistance = 300;

    /// <summary>
    /// Object currently gazed
    /// </summary>
    internal GameObject FocusedObject { get; private set; }

    internal GameObject oldFocusedObject { get; private set; }

    internal RaycastHit HitInfo { get; private set; }

    /// <summary>
    /// Cursor object visible in the scene
    /// </summary>
    internal GameObject Cursor { get; private set; }

    internal bool Hit { get; private set; }

    internal Vector3 Position { get; private set; }

    internal Vector3 Normal { get; private set; }

    private Vector3 _gazeOrigin;

    private Vector3 _gazeDirection;
Add the CreateCursor() method to create the HoloLens cursor in the scene, and call the method from the Start() method:
    /// <summary>
    /// Start method used upon initialisation.
    /// </summary>
    internal virtual void Start()
    {
        FocusedObject = null;
        Cursor = CreateCursor();
    }

    /// <summary>
    /// Method to create a cursor object.
    /// </summary>
    internal GameObject CreateCursor()
    {
        GameObject newCursor = GameObject.CreatePrimitive(PrimitiveType.Sphere);
        newCursor.SetActive(false);
        // Remove the collider, so it doesn't block raycast.
        Destroy(newCursor.GetComponent<SphereCollider>());
        newCursor.transform.localScale = new Vector3(0.05f, 0.05f, 0.05f);
        Material mat = new Material(Shader.Find("Diffuse"));
        newCursor.GetComponent<MeshRenderer>().material = mat;
        mat.color = Color.HSVToRGB(0.0223f, 0.7922f, 1.000f);
        newCursor.SetActive(true);

        return newCursor;
    }
The following methods enable the gaze Raycast and keep track of the focused objects.
/// <summary>
/// Called every frame
/// </summary>
internal virtual void Update()
{
    _gazeOrigin = Camera.main.transform.position;

    _gazeDirection = Camera.main.transform.forward;

    UpdateRaycast();
}
/// <summary>
/// Reset the old focused object, stop the gaze timer, and send data if it
/// is greater than one.
/// </summary>
private void ResetFocusedObject()
{
    // Ensure the old focused object is not null.
    if (oldFocusedObject != null)
    {
        if (oldFocusedObject.CompareTag(InteractibleTag))
        {
            // Provide the 'Gaze Exited' event.
            oldFocusedObject.SendMessage("OnGazeExited", SendMessageOptions.DontRequireReceiver);
        }
    }
}
private void UpdateRaycast() { // Set the old focused gameobject. oldFocusedObject = FocusedObject; RaycastHit hitInfo; // Initialise Raycasting. Hit = Physics.Raycast(_gazeOrigin, _gazeDirection, out hitInfo, GazeMaxDistance); HitInfo = hitInfo; // Check whether raycast has hit. if (Hit == true) { Position = hitInfo.point; Normal = hitInfo.normal; // Check whether the hit has a collider. if (hitInfo.collider != null) { // Set the focused object with what the user just looked at. FocusedObject = hitInfo.collider.gameObject; } else { // Object looked on is not valid, set focused gameobject to null. FocusedObject = null; } } else { // No object looked upon, set focused gameobject to null. FocusedObject = null; // Provide default position for cursor. Position = _gazeOrigin + (_gazeDirection * GazeMaxDistance); // Provide a default normal. Normal = _gazeDirection; } // Lerp the cursor to the given position, which helps to stabilize the gaze. Cursor.transform.position = Vector3.Lerp(Cursor.transform.position, Position, 0.6f); // Check whether the previous focused object is this same. If so, reset the focused object. if (FocusedObject != oldFocusedObject) { ResetFocusedObject(); if (FocusedObject != null) { if (FocusedObject.CompareTag(InteractibleTag)) { // Provide the 'Gaze Entered' event. FocusedObject.SendMessage("OnGazeEntered", SendMessageOptions.DontRequireReceiver); } } } }Save your changes in Visual Studio before returning to Unity.
Chapter 8 - Create the Interactions class
You will now need to create the Interactions script, which is responsible for:
Handling the Tap interaction and the Camera Gaze, which enables the user to interact with the log in "button" in the scene.
Creating the log in "button" object in the scene for the user to interact with.
To create the script:
Double-click on the Scripts folder, to open it.
Right-click inside the Scripts folder, click Create > C# Script. Name the script Interactions.
Double-click on the script to open it with Visual Studio.
Insert the following namespaces:
using UnityEngine;
using UnityEngine.XR.WSA.Input;
Change the inheritance of the Interaction class from MonoBehaviour to GazeInput.
public class Interactions : MonoBehaviourpublic class Interactions : GazeInputInside the Interaction class insert the following variable:
    /// <summary>
    /// Allows input recognition with the HoloLens
    /// </summary>
    private GestureRecognizer _gestureRecognizer;
Replace the Start method; notice it is an override method, which calls the 'base' Gaze class method. Start() will be called when the class initializes, registering for input recognition and creating the sign in button in the scene:
    /// <summary>
    /// Called on initialization, after Awake
    /// </summary>
    internal override void Start()
    {
        base.Start();

        // Register the application to recognize HoloLens user inputs
        _gestureRecognizer = new GestureRecognizer();
        _gestureRecognizer.SetRecognizableGestures(GestureSettings.Tap);
        _gestureRecognizer.Tapped += GestureRecognizer_Tapped;
        _gestureRecognizer.StartCapturingGestures();

        // Add the Graph script to this object
        gameObject.AddComponent<MeetingsUI>();
        CreateSignInButton();
    }
Add the CreateSignInButton() method, which will instantiate the sign in button in the scene and set its properties:
    /// <summary>
    /// Create the sign in button object in the scene
    /// and sets its properties
    /// </summary>
    void CreateSignInButton()
    {
        GameObject signInButton = GameObject.CreatePrimitive(PrimitiveType.Sphere);

        Material mat = new Material(Shader.Find("Diffuse"));
        signInButton.GetComponent<Renderer>().material = mat;
        mat.color = Color.blue;

        signInButton.transform.position = new Vector3(3.5f, 2f, 9f);
        signInButton.tag = "SignInButton";
        signInButton.AddComponent<Graph>();
    }
Add the GestureRecognizer_Tapped() method, which be respond for the Tap user event.
    /// <summary>
    /// Detects the User Tap Input
    /// </summary>
    private void GestureRecognizer_Tapped(TappedEventArgs obj)
    {
        if(base.FocusedObject != null)
        {
            Debug.Log($"TAP on {base.FocusedObject.name}");
            base.FocusedObject.SendMessage("SignInAsync", SendMessageOptions.RequireReceiver);
        }
    }
Delete the Update() method, and then save your changes in Visual Studio before returning to Unity.
Chapter 9 - Set up the script references
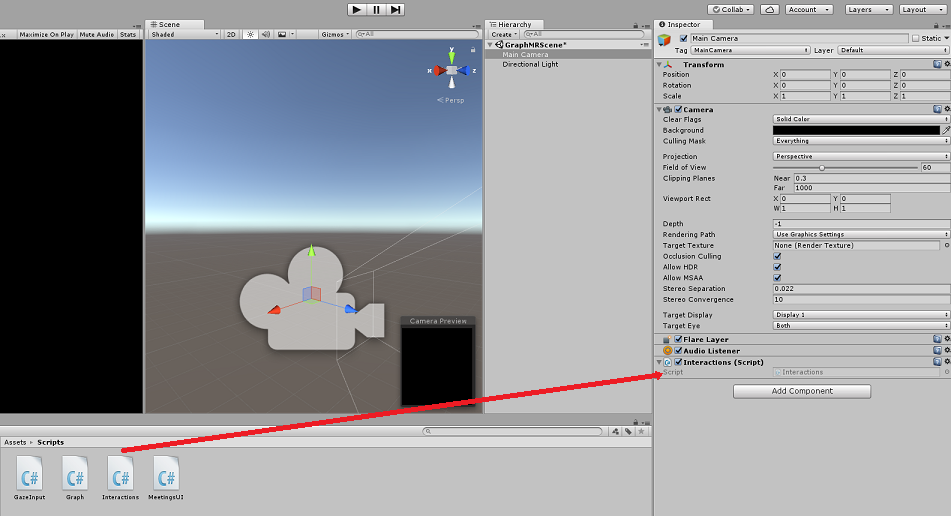
In this Chapter you need to place the Interactions script onto the Main Camera. That script will then handle placing the other scripts where they need to be.
From the Scripts folder in the Project Panel, drag the script Interactions to the Main Camera object, as pictured below.
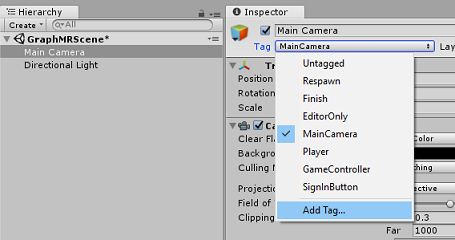
Chapter 10 - Setting up the Tag
The code handling the gaze will make use of the Tag SignInButton to identify which object the user will interact with to sign-in to Microsoft Graph.
To create the Tag:
In the Unity Editor click on the Main Camera in the Hierarchy Panel.
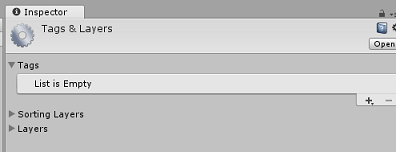
In the Inspector Panel click on the MainCamera Tag to open a drop-down list. Click on Add Tag...
Click on the + button.
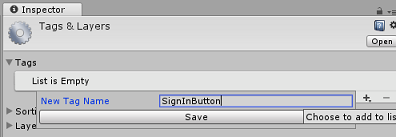
Write the Tag name as SignInButton and click Save.
Chapter 11 - Build the Unity project to UWP
Everything needed for the Unity section of this project has now been completed, so it is time to build it from Unity.
Navigate to Build Settings (File > Build Settings).
If not already, tick Unity C# Projects.
Click Build. Unity will launch a File Explorer window, where you need to create and then select a folder to build the app into. Create that folder now, and name it App. Then with the App folder selected, click Select Folder.
Unity will begin building your project to the App folder.
Once Unity has finished building (it might take some time), it will open a File Explorer window at the location of your build (check your task bar, as it may not always appear above your windows, but will notify you of the addition of a new window).
Chapter 12 - Deploy to HoloLens
To deploy on HoloLens:
You will need the IP Address of your HoloLens (for Remote Deploy), and to ensure your HoloLens is in Developer Mode. To do this:
Whilst wearing your HoloLens, open the Settings.
Go to Network & Internet > Wi-Fi > Advanced Options
Note the IPv4 address.
Next, navigate back to Settings, and then to Update & Security > For Developers
Set Developer Mode On.
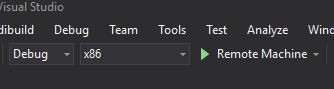
Navigate to your new Unity build (the App folder) and open the solution file with Visual Studio.
In the Solution Configuration select Debug.
In the Solution Platform, select x86, Remote Machine. You will be prompted to insert the IP address of a remote device (the HoloLens, in this case, which you noted).
Go to Build menu and click on Deploy Solution to sideload the application to your HoloLens.
Your app should now appear in the list of installed apps on your HoloLens, ready to be launched!
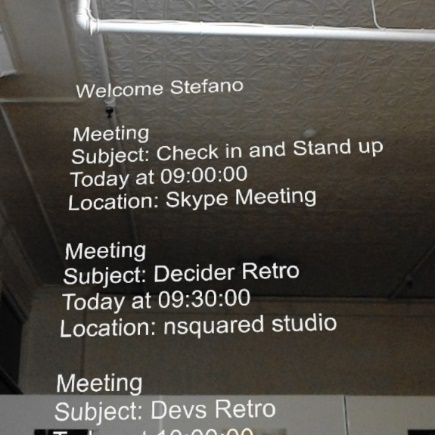
Your Microsoft Graph HoloLens application
Congratulations, you built a mixed reality app that leverages the Microsoft Graph, to read and display user Calendar data.
Bonus exercises
Exercise 1
Use Microsoft Graph to display other information about the user
- User email / phone number / profile picture
Exercise 1
Implement voice control to navigate the Microsoft Graph UI.
Feedback
Coming soon: Throughout 2024 we will be phasing out GitHub Issues as the feedback mechanism for content and replacing it with a new feedback system. For more information see: https://aka.ms/ContentUserFeedback.
Submit and view feedback for