Quickstart: Set up sign in for a desktop app using Azure Active Directory B2C
Azure Active Directory B2C (Azure AD B2C) provides cloud identity management to keep your application, business, and customers protected. Azure AD B2C enables your applications to authenticate to social accounts and enterprise accounts using open standard protocols. In this quickstart, you use a Windows Presentation Foundation (WPF) desktop application to sign in using a social identity provider and call an Azure AD B2C protected web API.
If you don't have an Azure subscription, create an Azure free account before you begin.
Prerequisites
Visual Studio 2019 with the ASP.NET and web development workload.
A social account from either Facebook, Google, or Microsoft.
Download a zip file or clone the Azure-Samples/active-directory-b2c-dotnet-desktop repository from GitHub.
git clone https://github.com/Azure-Samples/active-directory-b2c-dotnet-desktop.git
Run the application in Visual Studio
- In the sample application project folder, open the active-directory-b2c-wpf.sln solution in Visual Studio.
- Restore the NuGet packages.
- Press F5 to debug the application.
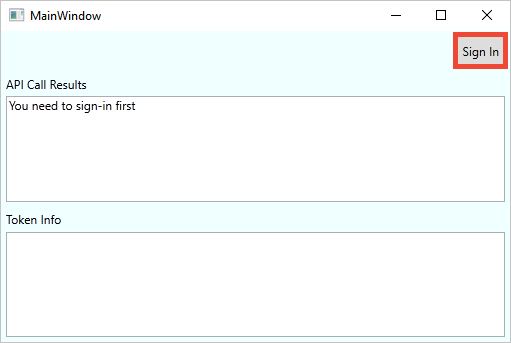
Sign in using your account
Select Sign in to start the Sign Up or Sign In workflow.
The sample supports several sign-up options. These options include using a social identity provider or creating a local account using an email address. For this quickstart, use a social identity provider account from either Facebook, Google, or Microsoft.
Azure AD B2C presents a sign in page for a fictitious company called Fabrikam for the sample web application. To sign up using a social identity provider, select the button of the identity provider you want to use.
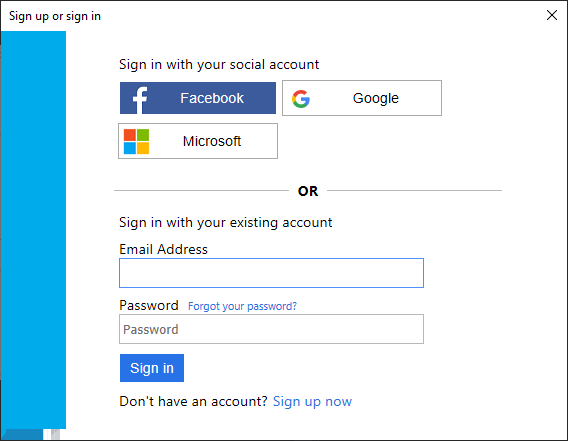
You authenticate (sign in) using your social account credentials and authorize the application to read information from your social account. By granting access, the application can retrieve profile information from the social account such as your name and city.
Finish the sign in process for the identity provider.
Your new account profile details are pre-populated with information from your social account.
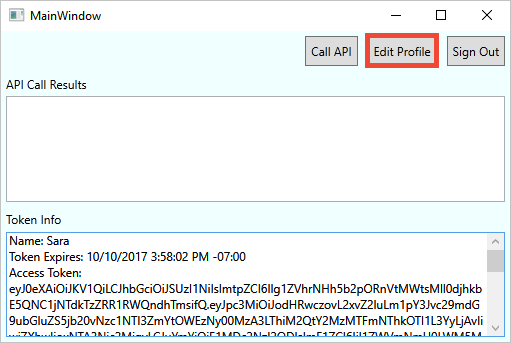
Edit your profile
Azure AD B2C provides functionality to allow users to update their profiles. The sample web app uses an Azure AD B2C edit profile user flow for the workflow.
In the application menu bar, select Edit profile to edit the profile you created.
Choose the identity provider associated with the account you created. For example, if you used Facebook as the identity provider when you created your account, choose Facebook to modify the associated profile details.
Change your Display name or City, and then select Continue.
A new access token is displayed in the Token info text box. If you want to verify the changes to your profile, copy and paste the access token into the token decoder https://jwt.ms.
Access a protected API resource
Select Call API to make a request to the protected resource.
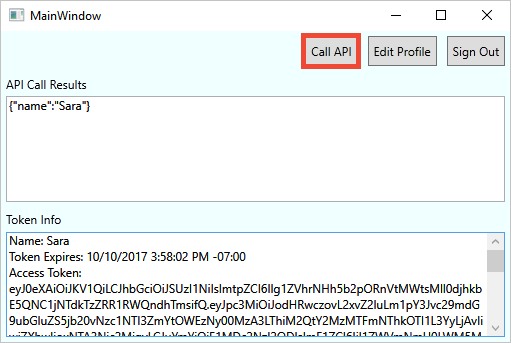
The application includes the Microsoft Entra access token in the request to the protected web API resource. The web API sends back the display name contained in the access token.
You've successfully used your Azure AD B2C user account to make an authorized call an Azure AD B2C protected web API.
Clean up resources
You can use your Azure AD B2C tenant if you plan to try other Azure AD B2C quickstarts or tutorials. When no longer needed, you can delete your Azure AD B2C tenant.
Next steps
In this quickstart, you used a sample desktop application to:
- Sign in with a custom sign in page
- Sign in with a social identity provider
- Create an Azure AD B2C account
- Call a web API protected by Azure AD B2C
Get started creating your own Azure AD B2C tenant.
Feedback
Coming soon: Throughout 2024 we will be phasing out GitHub Issues as the feedback mechanism for content and replacing it with a new feedback system. For more information see: https://aka.ms/ContentUserFeedback.
Submit and view feedback for