Authenticate Azure Batch services with Microsoft Entra ID
Azure Batch supports authentication with Microsoft Entra ID, Microsoft's multi-tenant cloud based directory and identity management service. Azure uses Microsoft Entra ID to authenticate its own customers, service administrators, and organizational users.
This article describes two ways to use Microsoft Entra authentication with Azure Batch:
Integrated authentication authenticates a user who's interacting with an application. The application gathers a user's credentials and uses those credentials to authorize access to Batch resources.
A service principal authenticates an unattended application. The service principal defines the policy and permissions for the application and represents the application to access Batch resources at runtime.
For more information about Microsoft Entra ID, see the Microsoft Entra documentation.
Gather endpoints for authentication
To authenticate Batch applications with Microsoft Entra ID, you need to include the Microsoft Entra endpoint and Batch resource endpoint in your code.
Microsoft Entra endpoint
The base Microsoft Entra authority endpoint is https://login.microsoftonline.com/. To authenticate with Microsoft Entra ID, use this endpoint with the tenant ID that identifies the Microsoft Entra tenant to use for authentication:
https://login.microsoftonline.com/<tenant-id>
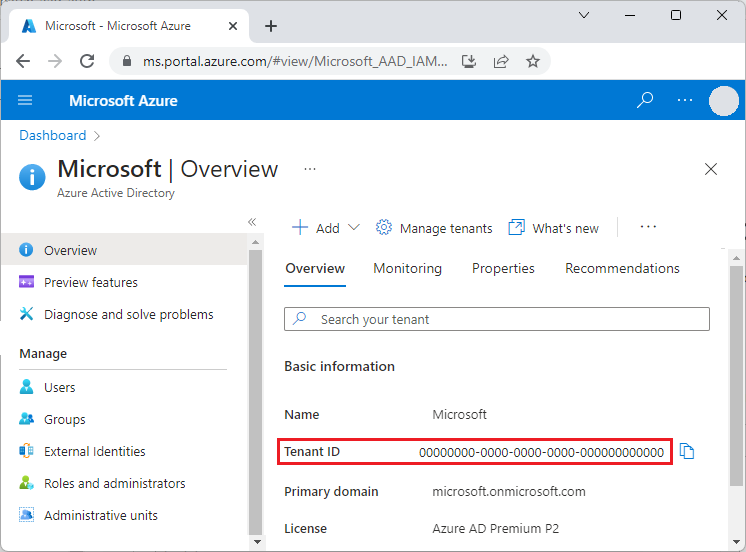
You can get your tenant ID from the main Microsoft Entra ID page in the Azure portal. You can also select Properties in the left navigation and see the Tenant ID on the Properties page.
Important
The tenant-specific Microsoft Entra endpoint is required when you authenticate by using a service principal.
When you authenticate by using integrated authentication, the tenant-specific endpoint is recommended, but optional. You can also use the Microsoft Entra common endpoint to provide a generic credential gathering interface when a specific tenant isn't provided. The common endpoint is
https://login.microsoftonline.com/common.
For more information about Microsoft Entra endpoints, see Authentication vs. authorization.
Batch resource endpoint
Use the Batch resource endpoint https://batch.core.windows.net/ to acquire a token for authenticating requests to the Batch service.
Register your application with a tenant
The first step in using Microsoft Entra authentication is to register your application in a Microsoft Entra tenant. Once you register your application, you can call the Microsoft Authentication Library (MSAL) from your code. The MSAL provides an API for authenticating with Microsoft Entra ID from your application. Registering your application is required whether you use integrated authentication or a service principal.
When you register your application, you supply information about your application to Microsoft Entra ID. Microsoft Entra ID then provides an application ID, also called a client ID, that you use to associate your application with Microsoft Entra ID at runtime. For more information about the application ID, see Application and service principal objects in Microsoft Entra ID.
To register your Batch application, follow the steps at Register an application.
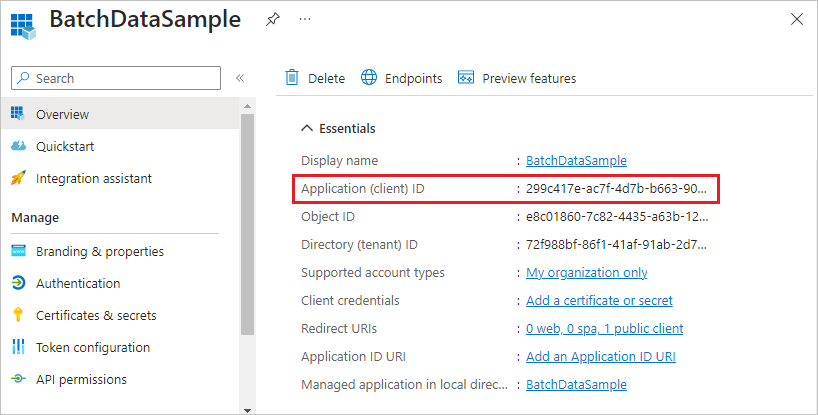
After you register your application, you can see the Application (client) ID on the application's Overview page.
Configure integrated authentication
To authenticate with integrated authentication, you need to grant your application permission to connect to the Batch service API. This step enables your application to use Microsoft Entra ID to authenticate calls to the Batch service API.
After you register your application, follow these steps to grant the application access to the Batch service:
- In the Azure portal, search for and select app registrations.
- On the App registrations page, select your application.
- On your application's page, select API permissions from the left navigation.
- On the API permissions page, select Add a permission.
- On the Request API permissions page, select Azure Batch.
- On the Azure Batch page, under Select permissions, select the checkbox next to user_impersonation, and then select Add permissions.
The API permissions page now shows that your Microsoft Entra application has access to both Microsoft Graph and Azure Batch. Permissions are granted to Microsoft Graph automatically when you register an app with Microsoft Entra ID.
Configure a service principal
To authenticate an application that runs unattended, you use a service principal. When your application authenticates by using a service principal, it sends both the application ID and a secret key to Microsoft Entra ID.
After you register your application, follow these steps in the Azure portal to configure a service principal:
- Request a secret for your application.
- Assign Azure role-based access control (Azure RBAC) to your application.
Request a secret for your application
Follow these steps to create and copy the secret key to use in your code:
- In the Azure portal, search for and select app registrations.
- On the App registrations page, select your application.
- On your application's page, select Certificates & secrets from the left navigation.
- On the Certificates & secrets page, select New client secret.
- On the Add a client secret page, enter a description and select an expiration period for the secret.
- Select Add to create the secret and display it on the Certificates & secrets page.
- Copy the secret Value to a safe place, because you won't be able to access it again after you leave this page. If you lose access to your key, you can generate a new one.
Assign Azure RBAC to your application
Follow these steps to assign an Azure RBAC role to your application. For detailed steps, see Assign Azure roles by using the Azure portal.
- In the Azure portal, navigate to the Batch account your application uses.
- Select Access control (IAM) from the left navigation.
- On the Access control (IAM) page, select Add role assignment.
- On the Add role assignment page, select the Role tab, and then select either the Contributor or Reader role for your app.
- Select the Members tab, and select Select members under Members.
- On the Select members screen, search for and select your application, and then select Select.
- Select Review + assign on the Add role assignment page.
Your application should now appear on the Role assignments tab of the Batch account's Access control (IAM) page.
Assign a custom role
A custom role grants granular permission to a user for submitting jobs, tasks, and more. You can use custom roles to prevent users from performing operations that affect cost, such as creating pools or modifying nodes.
You can use a custom role to grant or deny permissions to a Microsoft Entra user, group, or service principal for the following Azure Batch RBAC operations:
- Microsoft.Batch/batchAccounts/pools/write
- Microsoft.Batch/batchAccounts/pools/delete
- Microsoft.Batch/batchAccounts/pools/read
- Microsoft.Batch/batchAccounts/jobSchedules/write
- Microsoft.Batch/batchAccounts/jobSchedules/delete
- Microsoft.Batch/batchAccounts/jobSchedules/read
- Microsoft.Batch/batchAccounts/jobs/write
- Microsoft.Batch/batchAccounts/jobs/delete
- Microsoft.Batch/batchAccounts/jobs/read
- Microsoft.Batch/batchAccounts/certificates/write
- Microsoft.Batch/batchAccounts/certificates/delete
- Microsoft.Batch/batchAccounts/certificates/read
- Microsoft.Batch/batchAccounts/read, for any read operation
- Microsoft.Batch/batchAccounts/listKeys/action, for any operation
Custom roles are for users authenticated by Microsoft Entra ID, not for the Batch shared key account credentials. The Batch account credentials give full permission to the Batch account. Jobs that use autopool require pool-level permissions.
Note
Certain role assignments need to be specified in the actions field, whereas others need to be specified in the dataActions field. For more information, see Azure resource provider operations.
The following example shows an Azure Batch custom role definition:
{
 "properties":{
    "roleName":"Azure Batch Custom Job Submitter",
    "type":"CustomRole",
    "description":"Allows a user to submit jobs to Azure Batch but not manage pools",
    "assignableScopes":[
      "/subscriptions/88888888-8888-8888-8888-888888888888"
    ],
    "permissions":[
      {
        "actions":[
          "Microsoft.Batch/*/read",
          "Microsoft.Authorization/*/read",
          "Microsoft.Resources/subscriptions/resourceGroups/read",
          "Microsoft.Support/*",
          "Microsoft.Insights/alertRules/*"
        ],
        "notActions":[

        ],
        "dataActions":[
          "Microsoft.Batch/batchAccounts/jobs/*",
          "Microsoft.Batch/batchAccounts/jobSchedules/*"
        ],
        "notDataActions":[

        ]
      }
    ]
  }
}
For more information on creating a custom role, see Azure custom roles.
Code examples
The code examples in this section show how to authenticate with Microsoft Entra ID by using integrated authentication or with a service principal. The code examples use .NET and Python, but the concepts are similar for other languages.
Note
A Microsoft Entra authentication token expires after one hour. When you use a long-lived BatchClient object, it's best to get a token from MSAL on every request to ensure that you always have a valid token.
To do this in .NET, write a method that retrieves the token from Microsoft Entra ID, and pass that method to a BatchTokenCredentials object as a delegate. Every request to the Batch service calls the delegate method to ensure that a valid token is provided. By default MSAL caches tokens, so a new token is retrieved from Microsoft Entra-only when necessary. For more information about tokens in Microsoft Entra ID, see Security tokens.
Code example: Use Microsoft Entra integrated authentication with Batch .NET
To authenticate with integrated authentication from Batch .NET:
Install the Azure Batch .NET and the MSAL NuGet packages.
Declare the following
usingstatements in your code:using Microsoft.Azure.Batch; using Microsoft.Azure.Batch.Auth; using Microsoft.Identity.Client;Reference the Microsoft Entra endpoint, including the tenant ID. You can get your tenant ID from the Microsoft Entra ID Overview page in the Azure portal.
private const string AuthorityUri = "https://login.microsoftonline.com/<tenant-id>";Reference the Batch service resource endpoint:
private const string BatchResourceUri = "https://batch.core.windows.net/";Reference your Batch account:
private const string BatchAccountUrl = "https://<myaccount>.<mylocation>.batch.azure.com";Specify the application (client) ID for your application. You can get the application ID from your application's Overview page in the Azure portal.
private const string ClientId = "<application-id>";Specify the redirect URI that you provided when you registered the application.
private const string RedirectUri = "https://<redirect-uri>";Write a callback method to acquire the authentication token from Microsoft Entra ID. The following example calls MSAL to authenticate a user who's interacting with the application. The MSAL IConfidentialClientApplication.AcquireTokenByAuthorizationCode method prompts the user for their credentials. The application proceeds once the user provides credentials.
The authorizationCode parameter is the authorization code obtained from the authorization server after the user authenticates.
WithRedirectUrispecifies the redirect URI that the authorization server redirects the user to after authentication.public static async Task<string> GetTokenUsingAuthorizationCode(string authorizationCode, string redirectUri, string[] scopes) { var app = ConfidentialClientApplicationBuilder.Create(ClientId) .WithAuthority(AuthorityUri) .WithRedirectUri(RedirectUri) .Build(); var authResult = await app.AcquireTokenByAuthorizationCode(scopes, authorizationCode).ExecuteAsync(); return authResult.AccessToken; }Call this method with the following code, replacing
<authorization-code>with the authorization code obtained from the authorization server. The.defaultscope ensures that the user has permission to access all the scopes for the resource.var token = await GetTokenUsingAuthorizationCode("<authorization-code>", "RedirectUri", new string[] { "BatchResourceUri/.default" });Construct a BatchTokenCredentials object that takes the delegate as a parameter. Use those credentials to open a BatchClient object. Then use the BatchClient object for subsequent operations against the Batch service:
public static void PerformBatchOperations()
{
    Func<Task<string>> tokenProvider = () => GetTokenUsingAuthorizationCode();

    using (var client = BatchClient.Open(new BatchTokenCredentials(BatchAccountUrl, tokenProvider)))
    {
        client.JobOperations.ListJobs();
    }
}
Code example: Use a Microsoft Entra service principal with Batch .NET
To authenticate with a service principal from Batch .NET:
Install the Azure Batch .NET and the MSAL NuGet packages.
Declare the following
usingstatements in your code:using Microsoft.Azure.Batch; using Microsoft.Azure.Batch.Auth; using Microsoft.Identity.Client;Reference the Microsoft Entra endpoint, including the tenant ID. When you use a service principal, you must provide a tenant-specific endpoint. You can get your tenant ID from the Microsoft Entra ID Overview page in the Azure portal.
private const string AuthorityUri = "https://login.microsoftonline.com/<tenant-id>";Reference the Batch service resource endpoint:
private const string BatchResourceUri = "https://batch.core.windows.net/";Reference your Batch account:
private const string BatchAccountUrl = "https://<myaccount>.<mylocation>.batch.azure.com";Specify the application (client) ID for your application. You can get the application ID from your application's Overview page in the Azure portal.
private const string ClientId = "<application-id>";Specify the secret key that you copied from the Azure portal.
private const string ClientKey = "<secret-key>";Write a callback method to acquire the authentication token from Microsoft Entra ID. The following ConfidentialClientApplicationBuilder.Create method calls MSAL for unattended authentication.
public static async Task<string> GetAccessToken(string[] scopes)
{
    var app = ConfidentialClientApplicationBuilder.Create(clientId)
                .WithClientSecret(ClientKey)
                .WithAuthority(new Uri(AuthorityUri))
                .Build();

    var result = await app.AcquireTokenForClient(scopes).ExecuteAsync();
    return result.AccessToken;
}
Call this method by using the following code. The
.defaultscope ensures that the application has permission to access all the scopes for the resource.var token = await GetAccessToken(new string[] { "BatchResourceId/.default" });Construct a BatchTokenCredentials object that takes the delegate as a parameter. Use those credentials to open a BatchClient object. Then use the BatchClient object for subsequent operations against the Batch service:
public static void PerformBatchOperations()
{
    Func<Task<string>> tokenProvider = () => GetAccessToken();

    using (var client = BatchClient.Open(new BatchTokenCredentials(BatchAccountUrl, tokenProvider)))
    {
        client.JobOperations.ListJobs();
    }
}
Code example: Use a Microsoft Entra service principal with Batch Python
To authenticate with a service principal from Batch Python:
Install the azure-batch and azure-common Python modules.
Reference the modules:
from azure.batch import BatchServiceClient
from azure.common.credentials import ServicePrincipalCredentials
To use a service principal, provide a tenant-specific endpoint. You can get your tenant ID from the Microsoft Entra ID Overview page or Properties page in the Azure portal.
TENANT_ID = "<tenant-id>"Reference the Batch service resource endpoint:
RESOURCE = "https://batch.core.windows.net/"Reference your Batch account:
BATCH_ACCOUNT_URL = "https://<myaccount>.<mylocation>.batch.azure.com"Specify the application (client) ID for your application. You can get the application ID from your application's Overview page in the Azure portal.
CLIENT_ID = "<application-id>"Specify the secret key that you copied from the Azure portal:
SECRET = "<secret-key>"Create a ServicePrincipalCredentials object:
credentials = ServicePrincipalCredentials(
    client_id=CLIENT_ID,
    secret=SECRET,
    tenant=TENANT_ID,
    resource=RESOURCE
)
Use the service principal credentials to open a BatchServiceClient object. Then use the BatchServiceClient object for subsequent operations against the Batch service.
    batch_client = BatchServiceClient(
    credentials,
    batch_url=BATCH_ACCOUNT_URL
)
For a Python example of how to create a Batch client authenticated by using a Microsoft Entra token, see the Deploying Azure Batch Custom Image with a Python Script sample.
Next steps
- Authenticate Batch Management solutions with Active Directory
- Client credential flows in MSAL.NET
- Using MSAL.NET to get tokens by authorization code (for web sites)
- Application and service principal objects in Microsoft Entra ID
- How to create a Microsoft Entra application and service principal that can access resources
- Microsoft identity platform code samples
Feedback
Coming soon: Throughout 2024 we will be phasing out GitHub Issues as the feedback mechanism for content and replacing it with a new feedback system. For more information see: https://aka.ms/ContentUserFeedback.
Submit and view feedback for