Plan to manage costs for Azure Batch
This article describes how you plan for and manage costs for Azure Batch. Before you deploy the service, you can use the Azure pricing calculator to estimate costs for Azure Batch. Later, as you deploy Azure resources, review the estimated costs.
After you start running Batch workloads, use Cost Management features to set budgets and monitor costs. You can also review forecasted costs and identify spending trends to identify areas where you might want to act. Costs for Azure Batch are only a portion of the monthly costs in your Azure bill. Although this article explains how to plan for and manage costs for Azure Batch, you're billed for all Azure services and resources used in your Azure subscription, including the third-party services.
Prerequisites
Cost analysis in Cost Management supports most Azure account types, but not all of them. To view the full list of supported account types, see Understand Cost Management data. To view cost data, you need at least read access for an Azure account. For information about assigning access to Microsoft Cost Management data, see Assign access to data.
Estimate costs before using Azure Batch
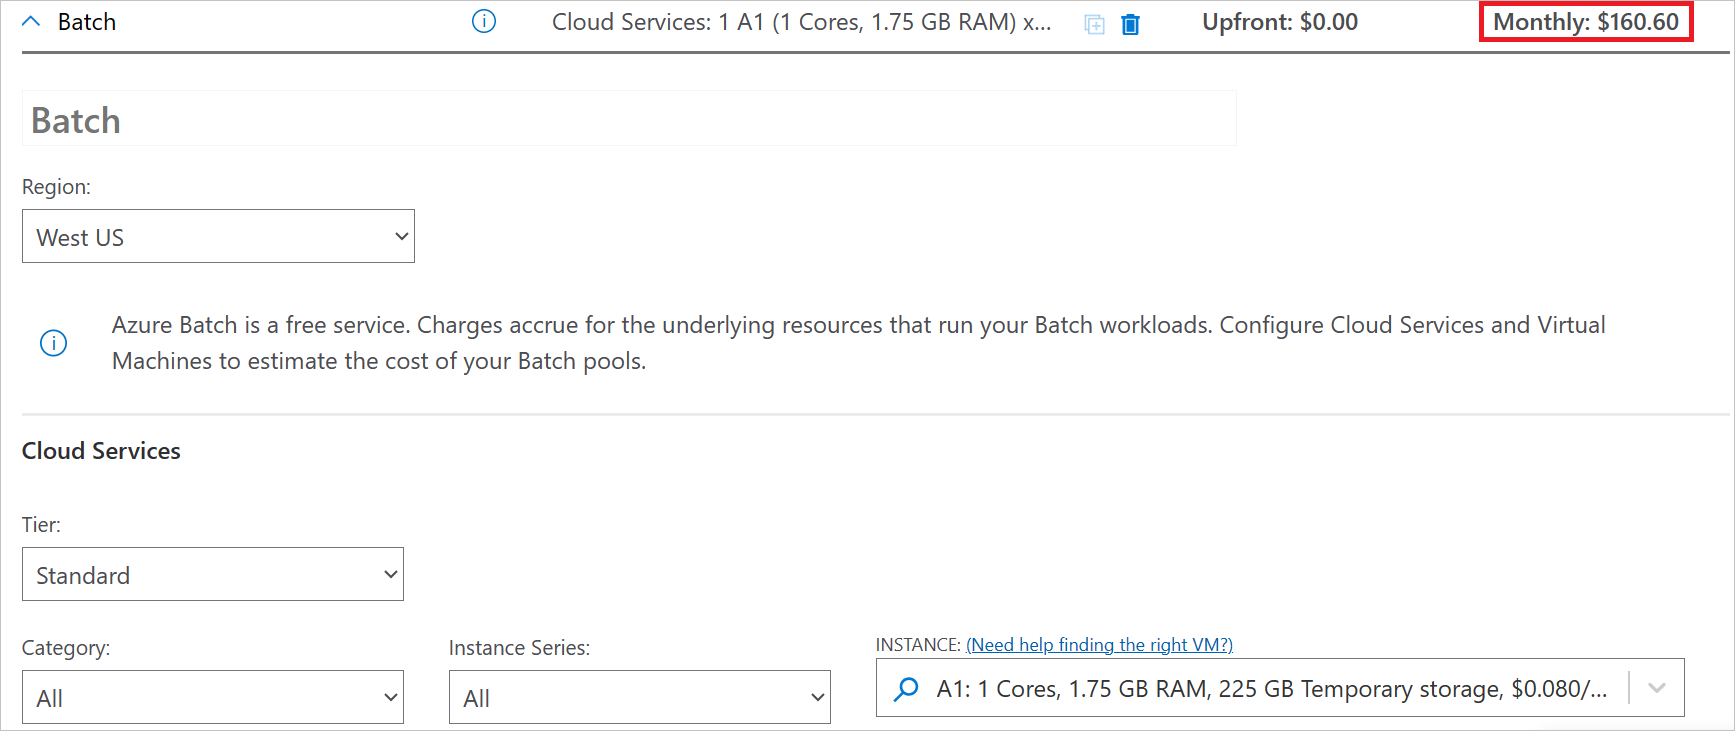
Use the Azure pricing calculator to estimate costs before you add virtual machines.
On the Products tab, go to the Compute section or search for Batch in the search bar. on the Batch tile, select Add to estimate and scroll down to the Your Estimate section.
Notice that Azure Batch is a free service and that the costs associated with Azure Batch are for the underlying resources that run your workloads. When adding Azure Batch to your estimate, the pricing calculator automatically creates a selection for Cloud Services and Virtual machines. You can read more about Azure Cloud Services and Azure Virtual Machines (VMs) in each product's documentation. What you need to know for estimated the cost of Azure Batch is that virtual machines are the most significant resource.
Select options from the drop-downs. There are various options available to choose from. The options that have the largest impact on your estimate total are your virtual machine's operating system, the operating system license if applicable, the VM size you select under INSTANCE, the number of instances you choose, and the amount of time your month your instances to run.
Notice that the total estimate changes as you select different options. The estimate appears in the upper corner and the bottom of the Your Estimate section.
You can learn more about the cost of running virtual machines from the Plan to manage costs for virtual machines documentation.
Understand the full billing model for Azure Batch
Azure Batch runs on Azure infrastructure that accrues costs when you deploy new resources. It's important to understand that there could be other additional infrastructure costs that might accrue.
How you're charged for Azure Batch
Azure Batch is a free service. There are no costs for Batch itself. However, there can be charges for the underlying compute resources and software licenses used to run Batch workloads. Costs may be incurred from virtual machines in a pool, data transfer from the VM, or any input or output data stored in the cloud.
Costs that might accrue with Azure Batch
Although Batch itself is a free service, many of the underlying resources that run your workloads aren't. These include:
- Virtual Machines
- To learn more about the costs associated with virtual machines, see the How you're charged for virtual machines section of Plan to manage costs for virtual machines.
- Each VM in a pool created with Virtual Machine Configuration has an associated OS disk that uses Azure-managed disks. Azure-managed disks have an additional cost, and other disk performance tiers have different costs as well.
- Storage
- When applications are deployed to Batch node virtual machines using application packages, you're billed for the Azure Storage resources that your application packages consume. You're also billed for the storage of any input or output files, such as resource files and other log data.
- In general, the cost of storage data associated with Batch is much lower than the cost of compute resources.
- In some cases, a load balancer
- Networking resources
- For Virtual Machine Configuration pools, standard load balancers are used, which require static IP addresses. The load balancers used by Batch are visible for accounts configured in user subscription mode, but not those in Batch service mode.
- Standard load balancers incur charges for all data passed to and from Batch pool VMs. Select Batch APIs that retrieve data from pool nodes (such as Get Task/Node File), task application packages, resource/output files, and container images also incur charges.
- Virtual Network
- Depending on what services you use, your Batch solution may incur additional fees. Services commonly used with Batch that may have associated costs include:
- Application Insights
- Data Factory
- Azure Monitor
Costs might accrue after resource deletion
After you delete Azure Batch resources, the following resources might continue to exist. They continue to accrue costs until you delete them.
- Virtual machine
- Any disks deployed other than the OS and local disks
- By default, the OS disk is deleted with the VM, but it can be set not to during the VM's creation
- Virtual network
- Your virtual NIC and public IP, if applicable, can be set to delete along with your virtual machine
- Bandwidth
- Load balancer
For virtual networks, one virtual network is billed per subscription and per region. Virtual networks cannot span regions or subscriptions. Setting up private endpoints in vNet setups may also incur charges.
Bandwidth is charged by usage; the more data transferred, the more you're charged.
Using Azure Prepayment with Azure Batch
While Azure Batch is a free service, you can pay for underlying resource charges with your Azure Prepayment credit. However, you can't use Azure Prepayment credit to pay for charges for third party products and services including those from the Azure Marketplace.
View cost analysis and create budgets
As you use Azure resources with Azure Batch, you incur costs. Azure resource usage unit costs vary by time intervals (seconds, minutes, hours, and days) or by unit usage (bytes, megabytes, and so on.) As soon as Azure resource use starts, costs are incurred, and you can see the costs in cost analysis. Microsoft Cost Management lets you plan, analyze and reduce your spending to maximize your cloud investment. You can view and filter Batch costs to be viewed and filtered, forecast future costs, and set spending limits with alerts when those limits are reached.
In the Azure portal, you can create budgets and spending alerts for your Batch pools or Batch accounts. Budgets and alerts are useful for notifying stakeholders of any risks of overspending, although it's possible for there to be a delay in spending alerts and to slightly exceed a budget.
The following screenshot shows an example of the Cost analysis view for a subscription, filtered to only display the accumulated costs associated with all Batch accounts. The lower charts show how the total cost for the period selected can be categorized by consumed service, location, and meter. While this is an example and is not meant to be reflective of costs you may see for your subscriptions, it is typical in that the largest cost is for the virtual machines that are allocated for Batch pool nodes.
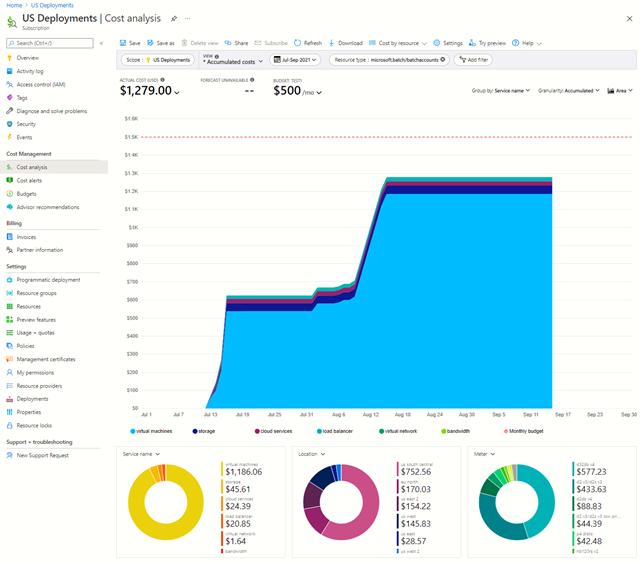
A further level of cost analysis detail can be obtained by specifying a Resource filter. For Batch accounts, these values are the Batch account name plus pool name. This allows you to view costs for a specific pool, multiple pools, or one or more accounts.
View cost analysis for a Batch pool
Batch service pool allocation mode
For Batch accounts created with the Batch service pool allocation mode:
- In the Azure portal, type in or select Cost Management + Billing .
- Select your subscription in the Billing scopes section.
- Under Cost Management, select Cost analysis.
- Select Add Filter. In the first drop-down, select Resource.
- In the second drop-down, select the Batch pool. When the pool is selected, you see the cost analysis for your pool. The screenshot below shows example data.
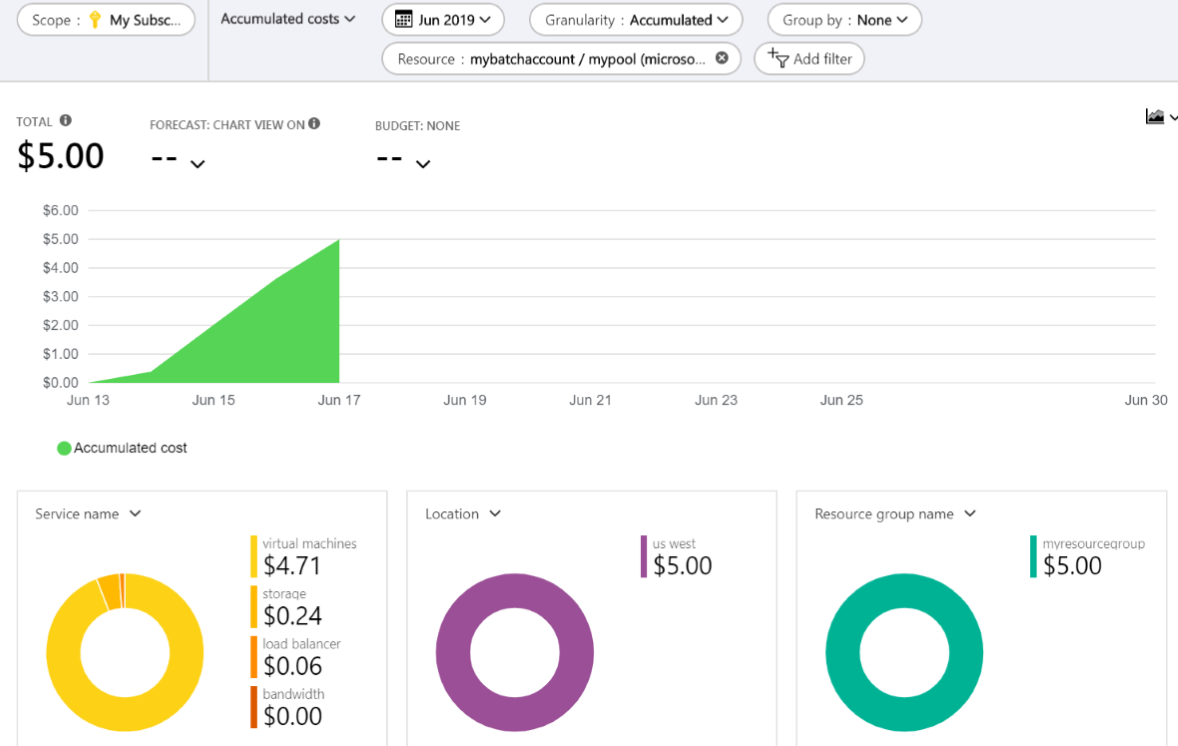
The resulting cost analysis shows the cost of the pool as well as the resources that contribute to this cost. In this example, the VMs used in the pool are the most costly resource.
Note
The pool in this example uses Virtual Machine Configuration, which is recommended for most pools and are charged based on the Virtual Machines pricing structure. Pools that use Cloud Services Configuration are charged based on the Cloud Services pricing structure.
Tags can be associated with Batch accounts, allowing tags to be used for further cost filtering. For example, tags can be used to associate project, user, or group information with a Batch account. Tags cannot currently be associated with Batch pools.
User subscription pool allocation mode
For Batch accounts created with the user subscription pool allocation mode:
- In the Azure portal, type in or select Cost Management + Billing .
- Select your subscription in the Billing scopes section.
- Under Cost Management, select Cost analysis.
- Select Add Filter. In the first drop-down, select Tag.
- In the second drop-down, select poolname.
- In the third drop-down, select the Batch pool. When the pool is selected, you see the cost analysis for your pool. The screenshot below shows example data.
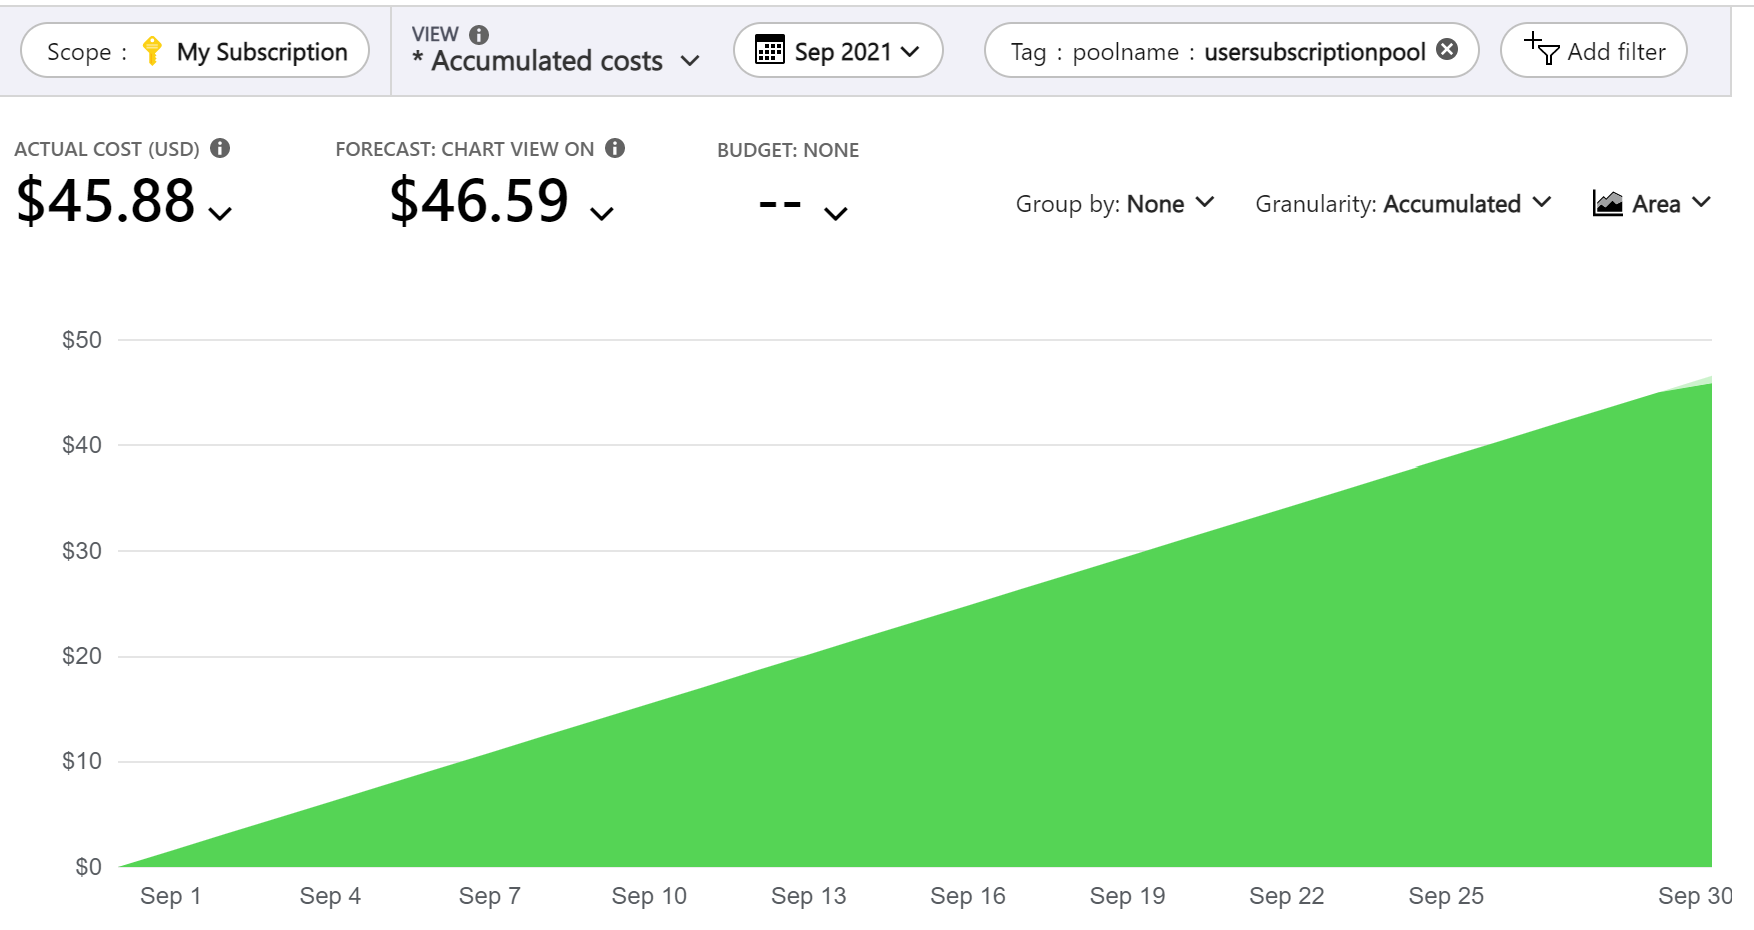
Note that if you're interested in viewing cost data for all pools in a user subscription Batch account, you can select batchaccountname in the second drop-down and the name of your Batch account in the third drop-down.
Note
Pools created by user subscription Batch accounts don't show up under the Resource filter, though their usage still shows up when filtering for "virtual machines" under service name.
Create a budget for a Batch pool
Budgets can be created and cost alerts issued when various percentages of a budget are reached, such as 60%, 80%, and 100%. The budgets can specify one or more filters, so you can monitor and alert on Batch account costs at various granularities.
- From the Cost analysis page, select Budget: none.
- Select Create new budget >.
- Use the resulting window to configure a budget specifically for your pool. For more information, see Tutorial: Create and manage Azure budgets.
Minimize costs associated with Azure Batch
Depending on your scenario, you may want to reduce costs as much as possible. Consider using one or more of these strategies to maximize the efficiency of your workloads and reduce potential costs.
Reduce pool node use
The largest costs associated with using Batch are typically from the virtual machines allocated for pool nodes. For Virtual Machine configuration pools, the associated managed disks used for the VM OS disks can also contribute significantly to costs.
Evaluate your Batch application to determine if pool nodes are being well utilized by job tasks, or if pool nodes are idle for more than the expected time. It may be possible to reduce the number of pool nodes that are allocated, reduce the rate of pool node scale-up, or increase the rate of scale-down to increase utilization.
In addition to custom monitoring, Batch metrics can help to identify nodes that are allocated but in an idle state. You can select a metric for most pool node states to view by using Batch monitoring metrics in the Azure portal. The 'Idle Node Count' and 'Running Node Count' could be viewed to give an indication of how well the pool nodes are utilized, for example.
Ensure pool nodes are able to run tasks
Allocated nodes that are listed for a pool normally incur costs, but it is possible for pool nodes to be in a state where can't run tasks, such as 'unusable' or 'starttaskfailed'. Batch APIs or metrics can be used to monitor for and detect this category of VM. The reason for these states can then be determined and corrective action taken to reduce or eliminate these unhealthy nodes.
Use the right pool node VM size
Ensure the appropriate VM size is being used, so that VMs are utilized well when running tasks while providing the performance necessary to complete your job tasks in the required time. Pool node VMs can be underutilized in some situations, such as low CPU usage. Costs can be saved by choosing a VM size with a lower price.
To determine VM utilization, you can log in to a node when running tasks to view performance data or use monitoring capabilities, such as Application Insights, to obtain performance data from pool nodes.
Use pool slots to reduce node requirements
Multiple task slots can be specified for a pool, so that the corresponding number of tasks can be run in parallel on each node. Pool task slots can be used to reduce the number of nodes used in a pool by choosing larger VM sizes and running multiple tasks in parallel on the node to ensure the node is well utilized. If nodes are underutilized, slots can be used to increase utilization. For example, for a single-threaded task application, one slot per core could be configured. It is also possible to have more slots than cores. This would be applicable if the application blocks significantly waiting for calls to external services to be returned, for one example.
Setting taskSchedulingPolicy to pack helps ensure VMs are utilized as much as possible, with scaling more easily able to remove nodes not running any tasks.
Use Azure Spot virtual machines
Azure Spot VMs reduce the cost of Batch workloads by taking advantage of surplus computing capacity in Azure. When you specify Spot VMs in your pools, Batch uses this surplus to run your workload. There can be substantial cost savings when you use Spot VMs instead of dedicated VMs. Keep in mind that Spot VMs are not suitable for all workloads, since there may not be available capacity to allocate, or they may get preempted.
Use ephemeral OS disks
By default, pool nodes use managed disks, which incur costs. Virtual Machine Configuration pools in some VM sizes can use ephemeral OS disks, which create the OS disk on the VM cache or temporary SSD, to avoid extra costs associated with managed disks.
Purchase reservations for virtual machine instances
If you intend to use Batch for a long period of time, you can reduce the cost of VMs by using Azure Reservations for your workloads. A reservation rate is considerably lower than a pay-as-you-go rate. Virtual machine instances used without a reservation are charged at the pay-as-you-go rate. When you purchase a reservation, the reservation discount is applied. When you commit to one-year or three-year plans for VM instances, significant discounts are applied to VM usage, including VMs consumed via Batch pools.
It is important to note that reservation discount is "use-it-or-lose-it." If there no matching resources are used for an hour, you'll lose the reservation quantity for that hour. Unused reserved hours can't be carried forward, and are therefore lost if not used. Batch workloads often scale the number of allocated VMs according to load and have varying load, including periods where there is no load. Care therefore needs to be taken determining the reservation amount, given that reserved hours are lost if Batch VMs are scaled down below the reservation quantity.
Use automatic scaling
Automatic scaling dynamically scales the number of VMs in your Batch pool based on demands of the current job. When you scale the pool based on the lifetime of a job, automatic scaling ensures that VMs are scaled up and used only when there is a job to perform. When the job is complete, or when there are no jobs, the VMs are automatically scaled down to save compute resources. Scaling allows you to lower the overall cost of your Batch solution by using only the resources you need.
Next steps
- Learn more about Microsoft Cost Management + Billing.
- Learn about using Azure Spot VMs with Batch.
Feedback
Coming soon: Throughout 2024 we will be phasing out GitHub Issues as the feedback mechanism for content and replacing it with a new feedback system. For more information see: https://aka.ms/ContentUserFeedback.
Submit and view feedback for