Tutorial: Configure role-based access control (RBAC) roles in Azure Kubernetes Service (AKS) using Ansible
Important
Ansible 2.8 (or later) is required to run the sample playbooks in this article.
Azure Kubernetes Service (AKS) makes it simple to deploy a managed Kubernetes cluster in Azure. AKS reduces the complexity and operational overhead of managing Kubernetes by offloading much of that responsibility to Azure. As a hosted Kubernetes service, Azure handles critical tasks like health monitoring and maintenance for you. The Kubernetes masters are managed by Azure. You only manage and maintain the agent nodes. As a managed Kubernetes service, AKS is free - you pay only for the agent nodes within your clusters; not for the masters.
AKS can be configured to use Microsoft Entra ID for user authentication. Once configured, you use your Microsoft Entra authentication token to sign into the AKS cluster. The RBAC can be based on a user's identity or directory group membership.
In this article, you learn how to:
- Create a Microsoft Entra ID-enabled AKS cluster
- Configure an RBAC role in the cluster
Prerequisites
- Azure subscription: If you don't have an Azure subscription, create a free account before you begin.
- Azure service principal: Create a service principal, making note of the following values: appId, displayName, password, and tenant.
Install Ansible: Do one of the following options:
- Install and configure Ansible on a Linux virtual machine
- Configure Azure Cloud Shell and - if you don't have access to a Linux virtual machine - create a virtual machine with Ansible.
- Install the RedHat OpenShift library -
pip install openshift
Configure Microsoft Entra ID for AKS authentication
When configuring Microsoft Entra ID for AKS authentication, two Microsoft Entra applications are configured. This operation must be completed by an Azure tenant administrator. For more information, see Integrate Microsoft Entra ID with AKS.
From the Azure tenant administrator, get the following values:
- Server app secret
- Server app ID
- Client app ID
- Tenant ID
These values are needed to run the sample playbook.
Create an AKS cluster
In this section, you create an AKS with the Microsoft Entra application.
Here are some key notes to consider when working with the sample playbook:
The playbook loads
ssh_keyfrom~/.ssh/id_rsa.pub. If you modify it, use the single-line format - starting with "ssh-rsa" (without the quotes).The
client_idandclient_secretvalues are loaded from~/.azure/credentials, which is the default credential file. You can set these values to your service principal or load these values from environment variables:client_id: "{{ lookup('env', 'AZURE_CLIENT_ID') }}" client_secret: "{{ lookup('env', 'AZURE_SECRET') }}"
Save the following playbook as aks-create.yml:
- name: Create resource group
  azure_rm_resourcegroup:
      name: "{{ resource_group }}"
      location: "{{ location }}"

- name: List supported kubernetes version from Azure
  azure_rm_aksversion_facts:
      location: "{{ location }}"
  register: versions

- name: Create AKS cluster with RBAC enabled
  azure_rm_aks:
      resource_group: "{{ resource_group }}"
      name: "{{ name }}"
      dns_prefix: "{{ name }}"
      enable_rbac: yes
      kubernetes_version: "{{ versions.azure_aks_versions[-1] }}"
      agent_pool_profiles:
        - count: 3
          name: nodepool1
          vm_size: Standard_D2_v2
      linux_profile:
          admin_username: azureuser
          ssh_key: "{{ lookup('file', '~/.ssh/id_rsa.pub') }}"
      service_principal:
          client_id: "{{ lookup('ini', 'client_id section=default file=~/.azure/credentials') }}"
          client_secret: "{{ lookup('ini', 'secret section=default file=~/.azure/credentials') }}"
      aad_profile:
          client_app_id: "{{ client_app_id }}"
          server_app_id: "{{ server_app_id }}"
          server_app_secret: "{{ server_app_secret }}"
          tenant_id: "{{ app_tenant_id }}"
  register: aks

- name: Save cluster user config
  copy:
      content: "{{ aks.kube_config }}"
      dest: "aks-{{ name }}-kubeconfig-user"

- name: Get admin config of AKS
  azure_rm_aks_facts:
      resource_group: "{{ resource_group }}"
      name: "{{ name }}"
      show_kubeconfig: admin
  register: aks

- name: Save the kubeconfig
  copy:
      content: "{{ aks.aks[0].kube_config }}"
      dest: "aks-{{ name }}-kubeconfig"
Get the Microsoft Entra Object ID
To create an RBAC binding, you first need to get the Microsoft Entra Object ID.
Sign in to the Azure portal.
In the search field at the top of the page, enter Microsoft Entra ID.
Click
Enter.In the Manage menu, select Users.
In the name field, search for your account.
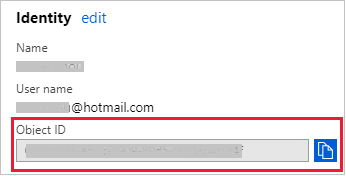
In the Name column, select the link to your account.
In the Identity section, copy the Object ID.
Create RBAC binding
In this section, you create a role binding or cluster role binding in AKS.
Save the following playbook as kube-role.yml:
apiVersion: rbac.authorization.k8s.io/v1
kind: ClusterRoleBinding
metadata:
  name: cluster-admins
roleRef:
  apiGroup: rbac.authorization.k8s.io
  kind: ClusterRole
  name: cluster-admin
subjects:
- apiGroup: rbac.authorization.k8s.io
  kind: User
  name: <your-aad-account>
Replace the <your-aad-account> placeholder with your Microsoft Entra tenant Object ID.
Save the following playbook - that deploys your new role to AKS - as aks-kube-deploy.yml:
- name: Apply role to AKS
  k8s:
      src: kube-role.yml
      kubeconfig: "aks-{{ name }}-kubeconfig"
Run the sample playbook
This section lists the complete sample playbook that calls the tasks creating in this article.
Save the following playbook as aks-rbac.yml:
---
- hosts: localhost
  vars:
      resource_group: aksansibletest
      name: aksansibletest
      location: eastus
  tasks:
     - name: Ensure resource group exist
       azure_rm_resourcegroup:
           name: "{{ resource_group }}"
           location: "{{ location }}"

     - name: Create AKS
       vars:
           client_app_id: <client id>
           server_app_id: <server id>
           server_app_secret: <server secret>
           app_tenant_id: <tenant id>
       include_tasks: aks-create.yml

     - name: Enable RBAC
       include_tasks: aks-kube-deploy.yml
In the vars section, replace the following placeholders with your Microsoft Entra information:
<client id><server id><server secret><tenant id>
Run the complete playbook using the ansible-playbook command:
ansible-playbook aks-rbac.yml
Verify the results
In this section, you use kubectl list the nodes creating in this article.
Enter the following command at a terminal prompt:
kubectl --kubeconfig aks-aksansibletest-kubeconfig-user get nodes
The command will direct you to an authentication page. Sign in with your Azure account.
Once authenticated, kubectl lists the nodes in similar fashion to the following results:
To sign in, use a web browser to open the page https://microsoft.com/devicelogin and enter the code XXXXXXXX to authenticate.
NAME                       STATUS   ROLES   AGE   VERSION
aks-nodepool1-33413200-0   Ready    agent   49m   v1.12.6
aks-nodepool1-33413200-1   Ready    agent   49m   v1.12.6
aks-nodepool1-33413200-2   Ready    agent   49m   v1.12.6
Clean up resources
When no longer needed, delete the resources created in this article.
Save the following code as cleanup.yml:
---
- hosts: localhost
  vars:
      name: aksansibletest
      resource_group: aksansibletest
  tasks:
      - name: Clean up resource group
        azure_rm_resourcegroup:
            name: "{{ resource_group }}"
            state: absent
            force: yes
      - name: Remove kubeconfig
        file:
            state: absent
            path: "aks-{{ name }}-kubeconfig"
Run the playbook using ansible-playbook
ansible-playbook cleanup.yml
Next steps
Feedback
Coming soon: Throughout 2024 we will be phasing out GitHub Issues as the feedback mechanism for content and replacing it with a new feedback system. For more information see: https://aka.ms/ContentUserFeedback.
Submit and view feedback for