Quickstart: Deploy the Ansible solution template for Azure to CentOS
Caution
This article references CentOS, a Linux distribution that is nearing End Of Life (EOL) status. Please consider your use and plan accordingly. For more information, see the CentOS End Of Life guidance.
The Ansible solution template for Azure is designed to configure an Ansible instance on a CentOS virtual machine along with Ansible and a suite of tools configured to work with Azure. The tools include:
- Ansible modules for Azure - The Ansible modules for Azure are a suite of modules that enable you to create and manage your infrastructure on Azure. The latest version of these modules is deployed by default. However, during the solution-template deployment process, you can specify a version number that is appropriate for your environment.
- Azure Command-Line Interface (CLI) 2.0 - The Azure CLI 2.0 is a cross-platform command-line experience for managing Azure resources.
- managed identities for Azure resources - The managed identities for Azure resources feature addresses the issue of keeping cloud application credentials secure.
Prerequisites
- Azure subscription: If you don't have an Azure subscription, create a free account before you begin.
Deploy the Ansible solution template
Browse to the Ansible solution template in the Azure Marketplace.
Select GET IT NOW.
A window appears that details the Terms of Use, Privacy Policy, and Use of Azure Marketplace Terms. Select Continue.
The Azure portal appears and displays the Ansible page that describes the solution template. Select Create.
In the Create Ansible page, you see several tabs. On the Basics tab, enter the required information:
Name - Specify the name your Ansible instance. For demo purposes, the name
ansiblehostis used.User name: - Specify the user name that will have access to the Ansible instance. For demo purposes, the name
ansibleuseris used.Authentication type: - Select either Password or SSH public key. For demo purposes, SSH public key is selected.
Password and Confirm password - If you select Password for Authentication type, enter your password for these values.
SSH public key - If you select SSH public key for Authentication type, enter your RSA public key in the single-line format - starting with
ssh-rsa.Subscription - Select your Azure subscription from the dropdown list.
Resource group - Select an existing resource group from the dropdown list, or select Create new and specify a name for a new resource group. For demo purposes, a new resource group named
ansiblergis used.Location - Select the location from the dropdown list that is appropriate for your scenario.
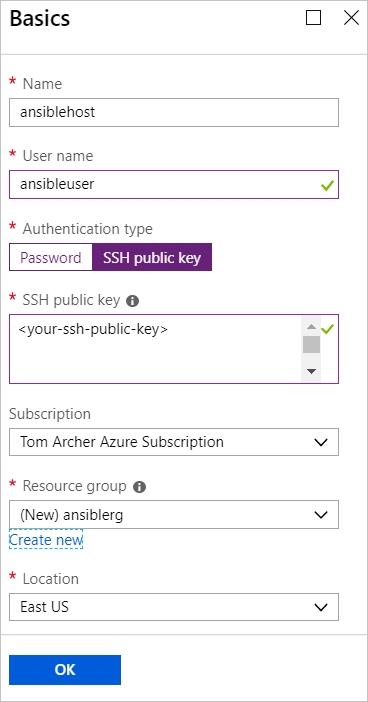
Select OK.
In the Additional Settings tab, enter the required information:
Size - The Azure portal defaults to a standard size. To specify a different size that accommodates your specific scenario, select the arrow to display a list of different sizes.
VM disk type - Select either SSD (Premium Solid-State Drive) or HDD (Hard Disk Drive). For demo purposes, SSD is selected for its performance benefits. For more information on each these types of disk storage, see the following articles:
Public IP Address - Specify this setting if you want to communicate with the virtual machine from outside the virtual machine. The default is a new public IP address that has the name
ansible-pip. To specify a different IP address, select the arrow specify the attributes - such as name, SKU, and Assignment, of that IP address.Domain name label - Enter the public-facing domain name of the virtual machine. The name must be unique and meet naming requirements. For more information about specifying a name for the virtual machine, see Naming conventions for Azure resources.
Ansible version - Specify either a version number or the value
latestto deploy the latest version. Select the information icon next to Ansible version to see more information about available versions.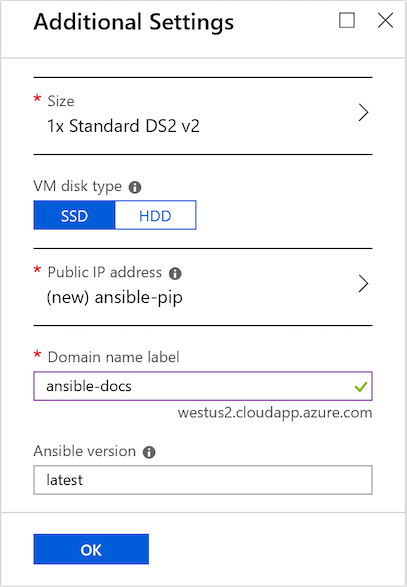
Select OK.
In the Ansible Integration Settings tab, specify the authentication type. For more information about securing Azure resources, see What is managed identities for Azure resources?.
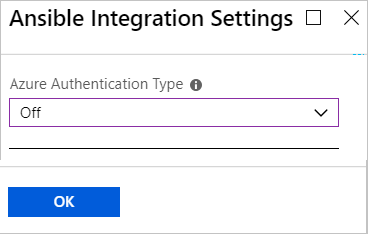
Select OK.
The Summary page displays showing the validation process and listing the specified criteria for the Ansible deployment. A link at the bottom of the tab allows you to Download the template and parameters for use with supported Azure languages and platforms.
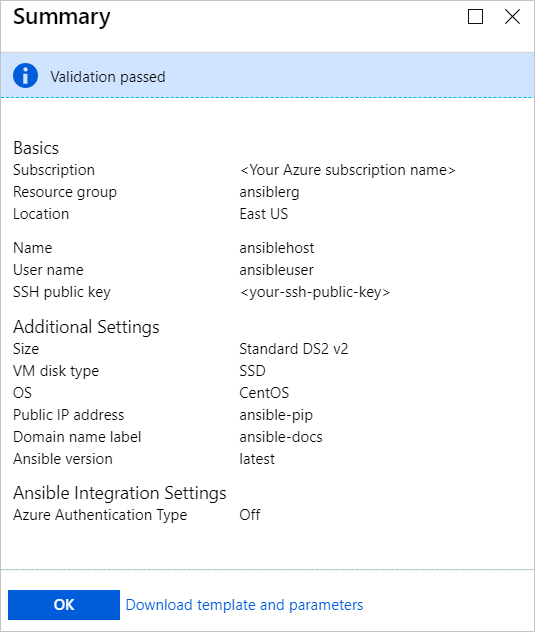
Select OK.
When the Create tab appears, select OK to deploy Ansible.
Select the Notifications icon at the top of the portal page to track the Ansible deployment. Once the deployment is complete, select Go to resource group.

On the resource group page, get the IP address of your Ansible host and sign in to manage your Azure resources using Ansible.
Next steps
Feedback
Coming soon: Throughout 2024 we will be phasing out GitHub Issues as the feedback mechanism for content and replacing it with a new feedback system. For more information see: https://aka.ms/ContentUserFeedback.
Submit and view feedback for