Tutorial: Migrate SQL Server to SQL Server on Azure Virtual Machines online in Azure Data Studio
Use the Azure SQL migration extension in Azure Data Studio to migrate the databases from a SQL Server instance to a SQL Server on Azure Virtual Machine (SQL Server 2016 and above) with minimal downtime. For methods that may require some manual effort, see the article SQL Server instance migration to SQL Server on Azure Virtual Machine.
In this tutorial, you migrate the AdventureWorks database from an on-premises instance of SQL Server to a SQL Server on Azure Virtual Machine with minimal downtime by using Azure Data Studio with Azure Database Migration Service.
In this tutorial, you learn how to:
- Launch the Migrate to Azure SQL wizard in Azure Data Studio.
- Run an assessment of your source SQL Server database(s)
- Collect performance data from your source SQL Server
- Get a recommendation of the SQL Server on Azure Virtual Machine SKU best suited for your workload
- Specify details of your source SQL Server, backup location and your target SQL Server on Azure Virtual Machine
- Create a new Azure Database Migration Service and install the self-hosted integration runtime to access source server and backups.
- Start and monitor the progress for your migration.
- Perform the migration cutover when you are ready.
This article describes an online migration from SQL Server to a SQL Server on Azure Virtual Machine. Offline migration, see Migrate SQL Server to a SQL Server on Azure Virtual Machine offline using Azure Data Studio with DMS.
Prerequisites
To complete this tutorial, you need to:
Install the Azure SQL migration extension from the Azure Data Studio marketplace
Have an Azure account that is assigned to one of the built-in roles listed below:
- Contributor for the target SQL Server on Azure Virtual Machine (and Storage Account to upload your database backup files from SMB network share).
- Reader role for the Azure Resource Groups containing the target SQL Server on Azure Virtual Machine or the Azure storage account.
- Owner or Contributor role for the Azure subscription.
- As an alternative to using the above built-in roles you can assign a custom role as defined in this article.
Important
Azure account is only required when configuring the migration steps and is not required for assessment or Azure recommendation steps in the migration wizard.
Create a target SQL Server on Azure Virtual Machine.
Important
If you have an existing Azure Virtual Machine, it should be registered with SQL IaaS Agent extension in Full management mode.
Ensure that the logins used to connect the source SQL Server are members of the sysadmin server role or have
CONTROL SERVERpermission.Use one of the following storage options for the full database and transaction log backup files:
- SMB network share
- Azure storage account file share or blob container
Important
- The Azure SQL Migration extension for Azure Data Studio doesn't take database backups, or neither initiate any database backups on your behalf. Instead, the service uses existing database backup files for the migration.
- If your database backup files are provided in an SMB network share, Create an Azure storage account that allows the DMS service to upload the database backup files. Make sure to create the Azure Storage Account in the same region as the Azure Database Migration Service instance is created.
- Azure Database Migration Service does not initiate any backups, and instead uses existing backups, which you may already have as part of your disaster recovery plan, for the migration.
- Each backup can be written to either a separate backup file or multiple backup files. However, appending multiple backups (i.e. full and t-log) into a single backup media is not supported.
- Use compressed backups to reduce the likelihood of experiencing potential issues associated with migrating large backups.
Ensure that the service account running the source SQL Server instance has read and write permissions on the SMB network share that contains database backup files.
The source SQL Server instance certificate from a database protected by Transparent Data Encryption (TDE) needs to be migrated to the target SQL Server on Azure Virtual Machine before migrating data. To learn more, see Move a TDE Protected Database to Another SQL Server.
Tip
If your database contains sensitive data that is protected by Always Encrypted, migration process using Azure Data Studio with DMS will automatically migrate your Always Encrypted keys to your target SQL Server on Azure Virtual Machine.
If your database backups are in a network file share, provide a machine to install self-hosted integration runtime to access and migrate database backups. The migration wizard provides the download link and authentication keys to download and install your self-hosted integration runtime. In preparation for the migration, ensure that the machine where you plan to install the self-hosted integration runtime has the following outbound firewall rules and domain names enabled:
Domain names Outbound ports Description Public Cloud: {datafactory}.{region}.datafactory.azure.net
or*.frontend.clouddatahub.net
Azure Government:{datafactory}.{region}.datafactory.azure.us
China:{datafactory}.{region}.datafactory.azure.cn443 Required by the self-hosted integration runtime to connect to the Data Migration service.
For new created Data Factory in public cloud, locate the FQDN from your Self-hosted Integration Runtime key, which is in format{datafactory}.{region}.datafactory.azure.net. For old Data factory, if you don't see the FQDN in your Self-hosted Integration key, use *.frontend.clouddatahub.net instead.download.microsoft.com443 Required by the self-hosted integration runtime for downloading the updates. If you have disabled autoupdate, you can skip configuring this domain. *.core.windows.net443 Used by the self-hosted integration runtime that connects to the Azure storage account for uploading database backups from your network share Tip
If your database backup files are already provided in an Azure storage account, self-hosted integration runtime is not required during the migration process.
Runtime is installed on the machine using self-hosted integration runtime. The machine connects to the source SQL Server instance and the network file share where backup files are located. Outbound port 445 should be enabled to allow access to the network file share. Also see recommendations for using self-hosted integration runtime
If you're using the Azure Database Migration Service for the first time, ensure that Microsoft.DataMigration resource provider is registered in your subscription. You can follow the steps to register the resource provider
Launch the Migrate to Azure SQL wizard in Azure Data Studio
- Open Azure Data Studio and select on the server icon to connect to your on-premises SQL Server (or SQL Server on Azure Virtual Machine).
- On the server connection, right-click and select Manage.
- On the server's home page, Select Azure SQL Migration extension.
- On the Azure SQL Migration dashboard, select Migrate to Azure SQL to launch the migration wizard.
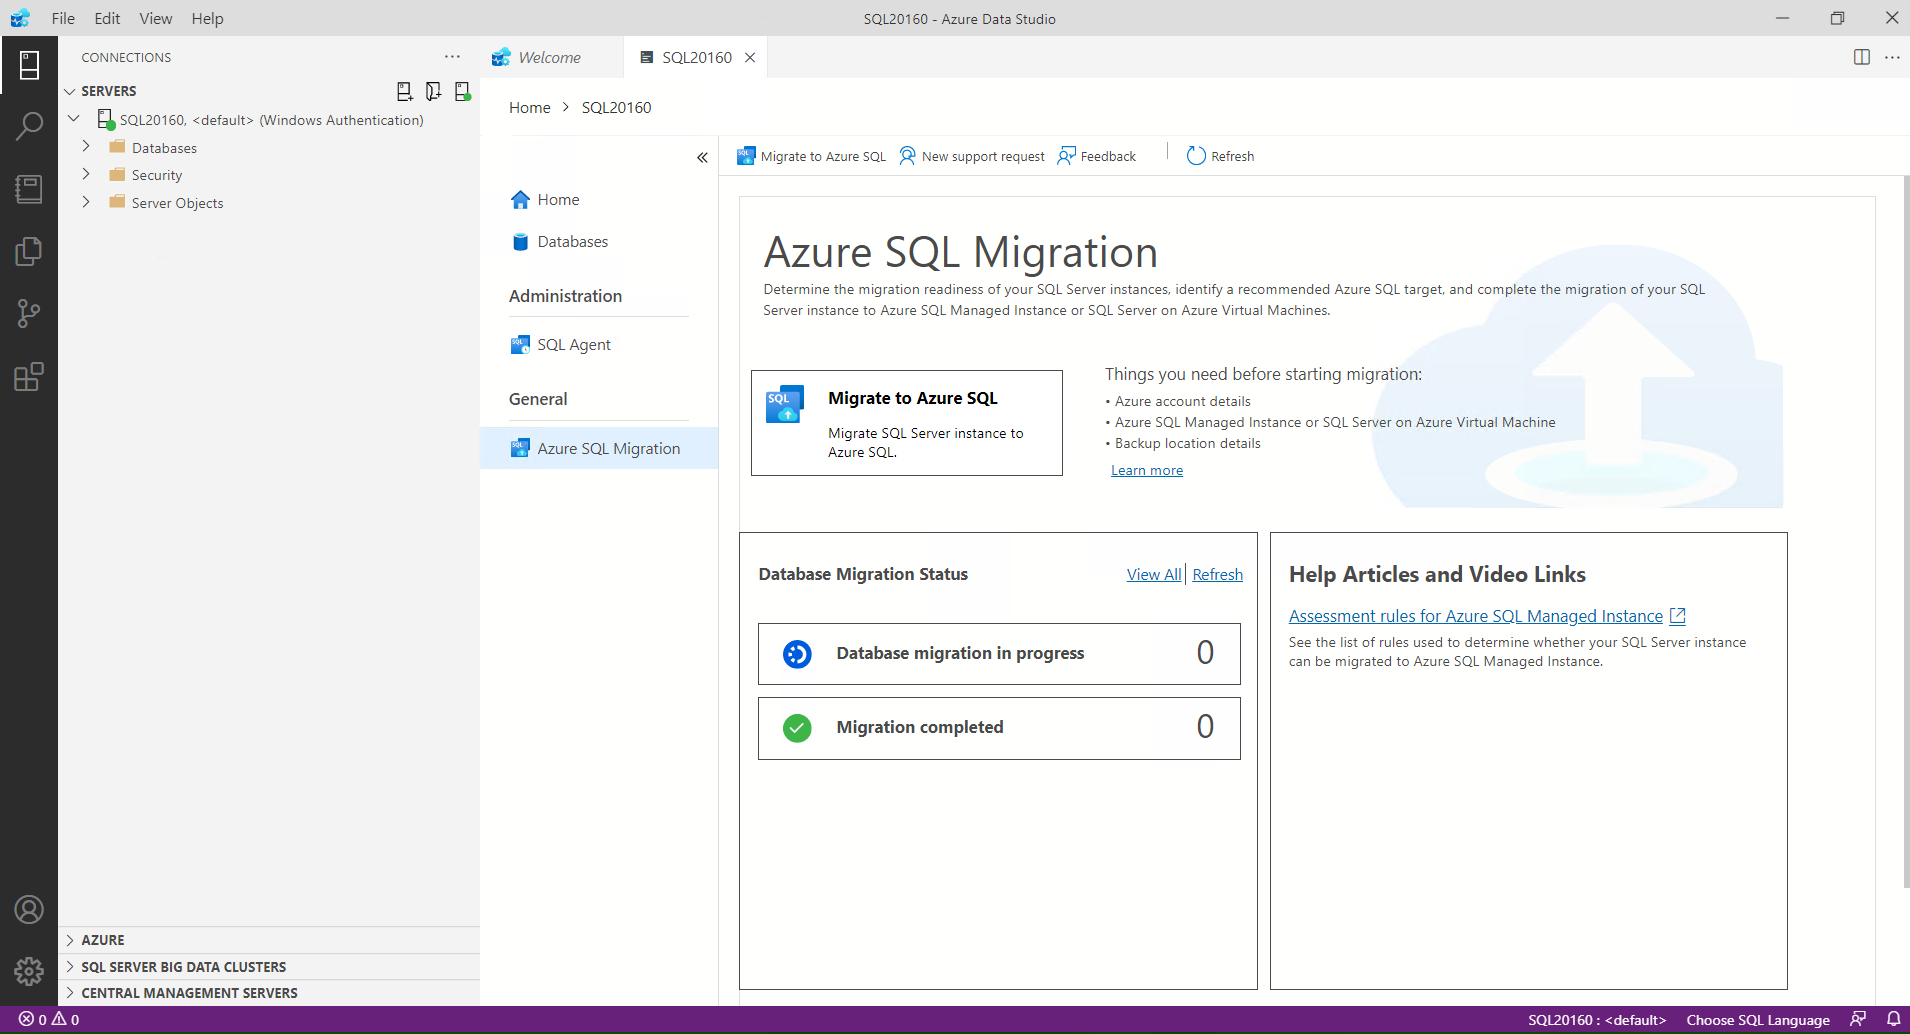
- In the first step of the migration wizard, link your existing or new Azure account to Azure Data Studio.
Run database assessment, collect performance data and get Azure recommendation
- Select the database(s) to run assessment and select Next.
- Select SQL Server on Azure Virtual Machine as the target.
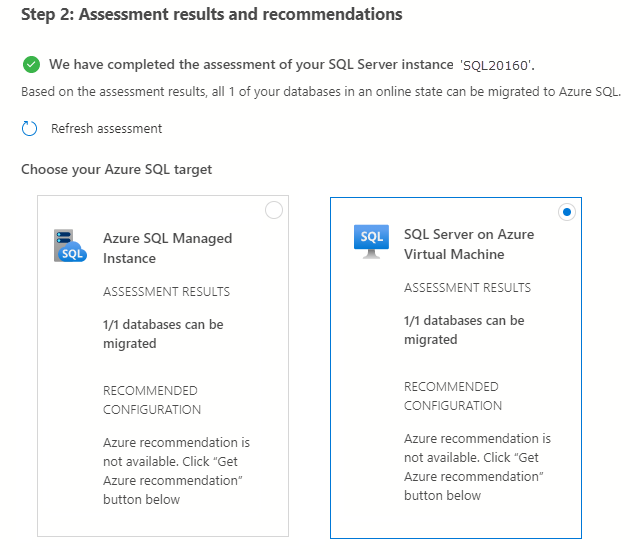
- Select on the View/Select button to view details of the assessment results for your database(s), select the database(s) to migrate, and select OK.
- Select the Get Azure recommendation button.
- Pick the Collect performance data now option and enter a path for performance logs to be collected and select the Start button.
- Azure Data Studio will now collect performance data until you either stop the collection, press the Next button in the wizard or close Azure Data Studio.
- After 10 minutes you see a recommended configuration for your Azure SQL VM. You can also press the Refresh recommendation link after the initial 10 minutes to refresh the recommendation with the extra data collected.
- In the above SQL Server on Azure Virtual Machine box, select the View details button for more information about your recommendation.
- Close the view details box and press the Next button.
Configure migration settings
- Specify your target SQL Server on Azure Virtual Machine by selecting your subscription, location, resource group from the corresponding drop-down lists and then select Next.
- Select Online migration as the migration mode.
Note
In the online migration mode, the source SQL Server database can be used for read and write activity while database backups are continuously restored on the target SQL Server on Azure Virtual Machine. Application downtime is limited to duration for the cutover at the end of migration.
- In step 5, select the location of your database backups. Your database backups can either be located on an on-premises network share or in an Azure storage blob container.
Note
If your database backups are provided in an on-premises network share, DMS will require you to setup self-hosted integration runtime in the next step of the wizard. Self-hosted integration runtime is required to access your source database backups, check the validity of the backup set and upload them to Azure storage account.
If your database backups are already on an Azure storage blob container, you do not need to setup self-hosted integration runtime.
For backups located on a network share provide the below details of your source SQL Server, source backup location, target database name and Azure storage account for the backup files to be uploaded to.
Field Description Source Credentials - Username The credential (Windows / SQL authentication) to connect to the source SQL Server instance and validate the backup files. Source Credentials - Password The credential (Windows / SQL authentication) to connect to the source SQL Server instance and validate the backup files. Network share location that contains backups The network share location that contains the full and transaction log backup files. Any invalid files or backups files in the network share that don't belong to the valid backup set will be automatically ignored during the migration process. Windows user account with read access to the network share location The Windows credential (username) that has read access to the network share to retrieve the backup files. Password The Windows credential (password) that has read access to the network share to retrieve the backup files. Target database name The target database name can be modified if you wish to change the database name on the target during the migration process. For backups stored in an Azure storage blob container, specify the below details of the Target database name, Resource group, Azure storage account, Blob container from the corresponding drop-down lists.
Field Description Target database name The target database name can be modified if you wish to change the database name on the target during the migration process. Storage account details The resource group, storage account and container where backup files are located.
- Select Next to continue.
Important
If loopback check functionality is enabled and the source SQL Server and file share are on the same computer, then source won't be able to access the files hare using FQDN. To fix this issue, disable loopback check functionality using the instructions here
The Azure SQL migration extension for Azure Data Studio no longer requires specific configurations on your Azure Storage account network settings to migrate your SQL Server databases to Azure. However, depending on your database backup location and desired storage account network settings, there are a few steps needed to ensure your resources can access the Azure Storage account. See the following table for the various migration scenarios and network configurations:
Scenario SMB network share Azure Storage account container Enabled from all networks No extra steps No extra steps Enabled from selected virtual networks and IP addresses See 1a See 2a Enabled from selected virtual networks and IP addresses + private endpoint See 1b See 2b 1a - Azure Blob storage network configuration
If you have your Self-Hosted Integration Runtime (SHIR) installed on an Azure VM, see section 1b - Azure Blob storage network configuration. If you have your Self-Hosted Integration Runtime (SHIR) installed on your on-premises network, you need to add your client IP address of the hosting machine in your Azure Storage account as so:
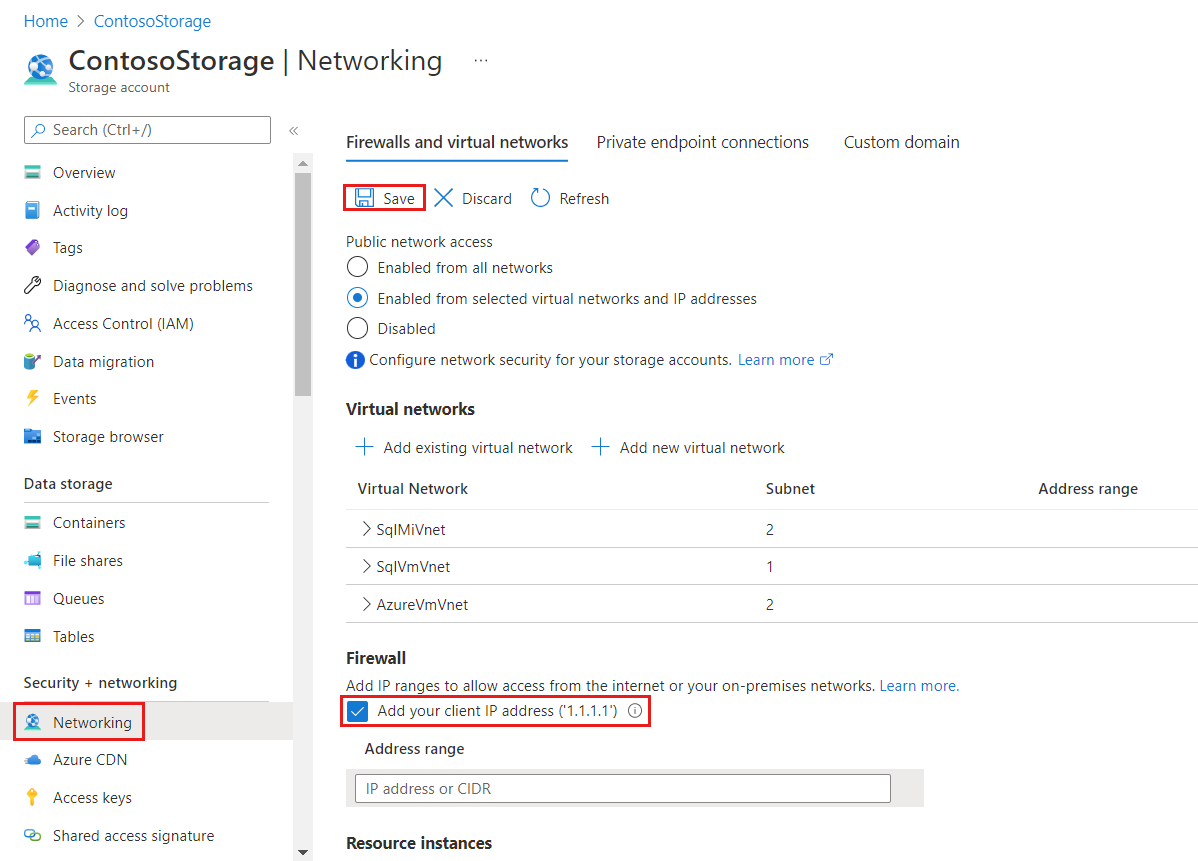
To apply this specific configuration, connect to the Azure portal from the SHIR machine, open the Azure Storage account configuration, select Networking, and then mark the Add your client IP address checkbox. Select Save to make the change persistent. See section 2a - Azure Blob storage network configuration (Private endpoint) for the remaining steps.
1b - Azure Blob storage network configuration
If your SHIR is hosted on an Azure VM, you need to add the virtual network of the VM to the Azure Storage account since the Virtual Machine has a nonpublic IP address that can't be added to the IP address range section.
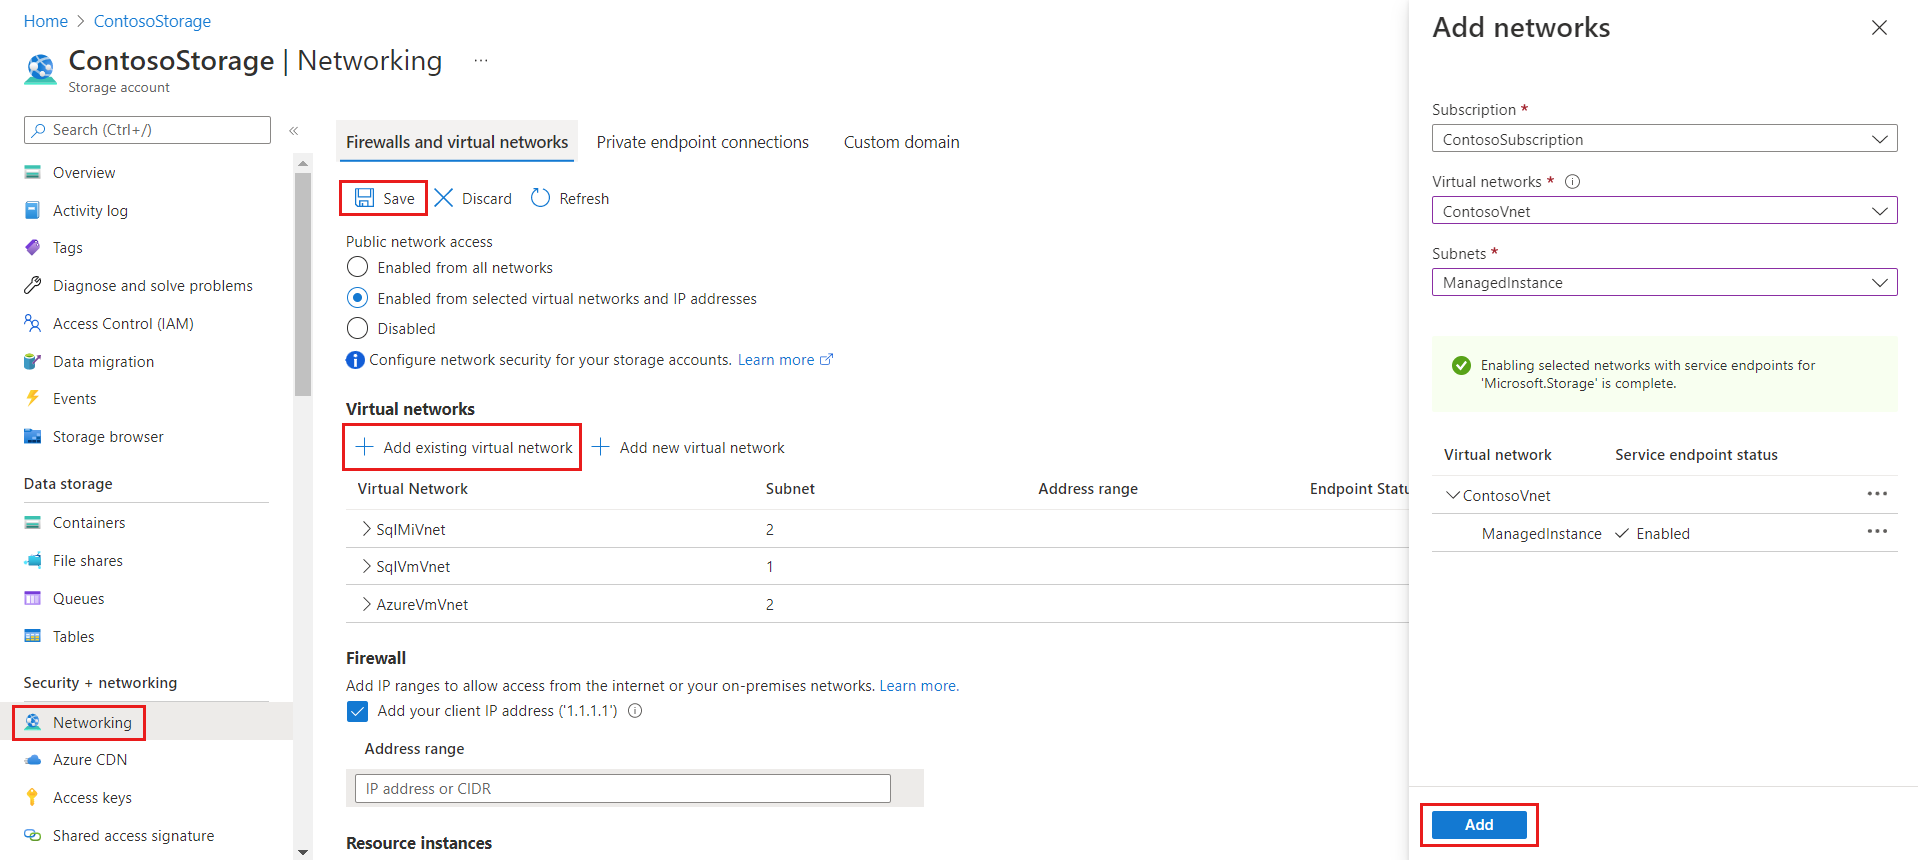
To apply this specific configuration, locate your Azure Storage account, from the Data storage panel select Networking, then mark the Add existing virtual network checkbox. A new panel opens up, select the subscription, virtual network, and subnet of the Azure VM hosting the Integration Runtime. This information can be found on the Overview page of the Azure Virtual Machine. The subnet may say Service endpoint required if so, select Enable. Once everything is ready, save the updates. Refer to section 2a - Azure Blob storage network configuration (Private endpoint)a for the remaining required steps.
2a - Azure Blob storage network configuration (Private endpoint)
If your backups are placed directly into an Azure Storage Container, all the above steps are unnecessary since there's no Integration Runtime communicating with the Azure Storage account. However, we still need to ensure that the target SQL Server instance can communicate with the Azure Storage account to restore the backups from the container. To apply this specific configuration, follow the instructions in section 1b - Azure Blob storage network configuration, specifying the target SQL instance Virtual Network when filling out the "Add existing virtual network" popup.
2b - Azure Blob storage network configuration (Private endpoint)
If you have a private endpoint set up on your Azure Storage account, follow the steps outlined in section 2a - Azure Blob storage network configuration (Private endpoint). However, you need to select the subnet of the private endpoint, not just the target SQL Server subnet. Ensure the private endpoint is hosted in the same VNet as the target SQL Server instance. If it isn't, create another private endpoint using the process in the Azure Storage account configuration section.
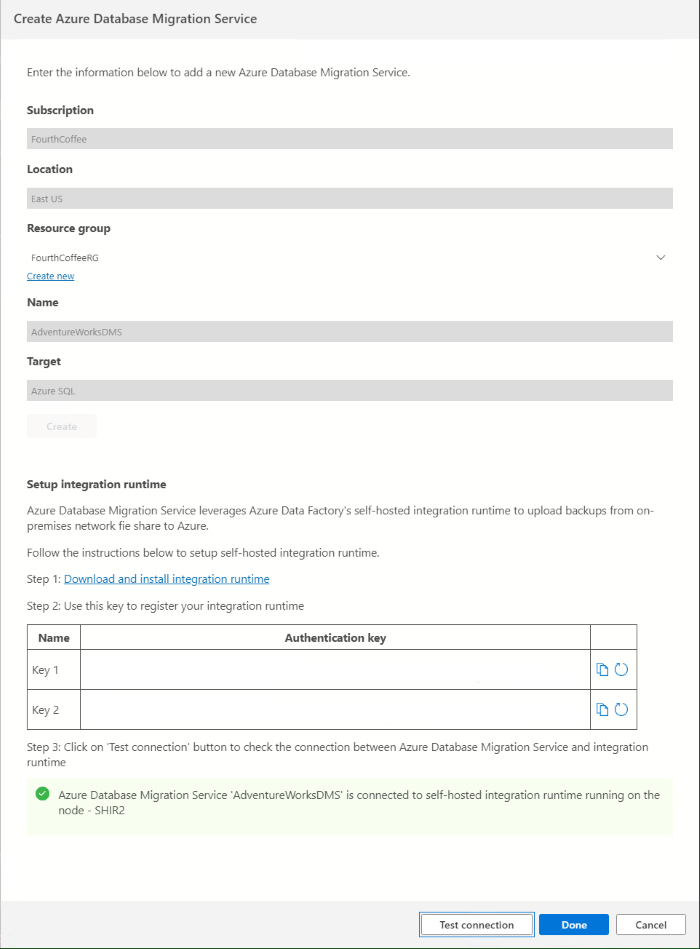
Create Azure Database Migration Service
- Create a new Azure Database Migration Service or reuse an existing Service that you previously created.
Note
If you had previously created DMS using the Azure Portal, you cannot reuse it in the migration wizard in Azure Data Studio. Only DMS created previously using Azure Data Studio can be reused.
- Select the Resource group where you have an existing DMS or need to create a new one. The Azure Database Migration Service dropdown lists any existing DMS in the selected resource group.
- To reuse an existing DMS, select it from the dropdown list and the status of the self-hosted integration runtime will be displayed at the bottom of the page.
- To create a new DMS, select on Create new.
- On the Create Azure Database Migration Service, screen provide the name for your DMS and select Create.
- After successful creation of DMS, you'll be provided with details to Setup integration runtime.
- Select on Download and install integration runtime to open the download link in a web browser. Complete the download. Install the integration runtime on a machine that meets the prerequisites of connecting to source SQL Server and the location containing the source backup.
- After the installation is complete, the Microsoft Integration Runtime Configuration Manager will automatically launch to begin the registration process.
- Copy and paste one of the authentication keys provided in the wizard screen in Azure Data Studio. If the authentication key is valid, a green check icon is displayed in the Integration Runtime Configuration Manager indicating that you can continue to Register.
- After successfully completing the registration of self-hosted integration runtime, close the Microsoft Integration Runtime Configuration Manager and switch back to the migration wizard in Azure Data Studio.
- Select Test connection in the Create Azure Database Migration Service screen in Azure Data Studio to validate that the newly created DMS is connected to the newly registered self-hosted integration runtime and select Done.
- Review the summary and select Done to start the database migration.
Monitor your migration
On the Database Migration Status, you can track the migrations in progress, migrations completed, and migrations failed (if any).
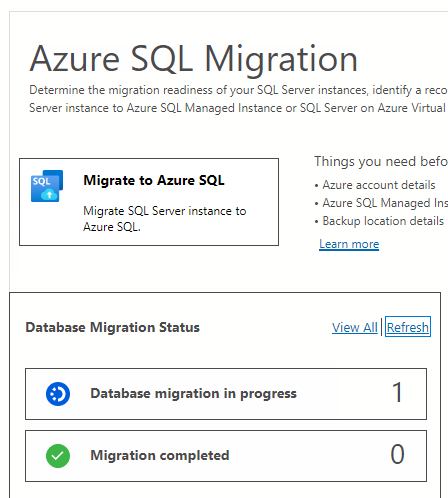
Select Database migrations in progress to view ongoing migrations and get further details by selecting the database name.
The migration details page displays the backup files and the corresponding status:
Status Description Arrived Backup file arrived in the source backup location and validated Uploading Integration runtime is currently uploading the backup file to Azure storage Uploaded Backup file is uploaded to Azure storage Restoring Azure Database Migration Service is currently restoring the backup file to SQL Server on Azure Virtual Machine Restored Backup file is successfully restored on SQL Server on Azure Virtual Machine Canceled Migration process was canceled Ignored Backup file was ignored as it doesn't belong to a valid database backup chain 
Complete migration cutover
The final step of the tutorial is to complete the migration cutover. The completion ensures the migrated database in SQL Server on Azure Virtual Machine is ready for use. Downtime is required for applications that connect to the database and the timing of the cutover needs to be carefully planned with business or application stakeholders.
To complete the cutover:
- Stop all incoming transactions to the source database.
- Make application configuration changes to point to the target database in SQL Server on Azure Virtual Machines.
- Take a final log backup of the source database in the backup location specified
- Put the source database in read-only mode. Therefore, users can read data from the database but not modify it.
- Ensure all database backups have the status Restored in the monitoring details page.
- Select Complete cutover in the monitoring details page.
During the cutover process, the migration status changes from in progress to completing. The migration status changes to succeeded when the cutover process is completed. The database migration is successful and that the migrated database is ready for use.
Limitations
Migrating to SQL Server on Azure VMs by using the Azure SQL extension for Azure Data Studio has the following limitations:
- If migrating a single database, the database backups must be placed in a flat-file structure inside a database folder (including container root folder), and the folders can't be nested, as it's not supported.
- If migrating multiple databases using the same Azure Blob Storage container, you must place backup files for different databases in separate folders inside the container.
- Overwriting existing databases using DMS in your target SQL Server on Azure Virtual Machine isn't supported.
- Configuring high availability and disaster recovery on your target to match source topology isn't supported by DMS.
- The following server objects aren't supported:
- SQL Server Agent jobs
- Credentials
- SSIS packages
- Server audit
- You can't use an existing self-hosted integration runtime created from Azure Data Factory for database migrations with DMS. Initially, the self-hosted integration runtime should be created using the Azure SQL migration extension in Azure Data Studio and can be reused for further database migrations.
- VM with SQL Server 2008 and below as target versions aren't supported when migrating to SQL Server on Azure Virtual Machines.
- If you're using a VM with SQL Server 2012 or SQL Server 2014, you need to store your source database backup files on an Azure Storage Blob Container instead of using the network share option. Store the backup files as page blobs since block blobs are only supported in SQL 2016 and after.
- You must make sure the SQL IaaS Agent Extension in the target Azure Virtual Machine is in Full mode instead of Lightweight mode.
- SQL IaaS Agent Extension only supports management of Default Server Instance or Single Named Instance.
- The number of databases you can migrate to a SQL server Azure Virtual Machine depends on the hardware specification and workload, but there is no enforced limit. However, every migration operation (start migration, cutover) for each database will take few mins sequentially. For example, to migrate 100 databases, it may take approx. 200 (2 x 100) minutes to create the migration queue/s and approx. 100 (1 x 100) minutes to cutover all 100 databases (excluding backup and restore timing). Therefore, the migration will become slower as the number of databases increases. Microsoft advises either scheduling a longer migration window in advance based on rigorous migration testing or partitioning large number of databases into batches when migrating them to a SQL server Azure VM.
- Apart from configuring the Networking/Firewall of your Azure Storage Account to allow your VM to access backup files. You also need to configure the Networking/Firewall of your SQL Server on Azure VM to allow outbound connection to your storage account.
- You need to keep the target SQL Server on Azure VM power ON while the SQL Migration is in progress. Also, when creating a new migration, failover or cancel the migration.
- Error:
Login failed for user 'NT Service\SQLIaaSExtensionQuery. Reason: SQL Server instance is in single-user mode. One possible reason is the target SQL Server on Azure VM is in upgrade mode. Solution: Please wait for the target SQL Server on Azure VM exit the upgrade mode and start migration again. - Error:
Ext_RestoreSettingsError, message: Failed to create restore job.;Cannot create file 'F:\data\XXX.mdf' because it already exists. Solution: Connect to the target SQL Server on Azure VM and delete the XXX.mdf file. Then, start migration again.
Next steps
- How to migrate a database to SQL Server on Azure Virtual Machines using the T-SQL RESTORE command, see Migrate a SQL Server database to SQL Server on a virtual machine.
- For information about SQL Server on Azure Virtual Machines, see Overview of SQL Server on Azure Windows Virtual Machines.
- For information about connecting apps to SQL Server on Azure Virtual Machines, see Connect applications.
- To troubleshoot, review Known issues.
Feedback
Coming soon: Throughout 2024 we will be phasing out GitHub Issues as the feedback mechanism for content and replacing it with a new feedback system. For more information see: https://aka.ms/ContentUserFeedback.
Submit and view feedback for