Enable Private Link on an HDInsight cluster
In this article, you'll learn about using Azure Private Link to connect to an HDInsight cluster privately across networks over the Microsoft backbone network. This article is an extension of the article Restrict cluster connectivity in Azure HDInsight, which focuses on restricting public connectivity. If you want public connectivity to or within your HDInsight clusters and dependent resources, consider restricting the connectivity of your cluster by following guidelines in Control network traffic in Azure HDInsight.
Private Link can be used in cross-network scenarios where virtual network peering isn't available or enabled.
Note
Restricting public connectivity is a prerequisite for enabling Private Link and shouldn't be considered the same capability.
The use of Private Link to connect to an HDInsight cluster is an optional feature and is disabled by default. The feature is available only when the resourceProviderConnection network property is set to outbound, as described in the article Restrict cluster connectivity in Azure HDInsight.
When privateLink is set as enabled, internal standard load balancers (SLBs) are created, and an Azure Private Link service is provisioned for each SLB. The Private Link service is what allows you to access the HDInsight cluster from private endpoints.
Private link deployment steps
Successfully creating a Private Link cluster takes many steps, so we've outlined them here. Follow each of the steps below to ensure everything is set up correctly.
Step 1: Create prerequisites
To start, deploy the following resources if you haven't created them already. You need to have at least one resource group, two virtual networks, and a network security group to attach to the subnet where the HDInsight cluster will be deployed as shown below.
| Type | Name | Purpose |
|---|---|---|
| Resource group | hdi-privlink-rg | Used to keep common resources together |
| Virtual network | hdi-privlink-cluster-vnet | The VNET where the cluster will be deployed |
| Virtual network | hdi-privlink-client-vnet | The VNET where clients will connect to the cluster from |
| Network security group | hdi-privlink-cluster-vnet-nsg | Default NSG as required for cluster deployment |
Note
The network security group (NSG) can simply be deployed, we do not need to modify any NSG rules for cluster deployment.
Step 2: Configure HDInsight subnet
- Disable privateLinkServiceNetworkPolicies on subnet. In order to choose a source IP address for your Private Link service, an explicit disable setting
privateLinkServiceNetworkPoliciesis required on the subnet. Follow the instructions here to disable network policies for Private Link services. - Enable Service Endpoints on subnet. For successful deployment of a Private Link HDInsight cluster, we recommend that you add the
Microsoft.SQL,Microsoft.Storage, andMicrosoft.KeyVaultservice endpoint(s) to your subnet prior to cluster deployment. Service endpoints route traffic directly from your virtual network to the service on the Microsoft Azure backbone network. Keeping traffic on the Azure backbone network allows you to continue auditing and monitoring outbound Internet traffic from your virtual networks, through forced-tunneling, without impacting service traffic.
Step 3: Deploy NAT gateway or firewall
Standard load balancers don't automatically provide public outbound NAT as basic load balancers do. Since Private Link clusters use standard load balancers, you must provide your own NAT solution, such as a NAT gateway or a NAT provided by your firewall, to connect to outbound, public HDInsight dependencies.
Deploy a NAT gateway (Option 1)
You can opt to use a NAT gateway if you don't want to configure a firewall or a network virtual appliance (NVA) for NAT. To get started, add a NAT gateway (with a new public IP address in your virtual network) to the configured subnet of your virtual network. This gateway is responsible for translating your private internal IP address to public addresses when traffic needs to go outside your virtual network.
For a basic setup to get started:
Search for 'NAT Gateways' in the Azure portal and click Create.
Use the following configurations in the NAT Gateway. (We aren't including all configs here, so you can use the default values.)
Config Value NAT gateway name hdi-privlink-nat-gateway Public IP Prefixes Create a new public IP prefix Public IP prefix name hdi-privlink-nat-gateway-prefix Public IP prefix size /28 (16 addresses) Virtual network hdi-privlink-cluster-vnet Subnet name default Once the NAT Gateway is finished deploying, you're ready to go to the next step.
Configure a firewall (Option 2)
For a basic setup to get started:
- Add a new subnet named AzureFirewallSubnet to your virtual network.
- Use the new subnet to configure a new firewall and add your firewall policies.
- Use the new firewall's private IP address as the
nextHopIpAddressvalue in your route table. - Add the route table to the configured subnet of your virtual network.
Your HDInsight cluster still needs access to its outbound dependencies. If these outbound dependencies aren't allowed, cluster creation might fail. For more information on setting up a firewall, see Control network traffic in Azure HDInsight.
Step 4: Deploy private link cluster
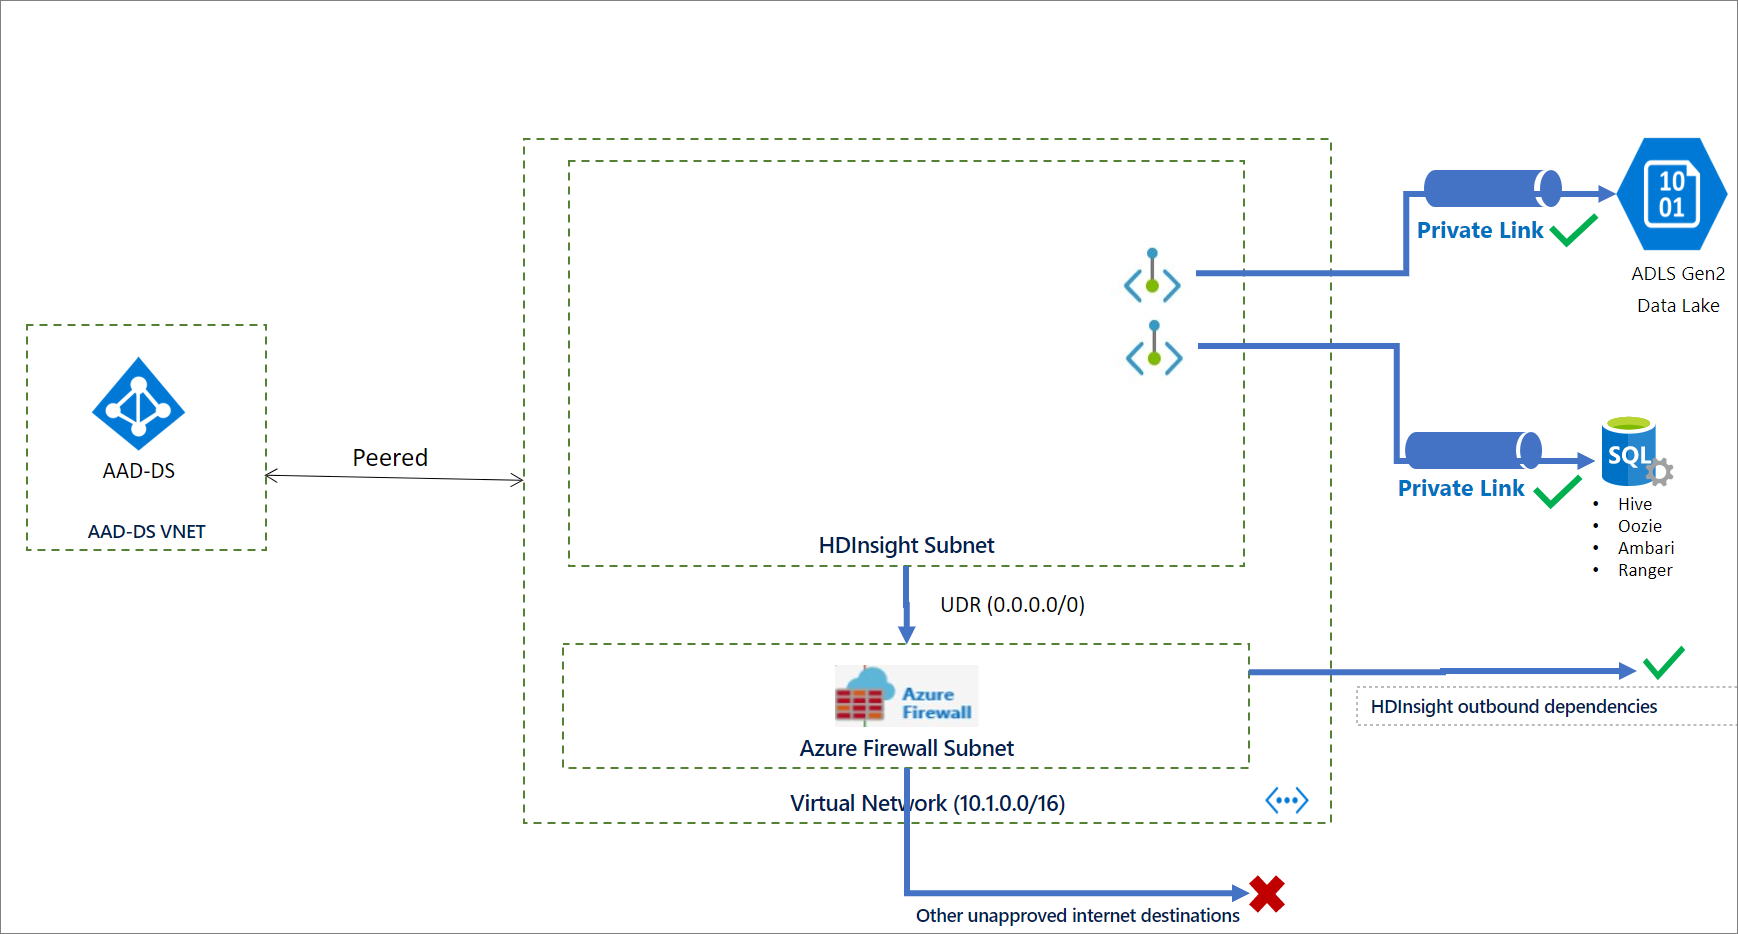
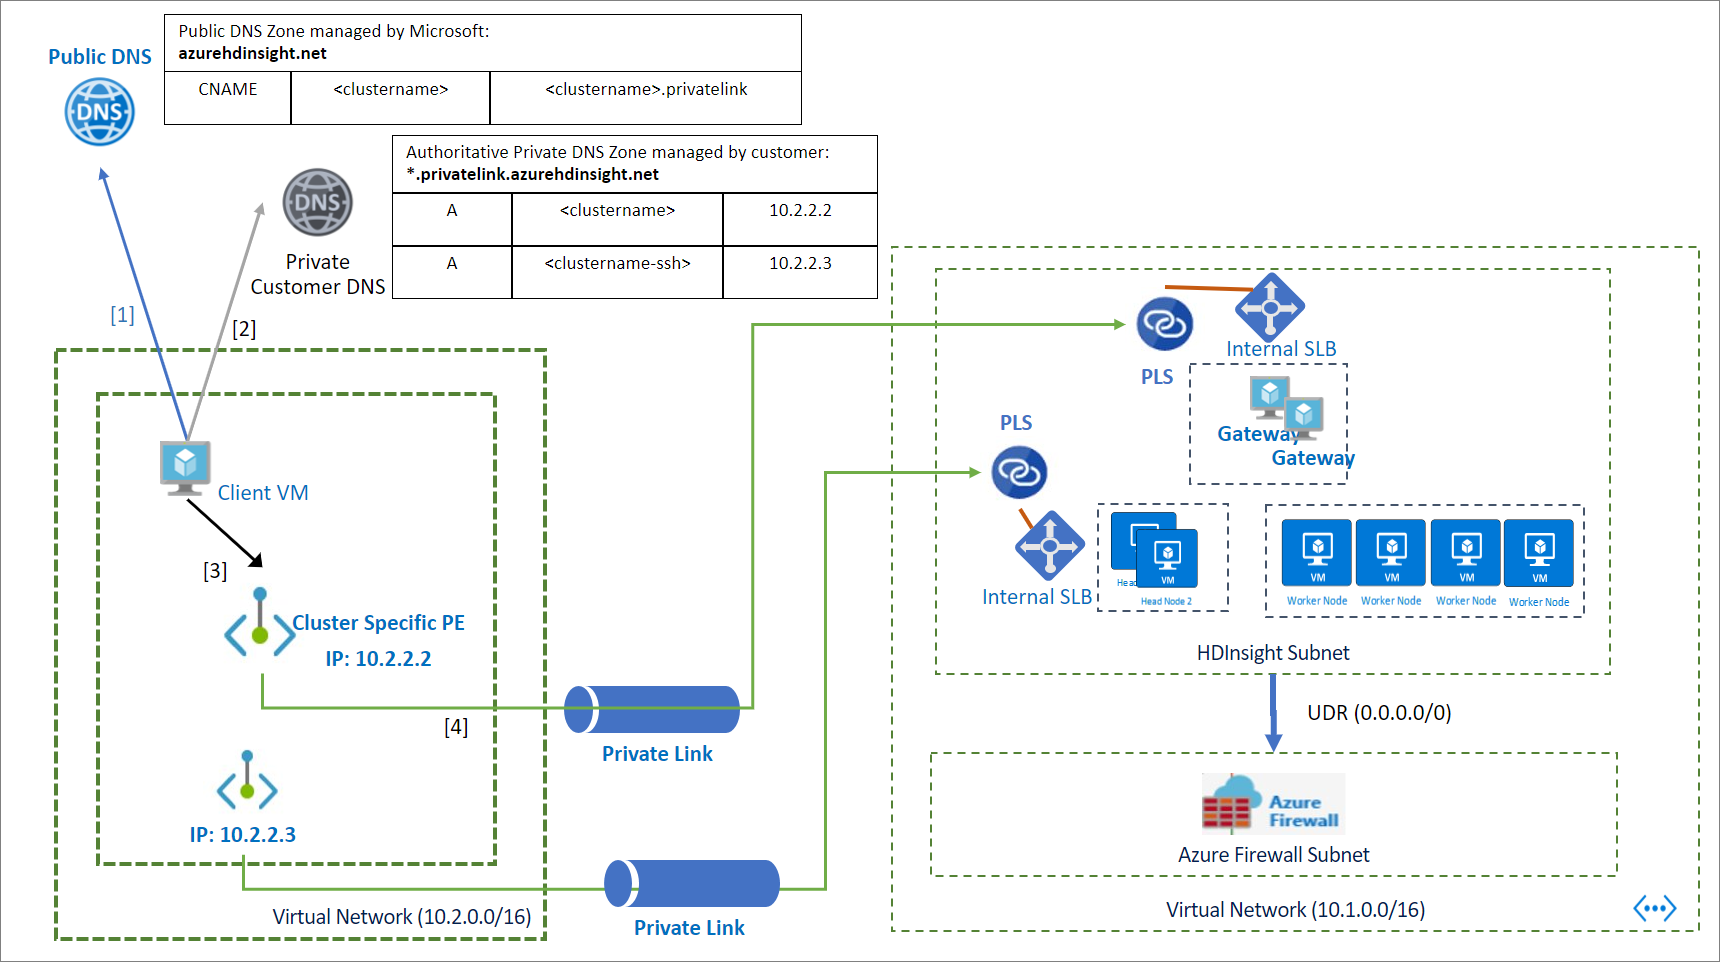
At this point, all prerequisites should be taken care of and you're ready to deploy the Private Link cluster. The following diagram shows an example of the networking configuration that's required before you create the cluster. In this example, all outbound traffic is forced to Azure Firewall through a user-defined route. The required outbound dependencies should be allowed on the firewall before cluster creation. For Enterprise Security Package clusters, virtual network peering can provide the network connectivity to Microsoft Entra Domain Services.
Create the cluster
The following JSON code snippet includes the two network properties that you must configure in your Azure Resource Manager template to create a private HDInsight cluster:
networkProperties: {
    "resourceProviderConnection": "Outbound",
    "privateLink": "Enabled"
}
For a complete template with many of the HDInsight enterprise security features, including Private Link, see HDInsight enterprise security template.
To create a cluster by using PowerShell, see the example.
To create a cluster by using the Azure CLI, see the example.
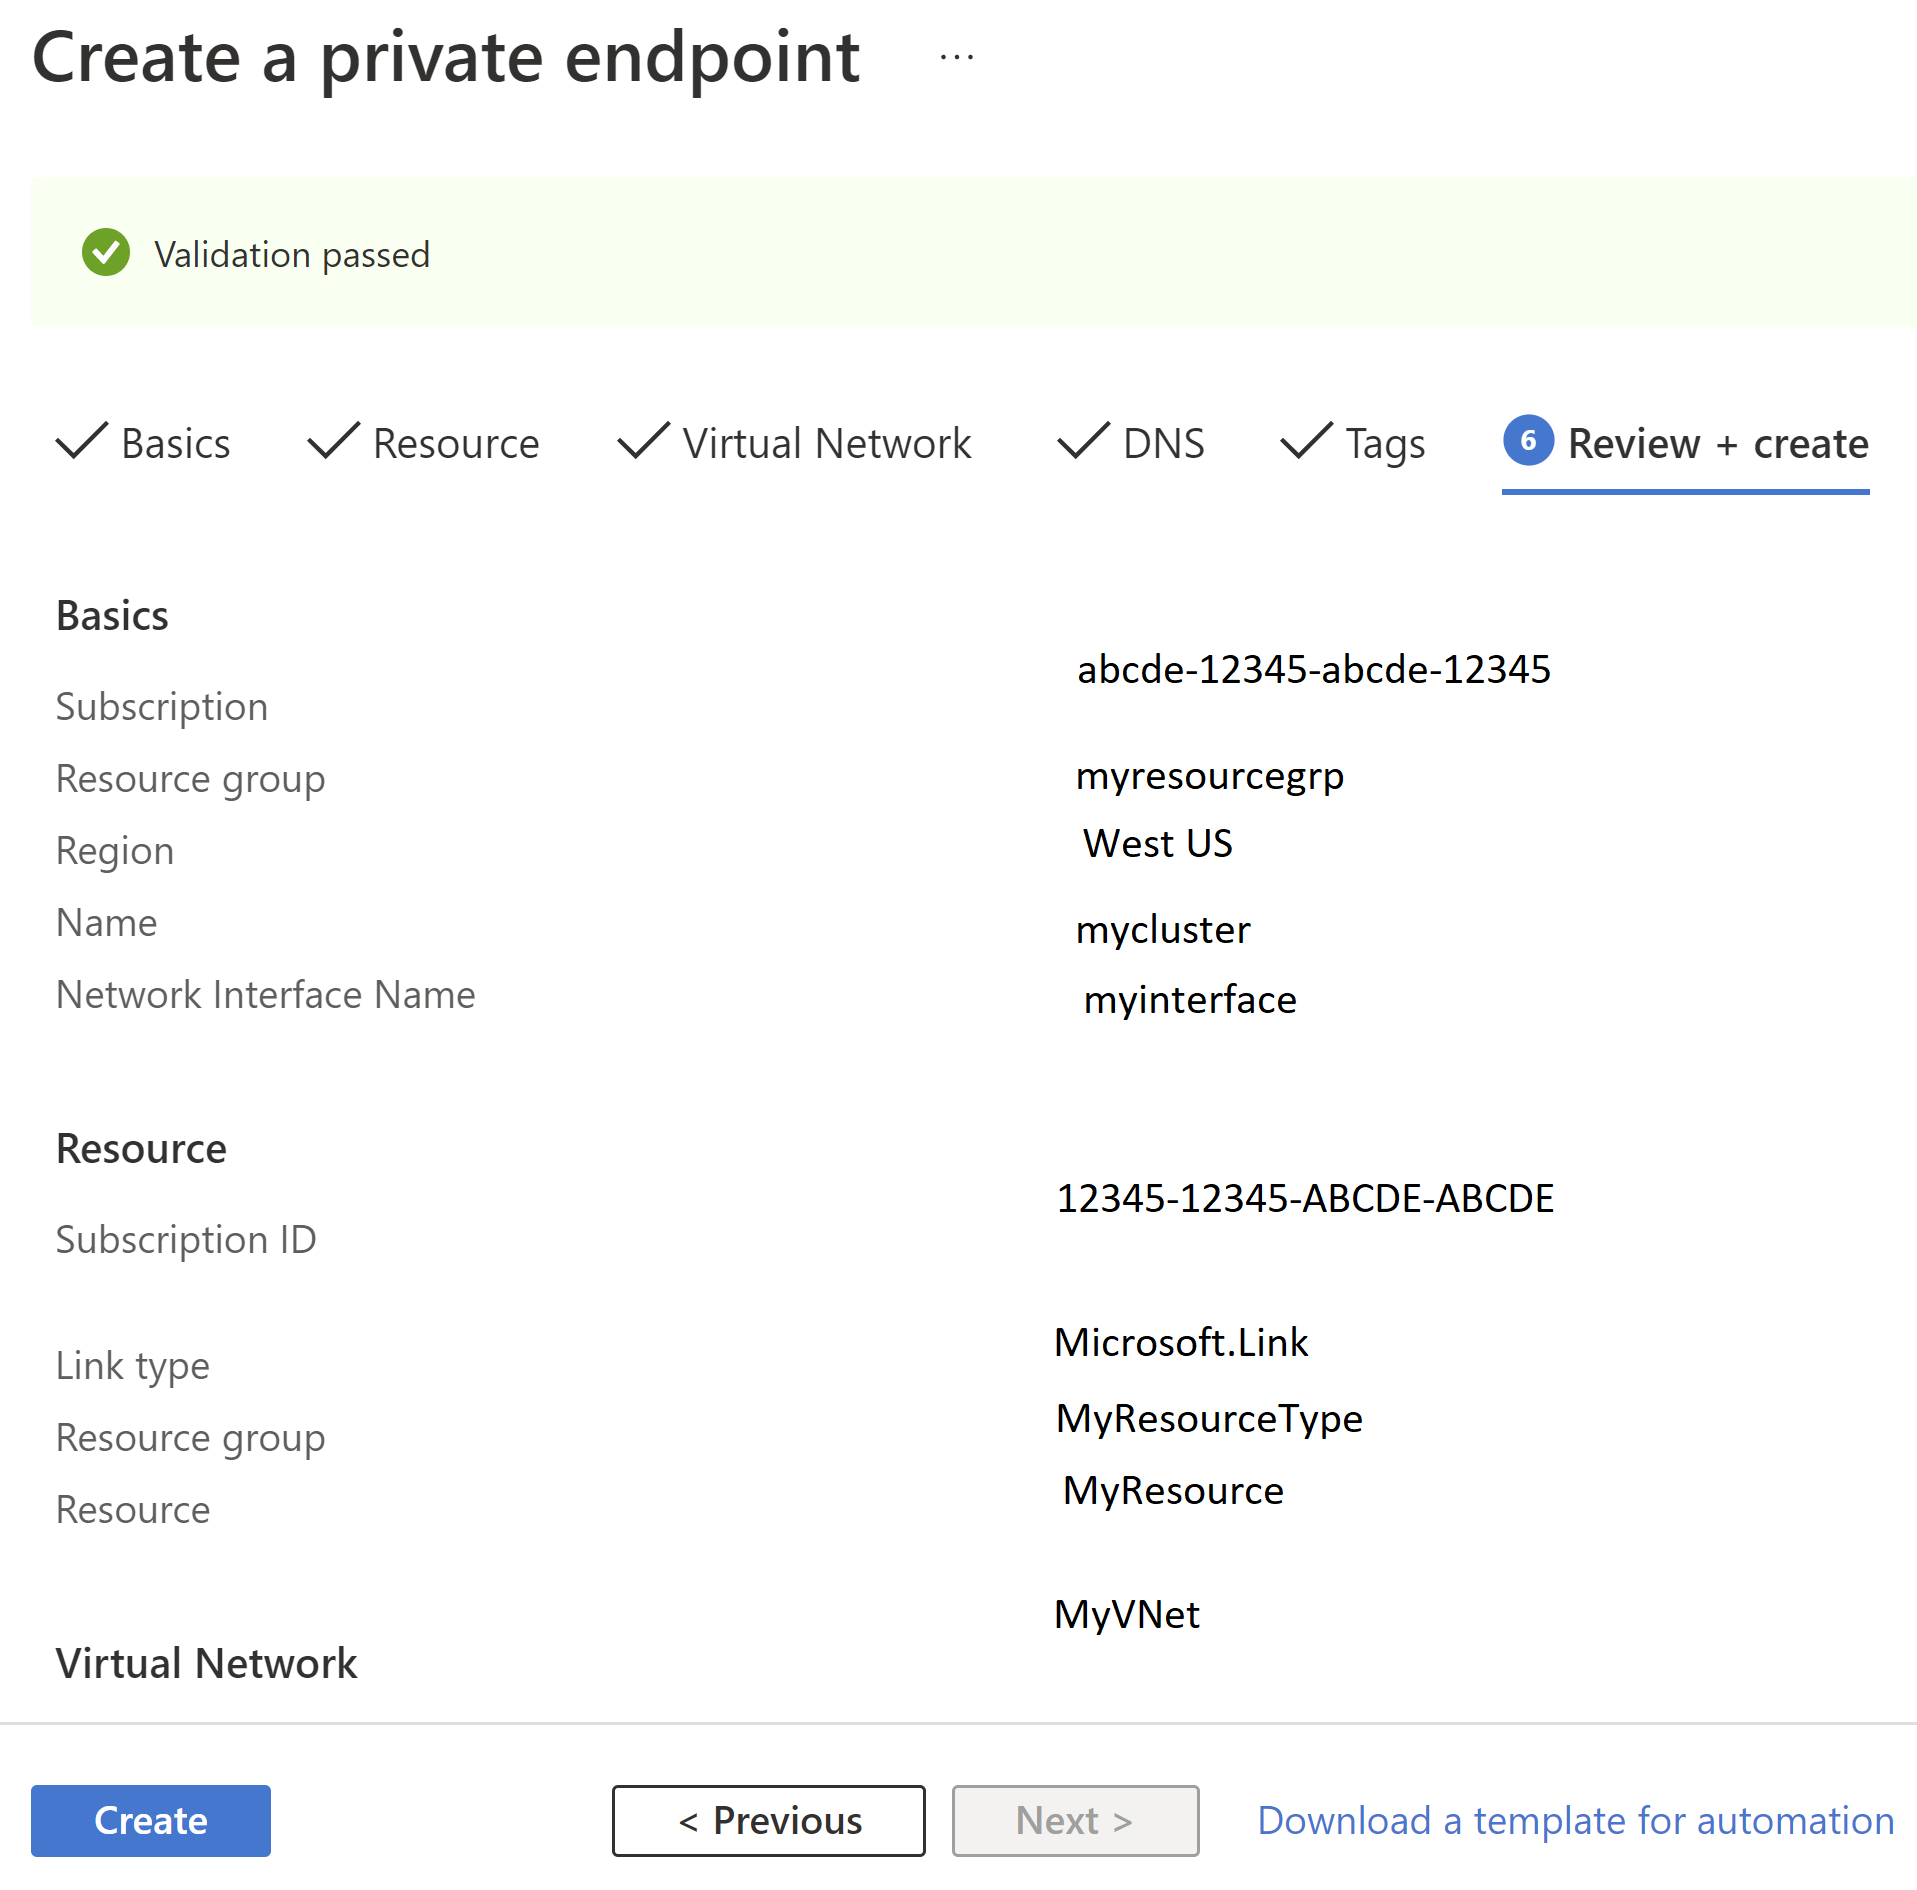
Step 5: Create private endpoints
Azure automatically creates a Private link service for the Ambari and SSH load balancers during the Private Link cluster deployment. After the cluster is deployed, you have to create two Private endpoints on the client VNET(s), one for Ambari and one for SSH access. Then, link them to the Private link services that were created as part of the cluster deployment.
To create the private endpoints:
Open the Azure portal and search for 'Private link'.
In the results, click the Private link icon.
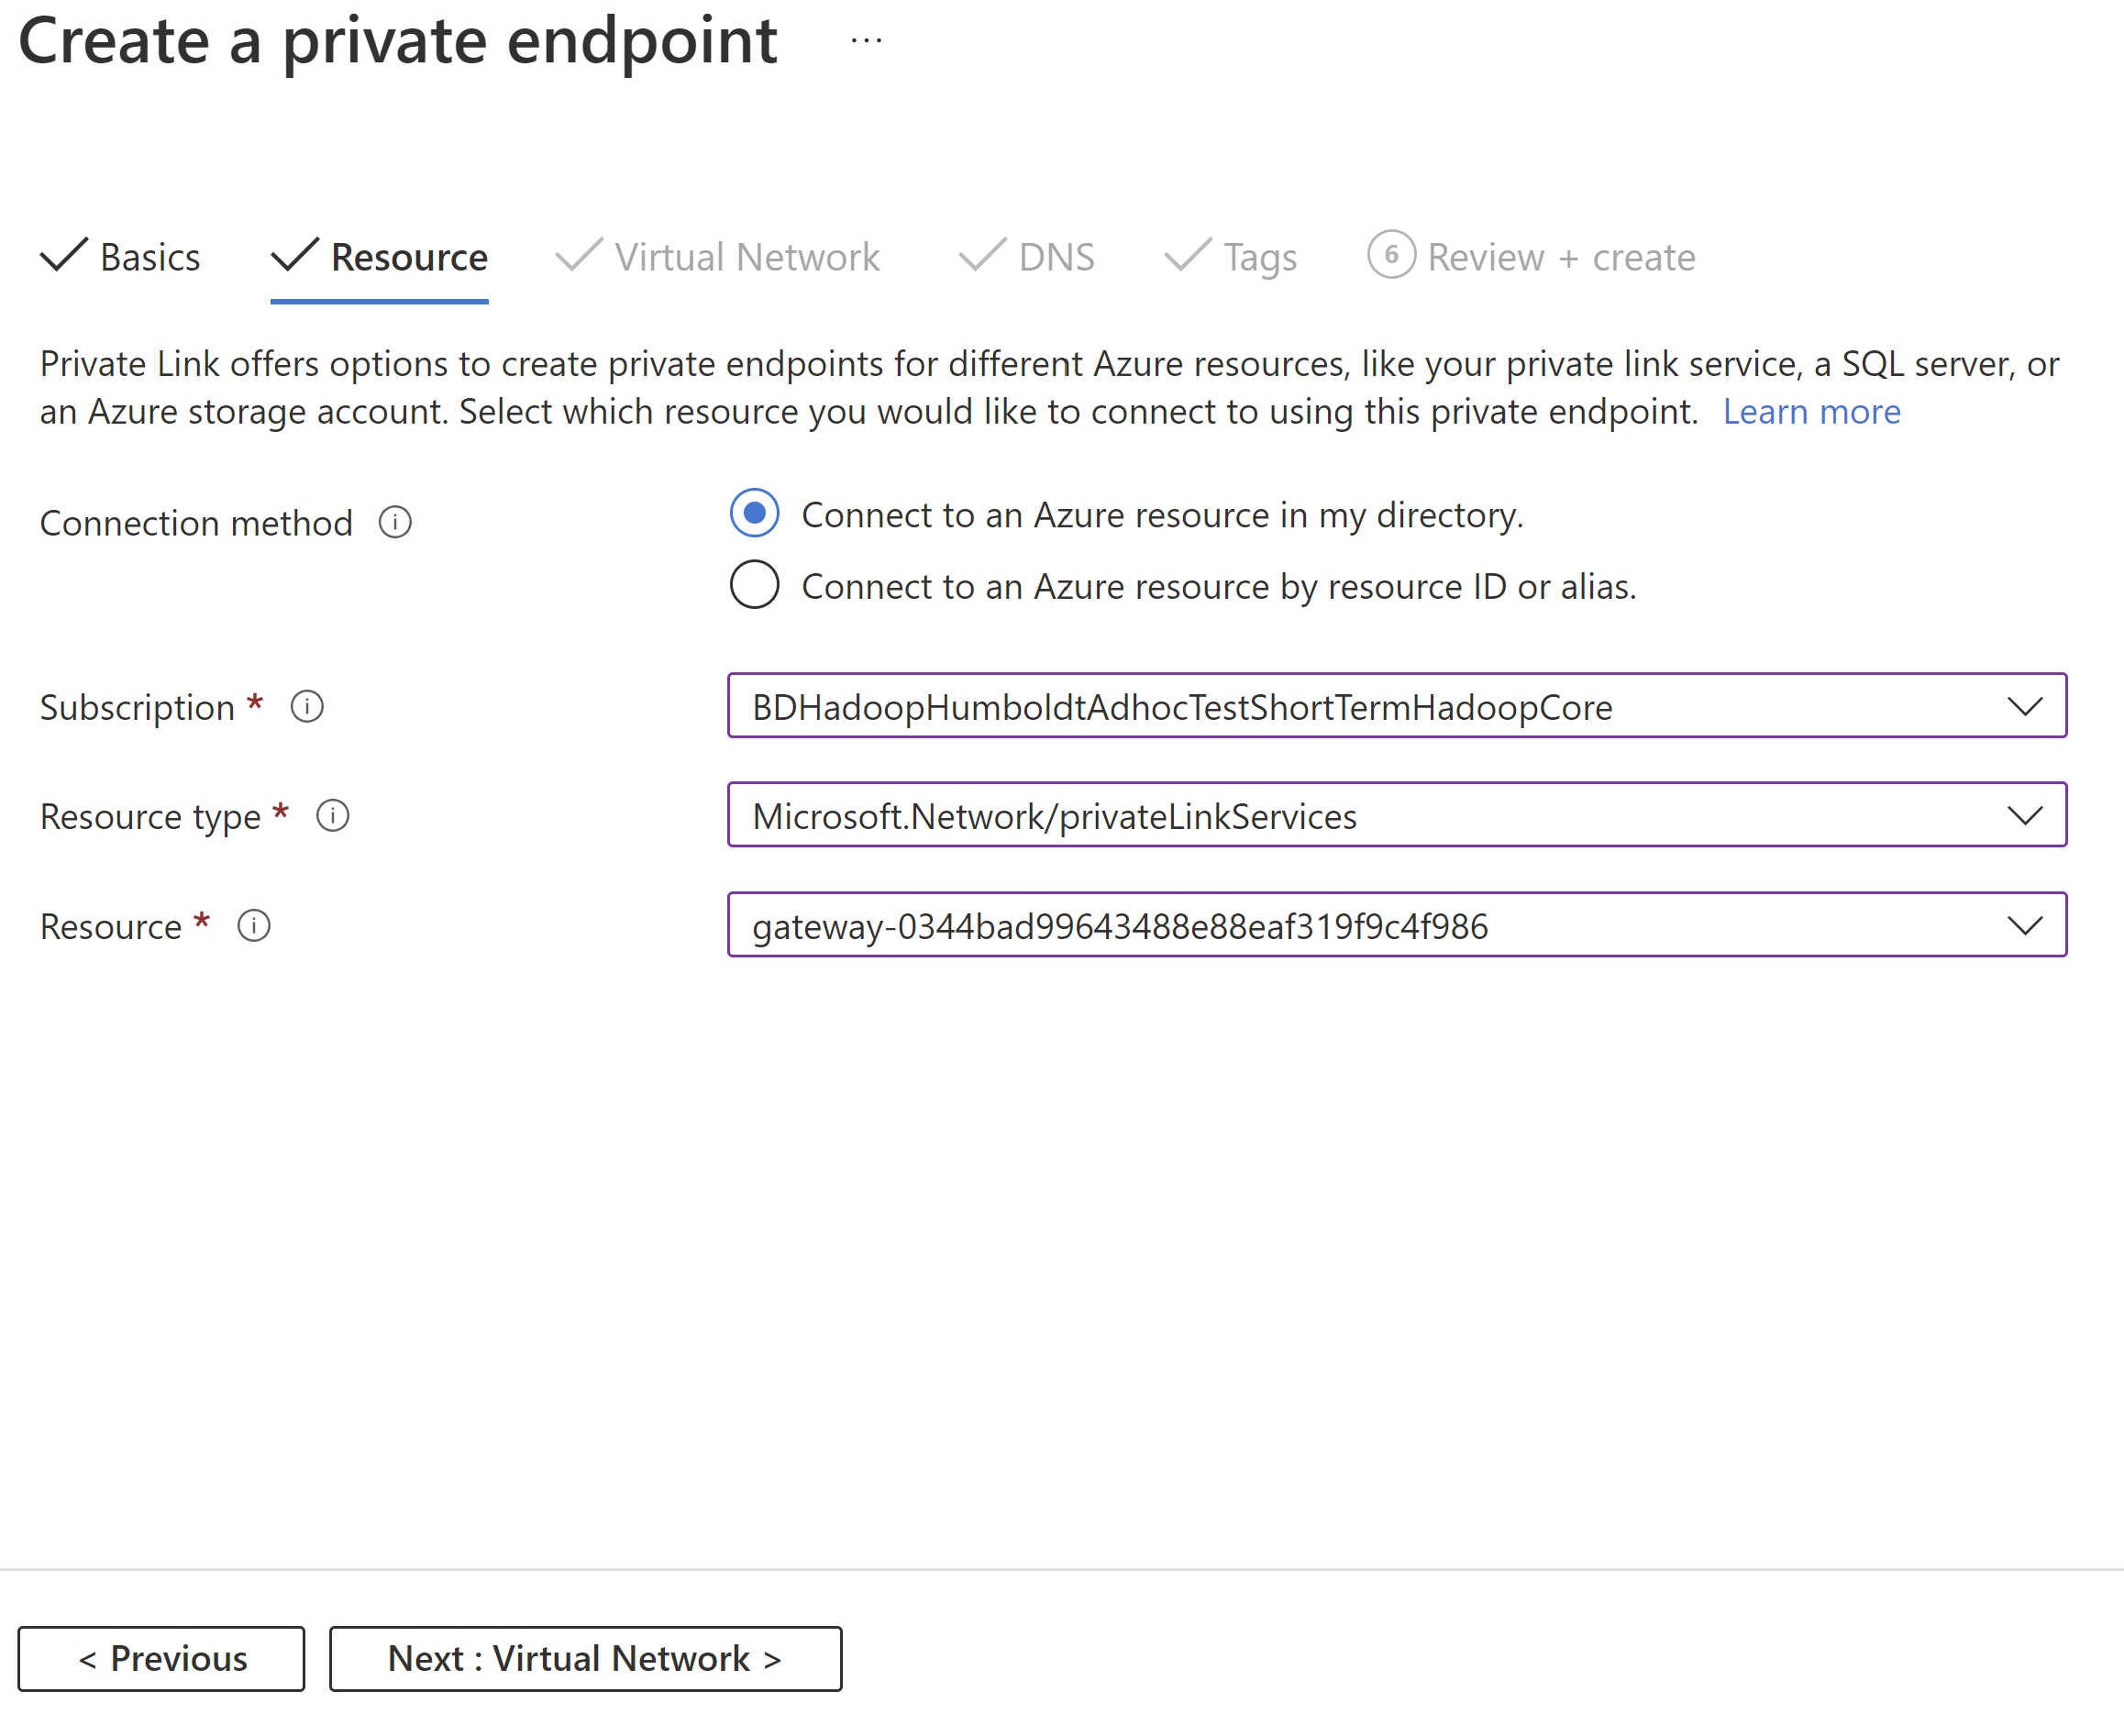
Click 'Create private endpoint' and use the following configurations to set up the Ambari private endpoint:
Config Value Name hdi-privlink-cluster Resource type Microsoft.Network/privateLinkServices Resource gateway-* (This value should match the HDI deployment ID of your cluster, for example gateway-4eafe3a2a67e4cd88762c22a55fe4654) Virtual network hdi-privlink-client-vnet Subnet default 

Repeat the process to create another private endpoint for SSH access using the following configurations:
Config Value Name hdi-privlink-cluster-ssh Resource type Microsoft.Network/privateLinkServices Resource headnode-* (This value should match the HDI deployment ID of your cluster, for example headnode-4eafe3a2a67e4cd88762c22a55fe4654) Virtual network hdi-privlink-client-vnet Subnet default
Important
If you're using KafkaRestProxy HDInsight cluster, then follow this extra steps to Enable Private Endpoints.
Once the private endpoints are created, you’re done with this phase of the setup. If you didn’t make a note of the private IP addresses assigned to the endpoints, follow the steps below:
- Open the client VNET in the Azure portal.
- Click on 'Private endpoints' tab.
- You should see both the Ambari and ssh Network interfaces listed.
- Click on each one and navigate to the ‘DNS configuration’ blade to see the private IP address.
- Make a note of these IP addresses because they are required to connect to the cluster and properly configure DNS.
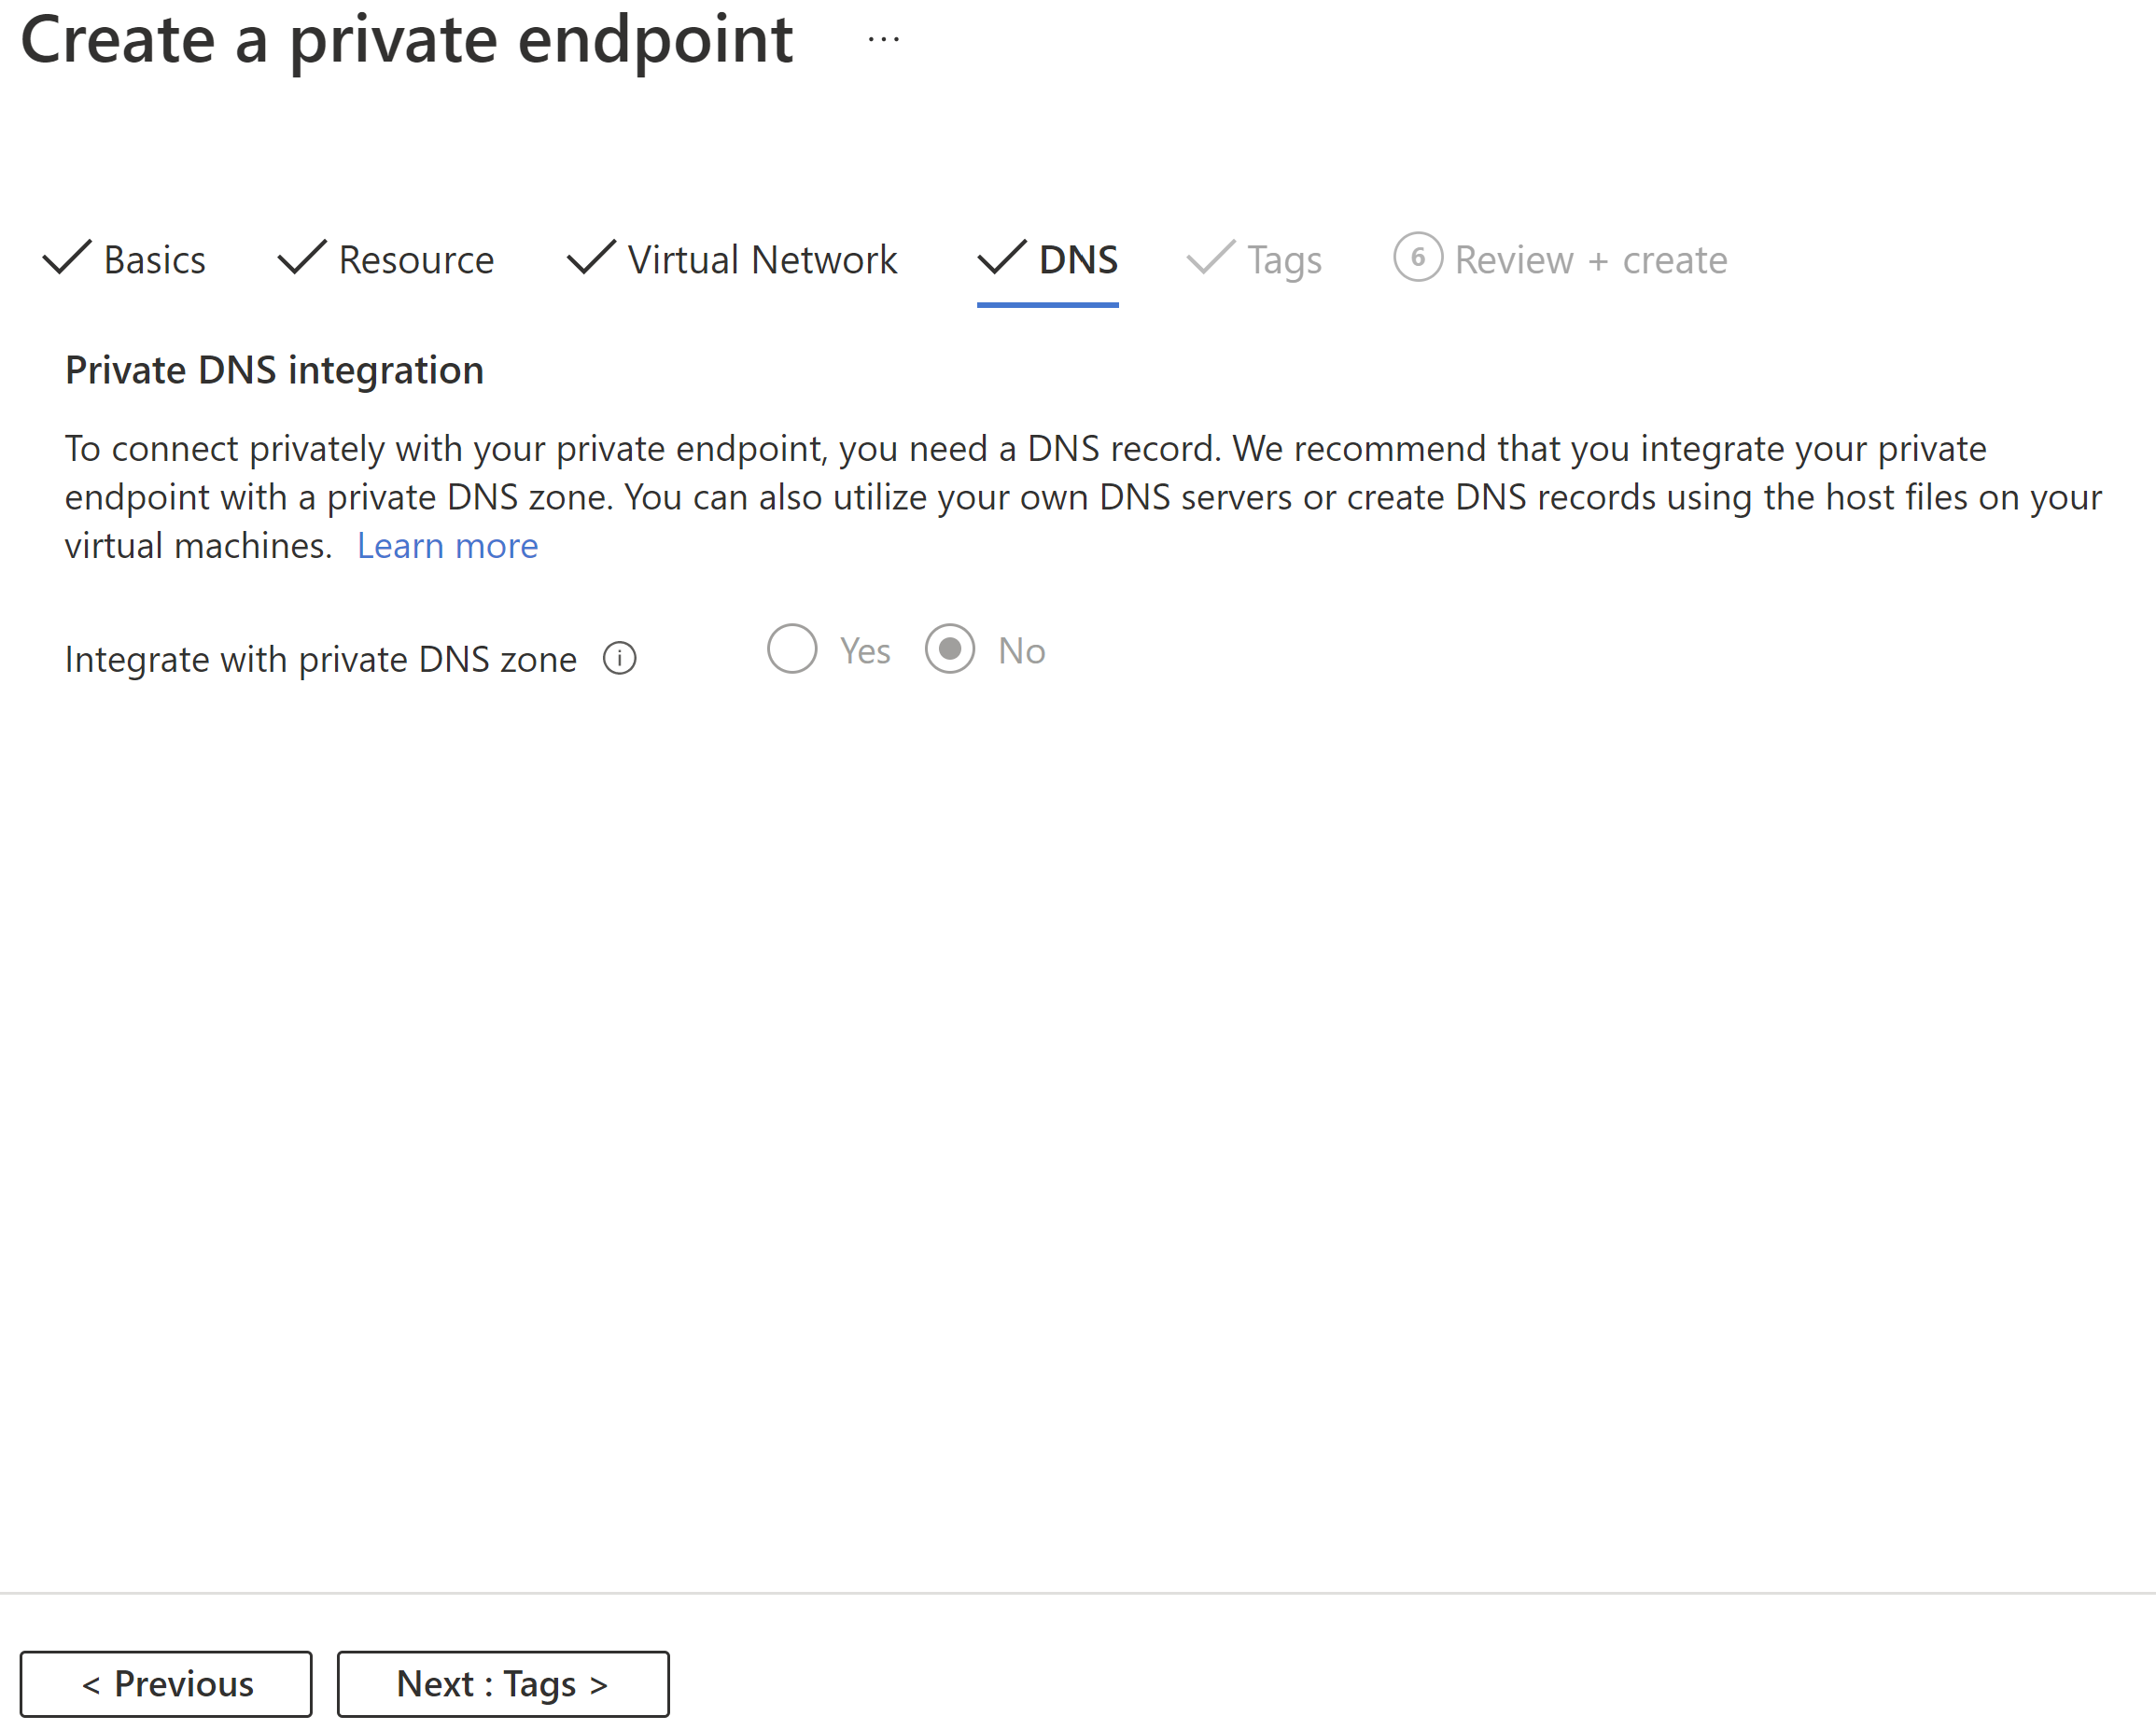
Step 6: Configure DNS to connect over private endpoints
To access private clusters, you can configure DNS resolution through private DNS zones. The Private Link entries created in the Azure-managed public DNS zone azurehdinsight.net are as follows:
<clustername>        CNAME    <clustername>.privatelink
<clustername>-int    CNAME    <clustername>-int.privatelink
<clustername>-ssh    CNAME    <clustername>-ssh.privatelink
The following image shows an example of the private DNS entries configured to enable access to a cluster from a virtual network that isn't peered or doesn't have a direct line of sight to the cluster. You can use an Azure DNS private zone to override *.privatelink.azurehdinsight.net fully qualified domain names (FQDNs) and resolve private endpoints' IP addresses in the client's network. The configuration is only for <clustername>.azurehdinsight.net in the example, but it also extends to other cluster endpoints.
To configure DNS resolution through a Private DNS zone:
Create an Azure Private DNS zone. (We aren't including all configs here, all other configs are left at default values)
Config Value Name privatelink.azurehdinsight.net 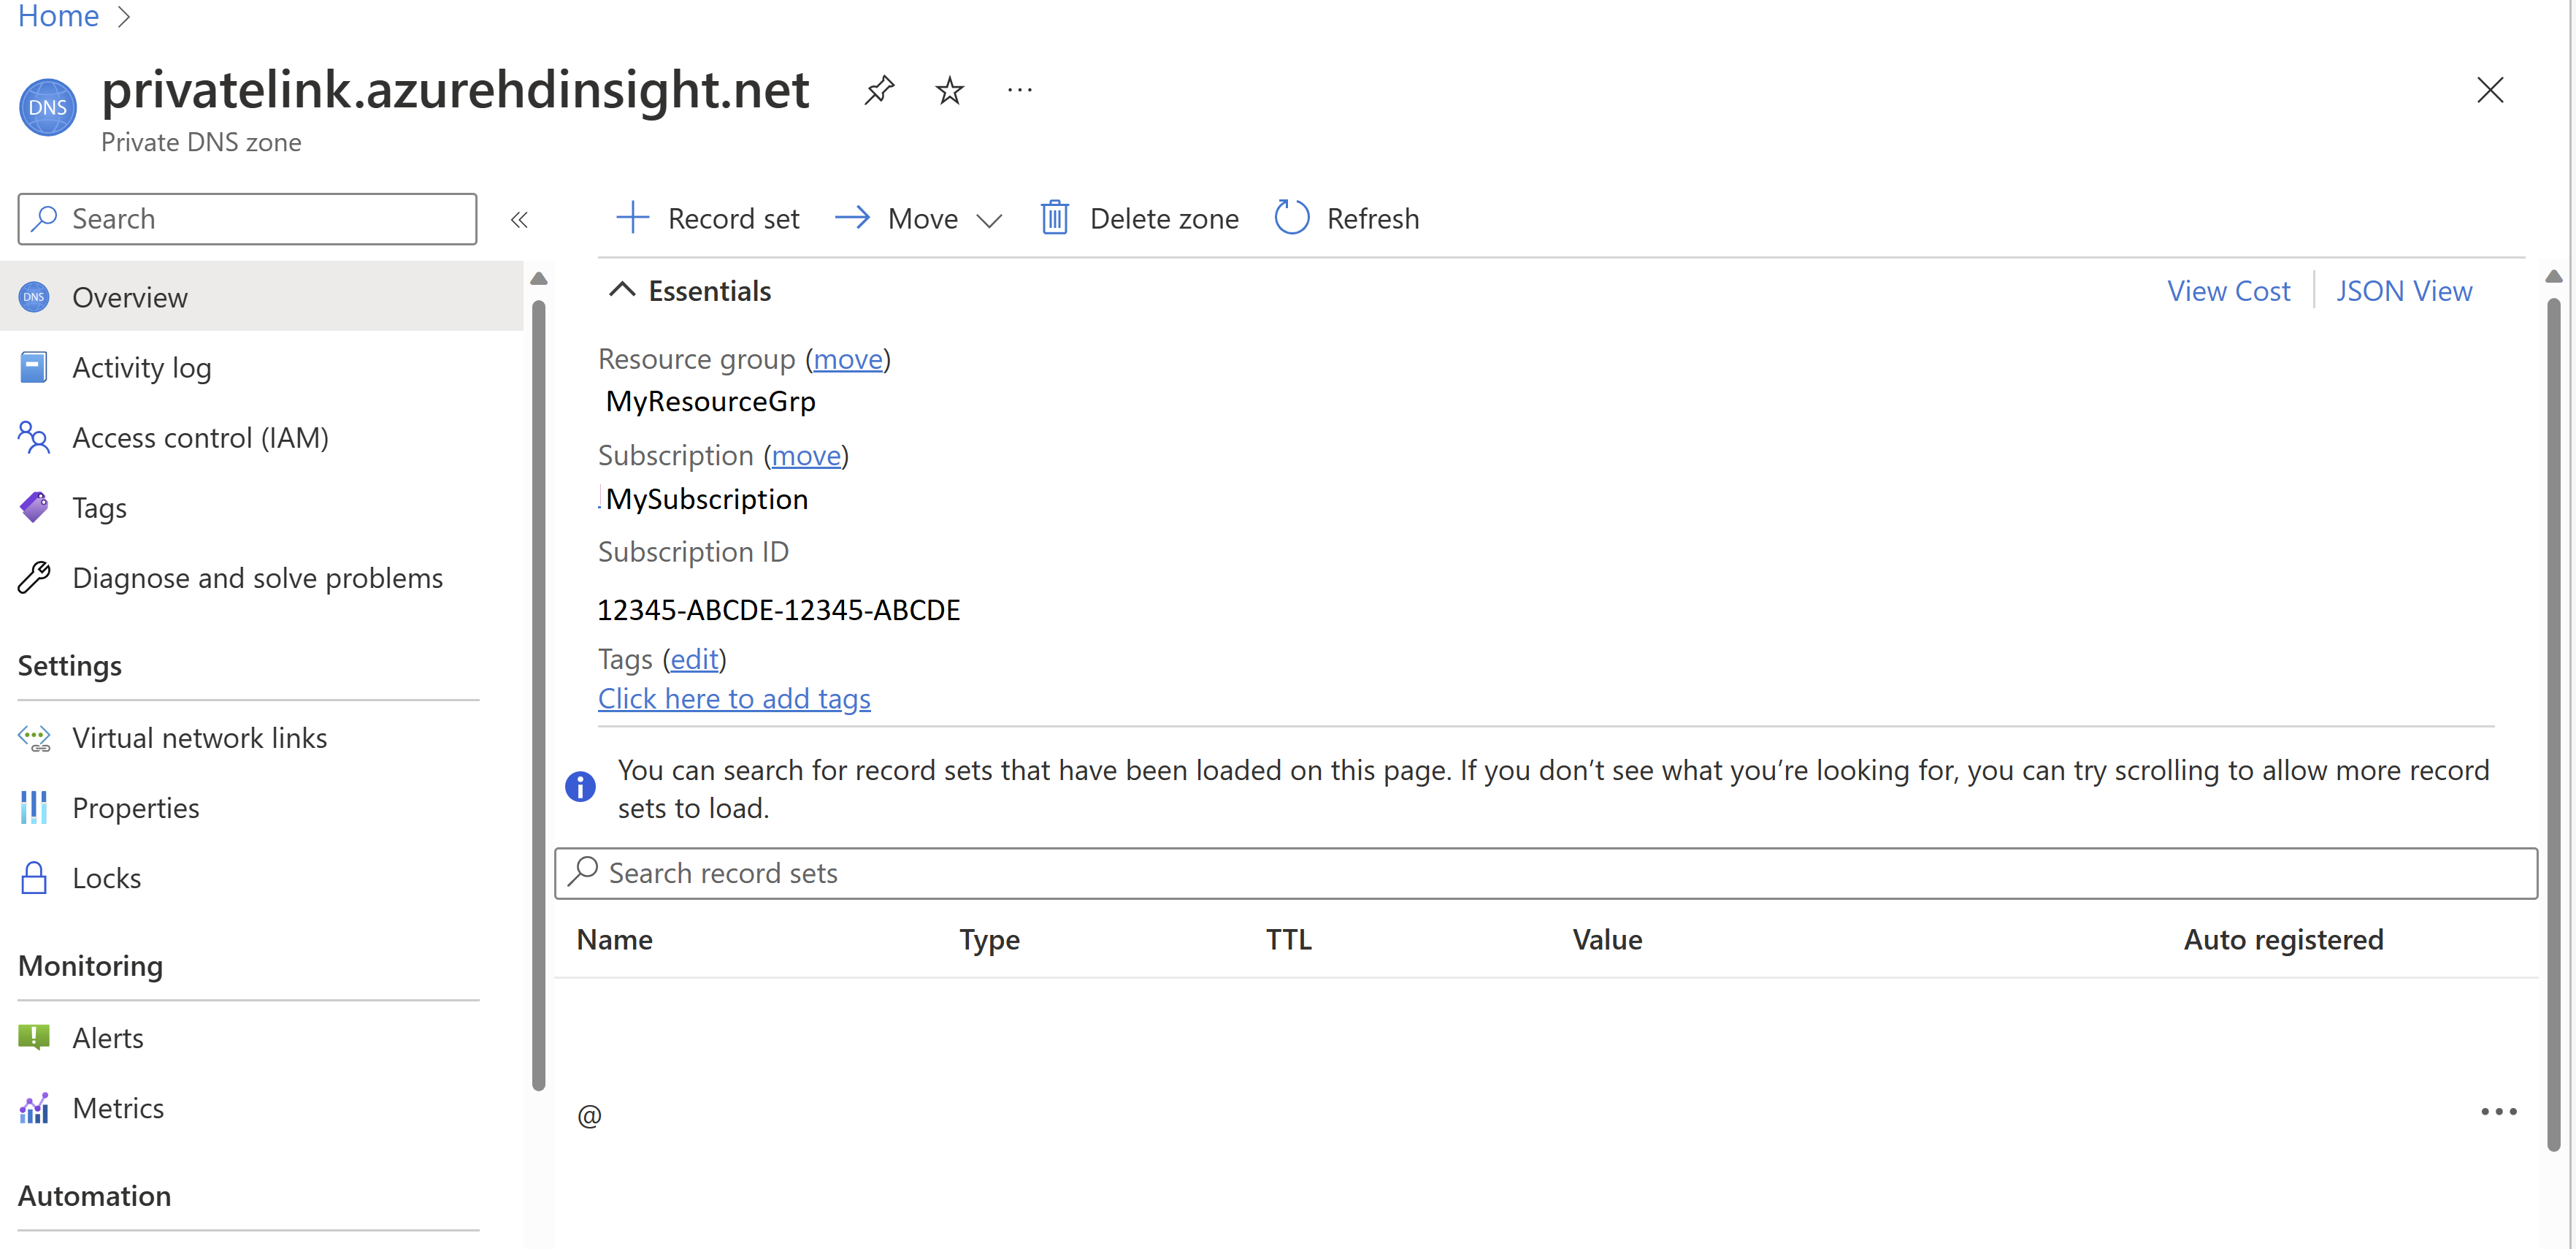
Add a Record set to the Private DNS zone for Ambari.
Config Value Name YourPrivateLinkClusterName Type A - Alias record to IPv4 address TTL 1 TTL unit Hours IP Address Private IP of private endpoint for Ambari access 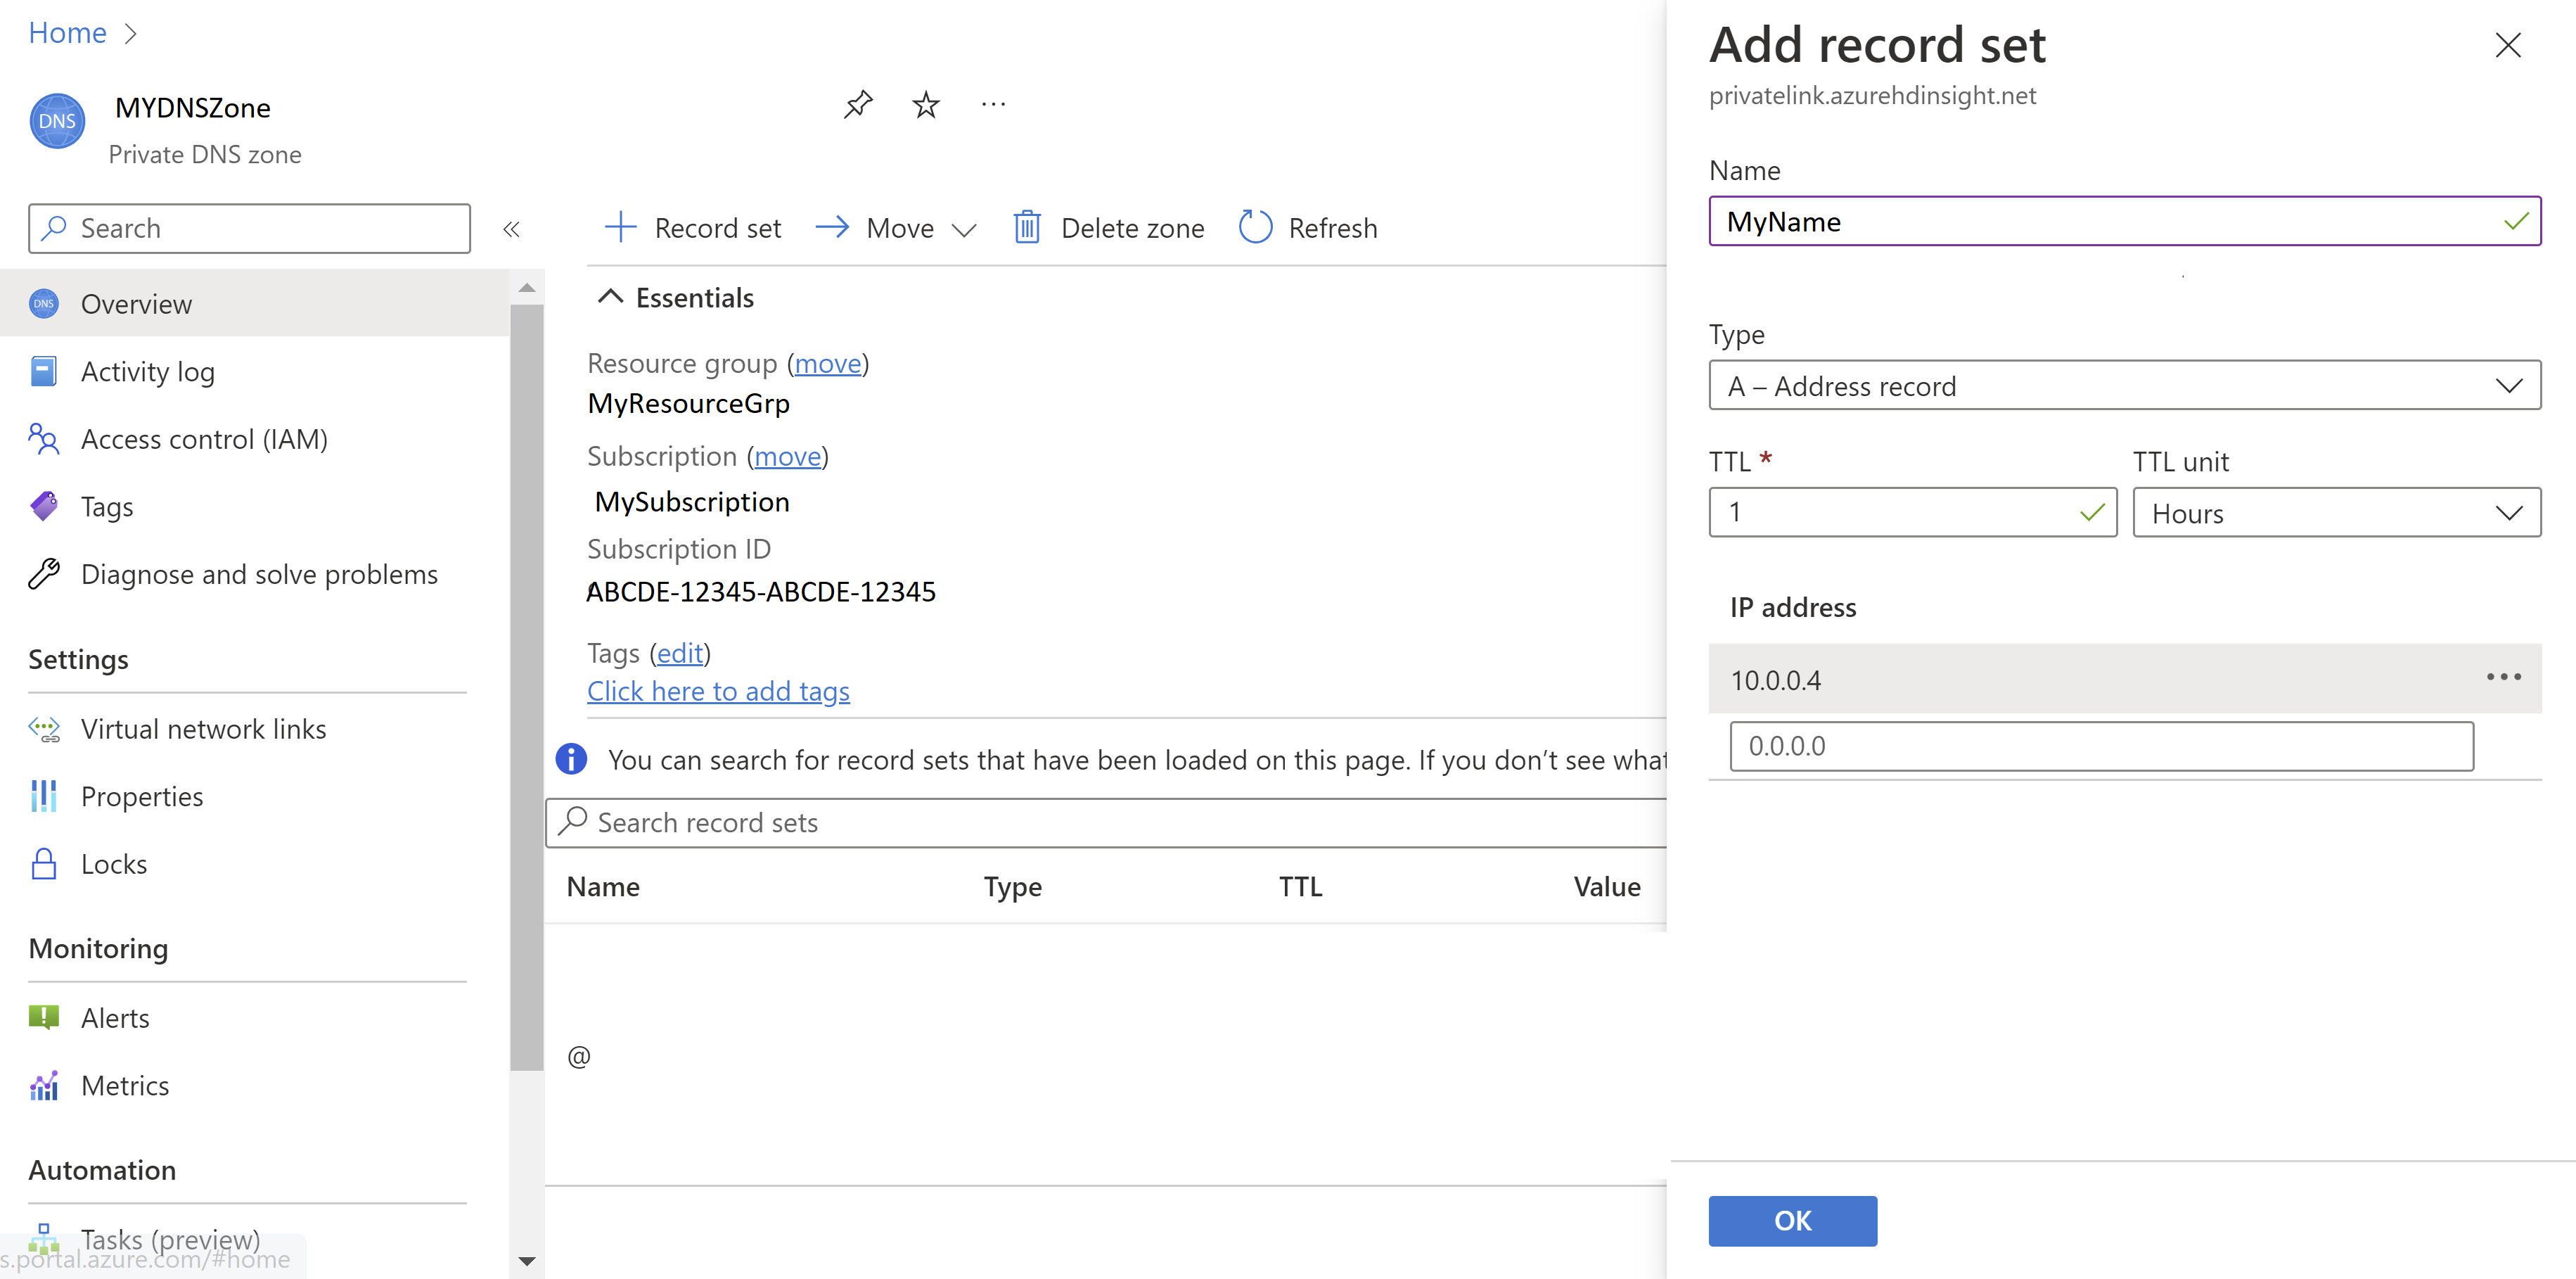
Add a Record set to the Private DNS zone for SSH.
Config Value Name YourPrivateLinkClusterName-ssh Type A - Alias record to IPv4 address TTL 1 TTL unit Hours IP Address Private IP of private endpoint for SSH access 
Important
If you are using KafkaRestProxy HDInsight cluster, then follow this extra steps to Configure DNS to connect over private endpoint.
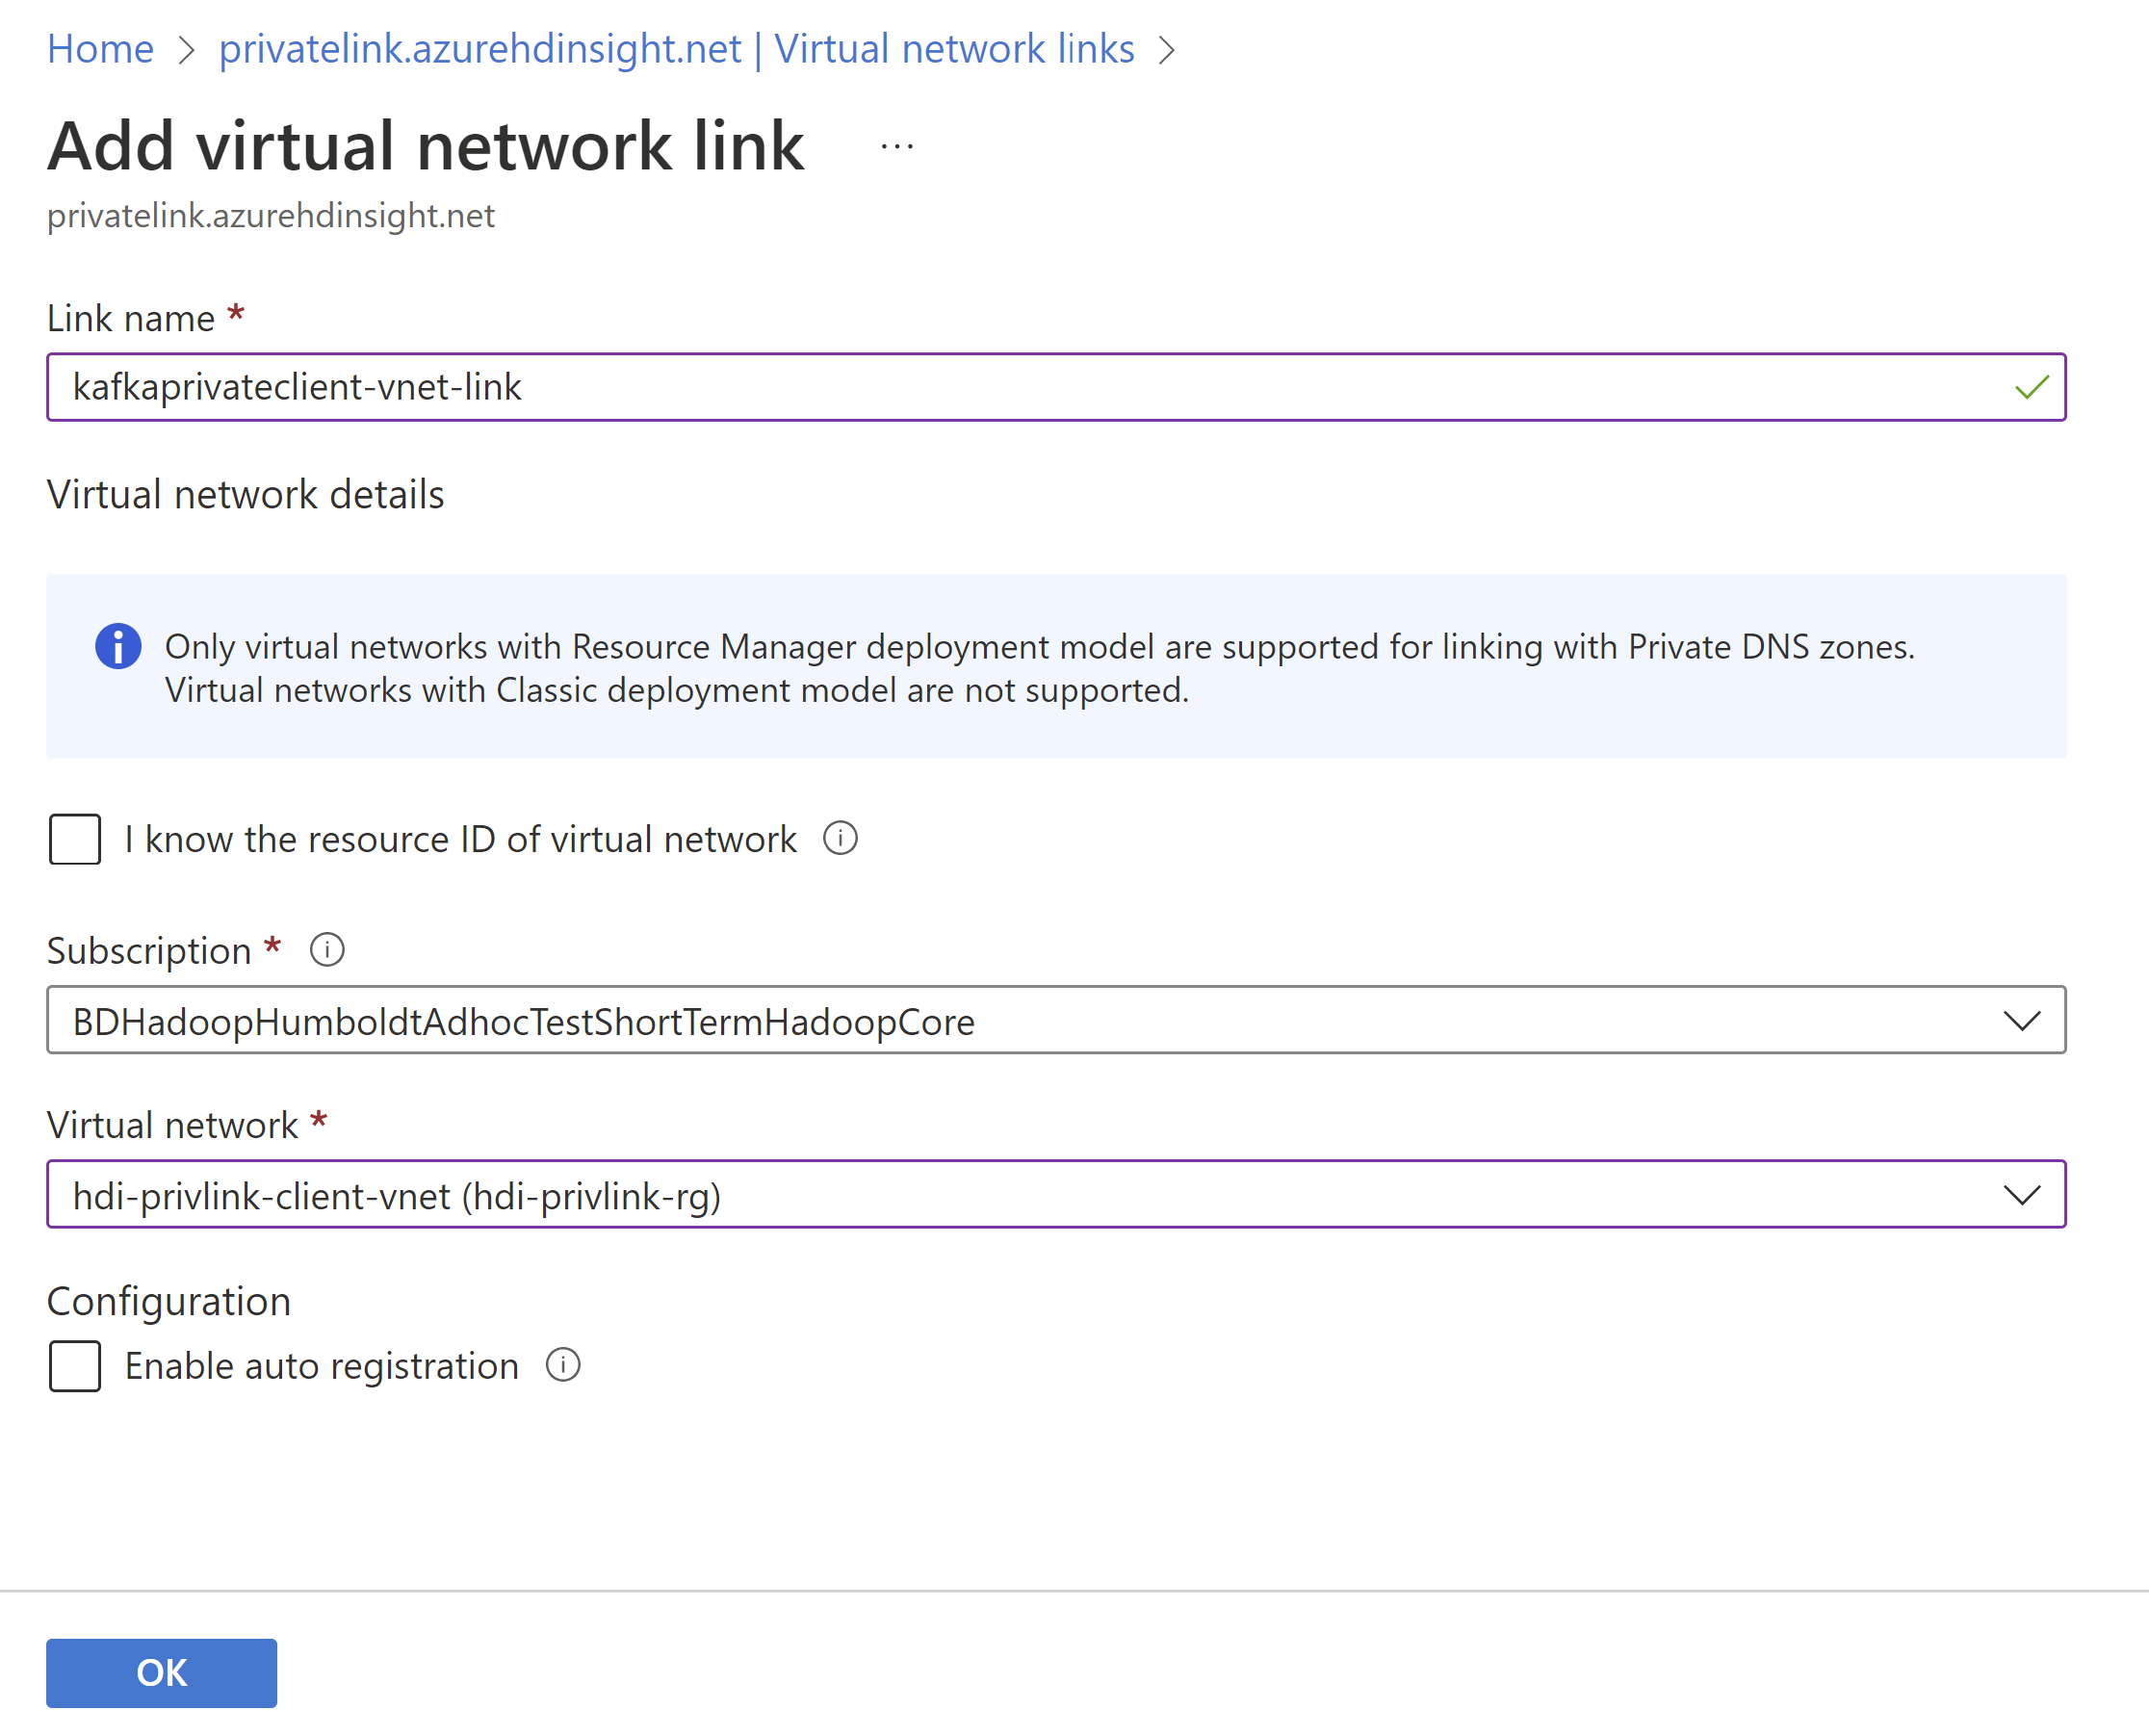
Associate the private DNS zone with the client VNET by adding a Virtual Network Link.
- Open the private DNS zone in the Azure portal.
- Click the 'Virtual network links' tab.
- Click the 'Add' button.
- Fill in the details: Link name, Subscription, and Virtual Network (your client VNET)
- Click Save.
Step 7: Check cluster connectivity
The last step is to test connectivity to the cluster. Since this cluster is isolated or private, we can't access the cluster using any public IP or FQDN. Instead we have a couple of options:
- Set up VPN access to the client VNET from your on-premises network
- Deploy a VM to the client VNET and access the cluster from this VM
For this example, we'll deploy a VM in the client VNET using the following configuration to test the connectivity.
| Config | Value |
|---|---|
| Virtual machine name | hdi-privlink-client-vm |
| Image | Windows 10 Pro, Version 2004 - Gen1 |
| Public inbound ports | Allow selected ports |
| Select inbound ports | RDP (3389) |
| I confirm I have an eligible Windows 10 license... | Checked |
| Virtual network | hdi-privlink-client-vnet |
| Subnet | default |
Once the client VM is deployed, you can test both Ambari and SSH access.
To test Ambari access:
- Open a web browser on the VM.
- Navigate to your cluster's regular FQDN:
https://<clustername>.azurehdinsight.net - If the Ambari UI loads, the configuration is correct for Ambari access.
To test ssh access:
- Open a command prompt to get a terminal window.
- In the terminal window, try connecting to your cluster with SSH:
ssh sshuser@<clustername>.azurehdinsight.net(Replace "sshuser" with the ssh user you created for your cluster) - If you're able to connect, the configuration is correct for SSH access.
Manage private endpoints for HDInsight
You can use private endpoints for your Azure HDInsight clusters to allow clients on a virtual network to securely access your cluster over Private Link. Network traffic between the clients on the virtual network and the HDInsight cluster traverses over the Microsoft backbone network, eliminating exposure from the public internet.
A Private Link service consumer (for example, Azure Data Factory) can choose from two connection approval methods:
- Automatic: If the service consumer has Azure role-based access control (RBAC) permissions on the HDInsight resource, the consumer can choose the automatic approval method. In this case, when the request reaches the HDInsight resource, no action is required from the HDInsight resource and the connection is automatically approved.
- Manual: If the service consumer doesn't have Azure RBAC permissions on the HDInsight resource, the consumer can choose the manual approval method. In this case, the connection request appears on the HDInsight resources as Pending. The HDInsight resource needs to manually approve the request before connections can be established.
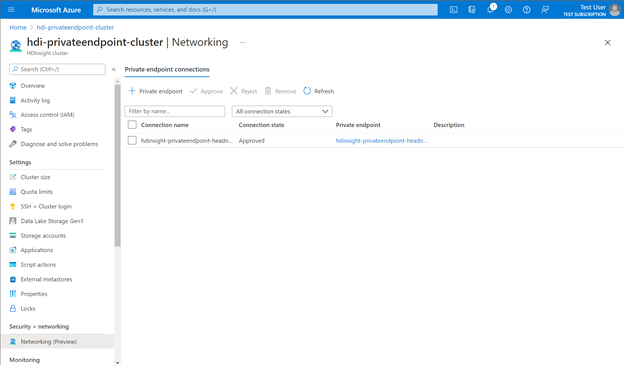
To manage private endpoints, in your cluster view in the Azure portal, go to the Networking section under Security + Networking. Here, you can see all existing connections, connection states, and private endpoint details.
You can also approve, reject, or remove existing connections. When you create a private connection, you can specify which HDInsight subresource (for example, gateway or head node) you also want to connect to.
The following table shows the various HDInsight resource actions and the resulting connection states for private endpoints. An HDInsight resource can also change the connection state of the private endpoint connection at a later time without consumer intervention. The action will update the state of the endpoint on the consumer side.
| Service provider action | Service consumer private endpoint state | Description |
|---|---|---|
| None | Pending | Connection is created manually and is pending approval by the Private Link resource owner. |
| Approve | Approved | Connection was automatically or manually approved and is ready to be used. |
| Reject | Rejected | Connection was rejected by the Private Link resource owner. |
| Remove | Disconnected | Connection was removed by the Private Link resource owner. The private endpoint becomes informative and should be deleted for cleanup. |
Next steps
Feedback
Coming soon: Throughout 2024 we will be phasing out GitHub Issues as the feedback mechanism for content and replacing it with a new feedback system. For more information see: https://aka.ms/ContentUserFeedback.
Submit and view feedback for