Import data wizard in Azure AI Search
The Import data wizard in the Azure portal creates multiple objects used for indexing and AI enrichment on a search service. If you're new to Azure AI Search, it's one of the most powerful features at your disposal. With minimal effort, you can create an indexing or enrichment pipeline that exercises most of the functionality of Azure AI Search.
If you're using the wizard for proof-of-concept testing, this article explains the internal workings of the wizard so that you can use it more effectively.
This article isn't a step by step. For help with using the wizard with built-in sample data, see the Quickstart: Create a search index or Quickstart: Create a text translation and entity skillset.
Starting the wizard
In the Azure portal, open the search service page from the dashboard or find your service in the service list. In the service Overview page at the top, select Import data.

The wizard opens fully expanded in the browser window so that you have more room to work.
You can also launch Import data from other Azure services, including Azure Cosmos DB, Azure SQL Database, SQL Managed Instance, and Azure Blob Storage. Look for Add Azure AI Search in the left-navigation pane on the service overview page.
Objects created by the wizard
The wizard will output the objects in the following table. After the objects are created, you can review their JSON definitions in the portal or call them from code.
| Object | Description |
|---|---|
| Indexer | A configuration object specifying a data source, target index, an optional skillset, optional schedule, and optional configuration settings for error handing and base-64 encoding. |
| Data Source | Persists connection information to a supported data source on Azure. A data source object is used exclusively with indexers. |
| Index | Physical data structure used for full text search and other queries. |
| Skillset | Optional. A complete set of instructions for manipulating, transforming, and shaping content, including analyzing and extracting information from image files. Unless the volume of work fall under the limit of 20 transactions per indexer per day, the skillset must include a reference to an Azure AI multi-service resource that provides enrichment. |
| Knowledge store | Optional. Stores output from an AI enrichment pipeline in tables and blobs in Azure Storage for independent analysis or downstream processing. |
Benefits and limitations
Before writing any code, you can use the wizard for prototyping and proof-of-concept testing. The wizard connects to external data sources, samples the data to create an initial index, and then imports the data as JSON documents into an index on Azure AI Search.
If you're evaluating skillsets, the wizard will handle all of the output field mappings and add helper functions to create usable objects. Text split is added if you specify a parsing mode. Text merge is added if you chose image analysis so that the wizard can reunite text descriptions with image content. Shaper skills added to support valid projections if you chose the knowledge store option. All of the above tasks come with a learning curve. If you're new to enrichment, the ability to have these steps handled for you allows you to measure the value of a skill without having to invest much time and effort.
Sampling is the process by which an index schema is inferred, and it has some limitations. When the data source is created, the wizard picks a random sample of documents to decide what columns are part of the data source. Not all files are read, as this could potentially take hours for very large data sources. Given a selection of documents, source metadata, such as field name or type, is used to create a fields collection in an index schema. Depending on the complexity of source data, you might need to edit the initial schema for accuracy, or extend it for completeness. You can make your changes inline on the index definition page.
Overall, the advantages of using the wizard are clear: as long as requirements are met, you can prototype a queryable index within minutes. Some of the complexities of indexing, such as serializing data as JSON documents, are handled by the wizard.
The wizard isn't without limitations. Constraints are summarized as follows:
The wizard doesn't support iteration or reuse. Each pass through the wizard creates a new index, skillset, and indexer configuration. Only data sources can be persisted and reused within the wizard. To edit or refine other objects, either delete the objects and start over, or use the REST APIs or .NET SDK to modify the structures.
Source content must reside in a supported data source.
Sampling is over a subset of source data. For large data sources, it's possible for the wizard to miss fields. You might need to extend the schema, or correct the inferred data types, if sampling is insufficient.
AI enrichment, as exposed in the portal, is limited to a subset of built-in skills.
A knowledge store, which can be created by the wizard, is limited to a few default projections and uses a default naming convention. If you want to customize names or projections, you'll need to create the knowledge store through REST API or the SDKs.
Public access to all networks must be enabled on the supported data source while the wizard is used, since the portal won't be able to access the data source during setup if public access is disabled. This means that if your data source has a firewall enabled or you have set a shared private link, you must disable them, run the Import Data wizard and then enable it after wizard setup is completed. If this isn't an option, you can create Azure AI Search data source, indexer, skillset and index through REST API or the SDKs.
Workflow
The wizard is organized into four main steps:
Connect to a supported Azure data source.
Create an index schema, inferred by sampling source data.
Optionally, add AI enrichments to extract or generate content and structure. Inputs for creating a knowledge store are collected in this step.
Run the wizard to create objects, load data, set a schedule and other configuration options.
The workflow is a pipeline, so it's one way. You can't use the wizard to edit any of the objects that were created, but you can use other portal tools, such as the index or indexer designer or the JSON editors, for allowed updates.
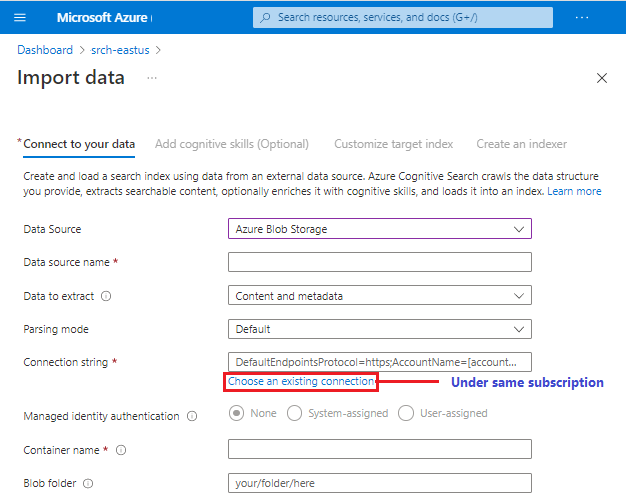
Data source configuration in the wizard
The Import data wizard connects to an external supported data source using the internal logic provided by Azure AI Search indexers, which are equipped to sample the source, read metadata, crack documents to read content and structure, and serialize contents as JSON for subsequent import to Azure AI Search.
You can paste in a connection to a supported data source in a different subscription or region, but the Choose an existing connection picker is scoped to the active subscription.
Not all preview data sources are guaranteed to be available in the wizard. Because each data source has the potential for introducing other changes downstream, a preview data source will only be added to the data sources list if it fully supports all of the experiences in the wizard, such as skillset definition and index schema inference.
You can only import from a single table, database view, or equivalent data structure, however the structure can include hierarchical or nested substructures. For more information, see How to model complex types.
Skillset configuration in the wizard
Skillset configuration occurs after the data source definition because the type of data source will inform the availability of certain built-in skills. In particular, if you're indexing files from Blob Storage, your choice of parsing mode of those files will determine whether sentiment analysis is available.
The wizard will add the skills you choose, but it will also add other skills that are necessary for achieving a successful outcome. For example, if you specify a knowledge store, the wizard adds a Shaper skill to support projections (or physical data structures).
Skillsets are optional and there's a button at the bottom of the page to skip ahead if you don't want AI enrichment.
Index schema configuration in the wizard
The wizard samples your data source to detect the fields and field type. Depending on the data source, it might also offer fields for indexing metadata.
Because sampling is an imprecise exercise, review the index for the following considerations:
Is the field list accurate? If your data source contains fields that weren't picked up in sampling, you can manually add any new fields that sampling missed, and remove any that don't add value to a search experience or that won't be used in a filter expression or scoring profile.
Is the data type appropriate for the incoming data? Azure AI Search supports the entity data model (EDM) data types. For Azure SQL data, there's mapping chart that lays out equivalent values. For more background, see Field mappings and transformations.
Do you have one field that can serve as the key? This field must be Edm.string and it must uniquely identify a document. For relational data, it might be mapped to a primary key. For blobs, it might be the
metadata-storage-path. If field values include spaces or dashes, you must set the Base-64 Encode Key option in the Create an Indexer step, under Advanced options, to suppress the validation check for these characters.Set attributes to determine how that field is used in an index.
Take your time with this step because attributes determine the physical expression of fields in the index. If you want to change attributes later, even programmatically, you'll almost always need to drop and rebuild the index. Core attributes like Searchable and Retrievable have a negligible impact on storage. Enabling filters and using suggesters increase storage requirements.
Searchable enables full-text search. Every field used in free form queries or in query expressions must have this attribute. Inverted indexes are created for each field that you mark as Searchable.
Retrievable returns the field in search results. Every field that provides content to search results must have this attribute. Setting this field doesn't appreciably affect index size.
Filterable allows the field to be referenced in filter expressions. Every field used in a $filter expression must have this attribute. Filter expressions are for exact matches. Because text strings remain intact, more storage is required to accommodate the verbatim content.
Facetable enables the field for faceted navigation. Only fields also marked as Filterable can be marked as Facetable.
Sortable allows the field to be used in a sort. Every field used in an $Orderby expression must have this attribute.
Do you need lexical analysis? For Edm.string fields that are Searchable, you can set an Analyzer if you want language-enhanced indexing and querying.
The default is Standard Lucene but you could choose Microsoft English if you wanted to use Microsoft's analyzer for advanced lexical processing, such as resolving irregular noun and verb forms. Only language analyzers can be specified in the portal. Using a custom analyzer or a non-language analyzer like Keyword, Pattern, and so forth, must be done programmatically. For more information about analyzers, see Add language analyzers.
Do you need typeahead functionality in the form of autocomplete or suggested results? Select the Suggester the checkbox to enable typeahead query suggestions and autocomplete on selected fields. Suggesters add to the number of tokenized terms in your index, and thus consume more storage.
Indexer configuration in the wizard
The last page of the wizard collects user inputs for indexer configuration. You can specify a schedule and set other options that will vary by the data source type.
Internally, the wizard also sets up the following definitions, which aren't visible in the indexer until after it's created:
- field mappings between the data source and index
- output field mappings between skill output and an index
Next steps
The best way to understand the benefits and limitations of the wizard is to step through it. The following quickstart explains each step.
Feedback
Coming soon: Throughout 2024 we will be phasing out GitHub Issues as the feedback mechanism for content and replacing it with a new feedback system. For more information see: https://aka.ms/ContentUserFeedback.
Submit and view feedback for