Designer Entity Splitting
This walkthrough shows how to map an entity type to two tables by modifying a model with the Entity Framework Designer (EF Designer). You can map an entity to multiple tables when the tables share a common key. The concepts that apply to mapping an entity type to two tables are easily extended to mapping an entity type to more than two tables.
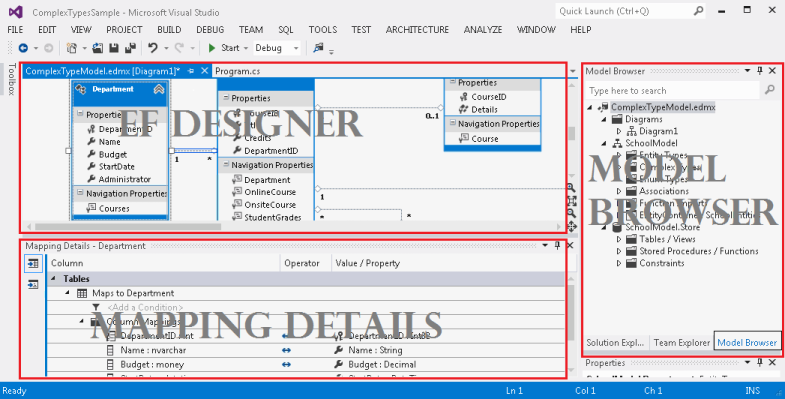
The following image shows the main windows that are used when working with the EF Designer.
Prerequisites
Visual Studio 2012 or Visual Studio 2010, Ultimate, Premium, Professional, or Web Express edition.
Create the Database
The database server that is installed with Visual Studio is different depending on the version of Visual Studio you have installed:
- If you are using Visual Studio 2012 then you'll be creating a LocalDB database.
- If you are using Visual Studio 2010 you'll be creating a SQL Express database.
First we'll create a database with two tables that we are going to combine into a single entity.
- Open Visual Studio
- View -> Server Explorer
- Right click on Data Connections -> Add Connection…
- If you haven’t connected to a database from Server Explorer before you’ll need to select Microsoft SQL Server as the data source
- Connect to either LocalDB or SQL Express, depending on which one you have installed
- Enter EntitySplitting as the database name
- Select OK and you will be asked if you want to create a new database, select Yes
- The new database will now appear in Server Explorer
- If you are using Visual Studio 2012
- Right-click on the database in Server Explorer and select New Query
- Copy the following SQL into the new query, then right-click on the query and select Execute
- If you are using Visual Studio 2010
- Select Data -> Transact SQL Editor -> New Query Connection...
- Enter .\SQLEXPRESS as the server name and click OK
- Select the EntitySplitting database from the drop down at the top of the query editor
- Copy the following SQL into the new query, then right-click on the query and select Execute SQL
CREATE TABLE [dbo].[Person] (
[PersonId] INT IDENTITY (1, 1) NOT NULL,
[FirstName] NVARCHAR (200) NULL,
[LastName] NVARCHAR (200) NULL,
CONSTRAINT [PK_Person] PRIMARY KEY CLUSTERED ([PersonId] ASC)
);

CREATE TABLE [dbo].[PersonInfo] (
[PersonId] INT NOT NULL,
[Email] NVARCHAR (200) NULL,
[Phone] NVARCHAR (50) NULL,
CONSTRAINT [PK_PersonInfo] PRIMARY KEY CLUSTERED ([PersonId] ASC),
CONSTRAINT [FK_Person_PersonInfo] FOREIGN KEY ([PersonId]) REFERENCES [dbo].[Person] ([PersonId]) ON DELETE CASCADE
);
Create the Project
- On the File menu, point to New, and then click Project.
- In the left pane, click Visual C#, and then select the Console Application template.
- Enter MapEntityToTablesSample as the name of the project and click OK.
- Click No if prompted to save the SQL query created in the first section.
Create a Model based on the Database
- Right-click the project name in Solution Explorer, point to Add, and then click New Item.
- Select Data from the left menu and then select ADO.NET Entity Data Model in the Templates pane.
- Enter MapEntityToTablesModel.edmx for the file name, and then click Add.
- In the Choose Model Contents dialog box, select Generate from database, and then click Next.
- Select the EntitySplitting connection from the drop down and click Next.
- In the Choose Your Database Objects dialog box, check the box next to the Tables node. This will add all the tables from the EntitySplitting database to the model.
- Click Finish.
The Entity Designer, which provides a design surface for editing your model, is displayed.
Map an Entity to Two Tables
In this step we will update the Person entity type to combine data from the Person and PersonInfo tables.
Select the Email and Phone properties of the **PersonInfo **entity and press Ctrl+X keys.
Select the **Person **entity and press Ctrl+V keys.
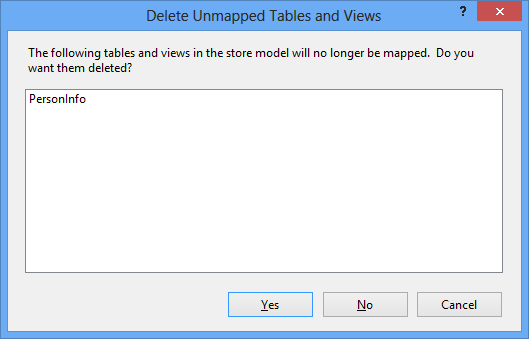
On the design surface, select the PersonInfo entity and press Delete button on the keyboard.
Click No when asked if you want to remove the PersonInfo table from the model, we are about to map it to the Person entity.
The next steps require the Mapping Details window. If you cannot see this window, right-click the design surface and select Mapping Details.
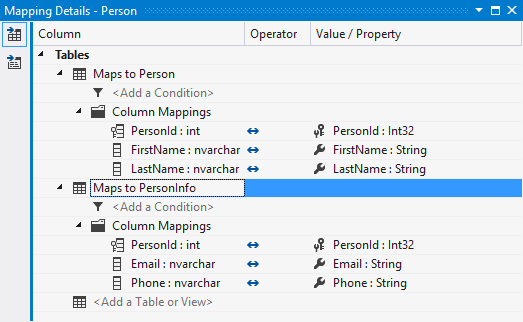
- Select the Person entity type and click <Add a Table or View> in the Mapping Details window.
- Select **PersonInfo ** from the drop-down list. The Mapping Details window is updated with default column mappings, these are fine for our scenario.
The Person entity type is now mapped to the Person and PersonInfo tables.
Use the Model
- Paste the following code in the Main method.
    using (var context = new EntitySplittingEntities())
    {
        var person = new Person
        {
            FirstName = "John",
            LastName = "Doe",
            Email = "john@example.com",
            Phone = "555-555-5555"
        };

        context.People.Add(person);
        context.SaveChanges();

        foreach (var item in context.People)
        {
            Console.WriteLine(item.FirstName);
        }
    }
- Compile and run the application.
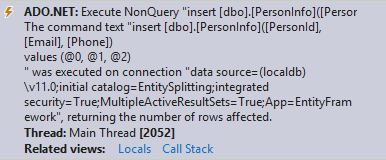
The following T-SQL statements were executed against the database as a result of running this application.
The following two INSERT statements were executed as a result of executing context.SaveChanges(). They take the data from the Person entity and split it between the Person and PersonInfo tables.
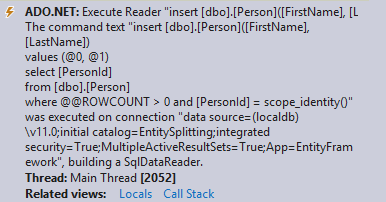
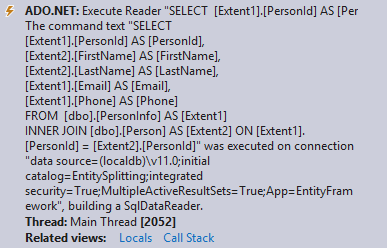
The following SELECT was executed as a result of enumerating the people in the database. It combines the data from the Person and PersonInfo table.
Feedback
Coming soon: Throughout 2024 we will be phasing out GitHub Issues as the feedback mechanism for content and replacing it with a new feedback system. For more information see: https://aka.ms/ContentUserFeedback.
Submit and view feedback for