Deploy Microsoft Entra hybrid joined devices by using Intune and Windows Autopilot
Important
Microsoft recommends deploying new devices as cloud-native using Microsoft Entra join. Deploying new devices as Microsoft Entra hybrid join devices isn't recommended, including through Autopilot. For more information, see Microsoft Entra joined vs. Microsoft Entra hybrid joined in cloud-native endpoints: Which option is right for your organization.
You can use Intune and Windows Autopilot to set up Microsoft Entra hybrid joined devices. To do so, follow the steps in this article. For more information about Microsoft Entra hybrid join, see Understanding Microsoft Entra hybrid join and co-management.
Prerequisites
- Successfully configured your Microsoft Entra hybrid joined devices. Be sure to verify your device registration by using the Get-MgDevice cmdlet.
- If Domain and OU-based filtering is configured as part of Microsoft Entra Connect, ensure that the default organizational unit (OU) or container intended for the Autopilot devices is included in the sync scope.
Device enrollment prerequisites
The device to be enrolled must follow these requirements:
- Use Windows 11 or Windows 10 version 1809 or later.
- Have access to the internet following Windows Autopilot network requirements.
- Have access to an Active Directory domain controller.
- Successfully ping the domain controller of the domain you're trying to join.
- If using Proxy, WPAD Proxy settings option must be enabled and configured.
- Undergo the out-of-box experience (OOBE).
- Use an authorization type that Microsoft Entra ID supports in OOBE.
Although not required, configuring Microsoft Entra hybrid join for Active Directory Federated Services (AD FS) enables a faster Windows Autopilot Microsoft Entra registration process during deployments. Federated customers that aren't supporting the use of passwords and using AD FS need to follow the steps in the article Active Directory Federation Services prompt=login parameter support to properly configure the authentication experience.
Intune connector server prerequisites
The Intune Connector for Active Directory must be installed on a computer that's running Windows Server 2016 or later with .NET Framework version 4.7.2 or later.
The server hosting the Intune Connector must have access to the internet and your Active Directory.
Note
The Intune Connector server requires standard domain client access to domain controllers, which includes the RPC port requirements it needs to communicate with Active Directory. For more information, see the following articles:
To increase scale and availability, you can install multiple connectors in your environment. We recommend installing the Connector on a server that's not running any other Intune connectors. Each connector must be able to create computer objects in any domain that you want to support.
If your organization has multiple domains and you install multiple Intune Connectors, a domain service account that can create computer objects in all domains must be used. This requirement is true even if you plan to implement Microsoft Entra hybrid join only for a specific domain. If these domains are untrusted domains, you must uninstall the connectors from domains in which you don't want to use Windows Autopilot. Otherwise, with multiple connectors across multiple domains, all connectors must be able to create computer objects in all domains.
This connector service account must have the following permissions:
- Log on as a service.
- Must be part of the Domain user group.
- Must be a member of the local Administrators group on the Windows server that hosts the connector.
Important
Managed service accounts aren't supported for the service account. The service account must be a domain account.
The Intune Connector requires the same endpoints as Intune.
Set up Windows automatic MDM enrollment
Sign in to the Azure portal. In the left pane, select Microsoft Entra ID > Mobility (MDM and MAM) > Microsoft Intune.
Make sure users who deploy Microsoft Entra joined devices by using Intune and Windows are members of a group included in MDM User scope.
Use the default values in the MDM Terms of use URL, MDM Discovery URL, and MDM Compliance URL boxes, and then select Save.
Increase the computer account limit in the Organizational Unit
The Intune Connector for your Active Directory creates autopilot-enrolled computers in the on-premises Active Directory domain. The computer that hosts the Intune Connector must have the rights to create the computer objects within the domain.
In some domains, computers aren't granted the rights to create computers. Additionally, domains have a built-in limit (default of 10) that applies to all users and computers that aren't delegated rights to create computer objects. The rights must be delegated to computers that host the Intune Connector on the organizational unit where Microsoft Entra hybrid joined devices are created.
The organizational unit that has the rights to create computers must match:
- The organizational unit entered in the Domain Join profile.
- If no profile is selected, the computer's domain name for your domain.
Open Active Directory Users and Computers (DSA.msc).
Right-click the organizational unit to use to create Microsoft Entra hybrid joined computers > Delegate Control.

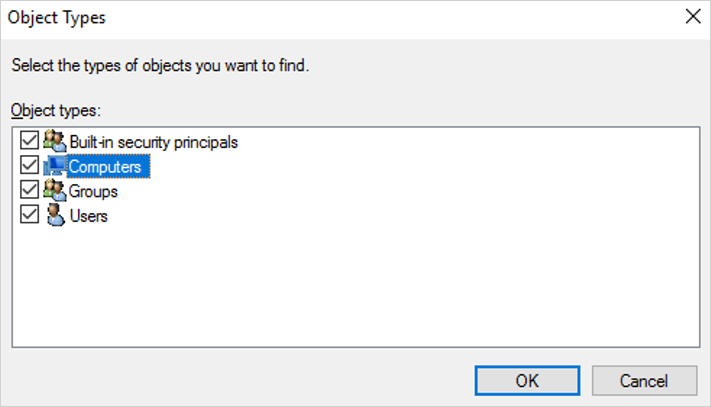
In the Delegation of Control wizard, select Next > Add > Object Types.
In the Object Types pane, select the Computers > OK.
In the Select Users, Computers, or Groups pane, in the Enter the object names to select box, enter the name of the computer where the Connector is installed.
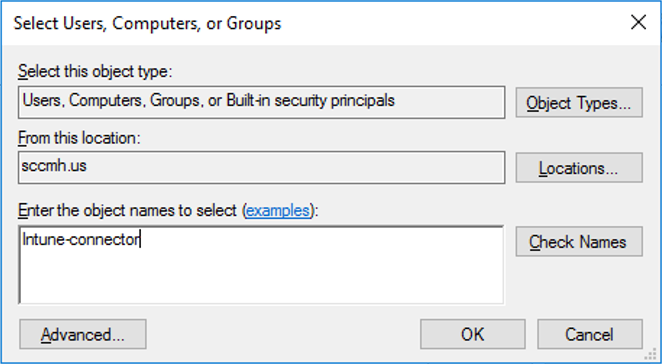
Select Check Names to validate your entry > OK > Next.
Select Create a custom task to delegate > Next.
Select Only the following objects in the folder > Computer objects.
Select Create selected objects in this folder and Delete selected objects in this folder.

Select Next.
Under Permissions, select the Full Control check box. This action selects all the other options.
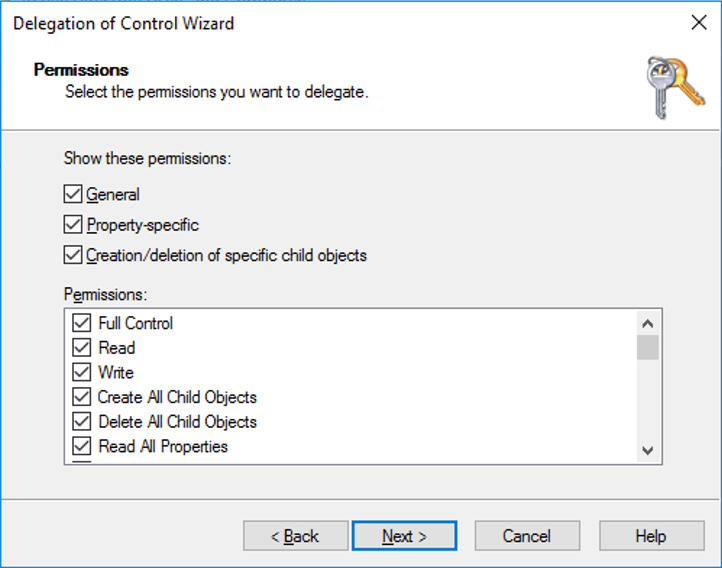
Select Next > Finish.
Install the Intune Connector
Before beginning the installation, make sure that all of the Intune connector server prerequisites are met.
Install steps
Turn off Internet Explorer Enhanced Security Configuration. By default Windows Server has Internet Explorer Enhanced Security Configuration turned on. If you're unable to sign in to the Intune Connector for Active Directory, then turn off Internet Explorer Enhanced Security Configuration for the Administrator. To turn off Internet Explorer Enhanced Security Configuration:
- On the server where the Intune Connector is being installed, open Server Manager.
- In the left pane of Server Manager, select Local Server.
- In the right PROPERTIES pane of Server Manager, select the On or Off link next to IE Enhanced Security Configuration.
- In the Internet Explorer Enhanced Security Configuration window, select Off under Administrators:, and then select OK.
In the Microsoft Intune admin center, select Devices > Windows > Windows enrollment > Intune Connector for Active Directory > Add.
Follow the instructions to download the Connector.
Open the downloaded Connector setup file, ODJConnectorBootstrapper.exe, to install the Connector.
At the end of the setup, select Configure Now.
Select Sign In.
Enter the Global administrator or Intune administrator role credentials. The user account must have an assigned Intune license.
Go to Devices > Windows > Windows enrollment > Intune Connector for Active Directory, and then confirm that the connection status is Active.
Note
- The Global administrator role is a temporary requirement at the time of installation.
- After you sign in to the Connector, it can take several minutes to appear in the Microsoft Intune admin center. It appears only if it can successfully communicate with the Intune service.
- Inactive Intune connectors still appear in the Intune Connectors page and will automatically be cleaned up after 30 days.
After the Intune Connector is installed, it will start logging in the Event Viewer under the path Applications and Services Logs > Microsoft > Intune > ODJConnectorService. Under this path, Admin and Operational logs can be found.
Note
The Intune Connector originally logged in the Event Viewer directly under Applications and Services Logs in a log called ODJ Connector Service. However, logging for the Intune Connector has since moved to the path Applications and Services Logs > Microsoft > Intune > ODJConnectorService. If you find that the ODJ Connector Service log at the original location is empty or not updating, check the new path location instead.
Configure web proxy settings
If you have a web proxy in your networking environment, ensure that the Intune Connector for Active Directory works properly by referring to Work with existing on-premises proxy servers.
Create a device group
In the Microsoft Intune admin center, select Groups > New group.
In the Group pane, choose the following options:
- For Group type, select Security.
- Enter a Group name and Group description.
- Select a Membership type.
If you selected Dynamic Devices for the membership type, in the Group pane, select Dynamic device members.
Select Edit in the Rule syntax box and enter one of the following code lines:
- To create a group that includes all your Autopilot devices, enter
(device.devicePhysicalIDs -any _ -startsWith "[ZTDId]"). - Intune's Group Tag field maps to the OrderID attribute on Microsoft Entra devices. If you want to create a group that includes all of your Autopilot devices with a specific Group Tag (OrderID), type:
(device.devicePhysicalIds -any _ -eq "[OrderID]:179887111881"). - To create a group that includes all your Autopilot devices with a specific Purchase Order ID, enter
(device.devicePhysicalIds -any _ -eq "[PurchaseOrderId]:76222342342").
- To create a group that includes all your Autopilot devices, enter
Select Save > Create.
Register your Autopilot devices
Select one of the following ways to enroll your Autopilot devices.
Register Autopilot devices that are already enrolled
Create an Autopilot deployment profile with the setting Convert all targeted devices to Autopilot set to Yes.
Assign the profile to a group that contains the members that you want to automatically register with Autopilot.
For more information, see Create an Autopilot deployment profile.
Register Autopilot devices that aren't enrolled
If your devices aren't yet enrolled, you can register them yourself. For more information, see Manual registration.
Register devices from an OEM
If you're buying new devices, some OEMs can register the devices for you. For more information, see OEM registration.
Display registered Autopilot device
Before they're enrolled in Intune, registered Autopilot devices are displayed in three places (with names set to their serial numbers):
- The Autopilot Devices pane in the Intune in the Azure portal. Select Device enrollment > Windows enrollment > Devices.
- The Microsoft Entra devices pane in the Intune in the Azure portal. Select Devices > Microsoft Entra Devices.
- The Microsoft Entra All Devices pane in Microsoft Entra ID in the Azure portal by selecting Devices > All Devices.
After your Autopilot devices are enrolled, they're displayed in four places:
- The Autopilot Devices pane in the Intune in the Azure portal. Select Device enrollment > Windows enrollment > Devices.
- The Microsoft Entra devices pane in the Intune in the Azure portal. Select Devices > Microsoft Entra Devices.
- The Microsoft Entra All Devices pane in Microsoft Entra ID in the Azure portal. Select Devices > All Devices.
- The All Devices pane in the Intune in the Azure portal. Select Devices > All Devices.
After your Autopilot devices are enrolled, their names become the hostname of the device. By default, the hostname begins with DESKTOP-.
A device object is precreated in Microsoft Entra ID once a device is registered in Autopilot. When a device goes through a hybrid Microsoft Entra deployment, by design, another device object is created resulting in duplicate entries.
BYO VPNs
The following VPN clients are tested and validated:
VPN clients
- In-box Windows VPN client
- Cisco AnyConnect (Win32 client)
- Pulse Secure (Win32 client)
- GlobalProtect (Win32 client)
- Checkpoint (Win32 client)
- Citrix NetScaler (Win32 client)
- SonicWall (Win32 client)
- FortiClient VPN (Win32 client)
Note
This list of VPN clients isn't a comprehensive list of all VPN clients that work with Autopilot. Contact the respective VPN vendor regarding compatibility and supportability with Autopilot or regarding any issues with using a VPN solution with Autopilot.
Not supported VPN clients
The following VPN solutions are known not to work with Autopilot and therefore aren't supported for use with Autopilot:
- UWP-based VPN plug-ins
- Anything that requires a user cert
- DirectAccess
Note
When using BYO VPNs, you should select Yes for the Skip AD connectivity check option in the Windows Autopilot deployment profile. Always-On VPNs shouldn't require this option since it connects automatically.
Create and assign an Autopilot deployment profile
Autopilot deployment profiles are used to configure the Autopilot devices.
In the Microsoft Intune admin center, select Devices > Windows > Windows enrollment > Deployment Profiles > Create Profile.
On the Basics page, type a Name and optional Description.
If you want all devices in the assigned groups to automatically register to Autopilot, set Convert all targeted devices to Autopilot to Yes. All corporate owned, non-Autopilot devices in assigned groups register with the Autopilot deployment service. Personally owned devices aren't registered to Autopilot. Allow 48 hours for the registration to be processed. When the device is unenrolled and reset, Autopilot enrolls it again. After a device is registered in this way, disabling this setting or removing the profile assignment won't remove the device from the Autopilot deployment service. You must instead remove the device directly.
Select Next.
On the Out-of-box experience (OOBE) page, for Deployment mode, select User-driven.
In the Join to Microsoft Entra ID as box, select Microsoft Entra hybrid joined.
If you're deploying devices off of the organization's network using VPN support, set the Skip Domain Connectivity Check option to Yes. For more information, see User-driven mode for Microsoft Entra hybrid join with VPN support.
Configure the remaining options on the Out-of-box experience (OOBE) page as needed.
Select Next.
On the Scope tags page, select scope tags for this profile.
Select Next.
On the Assignments page, select Select groups to include > search for and select the device group > Select.
Select Next > Create.
Note
Intune periodically checks for new devices in the assigned groups, and then begin the process of assigning profiles to those devices. Due to several different factors involved in the process of Autopilot profile assignment, an estimated time for the assignment can vary from scenario to scenario. These factors can include Microsoft Entra groups, membership rules, hash of a device, Intune and Autopilot service, and internet connection. The assignment time varies depending on all the factors and variables involved in a specific scenario.
(Optional) Turn on the enrollment status page
In the Microsoft Intune admin center, select Devices > Windows > Windows enrollment > Enrollment Status Page.
In the Enrollment Status Page pane, select Default > Settings.
In the Show app and profile installation progress box, select Yes.
Configure the other options as needed.
Select Save.
Create and assign a Domain Join profile
In the Microsoft Intune admin center, select Devices > Configuration profiles > Create Profile.
Enter the following properties:
- Name: Enter a descriptive name for the new profile.
- Description: Enter a description for the profile.
- Platform: Select Windows 10 and later.
- Profile type: Select Templates, choose the template name Domain Join, and select Create.
Enter the Name and Description and select Next.
Provide a Computer name prefix and Domain name.
(Optional) Provide an Organizational unit (OU) in DN format. Your options include:
- Provide an OU in which control is delegated to your Windows 2016 device that is running the Intune Connector.
- Provide an OU in which control is delegated to the root computers in your on-premises Active Directory.
- If you leave this blank, the computer object is created in the Active Directory default container (
CN=Computersif you never changed it).
Here are some valid examples:
OU=SubOU,OU=TopLevelOU,DC=contoso,DC=comOU=Mine,DC=contoso,DC=com
Here are some examples that aren't valid:
CN=Computers,DC=contoso,DC=com(you can't specify a container, instead leave the value blank to use the default for the domain)OU=Mine(you must specify the domain via theDC=attributes)
Note
Don't use quotation marks around the value in Organizational unit.
Select OK > Create. The profile is created and displayed in the list.
Assign a device profile to the same group used at the step Create a device group. Different groups can be used if there's a need to join devices to different domains or OUs.
Note
The naming capability for Windows Autopilot for Microsoft Entra hybrid join doesn't support variables such as %SERIAL%. It only supports prefixes for the computer name.
Uninstall the ODJ Connector
The ODJ connector is installed locally on a computer via an executable file. If the ODJ connector needs to be uninstalled from a computer, it needs to also be done locally on the computer. The ODJ connector can't be removed through the Intune portal or through a graph API call.
To uninstall the ODJ Connector from the computer, follow these steps:
- Sign into the computer hosting the ODJ connector.
- Right-click on the Start menu and select Settings.
- In the Windows Settings window, select Apps.
- Under Apps & features, find and select Intune Connector for Active Directory.
- Under Intune Connector for Active Directory, select the Uninstall button, and then select the Uninstall button again.
- The ODJ connector proceeds to uninstall.
Next steps
After you configure Windows Autopilot, learn how to manage those devices. For more information, see What is Microsoft Intune device management?.
Related articles
- What is a device identity?.
- Learn more about cloud-native endpoints.
- Microsoft Entra joined vs. Microsoft Entra hybrid joined in cloud-native endpoints.
- Tutorial: Set up and configure a cloud-native Windows endpoint with Microsoft Intune.
- How to: Plan your Microsoft Entra join implementation.
- A framework for Windows endpoint management transformation.
- Understanding hybrid Azure AD and co-management scenarios.
- Success with remote Windows Autopilot and hybrid Azure Active Directory join.
Feedback
Coming soon: Throughout 2024 we will be phasing out GitHub Issues as the feedback mechanism for content and replacing it with a new feedback system. For more information see: https://aka.ms/ContentUserFeedback.
Submit and view feedback for