Features in Configuration Manager technical preview version 2012
Applies to: Configuration Manager (technical preview branch)
This article introduces the features that are available in the technical preview for Configuration Manager, version 2012. Install this version to update and add new features to your technical preview site.
Review the technical preview article before installing this update. That article familiarizes you with the general requirements and limitations for using a technical preview, how to update between versions, and how to provide feedback.
The following sections describe the new features to try out in this version:
Windows 10 Servicing dashboard changes
We’ve simplified the Windows 10 Servicing dashboard to make it more relevant. The new Quality Update Versions chart displays the top five revisions of Windows 10 across your devices. The Latest Feature Update chart shows the number of devices that installed the latest feature update. The Windows 10 Usage chart, showing the distribution of Windows 10 major releases, was renamed to Feature Update Versions. Servicing plan and Windows 10 ring information were removed from the dashboard.

Known issues
When a build's revision number is three digits long, you may notice an extraneous dot before the build number in the Quality Update Versions chart. When one of these builds from the chart is selected, the temporary node displaying devices with the build will be empty.
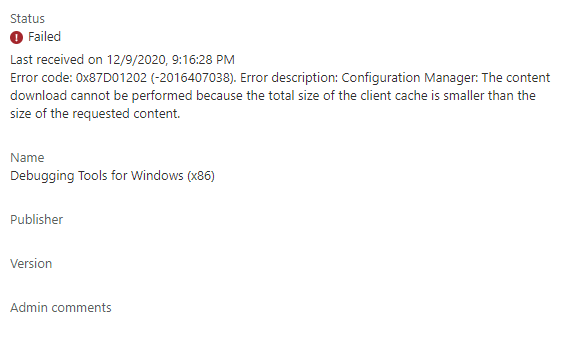
Tenant Attach: Application details
When tenant attach is enabled, the applications pane in the Microsoft Intune admin center will show an Error Description if the application status is Failed. For more information on the error code and troubleshooting steps, see Application installation common error codes reference.
Get console extensions from the Community hub
The Community hub now supports sharing extensions to the Configuration Manager console. When you get an extension from the hub, it's available in a new Console extensions node in the console. Getting an extension from the hub doesn't make it immediately available. First, an administrator has to approve the extension for the site. Then console users can install the extension to their local console.
After you approve an extension, when you open the console, you'll see a console notification. From the notification, you can start the extension installer. After the installer completes, the console restarts automatically, and then you can use the extension.
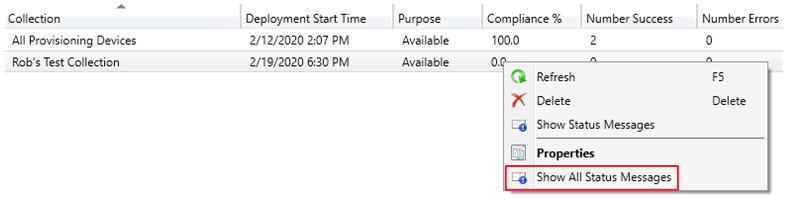
Console extension to show all status messages for a task sequence deployment
With this release, the Community hub includes one extension to help you test and use this feature: Show all status messages for a task sequence deployment. This extension is based on your feedback. When you install this extension, it adds a right-click action to task sequence deployments to Show all status messages.
To share a console extension with the community, use the same process to Contribute content.
Try it out!
Try to complete the tasks. Then send Feedback with your thoughts on the feature.
Use the community hub to download the console extension.
Go to the Administration workspace, expand Updates and servicing, and select the Console extensions node.
Select the new extension. In the ribbon, select Approve.
Restart the console. In the upper-right corner of the console, select the bell icon to display Configuration Manager console notifications.
The notification says New custom console extensions are available.
To start the install, select Install custom console extensions.
When the update is complete for the extension, select Close. The console restarts.
Go to the Software Library workspace, expand Operating Systems, and select the Task Sequences node. Right-click a task sequence, and select the new option to Show all status messages.
To troubleshoot the installation of an extension, see AdminUI.ExtensionInstaller.log in the AdminUILog directory on the computer with the console.
Community hub support for application content
This release continues to iterate on the scenario to share apps via the Community hub. Previously you could share just the definition of the app. Another hub user could download the app's XML metadata, and create it in their site. But to actually deploy the app, they would then need to locate the app's content.
You can now download linked content for Windows Installer apps in the hub. This improvement helps you to easily get a fully functional app from the Configuration Manager community. The hub provides an integrated link to the publicly available content for the app. When you download an app with content from the hub, it downloads both the app metadata from the hub and the MSI from its shared location outside the Community hub.
After the console downloads the file, it validates the hash. This check makes sure the content didn't change during download. It then validates the digital signature on the MSI file. If it can't verify the signature, it prompts you if you still want to import the file.
To help you test this new feature, the System Center Updates Publisher is available as an app with content in the Community hub. When you download SCUP from the Community hub, the console downloads the installer content from the Microsoft Download Center.
Note
At this time, you can't yet share an app with content in the Community hub.
Try it out!
Try to complete the tasks. Then send Feedback with your thoughts on the feature.
- In the Configuration Manager console, go to the Community workspace, and select the Community hub.
- Search for the app System Center Updates Publisher.
- Select Download.
- Specify a network path for the site to use as the content source.
After the hub downloads the app, use the following steps to verify the app:
- In the Configuration Manager console, go to the Software Library workspace, expand Application Management, and select the Applications node.
- Find the new application for System Center Updates Publisher.
- To view the new Windows Installer deployment type, in the Details pane, switch to the Deployment Types tab.
- To see the MSI downloaded from the Community hub, browse to the network path.
Note
If you want to install this app, make sure to review the SCUP prerequisites and installation instructions.
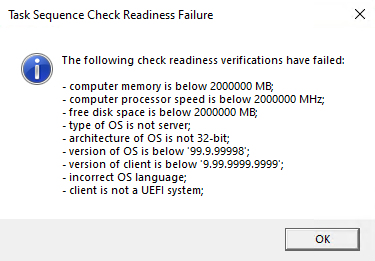
Task sequence error shows more check readiness details
Based on your feedback, the task sequence progress can now display more information about readiness checks. If a task sequence fails because the client doesn't meet the requirements configured in the Check readiness task sequence step, the user can now see more details about the failed prerequisites. They still see the common "task sequence error" message, but can now select an option to Inspect. This action shows the checks that failed on the device.
Disable application deployments
Based on your feedback, you can now disable application deployments.
Other objects already have similar behaviors:
- Software update deployments: Disable the deployment
- Phased deployments: Suspend the phase
- Package: Disable the program
- Task sequence: Disable the task sequence
- Configuration baseline: Disable the baseline
For device-based deployments, when you disable the deployment or object, use the client notification action to Download Computer Policy. This action immediately tells the client to update its policy from the site. If the deployment hasn't already started, the client receives the updated policy that the object is now disabled.
Starting in this release, you can now disable an application deployment.
Try it out!
Try to complete the tasks. Then send Feedback with your thoughts on the feature.
In the Configuration Manager console, go to the Software Library workspace, expand Application Management, and select the Applications node.
Select an app that you've deployed. In the details pane, switch to the Deployment tab.
Select a deployment. In the ribbon, on the Deployment tab, select Disable.
For a user-based deployment, the user needs to sign out of Windows. Policy updates when they sign in to Windows, or every 24 hours by default.
For a device-based deployment, note the name of the collection in Collection field of the deployment.
Tip
When you select the deployment, press CTRL + C. This keyboard shortcut copies the values of the current columns for the selected deployment.
Switch to the Assets and Compliance workspace, select the Device Collections node, and locate the target collection for the deployment. The quickest method is to search for the collection name as previously noted. You may need to select the option in the ribbon to search All subfolders.
Select the target collection for the deployment. In the ribbon, in the Collection group, select Client Notification and choose the Download Computer Policy action.
To enable the deployment, repeat this process but select the Enable action on the application deployment.
Access the top queries shared in the Community hub from CMPivot
You can now access the top CMPivot queries shared in the Community hub from on-premises CMPivot. By leveraging pre-created CMPivot queries shared by the broader community, CMPivot users gain access to a wider variety of queries. On-premises CMPivot accesses the Community hub and returns a list of the top downloaded CMPivot queries. Users can review the top queries, customize them, and then run on-demand. This improvement gives a wider selection of queries for immediate usage without having to construct them and also allows information sharing on how to build queries for future reference.
Prerequisites
Enable Community hub
- You don't need a GitHub account to download content.
Verify which content categories are displayed for Community hub
Install the Microsoft Edge WebView2 runtime extension from the Configuration Manager console notification
Meet all of the CMPivot prerequisites and permissions
Note
These queries are available when you run CMPivot from the Configuration Manager console. They're not yet available from standalone CMPivot.
Try it out!
Try to complete the tasks. Then send Feedback with your thoughts on the feature.
Go to the Assets and Compliance workspace then select the Device Collections node.
Select a target collection, target device, or group of devices then select Start CMPivot in the ribbon to launch the tool.
Use the Community hub icon on the menu.

Review the list of top shared CMPivot queries.
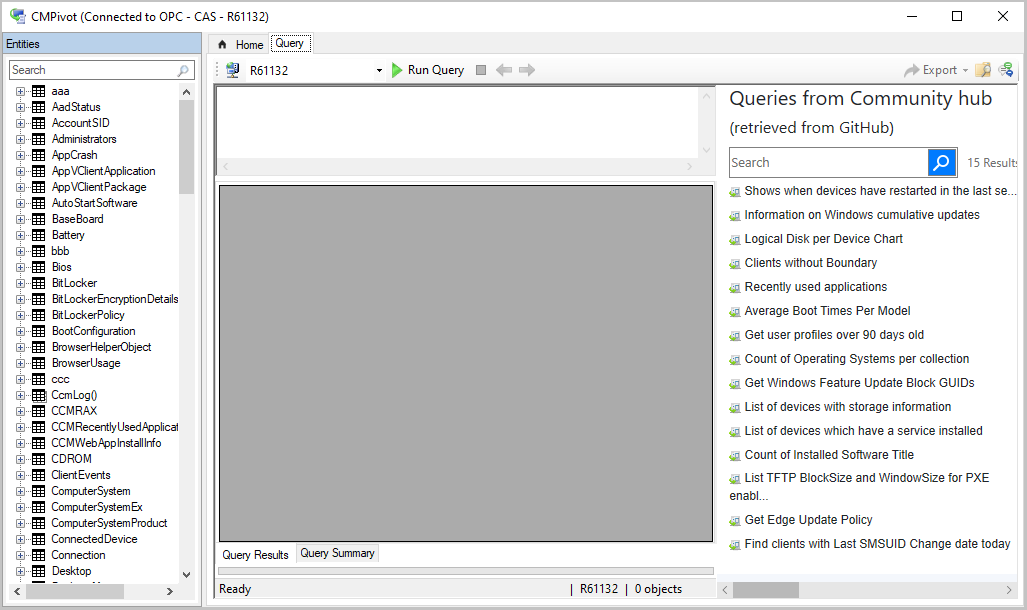
Select one of the top queries to load it into the query pane.
Edit the query if needed then select Run Query.
Optionally, add the original query or your edited version to your favorites list to run later.
Keep the CMPivot window open to view results from clients. When you close the CMPivot window, the session is complete. If the query has been sent, then clients still send a state message response to the server.

Improved user experience and security with Software Center custom tabs
Since current branch version 1906, you can add up to five custom tabs to Software Center. These custom tabs let you give your users easy access to common web apps and other sites. Previously, to display websites Software Center used the Windows built-in Internet Explorer browser control.
Starting in this release, Software Center can now use the Microsoft Edge WebView2 browser control. The WebView2 browser control provides improved security and user experience. For example, more websites should work with these custom tabs without displaying script errors or security warnings.

Prerequisites for Software Center custom tabs
The following components are required on the client device:
- Microsoft .NET Framework version 4.6.2 or later
- Microsoft Edge WebView2 runtime via the Evergreen standalone installer
- In this release, the user that runs Software Center needs local Administrator rights.
Try it out!
Try to complete the tasks. Then send Feedback with your thoughts on the feature.
In this release, you currently have to manually install the Microsoft Edge WebView2 browser control on the client. If you don't install this extension, Software Center continues to use the legacy Internet Explorer control. At this time, only use the Evergreen Standalone Installer. To download this installer, see Download the WebView2 Runtime.
You can use Configuration Manager to install this runtime on clients as an application. For more information, see Deploy applications
Then configure Software Center to display a custom tab. For more information, see Software Center client settings.
OneTrace support for jump lists
Support Center OneTrace now supports jump lists for recently opened files. Jump lists let you quickly go to previously opened files, so you can work faster.
There are now three methods to open recent files in OneTrace:
- Windows taskbar jump list
- Windows Start menu recently opened list
- In OneTrace from File menu or Recently opened tab.
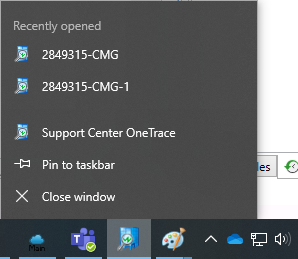
Windows taskbar jump list
When the OneTrace icon is on the Windows taskbar, right-click it, and then select a file from the Recently opened list.
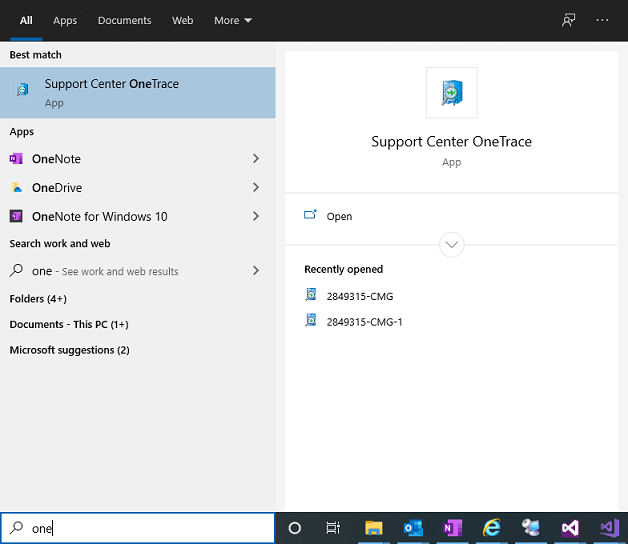
Windows Start menu recently opened list
Go to the Start menu, and type onetrace. Select a file from the Recently opened list.
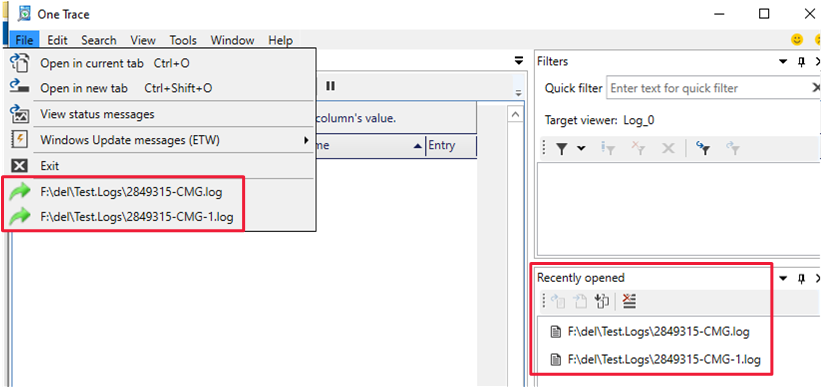
OneTrace recently opened list
There are two locations in OneTrace that show the list of recently opened files:
- The Recently opened tab in the lower right corner.
- Go to the File menu and select a file at the bottom of the menu.
PowerShell release notes preview
These release notes summarize changes to the Configuration Manager PowerShell cmdlets in technical preview version 2012.
For more information about PowerShell for Configuration Manager, see Get started with Configuration Manager cmdlets.
PowerShell module
If the Configuration Manager console on the device hasn't already connected to a site, if you manually import the ConfigurationManager module, it creates a PowerShell drive for the site based on the default SMS Provider.
New cmdlets
Get-CMDuplicateHardwareIdGuid
Get duplicate hardware identifiers by GUID.
Get-CMDuplicateHardwareIdGuid -Id "AB83D231-8C12-9413-FEBA-C0F9888B9291"
Get-CMDuplicateHardwareIdMacAddress
Get duplicate hardware identifiers by MAC address.
Get-CMDuplicateHardwareIdMacAddress -Id "60:45:BD:FB:4B:DB"
Sync-CMCloudManagementGateway
Synchronize the configuration of a CMG to Azure.
Sync-CMCloudManagementGateway -Name "GraniteFalls.cloudapp.net"
Get-CMCloudManagementGateway -Id 16777 | Sync-CMCloudManagementGateway
Modified cmdlets
New-CMApplication
Bugs that were fixed
Fixed a Software Center display issue when installing apps created with the time format "yyyy/MM/dd".
New-CMCertificateProfileScep
Bugs that were fixed
Fixed an issue for parameter SanType.
New-CMOperatingSystemImage
Non-breaking changes
Added parameter Index. When you add this parameter, the site extracts a single index image from a multi-index image. It then places the new image in the same source folder as the original image.
New-CMOperatingSystemInstaller
Non-breaking changes
Added parameter Index. When you add this parameter, the site replaces the current multi-index image with a new single index image.
New-CMTSRule
Non-breaking changes
Parameter ReferencedVariableOperator has one additional possible value: NotLike.
New-CMTSStepConditionVariable
Non-breaking changes
Parameter OperatorType has one additional possible value: NotLike
Set-CMTSStepConditionVariable
Non-breaking changes
Parameter OperatorType has one additional possible value: NotLike
Set-CMTSStep*
For example, Set-CMTSStepApplyDataImage and the 34 other similar cmdlets.
Non-breaking changes
Parameter OperatorType has one additional possible value: NotLike
New-CMSoftwareUpdateAutoDeploymentRule
Breaking changes
Fixed an issue for parameter O365LanguageSelection. You now need to specify a language with a country/region name. This change aligns this parameter with the options in the Configuration Manager console. For example, -O365LanguageSelection "English (United States)"
Set-CMCertificateProfileScep
Bugs that were fixed
Fixed an issue for parameter SanType.
Set-MSoftwareUpdateAutoDeploymentRule
Breaking changes
Fixed an issue for parameter O365LanguageSelection. You now need to specify a language with a country/region name. This change aligns this parameter with the options in the Configuration Manager console. For example, -O365LanguageSelection "English (United States)"
Next steps
For more information about installing or updating the technical preview branch, see Technical preview.
For more information about the different branches of Configuration Manager, see Which branch of Configuration Manager should I use?.
Feedback
Coming soon: Throughout 2024 we will be phasing out GitHub Issues as the feedback mechanism for content and replacing it with a new feedback system. For more information see: https://aka.ms/ContentUserFeedback.
Submit and view feedback for