Features in Configuration Manager technical preview version 2101
Applies to: Configuration Manager (technical preview branch)
This article introduces the features that are available in the technical preview for Configuration Manager, version 2101. Install this version to update and add new features to your technical preview site.
Review the technical preview article before installing this update. That article familiarizes you with the general requirements and limitations for using a technical preview, how to update between versions, and how to provide feedback.
The following sections describe the new features to try out in this version:
Console extension installation
You can now download console extensions from the Community hub and have it applied to all consoles connected to a hierarchy. This improvement allows you to start managing the approval and installation of console extensions used in your environment. In this technical preview, only Right Click Tools (Community Edition) from Recast Software is available for download and installation. This version of the Right Click Tools extension isn't a final production version. This extension is for technical preview environments only and will expire on April 1, 2021.
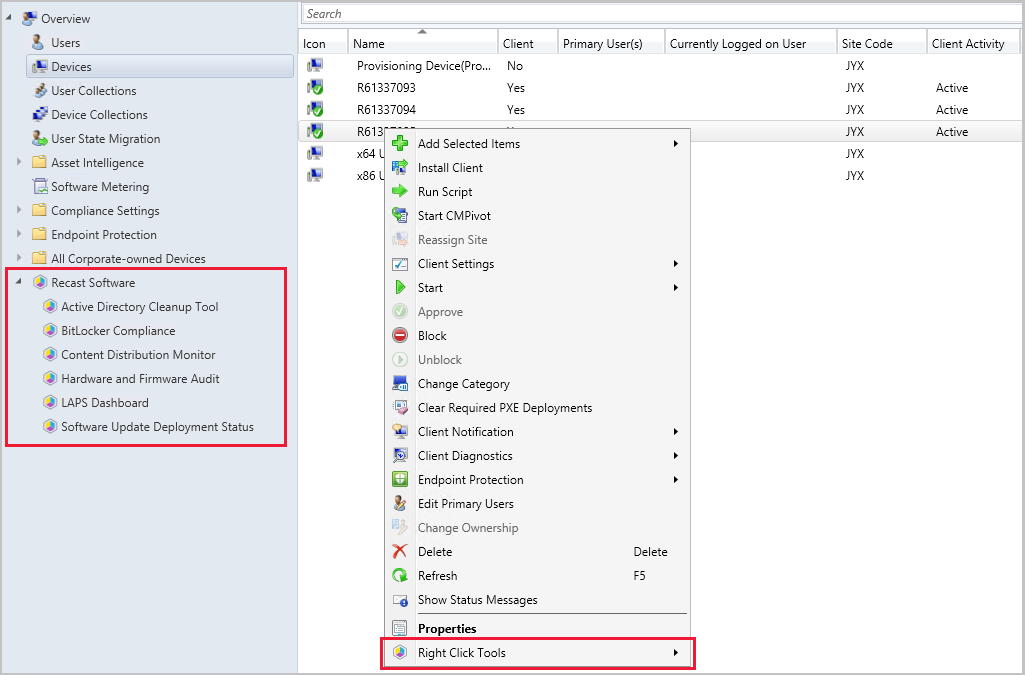
About the Console Extensions node
A new node has been added to the Configuration Manager console. The Console Extensions node is located under Administration > Overview > Updates and Servicing. Console extensions downloaded from the community hub will be located here. Actions for console extensions are grouped in the ribbon and the right-click menu.

Actions for All Sites group:
- Approve Installation: Approves the console extension for installation across all sites. An extension must be approved before notifications are enabled.
- Revoke Approval:
- Revokes the ability to install the extension from the Console Extensions node.
- Notifies then uninstalls existing instances of the extension across the hierarchy at the next launch of a locally installed console.
- Allows for reapproval of the extension at a later date.
- Enable Notifications: Upon next launch of the console, notifies users within the security scope that the extension can be installed.
- Disable Notifications: Disables the console notification messages for the extension. Users within the security scope can still install approved extensions from the Console Extensions node.
- Delete:
- Revokes the ability to install the extension from the Console Extensions node.
- Notifies then uninstalls existing instances of the extension across the hierarchy at the next launch of a locally installed console.
- Removes the extension from the Console Extensions node so it can't be reapproved later.
Classify group:
- Set Security Scopes: Set the security scopes to secure the object and limit access.
Local Extension group:
- Install: Installs the selected extension for the current local console
- Uninstall: Uninstalls the selected extension from the current local console
Try it out!
Try to complete the tasks. Then send Feedback with your thoughts on the feature.
Using the community hub, download the Right Click Tools extension from Recast Software.
From the Configuration Manager console, go to the Community hub node in the Community workspace.
Find Recast Software's Right Click Tools extension under the Recently Updated section on the Home page or search for it in the All objects page.
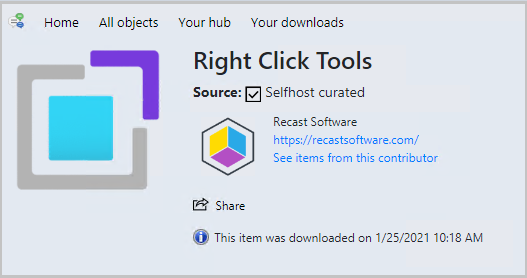
Select the Right Click Tools extension and choose Download.
Change the security scope for the extension. Changing the security scope is recommended for initial testing of an extension.
- Go to the Console Extensions node under Administration > Overview > Updates and Servicing.
- Select the extension, then select Set Security Scopes from the ribbon.
- Remove the Default security scope and add a scope that only contains one or two admins for initial testing.
- Choose OK to save the security scope for the extension.
Approve the Right Click Tools extension by selecting Approve Installation from the ribbon or right-click menu.
- If the extension isn't approved, you won't be able to install it or enable in-console notifications for it.
- If you restart your console at this point, a notification about the available extension won't occur since you haven't enabled the option yet.
Install the extension on the local console by choosing Install.
Once the extension is installed, verify it displays and you can use it from the local console's Assets and Compliance workspace.
Modify the security scopes for the extension to allow access by more admins. These admins will be targeted with the in-console notification for installing the extension.
Select Enable Notifications.
Launch a Configuration Manager console that doesn't have the extension installed. Ideally, use an account that you just gave access to when you modified the security scope.
Verify that the notification for the extension occurs and that you can install the extension.

Deploy a feature update with a task sequence
Based on your feedback, you can now upgrade a client's Windows OS by using a feature update deployed with a task sequence. This integration combines the simplicity of Windows servicing with the flexibility of task sequences. Servicing uses a single ESD file that you synchronize through the software update point. This process simplifies the need to manually get, import, and maintain the Windows image content used with a standard task sequence to upgrade Windows. The size of the ESD file is generally smaller than the WIM image file.
The user experience is the same as with a task sequence.
Prerequisites for a feature update in a task sequence
Synchronize the software update point to include the Upgrades classification. For more information, see Configure classifications and products.
For a deployment package that contains the feature update, distribute it to a distribution point that the client can access. For more information, see Download software updates.
Review the configuration of the following client settings in the Software Updates group, which are applicable to this scenario:
Specify thread priority for feature updates: In most instances, set this value to Normal.
Enable Dynamic Update for feature updates: Use this setting to use dynamic update to install language packs, features on demand, drivers, and cumulative updates during Windows Setup. Clients download these other updates from the internet.
Try it out!
Try to complete the tasks. Then send Feedback with your thoughts on the feature.
Edit the task sequence and select the Upgrade Operating System step.
Select the option to Install the following feature updates.
Select the new button (gold asterisk), and add a feature update.
Note
You can only add feature updates.
If your environment supports multiple languages or architectures, add multiple updates to the step. The client uses the first applicable update.
Select OK to save the task sequence and close the editor.
To troubleshoot this process, besides smsts.log for the overall task sequence, use the following software update logs:
- WUAHandler.log
- UpdateHandler.log
- UpdateDeployment.log
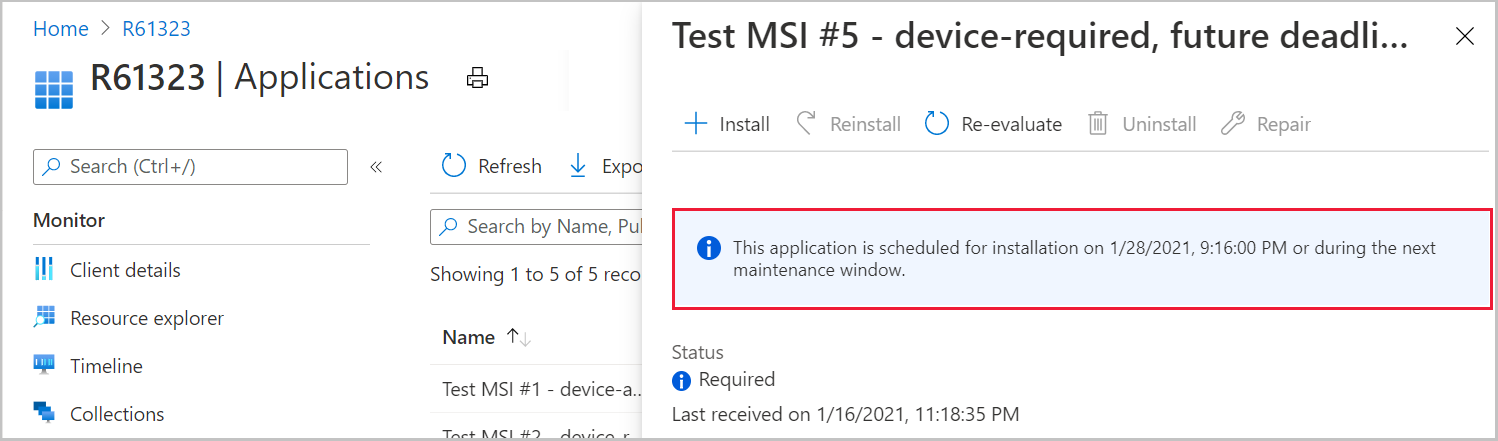
Tenant Attach: Required application deployments display in Microsoft Intune admin center
Applications targeted to a device or a user with a required deadline will now show in the Applications view for a tenant attached device in Microsoft Intune admin center. This improvement allows you to review when application installations are expected to occur on a device. The An administrator must approve a request for this application on the device option is no longer required to be set on the device available deployment for applications to be listed in the admin center.
We recommend using the An administrator must approve a request for this application on the device on application deployments when you have a large number of device available applications. By using this option, it defers targeting a new policy to the client until installation is initiated by the admin. By not targeting a large number of application policies to the client, it increases the performance of the site servers and the client. Use the following table to determine installation behavior on the device when you install an app from the admin center:
| Deployment options | Client requires policy sync before installation | Client must be online to queue the installation |
|---|---|---|
| Device required | Yes | Yes |
| Device available | Yes | Yes |
| Device requires approval | No | No The installation will occur when the client next comes online |
| User required | Yes | Yes |
| User available | No | No The installation will occur when the client next comes online |
| User requires approval | No | No The installation will occur when the client next comes online |
Try it out!
Try to complete the tasks. Then send Feedback with your thoughts on the feature.
- Sign in to the Microsoft Intune admin center.
- From Devices > All devices, choose a device managed by ConfigMgr.
- Select Applications (preview) then select an application that has a Status of Required.
- Review the details of the schedule for the installation of the application.
Client setting for displaying Software Center custom tabs
Technical preview version 2012 included an improved user experience and security with Software Center custom tabs. It required that you manually deploy the Microsoft Edge WebView2 browser control.
Starting in this release, you can now configure a client setting to use the WebView2 runtime.
Try it out!
Try to complete the tasks. Then send Feedback with your thoughts on the feature.
In the Software Center group of client settings, Customize Software Center settings.
On the Tabs tab, enable the option to Display custom tabs with Microsoft Edge WebView2 runtime.
If it's not already installed, the Configuration Manager client installs the Microsoft Edge WebView2 runtime (fixed version) on the device.
For more information, see How to configure client settings.
Note
If the client device isn't running .NET Framework version 4.6.2 or later, it falls back to use the Internet Explorer browser control.
Simplified CMPivot permissions requirements
We've simplified the CMPivot permissions requirements. The following changes have been made:
- CMPivot no longer requires SMS Scripts read permission
- The administration service still requires this permission when falling back to use the SMS Provider when a 503 (Service Unavailable) error is received, as seen in the CMPivot.log
- The default scope permission isn’t required.
CMPivot permissions by Configuration Manager version
| 1902 and earlier | 1906 | 2101 technical preview and later |
|---|---|---|
| Read permission on SMS Scripts | Read permission on SMS Scripts | N/A |
| Run Script permission on the Collection | Run CMPivot permission on the Collection | Run CMPivot permission on the Collection |
| Read permission on Inventory Reports | Read permission on Inventory Reports | Read permission on Inventory Reports |
| Default scope permission | Default scope permission | N/A |
Note
The new permissions are only applicable for CMPivot in the on-premises console. Currently these new permissions won't work for CMPivot standalone. If you're using CMPivot standalone, you will still need the SMS Scripts read right and the default scope. Currently, the following limitations also apply:
- CMPivot in the on-premises console requires SMS Scripts read right when viewing, saving, and deleting favorite queries.
- CMPivot in the on-premises console can't create a collection from the CMPivot results.
Allow exclusion of organizational units (OU) from Active Directory User Discovery
You can now exclude OUs from Active Directory User Discovery. To exclude an OU:
- From the Configuration Manager console, go to Administration > Hierarchy Configuration > Discovery Methods.
- Select Active Directory User Discovery then select Properties from the ribbon.
- On the General tab of the Active Directory User Discovery Properties window, select the New icon to specify a new Active Directory container or Edit to change an existing one.
- In the Active Directory Container dialog box, locate the search option named Select sub containers to be excluded from discovery.
- Select Add to add an exclusion or Remove to remove an existing exclusion.
- Select OK to save the Active Directory container configuration.
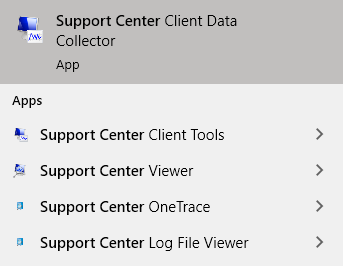
Changes to Support Center
Support Center is now split into the following tools:
Support Center Client Data Collector: Collects data from a device to view in the Support Center Viewer. This separate tool encompasses the existing Support Center action to Collect selected data.
Support Center Client Tools: The other Support Center troubleshooting functionality, except for Collect selected data.
The following tools are still a part of Support Center:
- Support Center Viewer
- Support Center OneTrace
- Support Center Log File Viewer
The Start menu group for Support Center now includes these five tools. There are no other changes to these tools in this release.
For more information on these tools, see Support Center.
Prerequisite rule for deprecated Azure Monitor connector
We continue to see broad adoption of native Azure Monitor log query groups as customers shift more of their workloads to the cloud. Because of this reason, starting in November 2020, the Configuration Manager feature to synchronize collections to Azure Monitor is deprecated.
When you update to this release, a new prerequisite check warns about the presence of the Log Analytics connector for Azure Monitor. (This feature is called the OMS Connector in the Azure Services wizard.) This connector is deprecated, and will be removed from the product in a future release. At that time, this check will be an error that blocks upgrade.
For more information, see Removed and deprecated features.
Manage aged distribution point messages
In some environments, a small number of error status messages for a distribution point can cause the entire server status to show an error state. This behavior could be due to a known issue when failing to distribute content. To help you better manage the state of distribution points, this release includes the following improvements:
Delete a specific distribution point status message. Go to the Monitoring workspace, expand Distribution Status, and select Distribution Point Configuration Status. Select a server, and switch to the Details tab in the bottom pane. Select a message, and then in the ribbon, select Delete.
Delete aged status messages for a specific distribution point. In the same Distribution Point Configuration Status node, select a server. In the ribbon, select Delete Aged Status Messages. Then choose a timeframe for messages to delete: older than 30 days, older than 90 days, older than one year.
Configure a site maintenance task to Delete Aged Distribution Point Messages. For more general information on tasks, see Maintenance tasks.
Encryption algorithm to capture and restore user state
The task sequence steps to Capture User State and Restore User State always encrypt the USMT state store. Previously, Configuration Manager configured USMT to use the 3DES algorithm. Starting in this release, both steps now use the highest supported encryption algorithm, AES 256.
If you have any active user state migrations, before you update the Configuration Manager client on those devices, restore the user state. Otherwise, the updated client will fail to restore the user state when it tries to use a different encryption algorithm. If necessary, you can manually restore the user state and explicitly use the USMT parameter /decrypt:3DES.
PowerShell release notes preview
These release notes summarize changes to the Configuration Manager PowerShell cmdlets in technical preview version 2101.
For more information about PowerShell for Configuration Manager, see Get started with Configuration Manager cmdlets.
Cmdlets that don't support PowerShell version 7
While Configuration Manager cmdlets provide general support for PowerShell version 7, the following cmdlets don't support PowerShell 7:
- Import-CMPackage
- Import-CMDriverPackage
- Import-CMTaskSequence
- Export-CMPackage
- Export-CMDriverPackage
- Export-CMTaskSequence
They require the .NET Framework instead of .NET Core that's used with PowerShell version 7.
Starting in version 2101, if you try to use these cmdlets in a PowerShell version 7 session, they fail with the following error: This cmdlet only supports the ".NET Framework" runtime.
New cmdlets
Get-CMApplicationGroup
Use this cmdlet to get an application group.
Get-CMApplicationGroup -Name 'Central app'
New-CMApplicationGroup
Use this cmdlet to create a new application group.
$apps = @('LOB Framework','CA UI')

New-CMApplicationGroup -Name 'Central app' -AddApplication $apps -Description 'Central app group' -Publisher 'Contoso IT' -SoftwareVersion '1.1.2' -ReleaseDate (Get-Date) -AddOwner 'jqpublic' -AddSupportContact 'jdoe' -LocalizedAppGroupName 'Central app'
Publish-CMThirdPartySoftwareUpdateContent
Use this cmdlet to publish third-party update content.
Get-CMSoftwareUpdate -Name "third-party update" | Publish-CMThirdPartySoftwareUpdateContent
Publish-CMThirdPartySoftwareUpdateContent -Name "third-party update1"
Publish-CMThirdPartySoftwareUpdateContent -CIId 16778432 -Force
Remove-CMApplicationGroup
Use this cmdlet to remove a specific application group.
Remove-CMApplicationGroup -Id 16778064 -Force
Remove-CMApplicationGroup -Name "test" -Force
Remove-CMApplicationGroup -InputObject $app -Force
Set-CMApplicationGroup
Use this cmdlet to configure a specific application group.
$result = Get-CMApplicationGroup -Name "appGroup1"
Set-CMApplicationGroup -Id 16779247 -Description "setById" -PassThru
Set-CMApplicationGroup -Name "appGroupNew" -Description "setByName" -PassThru
Set-CMApplicationGroup -ModelName $modelName -Description "setByModelName" -PassThru
Set-CMApplicationGroup -InputObject $result -Description "setByInput" -RemoveApplication $removeApp -PassThru
$result | Set-CMApplicationGroup -Description "setByPipeline" -AddApplication $removeApp -PassThru
Modified cmdlets
Copy-CMCollection
Non-breaking changes
Fixed validation with NewName parameter to align with console.
Get-CMDriver
Non-breaking changes
Add ability to filter by parameter AdministrativeCategory.
$category1 = Get-CMCategory -CategoryType DriverCategories -Name 'OEM 1'
$category2 = Get-CMCategory -CategoryType DriverCategories -Name 'OEM 2'
$categories = $category1,$category2

Get-CMDriver -AdministrativeCategory $categories
New-CMCollection
Non-breaking changes
Fixed validation with Name parameter to align with console.
Set-CMClientPushInstallation
Non-breaking changes
Add parameter AllownNTLMFallback to enable NTLM fallback.
Set-CMCollection
Non-breaking changes
Fixed validation with NewName parameter to align with console.
Set-CMThirdPartyUpdateCategory
Non-breaking changes
Fixed an issue with the PublishOption parameter set to FullContent.
Set-CMThirdPartyUpdateCatalog
Non-breaking changes
Add parameters CategoryNamePublishOption and CategoryIdPublishOption. Use these parameters to set the category publish option when you subscribe to a v3 catalog.
$id = "5768207d-6c40-465b-ad65-50501661368f"
$option = [Microsoft.ConfigurationManagement.Cmdlets.Sum.Commands.PublishOptionType]::MetadataOnly
$idOptionPair = @{$id = $option}
Set-CMThirdPartyUpdateCatalog -CatalogName 'pmp' -CategoryIdPublishOption $idOptionPair -Subscribe -Force
$name = "2BrightSparks"
$name1 = "8x8, Inc."
$option = [Microsoft.ConfigurationManagement.Cmdlets.Sum.Commands.PublishOptionType]::MetadataOnly
$nameOptionPair = @{$name = $option; $name1 = $option}
Set-CMThirdPartyUpdateCatalog -CatalogName pmp -CategoryNamePublishOption $nameOptionPair -Subscribe -Force
Known issues
Unable to upload files when sending a frown through the console
When filing a frown from the Configuration Manager console, files won't be uploaded.
Mitigation: To work around this issue, you'll need to edit the microsoft.configurationmanagement.exe.config file located in the admin console installation directory. Use the instruction below to work around the issue:
Open Notepad as administrator.
From Notepad, choose File then Open.
Browse to the Configuration Manager console installation directory and open the file named
Microsoft.ConfigurationManagement.exe.config.- The default location is
C:\Program Files (x86)\Microsoft Endpoint Manager\AdminConsole\bin\Microsoft.ConfigurationManagement.exe.config
- The default location is
In the
<runtime>section, add the following text:<assemblyBinding xmlns="urn:schemas-microsoft-com:asm.v1"> <dependentAssembly> <assemblyIdentity name="Microsoft.WindowsAzure.Storage" publicKeyToken="31bf3856ad364e35" culture="neutral" /> <bindingRedirect oldVersion="0.0.0.0-8.7.0.0" newVersion="6.2.0.0" /> </dependentAssembly> </assemblyBinding>
Save the config file then reopen the Configuration Manager console and file your feedback.

Next steps
For more information about installing or updating the technical preview branch, see Technical preview.
For more information about the different branches of Configuration Manager, see Which branch of Configuration Manager should I use?.
Feedback
Coming soon: Throughout 2024 we will be phasing out GitHub Issues as the feedback mechanism for content and replacing it with a new feedback system. For more information see: https://aka.ms/ContentUserFeedback.
Submit and view feedback for