Features in Configuration Manager technical preview version 2105.2
Applies to: Configuration Manager (technical preview branch)
This article introduces the features that are available in the technical preview for Configuration Manager, version 2105. Install this version to update and add new features to your technical preview site.
Review the technical preview article before installing this update. That article familiarizes you with the general requirements and limitations for using a technical preview, how to update between versions, and how to provide feedback.
The following sections describe the new features to try out in this version:
Windows Update native experience for software updates
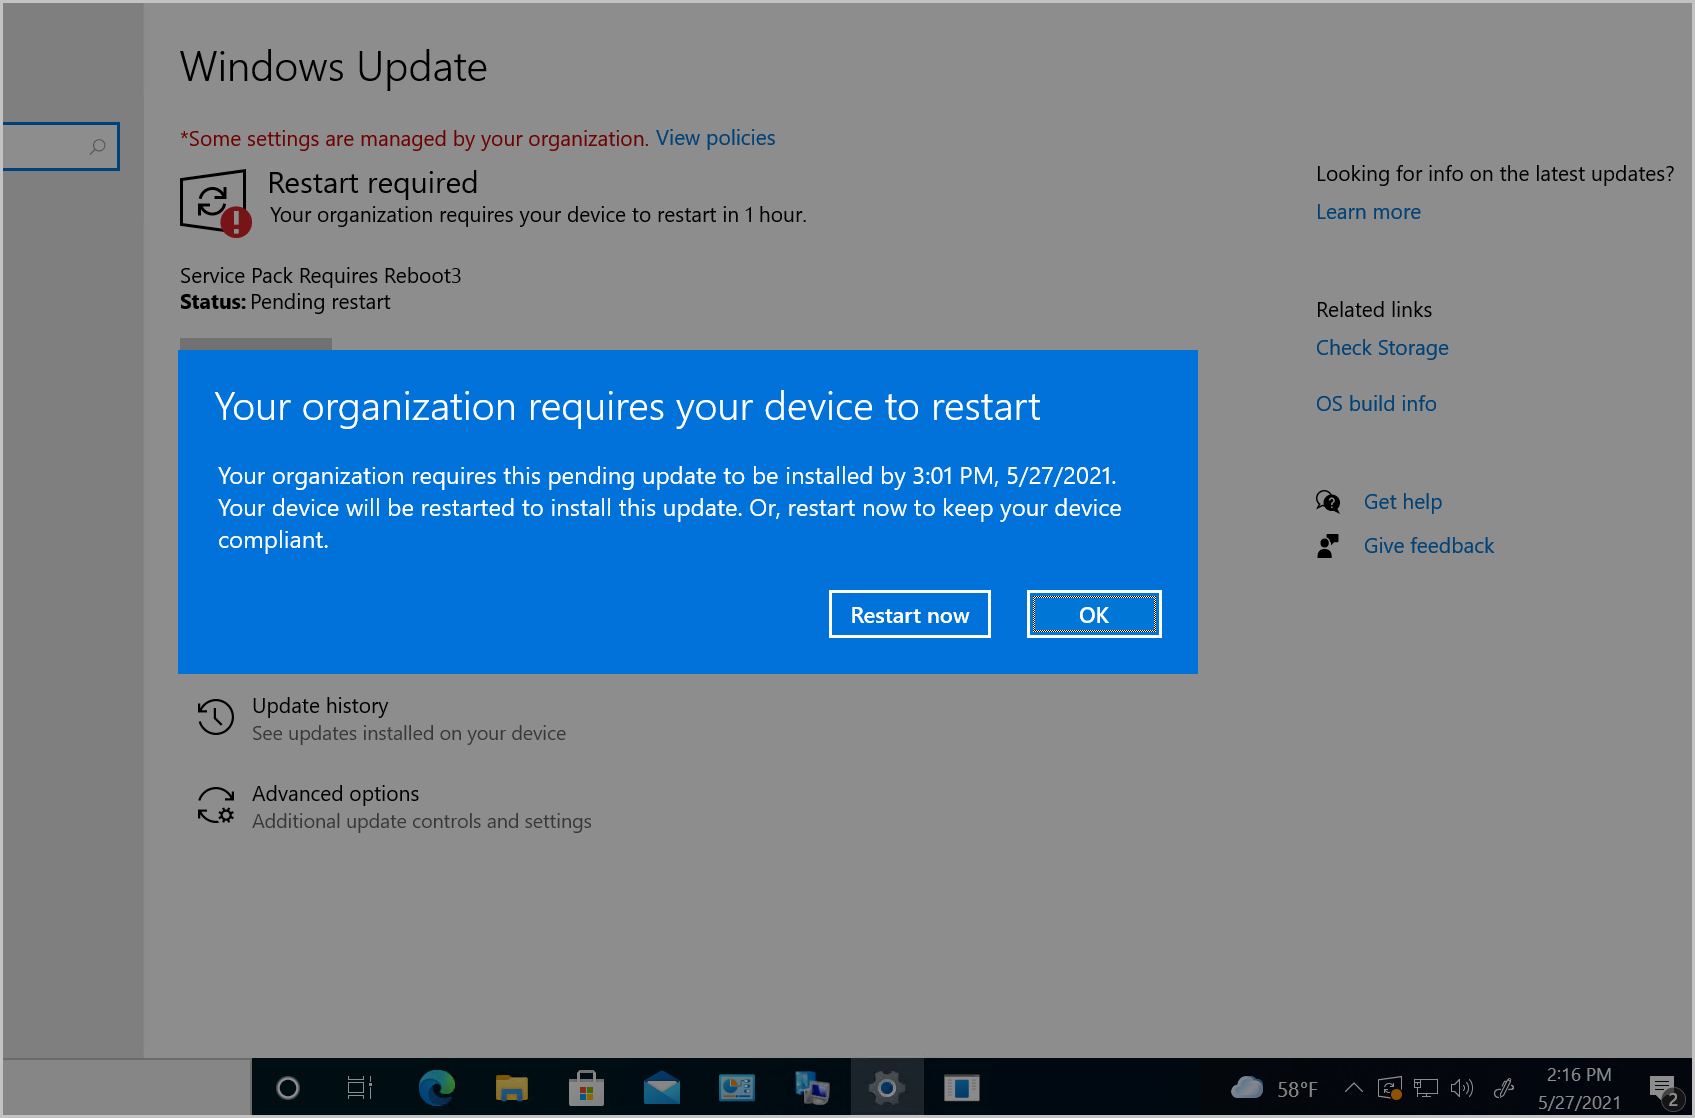
When installing software updates from Configuration Manager, you can now choose to use the native Windows Update interface and restart experience. The client's Windows Update Settings page displays the updates like they appear when using Windows Update for scanning. Restarts from software updates will also behave as though you're using Windows Update. To use this feature, client devices must be running Windows Insider build 21277 or later. To enable the Windows Update native experience:
From the Administration workspace, select Client Settings in Configuration Manager.
Select the Computer Restart group in Client Settings
For the Select the restart experience to be shows to end users setting, choose the Windows option.
If needed, you can change the number of days the device is allowed to be pending a restart before it's forced using the following setting:
Specify a deadline, the time (in days) from when a device is pending reboot until the device is forced to restart.
- Minimum value: 1 day
- Maximum value: 30 days
- Default value: 2 days
Send product feedback from error windows
Previously, if the Configuration Manager console reported an error in a separate window, you had to go back to the main console window to send feedback. In some cases, this action isn't possible with other console windows open.
Starting in this release, error messages include a link to Report error to Microsoft. This action opens the standard "send a frown" window to provide feedback. It automatically includes details about the user interface and the error to better help Microsoft engineers diagnose the error. Aside from making it easier to send a frown, it also lets you include the full context of the error message when you share a screenshot.

Try it out!
Try to complete the tasks. Then send Feedback with your thoughts on the feature.
Use the following steps to easily demonstrate an error and then start the process to provide feedback:
In the Configuration Manager console, open the properties for any custom collection.
On the Membership Rules tab, in the Add Rule list, select Query Rule.
In the Query Rule Properties window, select Edit Query Statement.
In the collection's Query Statement Properties window, select Show Query Language.
Change the default query statement to
Select * from not-a-class.Select the green triangle to open the Query Results Preview window, and then select Run.
You'll see an error message. Select Report error to Microsoft to open the Provide Feedback wizard. For more information on this wizard, see Send a frown.
Custom properties for devices
Many customers have other data that's external to Configuration Manager but useful for deployment targeting, collection building, and reporting. This data is typically non-technical in nature, not discoverable on the client, and comes from a single external source. For example, a central IT Infrastructure Library (ITIL) system or asset database, which has some of the following device attributes:
- Physical location
- Organizational priority
- Category
- Cost center
- Department
Starting in this release, you can use the administration service to set this data on devices. You can then use the custom properties in Configuration Manager for reporting or to create collections.
This feature is based on the following feedback:
Create Collection based on Machine variables query
Add new Device tab with custom properties (Variables)
Prerequisites for custom properties
The account that makes the API calls requires the following permissions on a collection that contains the target device:
- To set properties: Modify Resource
- To view properties: Read Resource
- To remove properties: Delete Resource
Try it out!
Try to complete the tasks. Then send Feedback with your thoughts on the feature.
Create custom properties
To create the custom properties, use the administration service. The site stores the property's name and its value in the site database as the new Device Extension Data class.
The following admin service API examples show how you can set, view, and remove the custom properties. These examples use PowerShell to make the API calls, but there are other methods you can use. To use these examples in your environment, change the variable values for the SMS Provider (provider) and resource ID (resourceID).
Warning
These sample scripts enable the ServicePointManager.ServerCertificateValidationCallback property. This configuration allows any certificate to pass validation for HTTPS. Use of this command is only for ease of testing in a lab environment. Don't use it in a production environment. For more information about how to enable secure HTTPS communication, see How to set up the administration service.
Set custom properties on a device
To set properties on a device, use the SetExtensionData API. Make a POST call to the URI https://<SMSProviderFQDN>/AdminService/v1.0/Device(<DeviceResourceID>)/AdminService.SetExtensionData with a JSON body. This example sets two name-value pairs for the device's asset tag and location.
$provider = "cm01.contoso.com"
$resourceID = "16777345"
$uri = "https://$provider/AdminService/v1.0/Device($resourceID)/AdminService.SetExtensionData"
$body = "{ExtensionData:{""AssetTag"":""0580255"",""Location"":""Inis Oirr""}}"
[System.Net.ServicePointManager]::ServerCertificateValidationCallback = {$true};
Invoke-RestMethod -Method "Post" -Uri $uri -UseDefaultCredentials -Body $body -ContentType "application/json"
View custom properties on a single device
To view properties on a single device, use the GetExtensionData API for a specific device. Make a GET call to the URI https://<SMSProviderFQDN>/AdminService/v1.0/Device(<DeviceResourceID>)/AdminService.GetExtensionData.
$provider = "cm01.contoso.com"
$resourceID = "16777345"
$uri = "https://$provider/AdminService/v1.0/Device($resourceID)/AdminService.GetExtensionData"
[System.Net.ServicePointManager]::ServerCertificateValidationCallback = {$true};
Invoke-RestMethod -Method "Get" -Uri $uri -UseDefaultCredentials
View custom properties on all devices
To view properties on all devices, use the GetExtensionData API without a device ID. Make a GET call to the URI https://<SMSProviderFQDN>/AdminService/v1.0/Device/AdminService.GetExtensionData. This call returns property values from devices to which you have read permission.
$provider = "cm01.contoso.com"
$uri = "https://$provider/AdminService/v1.0/Device/AdminService.GetExtensionData"
[System.Net.ServicePointManager]::ServerCertificateValidationCallback = {$true};
Invoke-RestMethod -Method "Get" -Uri $uri -UseDefaultCredentials
Remove custom properties
To remove properties values from all devices, use the DeleteExtensionData API without a device ID. Include a device resource ID to only remove properties from a specific device. Make a POST call to the URI https://<SMSProviderFQDN>/AdminService/v1.0/Device/AdminService.DeleteExtensionData.
$provider = "cm01.contoso.com"
$uri = "https://$provider/AdminService/v1.0/Device/AdminService.DeleteExtensionData"
[System.Net.ServicePointManager]::ServerCertificateValidationCallback = {$true};
Invoke-RestMethod -Method "Post" -Uri $uri -UseDefaultCredentials
Create a collection
Use the following steps to create a collection with a query rule based on the custom properties:
In the Configuration Manager console, Create a collection.
On the Membership Rules page, in the Add Rule list, select Query rule.
In the Query Rule Properties window, specify a Name for the query. Then select Edit Query Statement.
In the Query Statement Properties window, switch to the Criteria tab. Then select the golden asterisk (
*) to add new criteria.In the Criterion Properties window, Select the following values:
- Attribute class: Device Extension Data
- Attribute: PropertyName
Select an Operator and then specify the name of the property as the Value.
At this point, the Criterion Properties window should look similar to the following image:
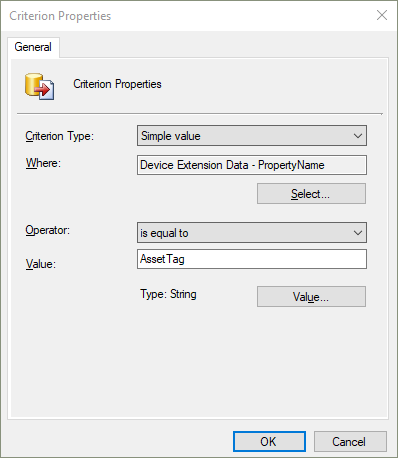
Select OK to save the criterion.
Repeat the steps to add a criterion for the PropertyValue attribute.
At this point, the collection Query Statement Properties window should look similar to the following image:
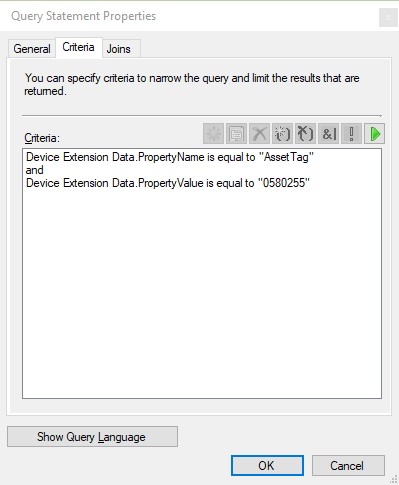
Select OK to close all property windows. Then complete the wizard to create the collection.
You can also use the following sample query. In the query statement properties window, select Show Query Language to paste the query statement.
select SMS_R_SYSTEM.ResourceID,SMS_R_SYSTEM.ResourceType,SMS_R_SYSTEM.Name,SMS_R_SYSTEM.SMSUniqueIdentifier,SMS_R_SYSTEM.ResourceDomainORWorkgroup,SMS_R_SYSTEM.Client
from SMS_R_System inner join SMS_G_System_ExtensionData on SMS_G_System_ExtensionData.ResourceId = SMS_R_System.ResourceId
where SMS_G_System_ExtensionData.PropertyName = "AssetTag" and SMS_G_System_ExtensionData.PropertyValue = "0580255"
Hardware inventory for client log settings
You can now inventory client log file settings such as log levels and size. This behavior allows you to track settings that you change by the Client Diagnostics actions. This new inventory class isn't enabled by default.
For more information on client log file settings, see About log files.
Try it out!
Try to complete the tasks. Then send Feedback with your thoughts on the feature.
In the Configuration Manager console, edit the default or any custom client settings. For more information, see Enable or disable existing hardware inventory classes.
Enable the new inventory class, Client Diagnostics (CCM_ClientDiagnostics). This class includes the following attributes:
- Debug Logging Enabled
- Logging Enabled
- Log Level
- History File Count
- Max Log File Size
For a device, download computer policy and then use the client notification action to Collect hardware inventory.
After the client completes the inventory cycle, use Resource Explorer to view the hardware inventory.
Simplified CMPivot permissions requirements
We've simplified the CMPivot permissions requirements. The new permissions are applicable for CMPivot standalone and CMPivot in the on-premises console. The following changes have been made:
- CMPivot no longer requires SMS Scripts read permission
- The SMS Provider still requires this permission if the administration service falls back to it due to a 503 (Service Unavailable) error, as seen in the CMPivot.log.
- The default scope permission isn’t required.
CMPivot permissions by Configuration Manager version
| 1902 and earlier | 1906 | 2105.2 technical preview and later |
|---|---|---|
| Read permission on SMS Scripts | Read permission on SMS Scripts | N/A |
| Run Script permission on the Collection | Run CMPivot permission on the Collection | Run CMPivot permission on the Collection |
| Read permission on Inventory Reports | Read permission on Inventory Reports | Read permission on Inventory Reports |
| Default scope permission | Default scope permission | N/A |
Hierarchy approved console extensions don't require signing
Starting in this technical preview, you can choose to allow unsigned hierarchy approved console extensions. You may need to allow unsigned console extensions due to an unsigned internally developed extension, or for testing your own custom extension in a lab.
To allow unsigned hierarchy approved console extensions:
- In the Configuration Manager console, go to the Administration workspace, expand Site Configuration, and select Sites.
- Select Hierarchy Settings from the ribbon.
- On the General tab, enable the Hierarchy approved console extensions can be unsigned option.
- Select Ok when done to close the Hierarchy Settings Properties.
Import a console extension for hierarchy approval
When you have the .cab file for an extension, you can test it in a Configuration Manager lab environment. You'll do this by posting it through the administration service. Once the extension is inserted into the site, you can approve it and install it locally from the Console Extensions node.
Run the following PowerShell script after editing the $adminServiceProvider and $cabFilePath:
$adminServiceProvider- The top-level SMSProvider server where the administration service is installed$cabFilePath- Path to the extension's.cabfile
$adminServiceProvider = "SMSProviderServer.contoso.com"
$cabFilePath = "C:\Testing\MyExtension.cab"
$adminServiceURL = "https://$adminServiceProvider/AdminService/v1/ConsoleExtensionMetadata/AdminService.UploadExtension"
$cabFileName = (Get-Item -Path $cabFilePath).Name
$Data = Get-Content $cabFilePath
$Bytes = [System.IO.File]::ReadAllBytes($cabFilePath)
$base64Content = [Convert]::ToBase64String($Bytes)

$Headers = @{
    "Content-Type" = "Application/json"
}

$Body = @{
            CabFile = @{
                FileName = $cabFileName
                FileContent = $base64Content
            }
            AllowUnsigned = $true
        } | ConvertTo-Json

$result = Invoke-WebRequest -Method Post -Uri $adminServiceURL -Body $Body -Headers $Headers -UseDefaultCredentials

if ($result.StatusCode -eq 200) {Write-Host "$cabFileName was published successfully."}
else {Write-Host "$cabFileName publish failed. Review AdminService.log for more information."}
Install and test an extension on a local console
Change the security scope for the extension. Changing the security scope is recommended for initial testing of an extension.
- Go to the Console Extensions node under Administration > Overview > Updates and Servicing.
- Select the extension, then select Set Security Scopes from the ribbon.
- Remove the Default security scope and add a scope that only contains one or two admins for initial testing.
- Choose OK to save the security scope for the extension.
Approve the extension by selecting Approve Installation from the ribbon or right-click menu.
- If the extension isn't approved, you won't be able to install it or enable in-console notifications for it.
- If you restart your console at this point, a notification about the available extension won't occur since you haven't enabled the option yet.
Install the extension on the local console by choosing Install.
Once the extension is installed, verify it displays and you can use it from the local console.
If needed, edit the security scope and Enable Notifications to target other admins with the in-console notification for installing the extension.
Improvements to CMPivot
CMPivot has the following improvements:
- Added a Key value to the Registry entity
- Added a new RegistryKey entity that returns all registry keys matching the given expression
- Added maxif and minif aggregators that can be used with the summarize operator
- Improvements to query autocomplete suggestions in the query editor
PowerShell release notes preview
These release notes summarize changes to the Configuration Manager PowerShell cmdlets in technical preview version 2105.
For more information about PowerShell for Configuration Manager, see Get started with Configuration Manager cmdlets.
New cmdlets
Manage install behaviors for application deployment types
This set of new cmdlets for application deployment type installation behavior is based on your feedback.
For more general information on the install behavior feature, see Check for running executable files.
Add-CMDeploymentTypeInstallBehavior
Use this cmdlet to add to the specified deployment type the executable files that need to close for the app install to succeed.
$msi_dt = Get-CMDeploymentType -ApplicationName "CenterApp" -DeploymentTypeName "InterDept - Windows Installer (.msi file)"
Add-CMDeploymentTypeInstallBehavior -InputObject $msi_dt -ExeFileName "notepad.exe" -DisplayName "Notepad"
Get-CMDeploymentTypeInstallBehavior
Use this cmdlet to get from the specified deployment type the list of executable files that need to close for the app install to succeed.
$msi_dt = Get-CMDeploymentType -ApplicationName "CenterApp" -DeploymentTypeName "InterDept - Windows Installer (.msi file)"
Get-CMDeploymentTypeInstallBehavior -InputObject $msi_dt
Remove-CMDeploymentTypeInstallBehavior
Use this cmdlet to remove from the specified deployment type the executable files that need to close for the app install to succeed.
$msi_dt = Get-CMDeploymentType -ApplicationName "CenterApp" -DeploymentTypeName "InterDept - Windows Installer (.msi file)"
Remove-CMDeploymentTypeInstallBehavior -InputObject $msi_dt -ExeFileName "notepad.exe"
Set-CMDeploymentTypeInstallBehavior
Use this cmdlet to modify the executable files that need to close for the app install to succeed.
$msi_dt = Get-CMDeploymentType -ApplicationName "CenterApp" -DeploymentTypeName "InterDept - Windows Installer (.msi file)"
Set-CMDeploymentTypeInstallBehavior -InputObject $msi_dt -ExeFileName "notepad.exe" -NewExeFileName "calc.exe" -DisplayName "Calculator"
Manage return codes for application deployment types
This set of new cmdlets for application deployment type return codes is based on your feedback.
For more general information, see Deployment type Return Codes.
Add-CMDeploymentTypeReturnCode
Use this cmdlet to add return codes to a supported deployment type.
$msi_dt = Get-CMDeploymentType -ApplicationName "CenterApp" -DeploymentTypeName "InterDept - Windows Installer (.msi file)"
Add-CMDeploymentTypeReturnCode -InputObject $msi_dt -ReturnCode 1602 -Name "User cancel" -CodeType Failure -Description "The user cancelled the installation"
Get-CMDeploymentTypeReturnCode
Use this cmdlet to get the list of return codes from the specified deployment type.
Get-CMDeploymentType -ApplicationName "CenterApp" -DeploymentTypeName "InterDept - Windows Installer (.msi file)" | Get-CMDeploymentTypeReturnCode
Remove-CMDeploymentTypeReturnCode
Use this cmdlet to delete return codes from the specified deployment type.
$msi_dt = Get-CMDeploymentType -ApplicationName "CenterApp" -DeploymentTypeName "InterDept - Windows Installer (.msi file)"
Remove-CMDeploymentTypeReturnCode -InputObject $msi_dt -ReturnCode 1602
Set-CMDeploymentTypeReturnCode
Use this cmdlet to modify return codes for the specified deployment type.
$msi_dt = Get-CMDeploymentType -ApplicationName "CenterApp" -DeploymentTypeName "InterDept - Windows Installer (.msi file)"
Add-CMDeploymentTypeReturnCode -InputObject $msi_dt -ReturnCode 3010 -Name "Always reboot" -CodeType HardReboot -Description "Change soft reboot to hard reboot"
Other new cmdlets
Get-CMClientSettingDeployment
Use this cmdlet to get a deployment of a custom client settings object. You can use this object with Remove-CMClientSetting.
For more information on client settings, see How to configure client settings.
$clientSetting =  Get-CMClientSetting -Name "Software Center customizations"
$clientSetting | Get-CMClientSettingDeployment
Get-CMClientSettingDeployment -Name "Software Center customizations"
Get-CMDeploymentTypeDetectionClause
Based on your feedback, use this cmdlet to get the detection clauses from the specified deployment type.
You can use this cmdlet to get a detection clause from one app and apply it to another, for example:
$appMsi = Get-CMDeploymentType -ApplicationName "CenterApp" -DeploymentTypeName "InterDept - Windows Installer (.msi file)"

$clause1 = Get-CMDeploymentTypeDetectionClause -InputObject $appMsi

Set-CMScriptDeploymentType -ApplicationName "Configuration Manager console" -DeploymentTypeName "Install" -AddDetectionClause $clause1
Deprecated cmdlets
The following cmdlets to start a deployment are deprecated and may be removed in a future release:
| Deprecated cmdlet | Replacement |
|---|---|
| Start-CMApplicationDeploymentSimulation | New-CMApplicationDeployment with the Simulation parameter |
| Start-CMClientSettingDeployment | New-CMClientSettingDeployment |
| Start-CMAntimalwarePolicyDeployment | New-CMAntimalwarePolicyDeployment |
Modified cmdlets
New-CMTaskSequence
For more information, see New-CMTaskSequence.
Non-breaking changes
The legacy InstallationLicensingMode parameter was removed.
Extended the maximum length of the Description parameter to
512characters.
New-CMTSStepApplyOperatingSystem
For more information, see New-CMTSStepApplyOperatingSystem.
Bugs that were fixed
Fixed validation issues with the DestinationVariable parameter to allow values that start with an underscore (_).
General known issues
Known issue with tenant attach onboarding
After you upgrade to technical preview branch version 2105.2, if you try to enable tenant attach, Configuration Manager immediately offboards the site from tenant attach.
This issue doesn't affect sites that already have tenant attach enabled.
To work around this issue, set the following registry entry on the site system that hosts the service connection point role:
Set-ItemProperty -Path "HKLM:\SOFTWARE\Microsoft\SMS\COMPONENTS\SMS_SERVICE_CONNECTOR" -Name "HeartbeatWorker_IntervalSec" -Value 60
After you configure this registry entry, then enable tenant attach.
Next steps
For more information about installing or updating the technical preview branch, see Technical preview.
For more information about the different branches of Configuration Manager, see Which branch of Configuration Manager should I use?.
Feedback
Coming soon: Throughout 2024 we will be phasing out GitHub Issues as the feedback mechanism for content and replacing it with a new feedback system. For more information see: https://aka.ms/ContentUserFeedback.
Submit and view feedback for