Create a Xamarin.Forms Shell application
The process for creating a Xamarin.Forms Shell application is as follows:
- Create a new Xamarin.Forms application, or load an existing application that you want to convert to a Shell application.
- Add a XAML file to the shared code project, that subclasses the
Shellclass. For more information, see Subclass the Shell class. - Set the
MainPageproperty of the application'sAppclass to the subclassedShellobject. For more information, see Bootstrap the Shell application. - Describe the visual hierarchy of the application in the subclassed
Shellclass. For more information, see Describe the visual hierarchy of the application.
For a step-by-step walkthrough of how to create a Shell application, see Create a Xamarin.Forms application quickstart.
Subclass the Shell class
The first step in creating a Xamarin.Forms Shell application is to add a XAML file to the shared code project that subclasses the Shell class. This file can be named anything, but AppShell is recommended. The following code example shows a newly created AppShell.xaml file:
<Shell xmlns="http://xamarin.com/schemas/2014/forms"
       xmlns:x="http://schemas.microsoft.com/winfx/2009/xaml"
       x:Class="MyApp.AppShell">

</Shell>
The following example shows the code-behind file, AppShell.xaml.cs:
using Xamarin.Forms;

namespace MyApp
{
    public partial class AppShell : Shell
    {
        public AppShell()
        {
            InitializeComponent();
        }
    }
}
Bootstrap the Shell application
After creating the XAML file that subclasses the Shell object, the MainPage property of the App class should be set to the subclassed Shell object:
namespace MyApp
{
    public partial class App : Application
    {
        public App()
        {
            InitializeComponent();
            MainPage = new AppShell();
        }
        ...
    }
}
In this example, the AppShell class is the XAML file that derives from the Shell class.
Warning
While a blank Shell application will build, attempting to run it will result in a InvalidOperationException being thrown.
Describe the visual hierarchy of the application
The final step in creating a Xamarin.Forms Shell application is to describe the visual hierarchy of the application, in the subclassed Shell class. A subclassed Shell class consists of three main hierarchical objects:
FlyoutItemorTabBar. AFlyoutItemrepresents one or more items in the flyout, and should be used when the navigation pattern for the application requires a flyout. ATabBarrepresents the bottom tab bar, and should be used when the navigation pattern for the application begins with bottom tabs and doesn't require a flyout. EveryFlyoutItemobject orTabBarobject is a child of theShellobject.Tab, which represents grouped content, navigable by bottom tabs. EveryTabobject is a child of aFlyoutItemobject orTabBarobject.ShellContent, which represents theContentPageobjects for each tab. EveryShellContentobject is a child of aTabobject. When more than oneShellContentobject is present in aTab, the objects will be navigable by top tabs.
These objects don't represent any user interface, but rather the organization of the application's visual hierarchy. Shell will take these objects and produce the navigation user interface for the content.
The following XAML shows an example of a subclassed Shell class:
<Shell xmlns="http://xamarin.com/schemas/2014/forms"
       xmlns:x="http://schemas.microsoft.com/winfx/2009/xaml"
       xmlns:views="clr-namespace:Xaminals.Views"
       x:Class="Xaminals.AppShell">
    ...
    <FlyoutItem FlyoutDisplayOptions="AsMultipleItems">
        <Tab Title="Domestic"
             Icon="paw.png">
            <ShellContent Title="Cats"
                          Icon="cat.png"
                          ContentTemplate="{DataTemplate views:CatsPage}" />
            <ShellContent Title="Dogs"
                          Icon="dog.png"
                          ContentTemplate="{DataTemplate views:DogsPage}" />
        </Tab>
        <!--
        Shell has implicit conversion operators that enable the Shell visual hierarchy to be simplified.
        This is possible because a subclassed Shell object can only ever contain a FlyoutItem object or a TabBar object,
        which can only ever contain Tab objects, which can only ever contain ShellContent objects.

        The implicit conversion automatically wraps the ShellContent objects below in Tab objects.
        -->
        <ShellContent Title="Monkeys"
                      Icon="monkey.png"
                      ContentTemplate="{DataTemplate views:MonkeysPage}" />
        <ShellContent Title="Elephants"
                      Icon="elephant.png"
                      ContentTemplate="{DataTemplate views:ElephantsPage}" />
        <ShellContent Title="Bears"
                      Icon="bear.png"
                      ContentTemplate="{DataTemplate views:BearsPage}" />
    </FlyoutItem>
    ...
</Shell>
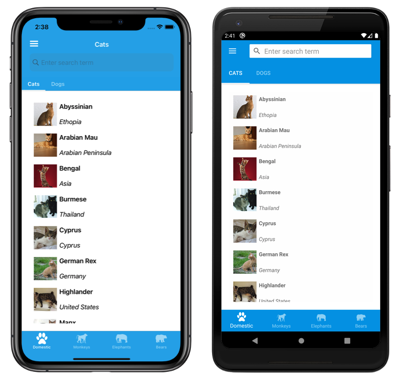
When run, this XAML displays the CatsPage, because it's the first item of content declared in the subclassed Shell class:
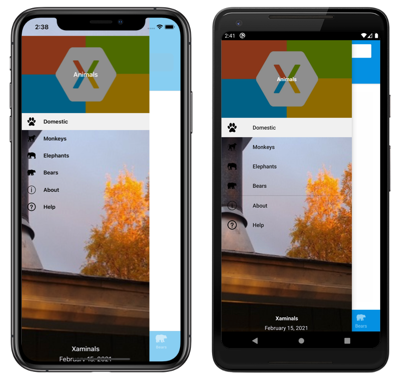
Pressing the hamburger icon, or swiping from the left, displays the flyout:
Multiple items are displayed on the flyout because the FlyoutDisplayOptions property is set to AsMultipleItems. For more information, see Flyout display options.
Important
In a Shell application, pages are created on demand in response to navigation. This is accomplished by using the DataTemplate markup extension to set the ContentTemplate property of each ShellContent object to a ContentPage object.

