Customize table and column mappings
The out-of-box table maps have predefined table and column mappings that enable the flow of data between two apps. In this way, they serve as "blueprints." However, because every business is different, the default table maps might sometimes not be enough. Therefore, dual-write fully supports customization by providing ways to change table maps and column mappings.
Note
The Worker Personal details entity in Microsoft Dataverse doesn't contain the Professional Suffix field. However, this field can be added through extensibility. You can't save new values to the Professional Suffix and Personal Suffix fields of the Worker entity while you're mapping the Worker Personal details entity from Dataverse to the Worker entity in finance and operations apps. The DirNameAffixPersonalSuffix data source contains these fields and won't save values to fields that aren't available in finance and operations apps.
Customize column mappings, add transforms, and enable filtering
In your finance and operations app, on the Dual-write page, on the Table mappings tab, select the table map to customize.
Note
Before you change table mappings, they must be stopped (not running). Otherwise, your changes won't be saved.
On the Table mappings tab, you can customize a column by selecting a new or custom column from either the finance and operations app or Dataverse.
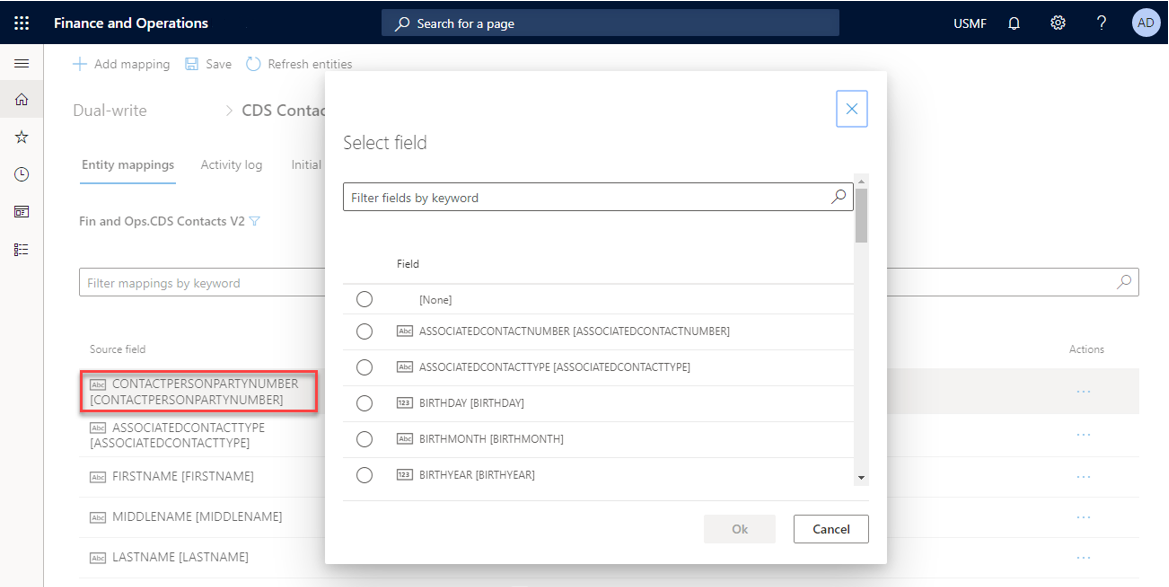
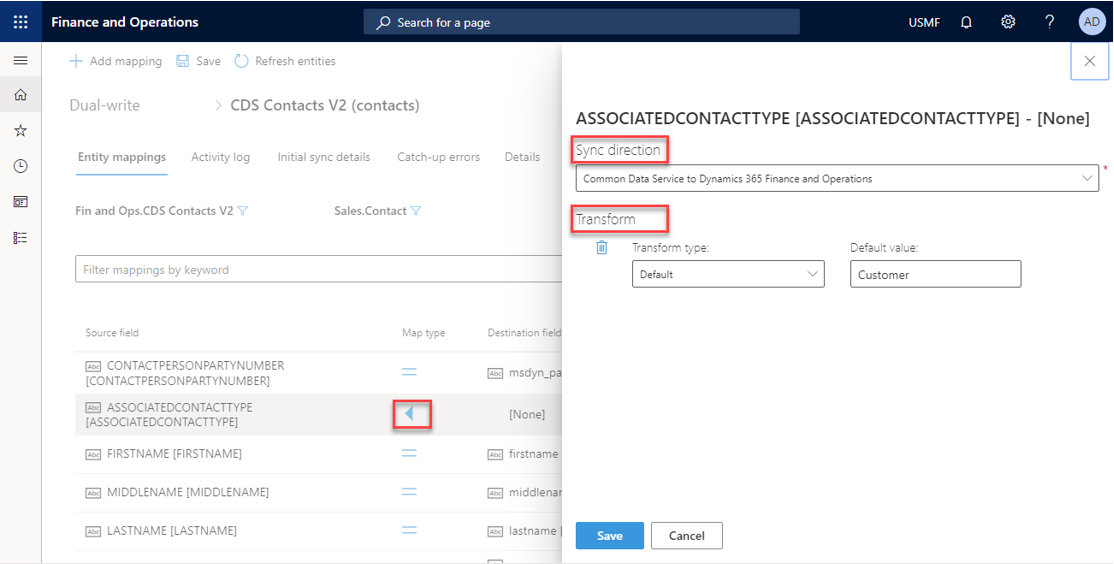
You can customize the synchronization direction (unidirectional or bidirectional) and add transforms by selecting the map type.
The following table describes the available synchronization directions.
Symbol Description 
Bidirectional column assignment 
Bidirectional column assignment that uses transforms 
Unidirectional column assignment (left to right) 
Unidirectional column assignment (right to left) 
Unidirectional column assignment that uses transforms (left to right) 
Unidirectional column assignment that uses transforms (right to left) The following table describes the available transform types.
Transform type Description Default Default values are values that are applied to destination columns when no source column value is available. Use default values for columns that are required on the destination table when you have no corresponding source column. Value map Value maps define how values that are present in one table should be mapped to values in the other table. In addition to adding transformation value mappings by adding or updating the mapping fields, you can modify the generated JSON directly. In the Transform section of the slide out pane, select Show JSON to open the field with the generated JSON for the value mappings. When you modify and save the JSON, the value mapping fields are updated to reflect the changes made to the JSON.
Directly modifying the JSON is useful where the fields may not be able to manage the values needed. For example, entering "null" in a value mapping field considers "null" as a string value rather than a
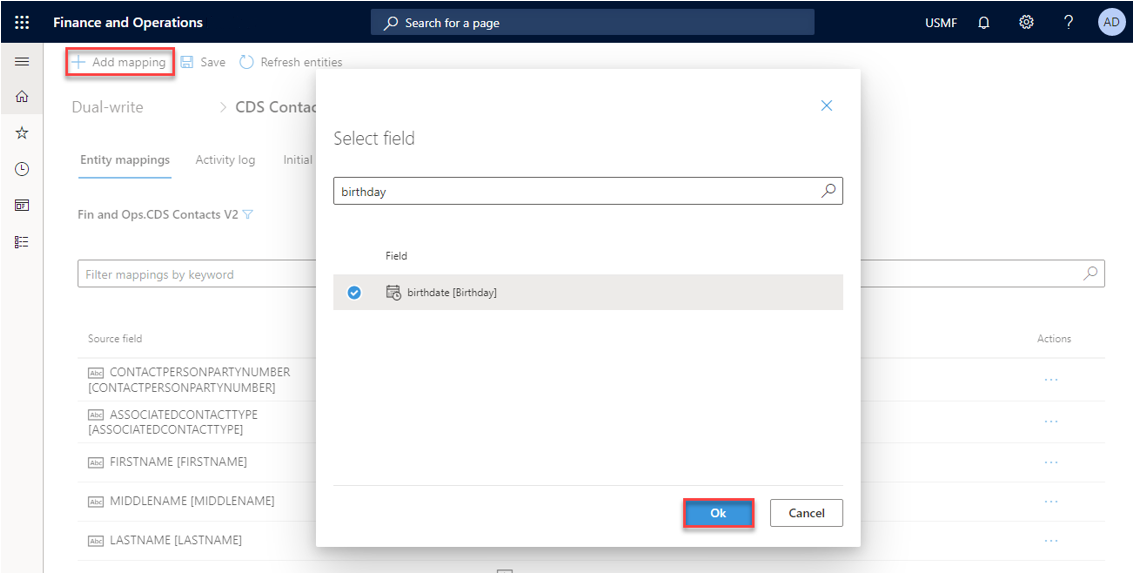
nullvalue. You can work around this situation by modifying the JSON directly. If you need to map the value "0" in finance and operations apps to anullvalue in Dataverse, you can enter the following JSON:[ { "transformType": "ValueMap", "valueMap": { "0": null } } ]You can add a new column by selecting Add mapping and then selecting an existing or custom column in the list.
The following illustration shows an example where a new birthdate column is being added.
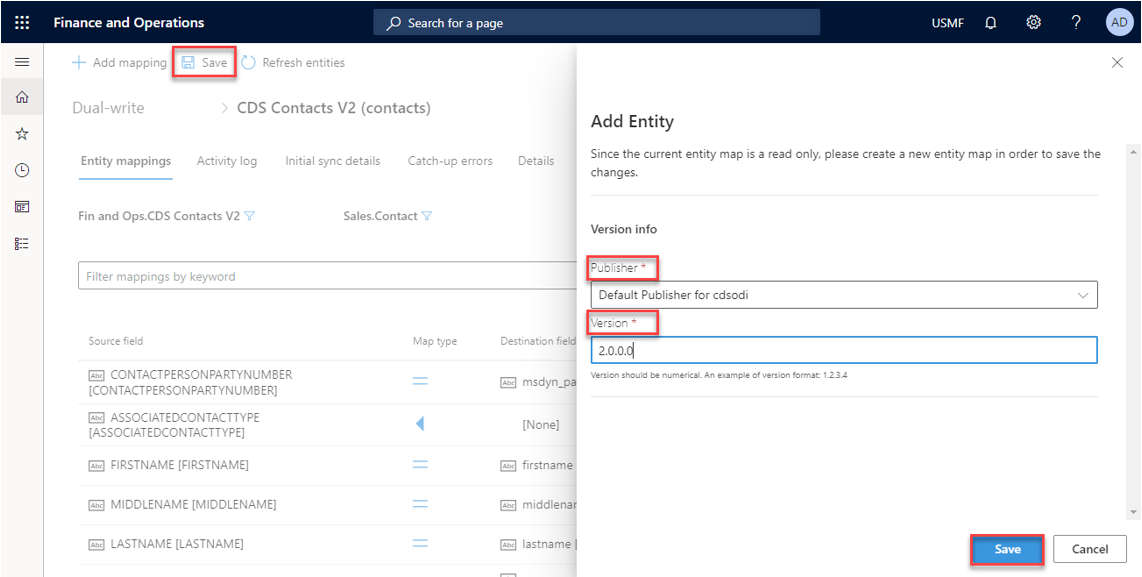
When you finish customizing the column mappings, select Save. Then follow the prompts to specify a publisher and a version number.
Filter your data
Dual-write lets you filter data by using Open Data Protocol (OData) filter expressions for Dataverse. For the finance and operations app, filtering resembles range expressions that are used in the query range.
On the table mapping page, select the filter button (funnel symbol).

In the Edit query dialog box, specify your filters. In this example, the filter that is specified returns only accounts where the account type equals 3.
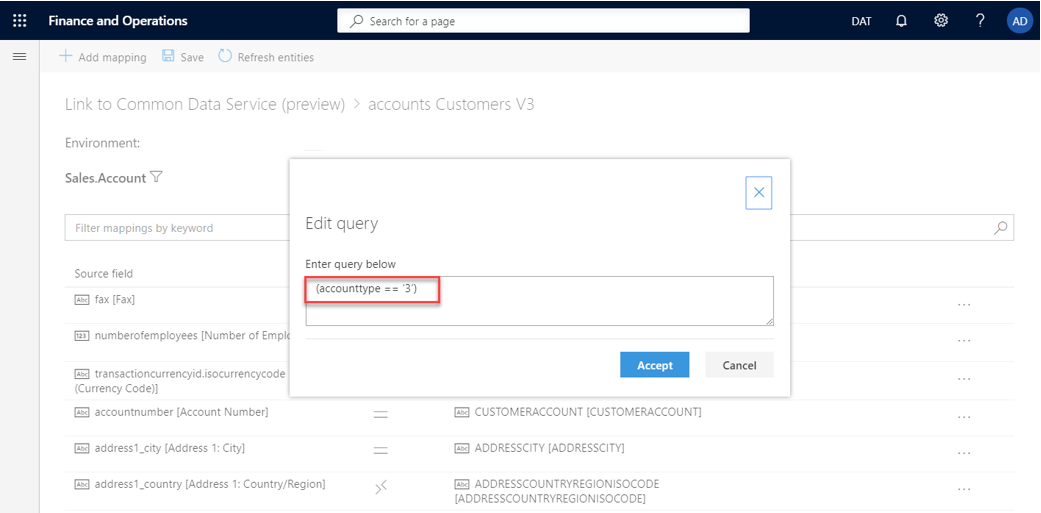
The following table shows some examples of filter expressions.
Filter Dataverse Finance and operations apps Enumeration fields AccountType eq '3' (AccountType == AccountType::Customer) Dates TransactionDate le '2021-06-23' (TransactionDate <= 23\06\2021) Multiple criteria combined numberofemployees gt 1000 and
numberofemployees le 2000((numberofemployees > 1000) &&
(numberofemployees <= 2000))The following are filter query operators supported by dual-write:
Type Operators More information Comparison operators Use the eq,ne,gt,ge,lt, andleoperators to compare a property and a value.Comparison operators Logical operators Use and,or, andnotto create more complex expressions.Logical operators Grouping operators Use parentheses: (and)to specify the precedence to evaluate a complex expression.Grouping operators Note
Nested lookups aren't supported in dual-write source filters. Only standard filter operators used directly against table columns are supported. For more examples, see Standard filter operators.
Query filters with the
containsoperator aren't supported.For more examples that show how to use expressions in query ranges, see Using Expressions in Query Ranges.
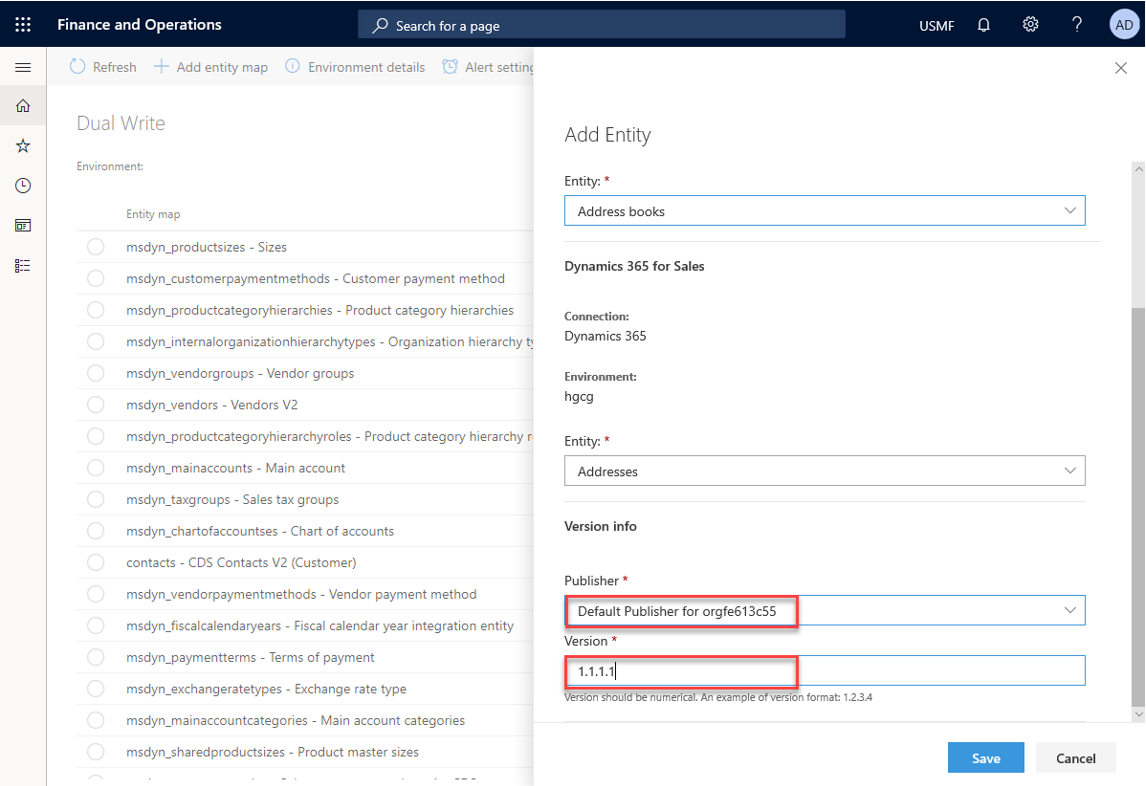
Add new table maps
Although Microsoft is continuing to add new tables, you can also add standard or custom table maps.
The following example shows how to add a new table map that is named Address books.
In the finance and operations app, on the Dual-write page, select Add table map.
Note
When you create a new solution that uses these modified table maps, you must specify the same publisher.
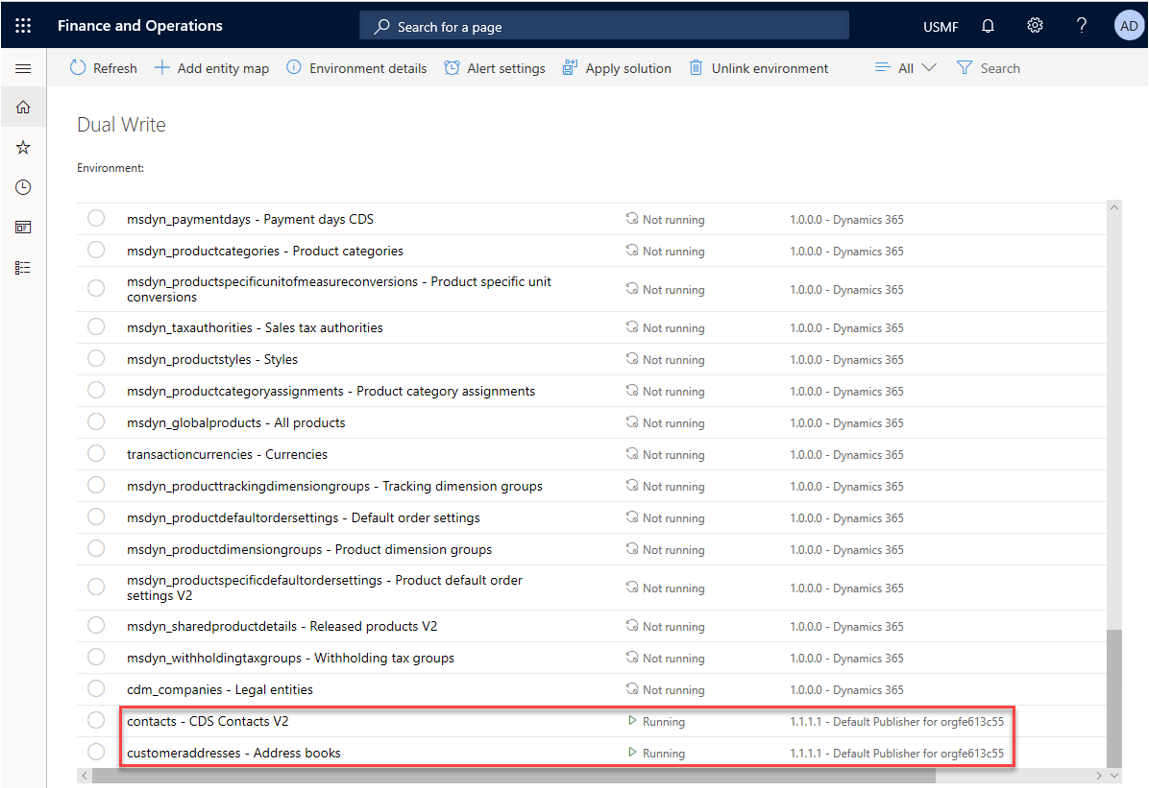
Confirm the table maps that you modified and added. Be sure to enable and test them, to ensure that they work as you expect.
Next steps
Feedback
Coming soon: Throughout 2024 we will be phasing out GitHub Issues as the feedback mechanism for content and replacing it with a new feedback system. For more information see: https://aka.ms/ContentUserFeedback.
Submit and view feedback for