Prepare processes and recordings
Before you can use the task mining capability to visualize and analyze your processes, you need to:
- Create your process in the process mining capability in Power Automate.
- Record the activities that make up the process using the Power Automate recorder.
- Prepare the recording for analysis.
- (Optional) Create recommended activity names to make it easier for you and others to prepare the recording for analysis.
Learn more about processes in the following video.
Create a process
In general, processes you think might be inefficient or repetitive are good candidates for analysis.
Sign in to Power Automate.
On the left-side navigation pane, select Process mining.
In the Create a new process section, select the Start here tile.
Enter a name for your process and description, and then select Recordings.
Select Create.
Record your process
Create a recording in one of two ways:
Create a recording right after process creation
After you create a process, you see a screen with two options as next steps.
- Select Add a recording.
Create a recording from the process details screen
To create a recording from the details screen, find and select your process.
Select Process mining > All processes below the tiles to the right.
Select the name of the process to go to the process details screen.
On the menu at the top, select New recording.
Select Open recorder.
Launch the recorder in Power Automate
By using any of the methods described previously, you should receive a message that says Launching the recorder in Power Automate.
You should've downloaded Power Automate before you started. However, you can also select Get the app to install it.
If you've installed Power Automate, you should see an Open Power Automate browser pop-up window. Select it to open the app.
If Power Automate is installed but doesn’t open correctly, select Open again.

Use the Power Automate recorder
Start recording your process in just one step.
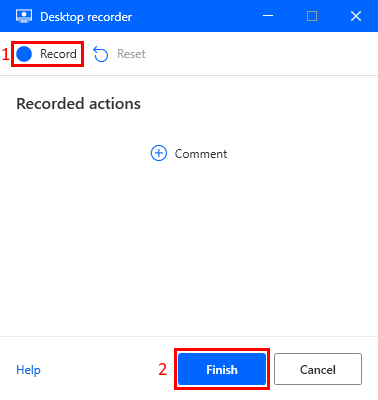
On the Desktop recorder screen, select Record.
Perform the actions that you want to record, and then select Finish at the bottom of the recorder screen.
After the recording has been saved successfully, select View recording to view the recorded steps and prepare the recording for analysis.
Note
Depending on the length of the recording, it might take some time before the actions are available.
Recorder features
As you record your actions, the action descriptions are listed on the recorder screen.
To delete any action from your recording, select the trash can icon.
To temporarily stop recording, select Pause recording at any time.
To continue recording from where you left off, select Start recording again.
To erase all the recorded actions and start over, select Reset recording.
Recording tips
Use these tips to improve your recording experience.
Be methodical in your actions. This includes waiting for the red box to focus on the item you're trying to interact with before selecting it, as there may be a slight delay.
If there were any selections made by mistake, delete the action in the recorder screen.
If you record a step that's not intended to be a part of the process, delete the step with the trash icon.
Prepare a recording for analysis
Once the recording is finished, the recorded actions can be viewed on the recording details screen. It's important to prepare the recording for analysis before proceeding.
The actions that were recorded during the process can be very detailed and specific. In order to make sense of them and create a clear process map, these actions need to be grouped together into larger activities. The process mining capabilitiy is now able to automatically group similar actions into activities.
Ensure that any sensitive information is removed from the recording before analysis. This can be done to protect data privacy and security. For more information on how to protect your data, go to Protect your data.
Here's a short video on how to prepare a recording for analysis.
Grouping actions into activities
Once you have completed the recording process, you might notice that some activities have already been automatically created for you. You have the option to keep these activities as they are, or you can modify them to better suit your needs.
Edit an existing activity
Here are some tips on editing an existing activity.
To change the starting action of an activity, drag the header of the activity up or down the list of actions to the desired starting point.
To change the name of an activity, select it and a combo box appears on the right.
You can choose from existing activity names in the dropdown menu, or create your own if needed.
Add a new activity
You can add an activity to a process after you recorded it.
Select Add activity to add an activity header. All actions below the header and before the next activity header are part of the group.
Move the activity header up or down the actions list to where you want the activity to start.
Name the activity on the right, using the dropdown menu to find existing activity names or create a new one.
Delete an activity
To analyze, you need at least two activities. Otherwise, the process map wouldn't be meaningful.
If you don't want an auto create activity or made a mistake and want to delete an activity, select Delete activity in the command bar.
If you don’t want any of the auto created activities or just want to start over from scratch, select Delete all activities in the command bar.
At any time, select Save on the top right to save your work.
Save and analyze
When you finish grouping, select Save and analyze on the top right.
Once analyzed, select View analytics in the notification bar to go to the analytics page.
To learn more, go to Analyze processes.
Alternatively, you can save without analyzing by selecting the caret next to Save and analyze, and then select Save.
Select Close to return to the process details screen.
Grouping tips
Here are some tips to group actions into activities, which may be helpful for your use case.
Use existing activity name: This creates a more consistent and accurate process map. Activity names are available in the dropdown menu whenever a recording is saved. To remove an activity name from the menu after it's removed from all recordings that use that name, you need to analyze the recording.
Look for patterns: Analyze the recorded actions for patterns that occur frequently, such as similar steps taken to complete a task or common applications used. Grouping these actions together can help identify common activities.
Use discretion: Group actions together that make sense to you and are related to the overall process. For example, if you are analyzing a sales process, you might group actions related to lead generation, outreach, and closing deals.
Consider frequency: You may want to group actions that occur frequently together. This can help identify bottlenecks in the process or areas where automation could be beneficial.
Think about dependencies: Consider grouping actions that have dependencies on each other. For example, if you need to download a file before uploading it, these two activities could be grouped together.
Use feedback: Collaborate with other stakeholders in the process, such as employees who perform the tasks or supervisors who oversee the process, to get feedback on the grouping of actions. Their insights can help improve the accuracy and usefulness of the process map.
Create recommended activity names
As a process owner or co-owner, you can create recommended activity names for a process. This ensures more consistency in naming across recordings.
On the process details screen, select Create activity names.
To add a new activity name entry to the recommended list, select New name.
When you're done, select Save.
The activity names you added now appear under Recommended names in the dropdown menu when grouping actions for a recording. Any activities that aren't defined in the recommended list appear under Custom names.
Feedback
Coming soon: Throughout 2024 we will be phasing out GitHub Issues as the feedback mechanism for content and replacing it with a new feedback system. For more information see: https://aka.ms/ContentUserFeedback.
Submit and view feedback for