Migrate a Unity 2019 project to Unity 2020 + OpenXR
For the smoothest migration, we recommend that you complete all the steps in this article in the order presented. Here's an overview of the major steps:
- Update MRTK to the latest stable version.
- Move your project to Unity 2019 XR Plug-in Management.
- Choose "Windows Mixed Reality."
- Upgrade to Unity 2020.3 LTS.
- Use the Mixed Reality Feature Tool to install more packages.
- Configure XR Plugin Management for OpenXR.
1. Update MRTK to the latest stable version
If you’re already using MRTK, we suggest that the first step in your migration should be to run the Mixed Reality Feature Tool and update to the latest stable version of MRTK.
Select the features you want
Note
The descriptions and images in this section are based on the most recent version of the Tool. If the instructions don't match what you're seeing, check to ensure that you're not using an older version of the Tool.
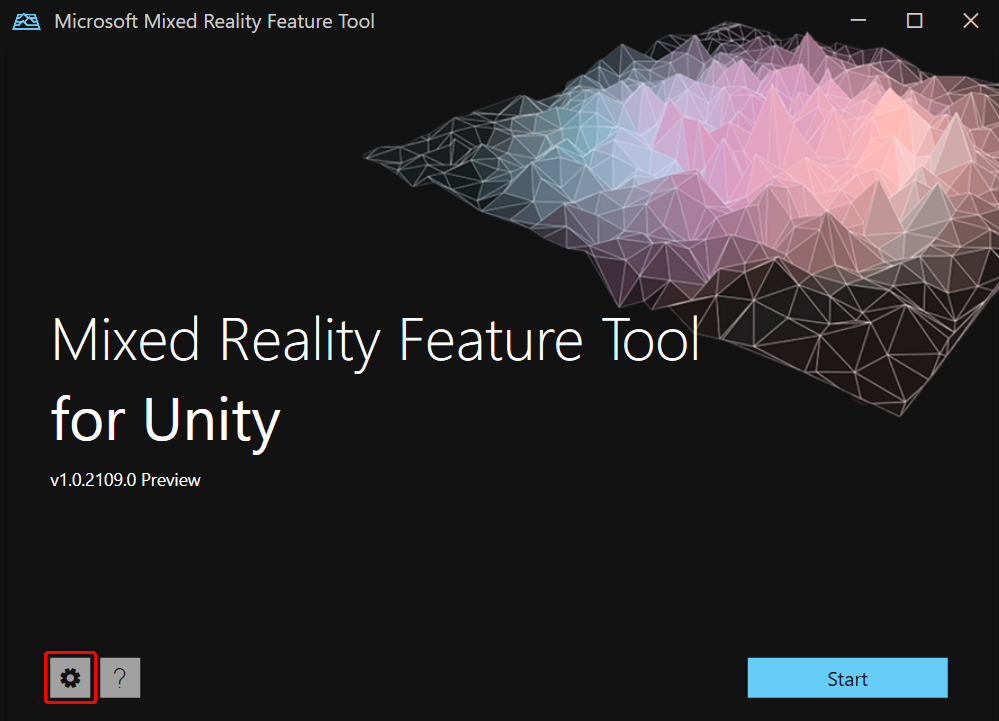
Open the Microsoft Mixed Reality Feature Tool and then click the Start button.
Select the Browse button (it's the "three-dot" button in the image below), then navigate to your project, and then open it.

Select Discover Features.
Note: You may need to wait a few seconds while the Tool refreshes the packages from the feeds.
On the Discover Features page, note that there is a list of six package groups.

Click the "+" button to the left of Mixed Reality Toolkit and then select the latest version of Mixed Reality Toolkit Foundation.
Import the features
- After you've made your selection(s), click Get Features.
- On the Import Features page, the left-side column, Features, displays the packages you just selected. The right-side column, Required dependencies, displays any dependencies. You can click the Details link for any of these items to learn more about them.
- When you're ready to move on, select Import. On the Review and Approve page, you can review information about the packages.
- Select Approve. The Feature Tool displays a message that says your project has been updated.
- Return to the Unity Editor and click a blank area in the UI. You'll see a message telling you that your packages are being imported.
By doing this upgrade while still using Unity 2019, you can view the MRTK Project Configurator and see any "deprecated API" warnings about how to get current. The warnings will tell you what to change. If you don't do this MRTK upgrade first, the old API might be gone and you won’t have those warnings.
Learn more about the Mixed Reality Feature Tool.
2. Move your project to Unity 2019 XR Plug-in Management
After you've updated MRTK, you can instruct Unity 2019 to use XR Plug-in Management.
- In the Unity editor on the menu bar, select Edit > Project Settings.
- In the left side column of the Project Settings window, select XR Plugin Management.
As this point, you might see a button labeled Install XR Plugin Management button. If so, continue on with the steps below. If you already have the XR management system installed, you can skip the rest of the steps in this section and continue on to the next section, "Choose 'Windows Mixed Reality'."
Click the Install XR Plugin Management button.
A dialog named Built in VR Detected appears and asks if you want to remove the built-in VR package. Click Ok.

The Built in VR Enabled dialog box appears. Click Ok. This disables built-in VR.
The MRTK Project Configurator window appears and requests that you enable an XR pipeline. Select the second option, XR SDK/SR Management.
On the next page in the Configurator, click Show Settings.
3. Choose "Windows Mixed Reality"
We're not quite ready to install OpenXR yet, but this next set of steps helps you to get clean on any APIs that were only available and supported on the “Built-in XR” path. (If you’re using MRTK, most of this is abstracted for you.)
- In the Unity Editor Project Settings window, ensure that you're on the XR Plug-in Management page.
- Do one of the following:
- If you're targeting the HoloLens 2:
Ensure that you're in the Universal Windows Platform tab (it's the second tab and displays the Windows logo) and then, under Plug-in-Providers, select Windows Mixed Reality. - If you're targeting Desktop VR:
Ensure that you're in the Desktop tab (it's the first tab and displays an image of a monitor), and then, under Plug-in-Providers, select Windows Mixed Reality.
- If you're targeting the HoloLens 2:
- The MRTK Project Configurator window appears again. Click the Next button, and then click Next again. (You may want to take a moment to read the explanations on these pages before moving on.)
- Select Import TMP Essentials.
- Select Done. This closes the Configurator.
- Close the Project Settings window, save your project, and then exit Unity.
Note
When you use XR Plug-in Management in Unity 2019, Azure Spatial Anchors (ASA) isn't supported. If your project has ASA code, you won’t be able to test it until after you've installed Unity 2020. Otherwise, you should be able to validate your app at this stage.
4. Upgrade to Unity 2020.3 LTS
- Install the latest LTS patch release of Unity 2020.3.
- Open your Unity 2019 project in Unity 2020.3.
You’ll see a dialog asking if you want to upgrade your project to a newer version of Unity. Click CONFIRM.
If you were previously using AR Foundation 2.0, the project will move you forward automatically to AR Foundation 4.0.
5. Use the Mixed Reality Feature Tool to install more packages
Use the Mixed Reality Feature Tool to import the packages below.
- If you’re using ASA, open the Azure Mixed Reality Services drop-down and select the latest version of Azure Spatial Anchors SDK Core and Azure Spatial Anchors SDK for Windows.
- Open the Platform Support drop-down and select the latest version of Mixed Reality OpenXR Plugin.
- After the packages load, a Warning dialog appears asking if you want to restart the Unity editor in order to enable backends. Select Yes.
- When Unity reopens, the MRTK Project Configurator appears. Take a moment to read the explanations in the window, and then select Apply.
- A dialog appears stating that Unity must be restarted for the input system to take effect. Select Apply.
6. Configure XR Plugin Management for OpenXR
After Unity reopens again, you can set OpenXR as the runtime:
On the menu bar, select Edit > Project Settings.
Look in the left-side column and ensure that you're on the XR Plug-in Management page and in the Universal Windows Platform tab (there's an image of the Windows logo on the tab).
In the Plug-in Providers list, select OpenXR.

In the same section, select Microsoft HoloLens feature group.
Note that there's now a yellow warning triangle next to OpenXR. Hover your cursor over the triangle, then read the message in the popup, and then select the triangle.

In the OpenXR Project Validation window, there are several issues listed. Select the Fix All button.

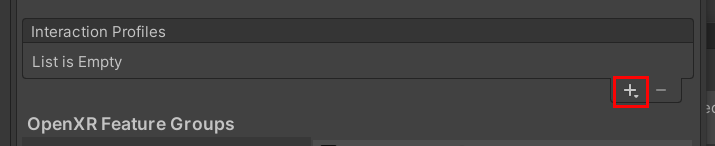
One issue remains and tells you that you must add at least one interaction profile. To do so, click Edit. This takes you to the settings for the OpenXR plugin in the Project Settings window.

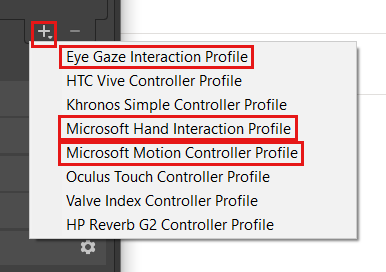
Select the plus sign (+) button three times, each time choosing a different profile:
Eye Gaze Interaction Profile
Microsoft Hand Interaction Profile
Microsoft Motion Controller Profile
If the Eye Gaze Interaction Profile, or any other profile, appears with a yellow triangle next to it, select the triangle, and then in the OpenXR Project Validation window, click the Fix button.

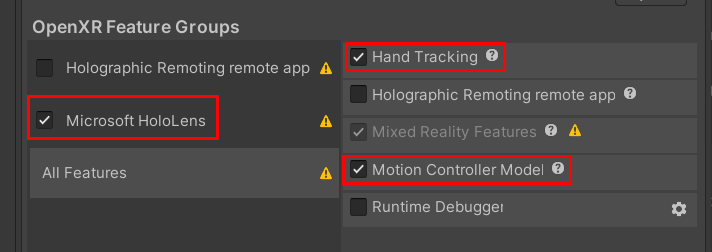
In the OpenXR Feature Groups section, select Microsoft HoloLens, and then select Hand Tracking and Motion Controller Model if they're not already selected.
Click the Depth Submission Mode drop down and then select Depth 16 Bit.

Close the Project Settings window and any other windows that are still open.
Your project is now fully migrated.
See also
Feedback
Coming soon: Throughout 2024 we will be phasing out GitHub Issues as the feedback mechanism for content and replacing it with a new feedback system. For more information see: https://aka.ms/ContentUserFeedback.
Submit and view feedback for