Store data in a local SQLite.NET database
 Download the sample
In this quickstart, you will learn how to:
- Store data locally in a SQLite.NET database.
The quickstart walks through how to store data in a local SQLite.NET database, from a Xamarin.Forms Shell application. The final application is shown below:


Prerequisites
You should successfully complete the previous quickstart before attempting this quickstart. Alternatively, download the previous quickstart sample and use it as the starting point for this quickstart.
Update the app with Visual Studio
Launch Visual Studio and open the Notes solution.
In Solution Explorer, right-click the Notes solution and select Manage NuGet Packages for Solution...:

In the NuGet Package Manager, select the Browse tab, and search for the sqlite-net-pcl NuGet package.
Warning
There are many NuGet packages with similar names. The correct package has these attributes:
- Authors: SQLite-net
- NuGet link: sqlite-net-pcl
Despite the package name, this NuGet package can be used in .NET Standard projects.
In the NuGet Package Manager, select the correct sqlite-net-pcl package, check the Project checkbox, and click the Install button to add it to the solution:
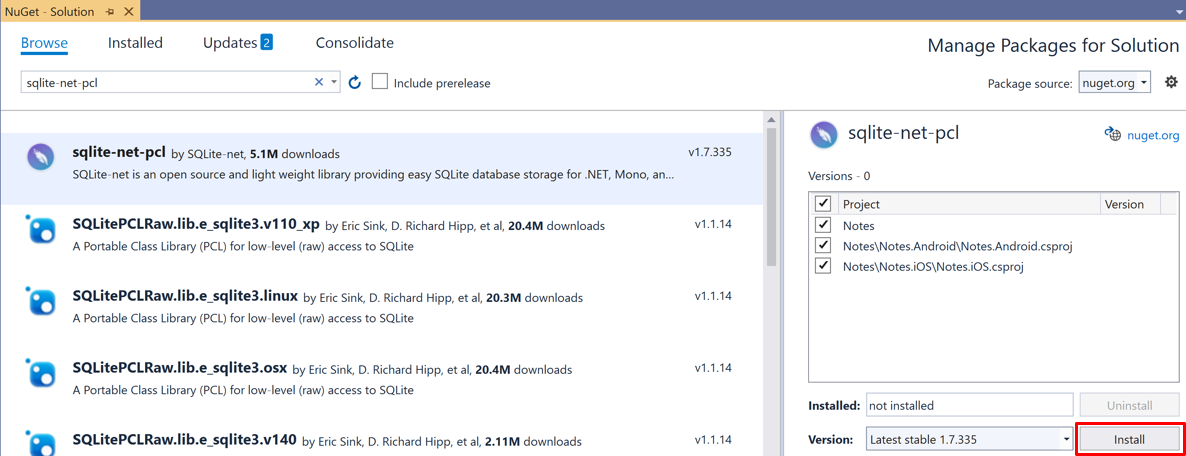
This package will be used to incorporate database operations into the application, and will be added to every project in the solution.
Important
SQLite.NET is a third-party library that's supported from the praeclarum/sqlite-net repo.
Close the NuGet Package Manager.
In Solution Explorer, in the Notes project, open Note.cs in the Models folder and replace the existing code with the following code:
using System;
using SQLite;

namespace Notes.Models
{
    public class Note
    {
        [PrimaryKey, AutoIncrement]
        public int ID { get; set; }
        public string Text { get; set; }
        public DateTime Date { get; set; }
    }
}
This class defines a
Notemodel that will store data about each note in the application. TheIDproperty is marked withPrimaryKeyandAutoIncrementattributes to ensure that eachNoteinstance in the SQLite.NET database will have a unique id provided by SQLite.NET.Save the changes to Note.cs by pressing CTRL+S.
Warning
The application will not currently build due to errors that will be fixed in subsequent steps.
In Solution Explorer, add a new folder named Data to the Notes project.
In Solution Explorer, in the Notes project, add a new class named NoteDatabase to the Data folder.
In NoteDatabase.cs, replace the existing code with the following code:
using System.Collections.Generic;
using System.Threading.Tasks;
using SQLite;
using Notes.Models;

namespace Notes.Data
{
    public class NoteDatabase
    {
        readonly SQLiteAsyncConnection database;

        public NoteDatabase(string dbPath)
        {
            database = new SQLiteAsyncConnection(dbPath);
            database.CreateTableAsync<Note>().Wait();
        }

        public Task<List<Note>> GetNotesAsync()
        {
            //Get all notes.
            return database.Table<Note>().ToListAsync();
        }

        public Task<Note> GetNoteAsync(int id)
        {
            // Get a specific note.
            return database.Table<Note>()
                            .Where(i => i.ID == id)
                            .FirstOrDefaultAsync();
        }

        public Task<int> SaveNoteAsync(Note note)
        {
            if (note.ID != 0)
            {
                // Update an existing note.
                return database.UpdateAsync(note);
            }
            else
            {
                // Save a new note.
                return database.InsertAsync(note);
            }
        }

        public Task<int> DeleteNoteAsync(Note note)
        {
            // Delete a note.
            return database.DeleteAsync(note);
        }
    }
}
This class contains code to create the database, read data from it, write data to it, and delete data from it. The code uses asynchronous SQLite.NET APIs that move database operations to background threads. In addition, the
NoteDatabaseconstructor takes the path of the database file as an argument. This path will be provided by theAppclass in the next step.Save the changes to NoteDatabase.cs by pressing CTRL+S.
Warning
The application will not currently build due to errors that will be fixed in subsequent steps.
In Solution Explorer, in the Notes project, expand App.xaml and double-click App.xaml.cs to open it. Then replace the existing code with the following code:
using System;
using System.IO;
using Notes.Data;
using Xamarin.Forms;

namespace Notes
{
    public partial class App : Application
    {
        static NoteDatabase database;

        // Create the database connection as a singleton.
        public static NoteDatabase Database
        {
            get
            {
                if (database == null)
                {
                    database = new NoteDatabase(Path.Combine(Environment.GetFolderPath(Environment.SpecialFolder.LocalApplicationData), "Notes.db3"));
                }
                return database;
            }
        }

        public App()
        {
            InitializeComponent();
            MainPage = new AppShell();
        }

        protected override void OnStart()
        {
        }

        protected override void OnSleep()
        {
        }

        protected override void OnResume()
        {
        }
    }
}
This code defines a
Databaseproperty that creates a newNoteDatabaseinstance as a singleton, passing in the filename of the database as the argument to theNoteDatabaseconstructor. The advantage of exposing the database as a singleton is that a single database connection is created that's kept open while the application runs, therefore avoiding the expense of opening and closing the database file each time a database operation is performed.Save the changes to App.xaml.cs by pressing CTRL+S.
Warning
The application will not currently build due to errors that will be fixed in subsequent steps.
In Solution Explorer, in the Notes project, expand NotesPage.xaml in the Views folder and open NotesPage.xaml.cs. Then replace the
OnAppearingandOnSelectionChangedmethods with the following code:protected override async void OnAppearing() { base.OnAppearing(); // Retrieve all the notes from the database, and set them as the // data source for the CollectionView. collectionView.ItemsSource = await App.Database.GetNotesAsync(); } async void OnSelectionChanged(object sender, SelectionChangedEventArgs e) { if (e.CurrentSelection != null) { // Navigate to the NoteEntryPage, passing the ID as a query parameter. Note note = (Note)e.CurrentSelection.FirstOrDefault(); await Shell.Current.GoToAsync($"{nameof(NoteEntryPage)}?{nameof(NoteEntryPage.ItemId)}={note.ID.ToString()}"); } }The
OnAppearingmethod populates theCollectionViewwith any notes stored in the database. TheOnSelectionChangedmethod navigates to theNoteEntryPage, passing theIDproperty of the selectedNoteobject as a query parameter.Save the changes to NotesPage.xaml.cs by pressing CTRL+S.
Warning
The application will not currently build due to errors that will be fixed in subsequent steps.
In Solution Explorer, expand NoteEntryPage.xaml in the Views folder and open NoteEntryPage.xaml.cs. Then replace the
LoadNote,OnSaveButtonClicked, andOnDeleteButtonClickedmethods with the following code:async void LoadNote(string itemId) { try { int id = Convert.ToInt32(itemId); // Retrieve the note and set it as the BindingContext of the page. Note note = await App.Database.GetNoteAsync(id); BindingContext = note; } catch (Exception) { Console.WriteLine("Failed to load note."); } } async void OnSaveButtonClicked(object sender, EventArgs e) { var note = (Note)BindingContext; note.Date = DateTime.UtcNow; if (!string.IsNullOrWhiteSpace(note.Text)) { await App.Database.SaveNoteAsync(note); } // Navigate backwards await Shell.Current.GoToAsync(".."); } async void OnDeleteButtonClicked(object sender, EventArgs e) { var note = (Note)BindingContext; await App.Database.DeleteNoteAsync(note); // Navigate backwards await Shell.Current.GoToAsync(".."); }The
NoteEntryPageuses theLoadNotemethod to retrieve the note from the database, whose ID was passed as a query parameter to the page, and store it as aNoteobject in theBindingContextof the page. When theOnSaveButtonClickedevent handler is executed, theNoteinstance is saved to the database and the application navigates back to the previous page. When theOnDeleteButtonClickedevent handler is executed, theNoteinstance is deleted from the database and the application navigates back to the previous page.Save the changes to NoteEntryPage.xaml.cs by pressing CTRL+S.
Build and run the project on each platform. For more information, see Building the quickstart.
On the NotesPage press the Add button to navigate to the NoteEntryPage and enter a note. After saving the note the application will navigate back to the NotesPage.
Enter several notes, of varying length, to observe the application behavior. Close the application and re-launch it to ensure that the notes you entered were saved to the database.
Update the app with Visual Studio for Mac
Launch Visual Studio for Mac and open the Notes solution.
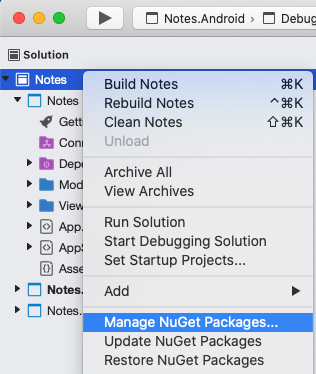
In the Solution Pad, right-click the Notes solution and select Manage NuGet Packages...:
In the Manage NuGet Packages dialog, select the Browse tab, and search for the sqlite-net-pcl NuGet package.
Warning
There are many NuGet packages with similar names. The correct package has these attributes:
- Authors: SQLite-net
- NuGet link: sqlite-net-pcl
Despite the package name, this NuGet package can be used in .NET Standard projects.
In the Manage NuGet Packages dialog, select the sqlite-net-pcl package, and click the Add Package button to add it to the solution:
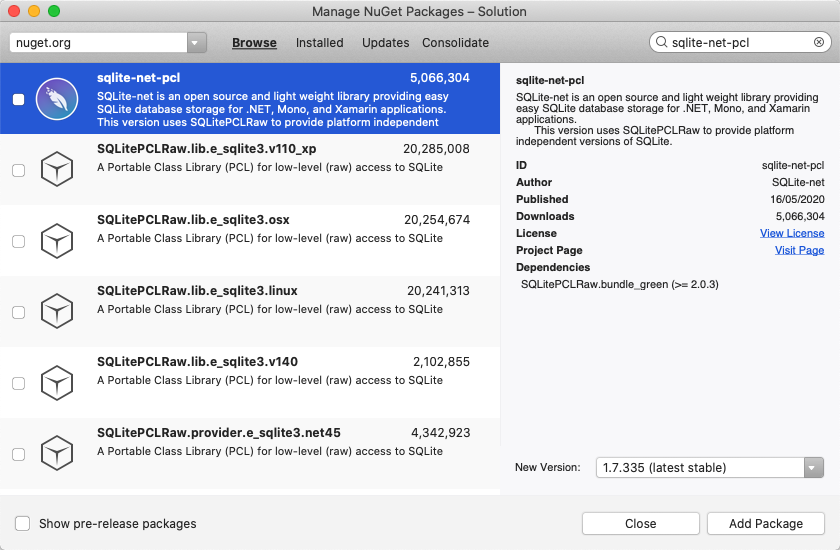
This package will be used to incorporate database operations into the application.
In the Select Projects dialog, ensure that every checkbox is checked and press the Ok button:

This will add the NuGet package to every project in the solution.
In the Solution Pad, in the Notes project, open Note.cs in the Models folder and replace the existing code with the following code:
using System;
using SQLite;

namespace Notes.Models
{
    public class Note
    {
        [PrimaryKey, AutoIncrement]
        public int ID { get; set; }
        public string Text { get; set; }
        public DateTime Date { get; set; }
    }
}
This class defines a
Notemodel that will store data about each note in the application. TheIDproperty is marked withPrimaryKeyandAutoIncrementattributes to ensure that eachNoteinstance in the SQLite.NET database will have a unique id provided by SQLite.NET.Save the changes to Note.cs by choosing File > Save (or by pressing ⌘ + S).
Warning
The application will not currently build due to errors that will be fixed in subsequent steps.
In the Solution Pad, add a new folder named Data to the Notes project.
In the Solution Pad, in the Notes project, add a new class named NoteDatabase to the Data folder.
In NoteDatabase.cs, replace the existing code with the following code:
using System.Collections.Generic;
using System.Threading.Tasks;
using SQLite;
using Notes.Models;

namespace Notes.Data
{
    public class NoteDatabase
    {
        readonly SQLiteAsyncConnection database;

        public NoteDatabase(string dbPath)
        {
            database = new SQLiteAsyncConnection(dbPath);
            database.CreateTableAsync<Note>().Wait();
        }

        public Task<List<Note>> GetNotesAsync()
        {
            //Get all notes.
            return database.Table<Note>().ToListAsync();
        }

        public Task<Note> GetNoteAsync(int id)
        {
            // Get a specific note.
            return database.Table<Note>()
                            .Where(i => i.ID == id)
                            .FirstOrDefaultAsync();
        }

        public Task<int> SaveNoteAsync(Note note)
        {
            if (note.ID != 0)
            {
                // Update an existing note.
                return database.UpdateAsync(note);
            }
            else
            {
                // Save a new note.
                return database.InsertAsync(note);
            }
        }

        public Task<int> DeleteNoteAsync(Note note)
        {
            // Delete a note.
            return database.DeleteAsync(note);
        }
    }
}
This class contains code to create the database, read data from it, write data to it, and delete data from it. The code uses asynchronous SQLite.NET APIs that move database operations to background threads. In addition, the
NoteDatabaseconstructor takes the path of the database file as an argument. This path will be provided by theAppclass in the next step.Save the changes to NoteDatabase.cs by choosing File > Save (or by pressing ⌘ + S).
Warning
The application will not currently build due to errors that will be fixed in subsequent steps.
In the Solution Pad, in the Notes project, expand App.xaml and double-click App.xaml.cs to open it. Then replace the existing code with the following code:
using System;
using System.IO;
using Notes.Data;
using Xamarin.Forms;

namespace Notes
{
    public partial class App : Application
    {
        static NoteDatabase database;

        // Create the database connection as a singleton.
        public static NoteDatabase Database
        {
            get
            {
                if (database == null)
                {
                    database = new NoteDatabase(Path.Combine(Environment.GetFolderPath(Environment.SpecialFolder.LocalApplicationData), "Notes.db3"));
                }
                return database;
            }
        }

        public App()
        {
            InitializeComponent();
            MainPage = new AppShell();
        }

        protected override void OnStart()
        {
        }

        protected override void OnSleep()
        {
        }

        protected override void OnResume()
        {
        }
    }
}
This code defines a
Databaseproperty that creates a newNoteDatabaseinstance as a singleton, passing in the filename of the database as the argument to theNoteDatabaseconstructor. The advantage of exposing the database as a singleton is that a single database connection is created that's kept open while the application runs, therefore avoiding the expense of opening and closing the database file each time a database operation is performed.Save the changes to App.xaml.cs by choosing File > Save (or by pressing ⌘ + S).
Warning
The application will not currently build due to errors that will be fixed in subsequent steps.
In the Solution Pad, in the Notes project, expand NotesPage.xaml in the Views folder and open NotesPage.xaml.cs. Then replace the
OnAppearingandOnSelectionChangedmethods with the following code:protected override async void OnAppearing() { base.OnAppearing(); // Retrieve all the notes from the database, and set them as the // data source for the CollectionView. collectionView.ItemsSource = await App.Database.GetNotesAsync(); } async void OnSelectionChanged(object sender, SelectionChangedEventArgs e) { if (e.CurrentSelection != null) { // Navigate to the NoteEntryPage, passing the ID as a query parameter. Note note = (Note)e.CurrentSelection.FirstOrDefault(); await Shell.Current.GoToAsync($"{nameof(NoteEntryPage)}?{nameof(NoteEntryPage.ItemId)}={note.ID.ToString()}"); } }The
OnAppearingmethod populates theCollectionViewwith any notes stored in the database. TheOnSelectionChangedmethod navigates to theNoteEntryPage, passing theIDproperty of the selectedNoteobject as a query parameter.Save the changes to NotesPage.xaml.cs by choosing File > Save (or by pressing ⌘ + S).
Warning
The application will not currently build due to errors that will be fixed in subsequent steps.
In the Solution Pad, expand NoteEntryPage.xaml in the Views folder and open NoteEntryPage.xaml.cs. Then replace the
LoadNote,OnSaveButtonClicked, andOnDeleteButtonClickedmethods with the following code:async void LoadNote(string itemId) { try { int id = Convert.ToInt32(itemId); // Retrieve the note and set it as the BindingContext of the page. Note note = await App.Database.GetNoteAsync(id); BindingContext = note; } catch (Exception) { Console.WriteLine("Failed to load note."); } } async void OnSaveButtonClicked(object sender, EventArgs e) { var note = (Note)BindingContext; note.Date = DateTime.UtcNow; if (!string.IsNullOrWhiteSpace(note.Text)) { await App.Database.SaveNoteAsync(note); } // Navigate backwards await Shell.Current.GoToAsync(".."); } async void OnDeleteButtonClicked(object sender, EventArgs e) { var note = (Note)BindingContext; await App.Database.DeleteNoteAsync(note); // Navigate backwards await Shell.Current.GoToAsync(".."); }The
NoteEntryPageuses theLoadNotemethod to retrieve the note from the database, whose ID was passed as a query parameter to the page, and store it as aNoteobject in theBindingContextof the page. When theOnSaveButtonClickedevent handler is executed, theNoteinstance is saved to the database and the application navigates back to the previous page. When theOnDeleteButtonClickedevent handler is executed, theNoteinstance is deleted from the database and the application navigates back to the previous page.Save the changes to NoteEntryPage.xaml.cs by choosing File > Save (or by pressing ⌘ + S).
Build and run the project on each platform. For more information, see Building the quickstart.
On the NotesPage press the Add button to navigate to the NoteEntryPage and enter a note. After saving the note the application will navigate back to the NotesPage.
Enter several notes, of varying length, to observe the application behavior. Close the application and re-launch it to ensure that the notes you entered were saved to the database.
Next steps
In this quickstart, you learned how to:
- Store data locally in a SQLite.NET database.
Continue to the next quickstart to style the application with XAML styles.