Navigating menus with Outlook Voice Access in Exchange Server
Applies to: Exchange Server 2013, Exchange Server 2016
Outlook Voice Access is a feature in Unified Messaging (UM) that enables users to retrieve email and voice mail messages and manage their calendar and personal contacts by using an analog, digital, or mobile telephone. They can interact with their mailbox using their telephone keypad or voice commands, but must use the keypad on their telephone to search for a user in the directory for your organization.
When UM-enabled users call in to an Outlook Voice Access number, they can sign in to their mailbox using a telephone and are presented with a series of voice prompts. These voice prompts help them navigate the voice mail system menus and enable them to access their mailbox. Outlook Voice Access lets users do the following:
Retrieve, listen to, reply to, create, and forward voice or email messages.
Listen to or change calendar information.
Change personal options, such as a PIN, or call or send a voice message to a personal contact.
An Outlook Voice Access number is assigned to a user when they're enabled for UM. The user can find an Outlook Voice Access number to access their mailbox in the welcome message that's sent to them when they're enabled for UM or by signing in to their mailbox using Outlook Web App, going to Options > Telephone, and locating the Outlook Voice Access number or numbers in the Outlook Voice Access section.
After a user enters their extension number and PIN, the voice mail system will let them know how many new voice mail and email messages they have and when their next meeting is. After the voice mail system has played this prompt, an Outlook Voice Access main menu will be read to the user and the user can say one of the following:
Voice mail
Email
Calendar
Personal options
Reading and reviewing email
Users can listen to, reply to, create, and forward unread email messages using the telephone. For example, if a user is expecting an important email message, and does not have access to the Internet, they can use a mobile telephone to dial an Outlook Voice Access number.
Listen to email messages
To listen to email messages using their voice, the user must dial an Outlook Voice Access number, enter their extension number and PIN, and then do the following:
Say "Email" to access their email.
The voice mail system will read the name, subject, time, and priority of the first unread email message.
The user can then say one of the following options:
"Next message" to mark the message as Read and go to the next email message.
"Mark unread" to keep the message marked as Unread and go to the next message.
"End" to jump to the end of the message.
"Delete" to delete the message.
This process is shown in the following figure.

To listen to email messages using the telephone keypad, users must dial an Outlook Voice Access number, enter their extension number and PIN, and then do the following:
Press 2 to access their email.
The voice mail system will read the name, subject, time, and priority of the first unread email message.
The user can then press one of the following options:
Pound (#) key to mark the message as Read and go to the next email message.
9 to keep the message marked as Unread and go to the next message.
33 to jump to the end of the message.
7 to delete the message.
This process is shown in the following figure.

Reply to email messages
To listen to email messages and then reply using their voice, users must do the following:
Say "Email."
Say "Next message" repeatedly until they reach the email message to which they want to reply.
Listen to the message or say "End" to go to the end of the message.
Say one of the following:
"Reply" to reply to the sender.
"Reply all" to reply to the sender and all other recipients.
"Forward" to forward the message to another user or group.
Record a reply and then hang up, remain silent, or press any key. To accept the reply message and send it, say "Send it."
This process is shown in the following figure.

To listen to email messages and then reply using the telephone keypad, users must do the following:
Press 2.
Press # repeatedly until they reach the email message to which they want to reply.
Listen to the message or press 33 to go to the end of the message.
Press one of the following:
8 to reply to the sender.
88 to reply to the sender and all other recipients.
6 to forward the message to another user or group.
Record a reply, and then press #. To accept the reply message and send it, press 1.
This process is shown in the following figure.

Listen to the next unread email message
To listen to an email message and then go to the next unread message using their voice, users must do the following:
Say "Email."
Say "Next unread." Say "Mark unread" if they want to mark the message as Unread.
This process is shown in the following figure.

To listen to an email message and then go to the next unread message using the telephone keypad, users must do the following:
Press 2.
Press ## to listen to the next unread message. Press 9 to mark the message as Unread.
This process is shown in the following figure.

Flag an email message for follow-up
To listen to email messages and flag messages for follow-up using their voice, users must do the following:
Say "Email."
Say "Next message" repeatedly until they reach the email message that they want to flag for follow-up. Say "Mark unread" to mark the message as Unread.
Listen to the message or say "End" to go to the end of the message.
Say "Flag" or "Flag for follow-up" to flag the message for follow-up.
This process is shown in the following figure.

To listen to email messages and flag messages for follow-up using the telephone keypad, users must do the following:
Press 2.
Press # repeatedly until they reach the email message that they want to flag for follow-up. Press 9 to mark the message as Unread.
Listen to the message or press 33 to go to the end of the message.
Press 0 (zero) twice to access more options.
Press 44 to flag the message for follow-up.
This process is shown in the following figure.

Hide a conversation
To listen to email messages and hide a conversation so that the voice mail system will not continue to read other email messages that are in the same email conversation using their voice, users must do the following:
Say "Email."
Say "Next message" repeatedly until they reach the email message that they want. Say "Mark unread" to mark the message as Unread.
Listen to the message or say "End" to go to the end of the message.
Say "Hide" or "Hide conversation" to hide the conversation. The next email message from a different conversation will be read.
This process is shown in the following figure.

To listen to email messages and hide a conversation so that the voice mail system will not continue to read other email messages that are in the same email conversation using the telephone keypad, users must do the following:
Press 2.
Press # repeatedly until they reach the email message that they want to hide. Press 9 to mark the message as Unread.
Listen to the message or press 33 to go to the end of the message.
Press 99 to hide the conversation. The next email message from a different conversation will be read.
This process is shown in the following figure.

Note
When a conversation is hidden, it is hidden only for the current session. If users sign out and then sign in to their mailbox again, the voice mail system will read email messages that are in the same conversation.
Managing calendar meetings and appointments
Users can listen to, reply to, create, and forward meeting requests and appointments in their calendar over the telephone.
For example, a user has a meeting at 10:00 A.M. However, because of some unexpected delays, the user will be 15 minutes late. The user can inform the other meeting attendees by calling the telephone number for Outlook Voice Access, signing in to their mailbox, and then accessing the list of meetings for that day in the calendar. After the voice mail system reads the meeting request for the 10:00 A.M. meeting, the user can use the I'll be late feature to inform all the meeting attendees that the user will be 15 minutes late. Each attendee will receive an email message that informs them that the user will be 15 minutes late. The user also has the option to attach a voice mail message.
In another example, a user may have an important client who decides to schedule an all-day meeting on very short notice. The user must cancel all other meetings for that day in the simplest possible way. Using the Clear my calendar feature, users can quickly and easily clear their calendar for the whole day.
Send an I'll be late message
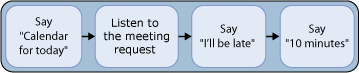
To send an I'll be late message to meeting participants using their voice, users must dial an Outlook Voice Access number, enter their extension number and PIN, and then do the following:
Say "Calendar for today" to access their calendar.
Listen to the meeting requests to locate the meeting for which to send an I'll be late message.
After the meeting request has been read, say "I'll be late."
The voice mail system asks, "How late?" Say "10 minutes."
The voice mail system asks, "Do you want to record a message?" If so, say "Yes," record the message, and then say "Send it." If not, say "No."
This process is shown in the following figure.
To send an I'll be late message to meeting participants using the telephone keypad, users must dial an Outlook Voice Access number, enter their extension number and PIN, and then do the following:
Press 3 to access their calendar.
Listen to the meeting requests to locate the meeting for which to send an I'll be late message.
After the meeting request has been read, press 3.
The voice mail system asks, "How late?" Enter 10 on the telephone key pad.

Cancel a meeting
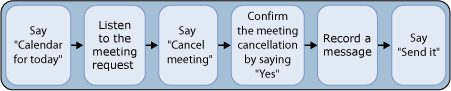
To cancel a meeting, the user must be the meeting organizer. To cancel the meeting using their voice, meeting organizers must do the following:
Say "Calendar for today."
Listen to the meeting requests to locate the meeting to cancel.
After the meeting request has been read, say "Cancel meeting."
Confirm the meeting cancellation by saying "Yes."
If the meeting organizer chooses to send a voice message, they can then say "Yes," record the message, and then say "Send it."
This process is shown in the following figure.
To cancel a meeting, the user must be the meeting organizer. To cancel the meeting using the telephone keypad, meeting organizers must do the following:
Press 3.
Listen to the meeting requests to locate the meeting to cancel.
Press 7 to cancel the meeting.
If the meeting organizer chooses to send a voice message, they can then press one of the following options:
pound key to stop recording the message.
1 to accept the recorded message.
This process is shown in the following figure.

Clear a calendar
To clear their calendar using their voice, users must do the following:
Say "Calendar for today."
Say "Clear my calendar."
Enter the time or the number of days to be cleared.
The voice mail system asks whether they want to attach a recorded voice message. If so, say "Yes," record the message, and then say "Send it." If not, say "No."
This process is shown in the following figure.

To clear their calendar using the telephone keypad, users must do the following:
Press 3.
Press 00 to go to the More Options menu.
Press 77 to clear their calendar.
Enter the number of hours to clear from the calendar.
If users choose to send a voice message, they can do one of the following:
Press # to not send a voice message.
Record the voice message when prompted, press # to stop recording the message, and then press 1 to accept the recorded message.
This process is shown in the following figure.

Accept a meeting request
To accept a meeting request using their voice, users must do the following:
Say "Email" to access their email.
Listen to the email message that contains a meeting request.
Say "Accept" to accept the meeting request.
This process is shown in the following figure.

To accept a meeting request using the telephone keypad, users must do the following:
Press 2 to access their email.
Listen to the email message that contains a meeting request.
Press 4 to accept the meeting request.
This process is shown in the following figure.

Reply to a meeting request
To reply to a meeting request using their voice, users must do the following:
Say "Calendar for today."
Listen to the meeting requests to locate the meeting request to reply to.
Say "More options" to open the More Options menu.
Say "Reply" to reply to the meeting organizer.
Record a message.
Say "Send it."
This process is shown in the following figure.

To reply to a meeting request using the telephone keypad, users must do the following:
Press 3.
Listen to the meeting requests to locate the meeting request to reply to.
Press 00 for more options.
Press 8 to reply to the meeting organizer.
Record a message, and then press #.
Press 1 to accept the recording and send the message.
This process is shown in the following figure.

Managing personal options and contacts
Users can manage their personal options and contacts using Outlook Voice Access. They can:
Call a personal contact.
Locate and call a user in the directory.
Configure personal options, such as changing their PIN over the telephone.
When users first set up their mailbox, they must create personal and Automatic Replies greetings that callers will hear when users are unable to answer their telephone. If, for example, users realize that they have forgotten to turn on an Automatic Replies voice greeting that will give callers an alternative number to call if they have an immediate issue, users can use Outlook Voice Access to access their personal options and record and turn on an Automatic Replies greeting from any telephone.
If a user has to contact an account manager with important information about a client, the user can call the number that is used for Outlook Voice Access, use the directory search feature using their telephone keypad to locate the account manager, and then place the call.
Note
When users access the Personal Options menu, they must use the telephone keypad.
Record a personal greeting
To record a personal greeting using their voice, users must dial an Outlook Voice Access number, enter their extension number and PIN, and then do the following:
Say "Personal options" to access personal options.
Press 2 to record greetings.
Press 1 to record a personal greeting. Press 2 if they need to re-record the personal greeting.
Press # to stop recording the personal greeting.
Press 1 to accept the personal greeting.
This process is shown in the following figure.

To record a personal greeting using the telephone keypad, users must dial an Outlook Voice Access number, enter their extension number and PIN, and then do the following:
Press 6 to access personal options.
Press 2 to record greetings.
Press 1 to record a personal greeting. Press 2 if they need to re-record the personal greeting.
Press # to stop recording the personal greeting.
Press 1 to accept the personal greeting.
This process is shown in the following figure.

Note
When users change their telephone greeting, they are also given the option to turn on or off their email automatic reply message.
Send a voice message to a user
To locate and send a voice message to another UM-enabled user using their voice, users must do the following:
Say "Directory."
Say the name of the person to locate.
Select the correct person from the list.
Say "Send a message," and then record the voice message.
Say "Send it" to send the message.
This process is shown in the following figure.

To locate and send a voice message to another UM-enabled user using the telephone keypad, users must do the following:
Press 4 to search for a contact.
Press 00 to locate the person in the directory.
Use the telephone keypad to spell the name of the person to locate.
Select the correct person from the list.
Press 3 to send a voice message to the person.
Record the voice message, and then press # to stop recording.
Press 1 to accept the voice message and send it.
This process is shown in the following figure.

Change a PIN
To change their PIN using their voice, users must do the following:
Say "Personal options."
Press 3 to change the PIN.
Enter the new PIN, and then press #.
Press # to confirm the new PIN.
This process is shown in the following figure.

To change their PIN using the telephone keypad, users must do the following:
Press 6 to access personal options.
Press 3 to change the PIN.
Enter the new PIN, and then press #.
Press # to confirm the new PIN.
This process is shown in the following figure.
