Create roles
Applies to:  SQL Server 2019 and later Analysis Services
Azure Analysis Services
Fabric/Power BI Premium
SQL Server 2019 and later Analysis Services
Azure Analysis Services
Fabric/Power BI Premium
In this lesson, you create roles. Roles provide model database object and data security by limiting access to only those users that are role members. Each role is defined with a single permission: None, Read, Read and Process, Process, or Administrator. Roles can be defined during model authoring by using Role Manager. After a model has been deployed, you can manage roles by using SQL Server Management Studio (SSMS). To learn more, see Roles.
Note
Creating roles is not necessary to complete this tutorial. By default, the account you are currently logged in with has Administrator privileges on the model. However, for other users in your organization to browse by using a reporting client, you must create at least one role with Read permissions and add those users as members.
You create three roles:
Sales Manager - This role can include users in your organization for which you want to have Read permission to all model objects and data.
Sales Analyst US - This role can include users in your organization for which you want only to be able to browse data related to sales in the United States. For this role, you use a DAX formula to define a Row Filter, which restricts members to browse data only for the United States.
Administrator - This role can include users for which you want to have Administrator permission, which allows unlimited access and permissions to perform administrative tasks on the model database.
Because Windows user and group accounts in your organization are unique, you can add accounts from your particular organization to members. However, for this tutorial, you can also leave the members blank. You test the effect of each role later in Lesson 12: Analyze in Excel.
Estimated time to complete this lesson: 15 minutes
Prerequisites
This article is part of a tabular modeling tutorial, which should be completed in order. Before performing the tasks in this lesson, you should have completed the previous lesson: Lesson 10: Create partitions.
Create roles
To create a Sales Manager user role
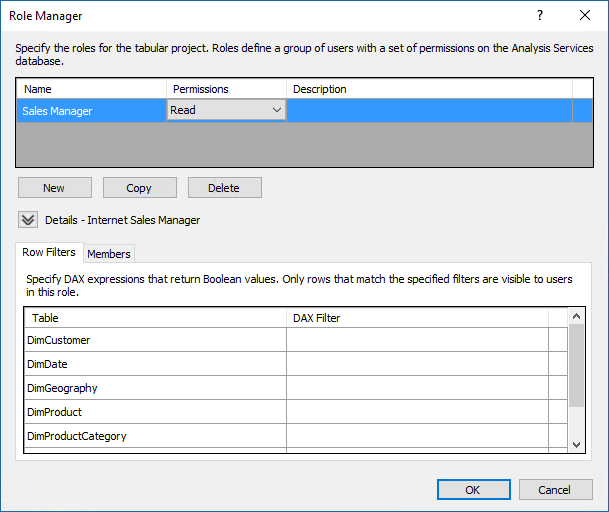
In Tabular Model Explorer, right-click Roles > Roles.
In Role Manager, click New.
Click the new role, and then in the Name column, rename the role to Sales Manager.
In the Permissions column, click the dropdown list, and then select the Read permission.
Optional: Click the Members tab, and then click Add. In the Select Users or Groups dialog box, enter the Windows users or groups from your organization you want to include in the role.
To create a Sales Analyst US user role
In Role Manager, click New.
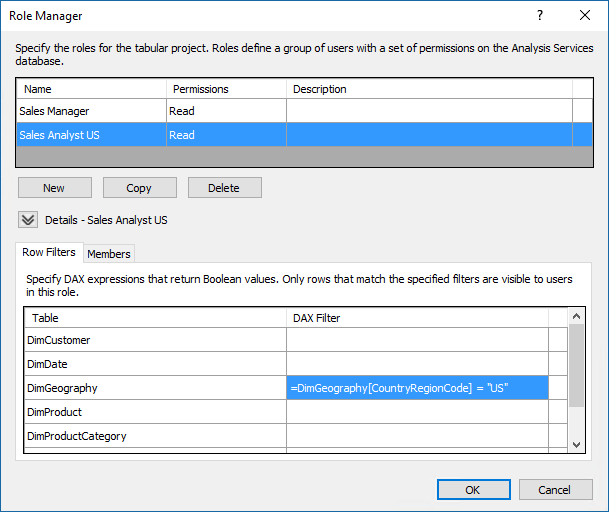
Rename the role to Sales Analyst US.
Give this role Read permission.
Click the Row Filters tab, and then for the DimGeography table only, in the DAX Filter column, type the following formula:
=DimGeography[CountryRegionCode] = "US"A Row Filter formula must resolve to a Boolean (TRUE/FALSE) value. With this formula, you are specifying that only rows with the Country Region Code value of "US" are visible to the user.
Optional: Click the Members tab, and then click Add. In the Select Users or Groups dialog box, enter the users or groups from your organization you want to include in the role.
To create an Administrator user role
Click New.
Rename the role to Administrator.
Give this role Administrator permission.
Optional: Click the Members tab, and then click Add. In the Select Users or Groups dialog box, enter the users or groups from your organization you want to include in the role.
Next step
Feedback
Coming soon: Throughout 2024 we will be phasing out GitHub Issues as the feedback mechanism for content and replacing it with a new feedback system. For more information see: https://aka.ms/ContentUserFeedback.
Submit and view feedback for