Create hierarchies
Applies to:  SQL Server 2019 and later Analysis Services
Azure Analysis Services
Fabric/Power BI Premium
SQL Server 2019 and later Analysis Services
Azure Analysis Services
Fabric/Power BI Premium
In this lesson, you create hierarchies. Hierarchies are groups of columns arranged in levels. For example, a Geography hierarchy might have sublevels for Country, State, County, and City. Hierarchies can appear separate from other columns in a reporting client field list, making them easier for users to navigate and include in a report. To learn more, see Hierarchies
To create hierarchies, use the model designer in Diagram View. Creating and managing hierarchies is not supported in Data View.
Estimated time to complete this lesson: 20 minutes
Prerequisites
This article is part of a tabular modeling tutorial, which should be completed in order. Before performing the tasks in this lesson, you should have completed the previous lesson: Lesson 8: Create perspectives.
Create new hierarchies
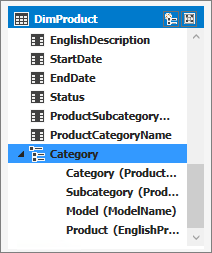
To create a Category hierarchy in the DimProduct table
In the model designer (diagram view), right-click the DimProduct table > Create Hierarchy. A new hierarchy appears at the bottom of the table window. Rename the hierarchy Category.
Click and drag the ProductCategoryName column to the new Category hierarchy.
In the Category hierarchy, right-click ProductCategoryName > Rename, and then type Category.
Note
Renaming a column in a hierarchy does not rename that column in the table. A column in a hierarchy is just a representation of the column in the table.
Click and drag the ProductSubcategoryName column to the Category hierarchy. Rename it Subcategory.
Right-click the ModelName column > Add to hierarchy, and then select Category. Rename it Model.
Finally, add EnglishProductName to the Category hierarchy. Rename it Product.
To create hierarchies in the DimDate table
In the DimDate table, create a hierarchy named Calendar. Include the following columns in-order:
- CalendarYear
- CalendarSemester
- CalendarQuarter
- MonthCalendar
- DayNumberOfMonth
In the DimDate table, create a Fiscal hierarchy. Include the following columns in-order:
- FiscalYear
- FiscalSemester
- FiscalQuarter
- MonthCalendar
- DayNumberOfMonth
Finally, in the DimDate table, create a ProductionCalendar hierarchy. Include the following columns in-order:
- CalendarYear
- WeekNumberOfYear
- DayNumberOfWeek
Next step
Feedback
Coming soon: Throughout 2024 we will be phasing out GitHub Issues as the feedback mechanism for content and replacing it with a new feedback system. For more information see: https://aka.ms/ContentUserFeedback.
Submit and view feedback for