Windows Server
A family of Microsoft server operating systems that support enterprise-level management, data storage, applications, and communications.
12,112 questions
This browser is no longer supported.
Upgrade to Microsoft Edge to take advantage of the latest features, security updates, and technical support.
' cx='32' cy='32' r='32' /%3E%3Ctext x='50%25' y='55%25' dominant-baseline='middle' text-anchor='middle' fill='%23FFF' %3EFF%3C/text%3E%3C/svg%3E)
Apply to: Windows 7, Windows 8, Windows 10
The purpose of this Step-by-Step Guide is to use Active Directory user photos in Windows clients.
This guide contains instructions for user photos in Active Directory and steps to use it as a account logon image.
User photos are stored in the attributes of the user accounts in Active Directory. The photos can be used by applications like Outlook, Skype for Business (Lync) or SharePoint to display the picture of currently logged-in user in their interface.
There are three steps to use Active Directory user photos in Windows clients:
• Import photos into Active Directory
• Assign registry key permissions through Group Policy
• Deploy a logoff script through Group Policy
• Check the result
Step One: Import photos into Active Directory
Following PowerShell command can be used to complete the goal.
$ADphoto = [byte[]](Get-Content<path to file>-Encoding byte)
Set-ADUser<username>-Replace @{thumbnailPhoto=$ADphoto}
Just remember to provide an exact path to the image file and the user’s name, for example in my lab:

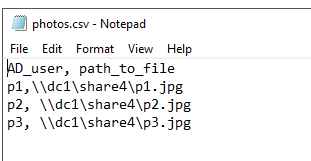
If you want to Set up photo for users in batch, a CSV file named photos.csv need to be prepared as following format:
AD_user, path_to_file
User1,C:\Photos\user1.jpg
User2, C:\Photos\user2.jpg
User3, C:\Photos\user3.jpg
Then the PowerShell command should be :
Import-Csv C:\Photos\photos.csv |%{Set-ADUser -Identity $_.AD_user -Replace @{thumbnailPhoto=([byte[]](Get-Content $_.path_to_file -Encoding byte))}}
In my lab:

Note: the path for the photos and csv file can be either a local path or a UNC path as in the screenshot.
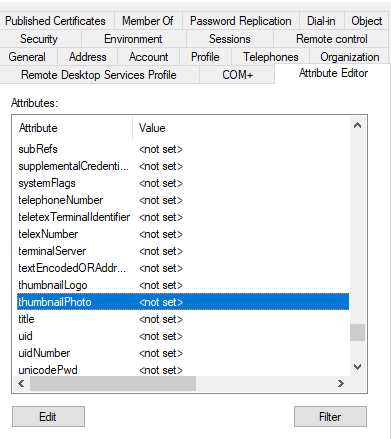
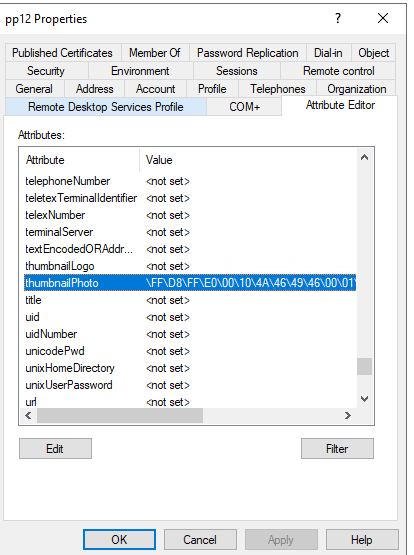
Then you can check if the thumbnailPhoto attribute of the user has been set.
Open the Active Directory Users and Computers tool and make sure that Advanced Features options on the View menu is checked.
Right click the user and select the properties, then select the attribute Editor tag, check if the thumbnailPhoto attribute shows any value. If you see <not set>, it means there is no photo configured. Here are screenshots for your reference:
Note:
There is also one key point – the photo stored in the thumbnailPhoto attribute cannot be bigger than 100 kB, and the recommended size is 96 x 96 pixels.
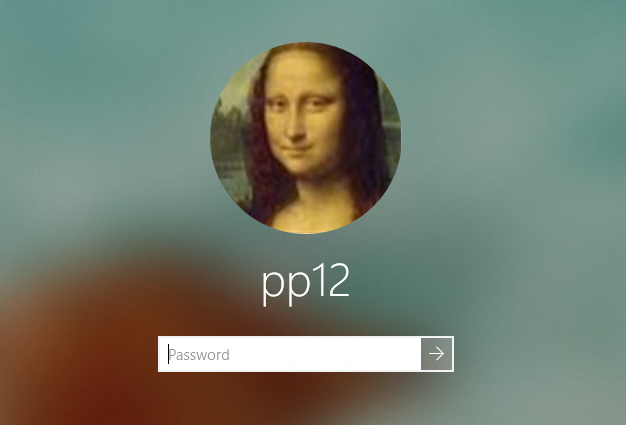
Here is the most beautiful picture to be used in my lab.

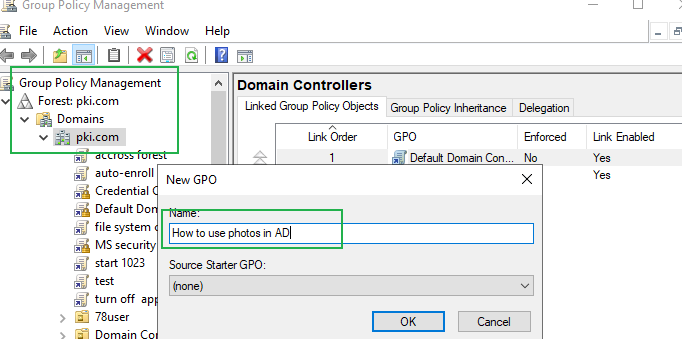
Step Two. Add registry key permissions through Group Policy
Create a new GPO on the domain level.
Note: Assign the change account picture permission to users through the registry key. If users don't have the permissions, the scripts in step 3 would not work.
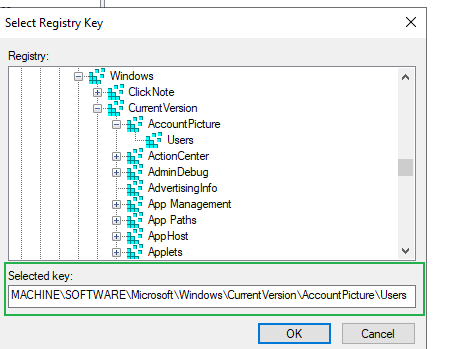
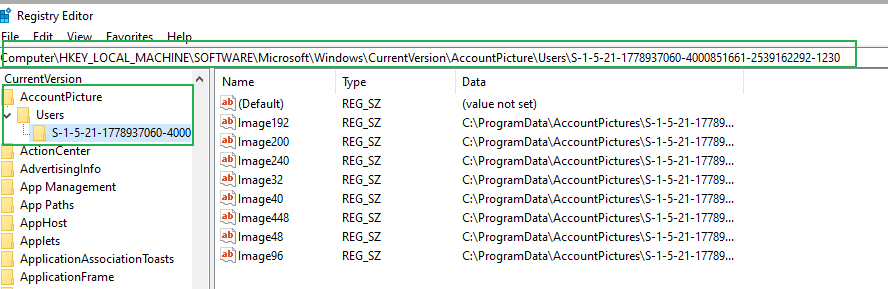
The registry key is under: MACHINE\SOFTWARE\Microsoft\Windows\CurrentVersion\AccountPicture\Users
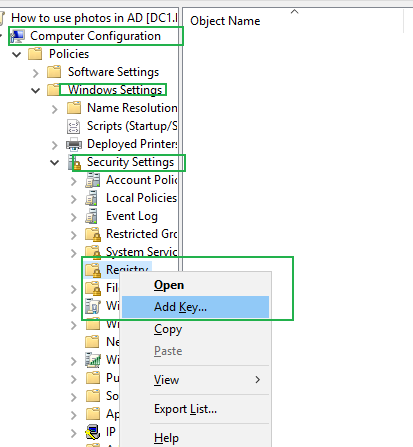
Edit the GPO under Computer Configuration>Windows Settings>Security Settings>Registry as following:
Right click the Registry entry, and click Add Key:
Navigate to: MACHINE\SOFTWARE\Microsoft\Windows\CurrentVersion\AccountPicture\Users
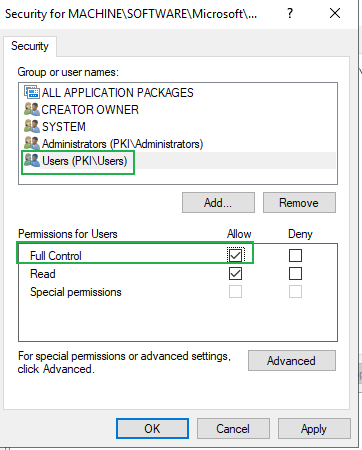
Give FULL permission to users:
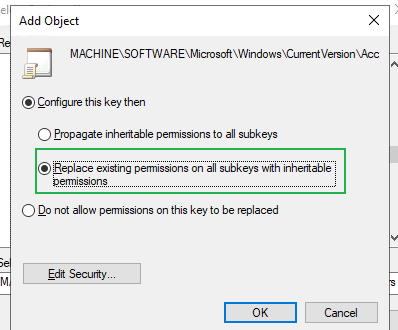
Click OK and close the Group Policy Management Editor.
To update Group policy, we need to restart the computers.
Step Three. Deploy a logoff script through Group Policy
For the script, you can refer to this one.
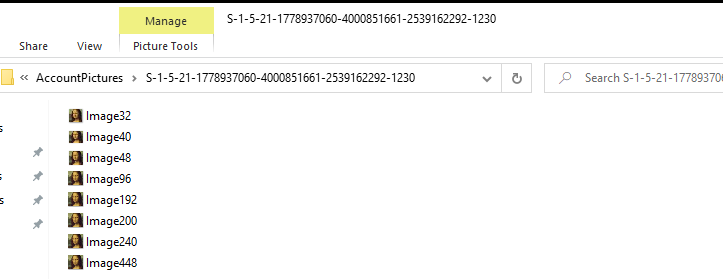
Note: This script is used to export the photo stored in the thumbnailPhoto attribute and saves it on your machine, in a specified folder (in this case: C:\ProgramData\AccountPictures{User SID}).
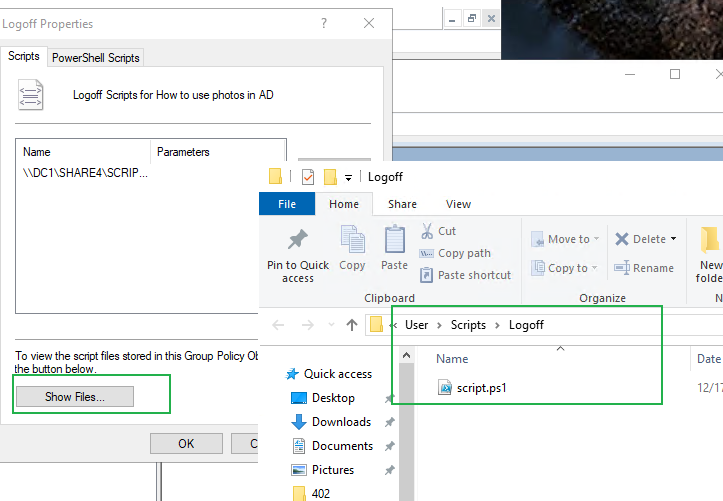
Copy the script content to your notepad and saved as filename.ps1; Put it into a shared folder. Users should have permission to read it.
Edit the GPO we created before.
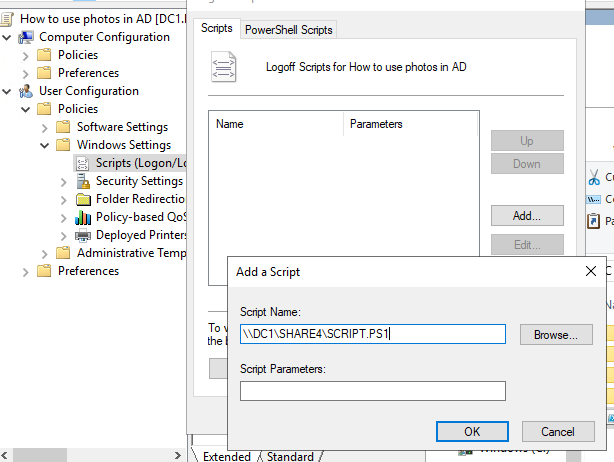
Navigate to User Configuration>Windows Settings>Scripts
Double click the logoff
Click add option, enter the path of the script as following:
Click the option Show files, copy the file to the location:
Update the group policy : log off and login again.
Last, check the result. **
If the policy was applied, you will see the result on the clients where the users will logon to:
The photo stored in the thumbnailPhoto attribute would be exported to into a specified folder on your machine. **(C:\ProgramData\AccountPictures{User SID})
New registry keys will also be created under MACHINE\SOFTWARE\Microsoft\Windows\CurrentVersion\AccountPicture\Users{User SID} in the Windows registry, with paths to these photos.
And you will see the photo we configured on the logon image.
If you also want to use the photos, have a try!
' cx='32' cy='32' r='32' /%3E%3Ctext x='50%25' y='55%25' dominant-baseline='middle' text-anchor='middle' fill='%23FFF' %3EJB%3C/text%3E%3C/svg%3E)
Hi There @Fan Fan
Nice article. I have followed it and I can see the photos added to the program data\account pictures. I can also see the registry entries have been made but still the photo isn't being shown at login.
' cx='32' cy='32' r='32' /%3E%3Ctext x='50%25' y='55%25' dominant-baseline='middle' text-anchor='middle' fill='%23FFF' %3ETR%3C/text%3E%3C/svg%3E)
Same here nothing on my login screen, but everything did sync to my exchange server.
' cx='32' cy='32' r='32' /%3E%3Ctext x='50%25' y='55%25' dominant-baseline='middle' text-anchor='middle' fill='%23FFF' %3ES%3C/text%3E%3C/svg%3E)
@Fan Fan I have followed your step however I am not able to view the image on my computer ?
' cx='32' cy='32' r='32' /%3E%3Ctext x='50%25' y='55%25' dominant-baseline='middle' text-anchor='middle' fill='%23FFF' %3ERJ%3C/text%3E%3C/svg%3E)
It works as far as copying the script to Logoff folder. Access Denied.
Which permissions do I need? Cant seem to find the correct one.
Edit:
Found the solution. Don't use UNC network path. Open folder locally and paste the file.
I have provided local path and have shared the folder with read permission still unsuccessful
' cx='32' cy='32' r='32' /%3E%3Ctext x='50%25' y='55%25' dominant-baseline='middle' text-anchor='middle' fill='%23FFF' %3EMG%3C/text%3E%3C/svg%3E)
For everyone who struggles with this tutorial: