Virtual Keyboards
The input tag has four options for mode: password, singleline, multiline or display. When an input element with singleline, multiline, or password mode receives focus, the player may launch an onscreen keyboard to allow user input or a software player may enable use of the computer keyboard. This is not required, though (currently, only the Xbox presents the user with a keyboard). And, there's no guarantee on how a player's keyboard will look and if they will implement all the keys you want. Maybe you want an alphabetical keyboard. Maybe you want “.com” and “.net” keys to make entering email addresses easier. If you need user input, your best bet is to use the display mode on your input tag and implement your own virtual keyboard.
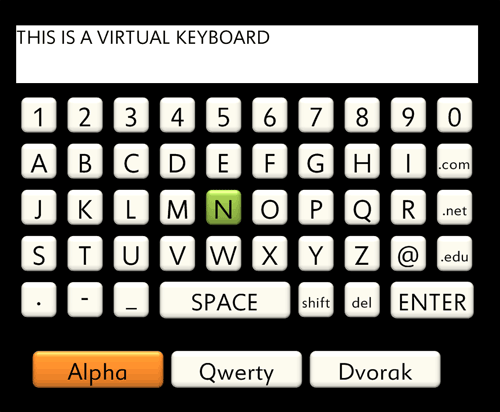
The project at the end of this blog has 3 sample virtual keyboards to choose from - alphabetical (for me), QWERTY, and Dvorak (for Chris). They all use the same markup, styles, timing, and script files. Only the markup files are different.
Here's a sample of what the "A" key looks like:
<div style="key col1" class="uppercase">
<button class="key btn" style="key_btn" accessKey="VK_A_BUTTON" custom:key="A"/>
<p>A</p>
</div>
class
The parent div has a class attribute. A class is a way to group similar elements. It doesn't apply a style like the same attribute would in HTML. Class is used here to group which elements are hid or shown when the shift button is actioned. Class is also used to group all the keyboard keys so only one cue is needed for all buttons with the class applied.
<cue begin="class('key')[state:actioned()]" end="defaultNode()[not(state:actioned())]">
<event name="key_action"/>
</cue>
Custom Namespace
The buttons of the keyboard also have a "custom:key" attribute. The markup is extensible and custom attributes can be added if you add the namespace to the root element of the document.
xmlns:custom="https://custom"
This allows us to pass custom information on the button that has been actioned to the script by calling getNamedItem on the target of the action
var element = evt.target;
var attr = element.attributes.getNamedItem("custom:key");
var key = attr.value;
accessKey
Adding accessKey to a button adds a shortcut to actioning that button. This is particularly useful for the number keys because it allows users to navigate the keyboard or use the number panel on the remote. Note that for the letter keys, only keys A, B, C, and D are required to be supported. Letters E-L are optionally supported. Letters M-Z are not supported.
computeImplicitNav
As I stated earlier, shift is being handled by hiding or showing uppercase or lowercase classes. By setting style:display to none, the disabled keys are removed from display. However, changing a key's display from none to auto does not automatically add the element to the keyboard's navigation. So, when display has been updated, an event is sent to the script and computeImplicitNav re-calculates the keyboard's implicit navigation.