How to publish Forefront Identity Manager (FIM) Portal through Web Application Proxy (WAP)
As Microsoft has introduced a new reverse proxy solution called Web Application Proxy (WAP) in Windows 2012 R2, more people have started using this feature for publishing their internal applications to the external world. I would like to explain in this blog post how we can publish the Forefront Identity Manager (FIM) Portal to the external world using the Web Application Proxy.
Let’s have a look at some basic information about the Web Application Proxy.
The minimum requirement to install the Web Application Proxy in your environment is;
At least one Windows 2012 Domain controller
One ADFS 2.0 running on Windows Server 2012
One Windows Server 2012 R2 for Web Application Proxy service.
Since the scope of this blog is to demonstrate how to publish the Forefront Identity Manager portals through Web Application Proxy, I do not want to go in to the details of installing and configuring ADFS and WAP.
You can find the details on that in the below article.
Installing and Configuring Web Application Proxy for Publishing Internal Applications
Pre-authentication available on Web Application Proxy
There are 2 type of authentication methods available in Web Application Proxy when you publish an application.
- ADFS
- Pass-through
ADFS authentication can be broadly divided in to two;
- Claims-Aware
- Non-Claims-Aware
Example for Claims-Aware applications are SharePoint 2013. As FIM is not a Claims-Aware application, we will publish it through WAP using the Non-Claims-Aware method.
Pass-throughAuthentication
The Pass-through authentication on Web Application Proxy is othing but allowing the client to directly authenticate with the backend ebserver. In this case WAP does not do any kind of Pre-authentication for the session.
Now, let’s talk about Publishing FIM Portal through WAP with Pre-Authentication in detail:
Publishing FIM Portal through WAP with Pre-Authentication
The first requirement for publishing a Non-Claims aware application with pre-authentication is Kerberos Constrained Delegation (KCD). The WAP will authenticate the client user against ADFS and then delegate the credentials to the backend application using Kerberos Constrained Delegation method. So it is important to setup the FIM Portal for Kerberos Authentication.
You can see here how to configure FIM for Kerberos Authentication.
Collecting the Pre-requisites from your FIM environment
1. Find the account under which the Application Pool for FIM Portal is running.
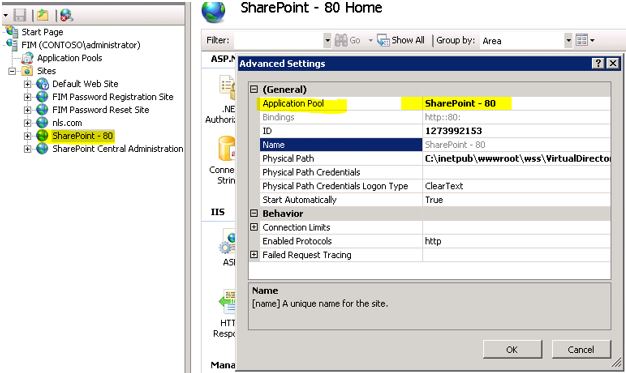
I installed my FIM Portal on the default ‘SharePoint-80’ Site and for you it may be different. On the IIS management console, right click on the FIM Portal and select ‘Manage Web site’ -> ‘Advanced Settings’
You can see on the top under which Application pool this FIM Portal is running. In my case it is ‘SharePoint -80’
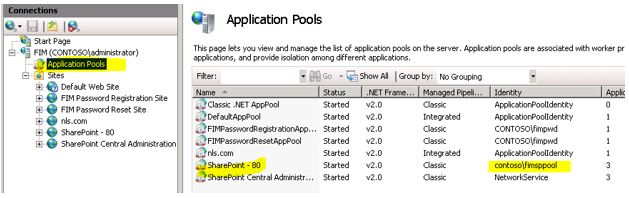
Go to the Application Pool section on the IIS and check what is the account configured for this FIM Portal AppPool. In my lab it is, contoso\fimsppool
2. Check whether you have the correct Service Principal Name (SPN) registered for this AppPool account.
Open an elevated command prompt on your server and enter the below command to check it.
Setspn – L contoso\fimsppool
(here contoso is your domainand fimsppool is the account under which the FIM Portal AppPool is running).
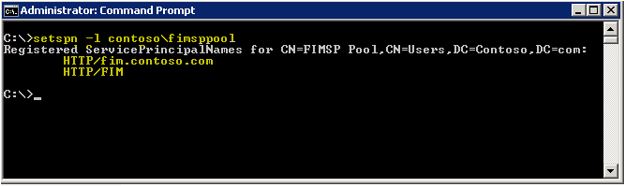
I have 2 SPNs registered HTTP/fim.contoso.com and HTTP/FIM
3. Find out your internal url for accessing the FIM Portal
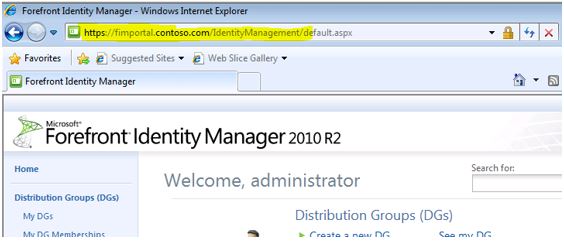
I am using https://fim.contoso.com

Go to your WAP server and try to access the FIM portal using this same URL. If you are able to access then you can proceed with publishing. If you cannot access the FIM Portal from the WAP server, then you need to troubleshoot that first. You can check whether the name resolution works correctly or not or is there any Firewall in between the WAP and FIM portal server which is blocking the traffic etc.
Now we have all the required details about FIM for publishing.
FIM Portal Application Pool Account : contoso\fimsppool
SPN registered on AppPool Account : http/fim.contoso.com
Internal FIM Portal URL : https://fim.contoso.com
Creating the Relying Party Trust in ADFS for FIM Portal.
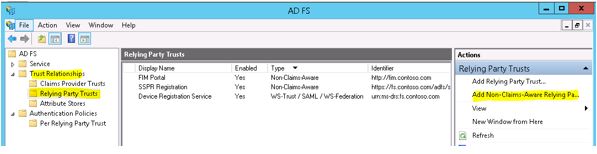
Go to your ADFS 2012 server and Open the ADFS Management console.
Expand the ‘Trust Relationships’ and select the ‘Relying Party Trusts’ Click on the ‘Add Non-Claims-Aware Relaying Party Trust’
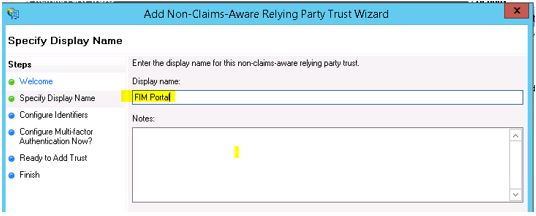
Click Start on the Window and give a Display name to identify this Relying Party
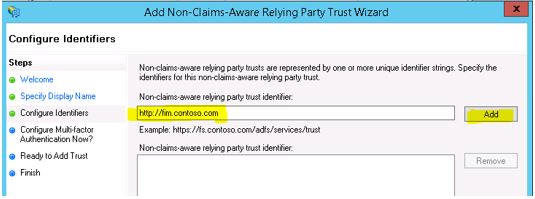
Click next and type the URL you use to access the FIM Portal on your Intranet and click Add.
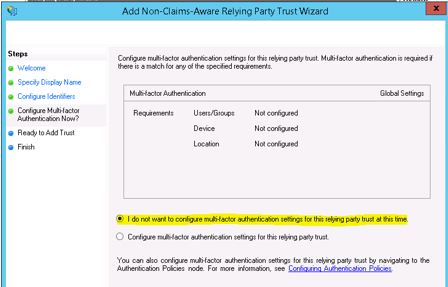
Click Next and select the first option on the next window.
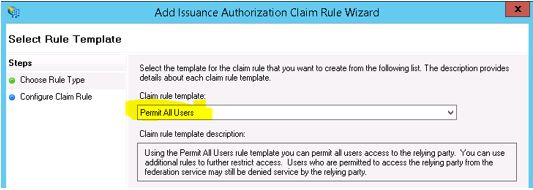
Click next and Close the Wizard and an Issuance Authorization Rules will automatically open. If not, open up Edit Issuance Authorization Rules for the Relying Party that you have just added
Click on Add Rules
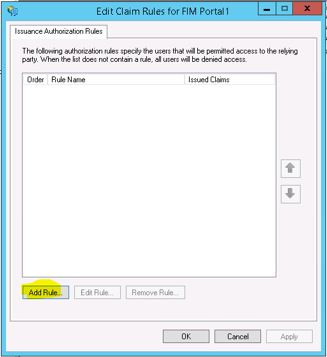
Select ‘Permit All Users’ from the Claim rule template. Click Next, Finish and Apply the Wizard.
Now we have completed creating the Relaying Party Trust for FIM Portal on ADFS.
Now, let’s go to the next step of how to Configure Delegation to the WAP computer Account in Active Directory:
Configure Delegation to the WAP computer Account in Active Directory
Find your WAP computer object in AD and take the properties of it. Go to the ‘Delegation’ tab and select the highlighted options and then click on Add button
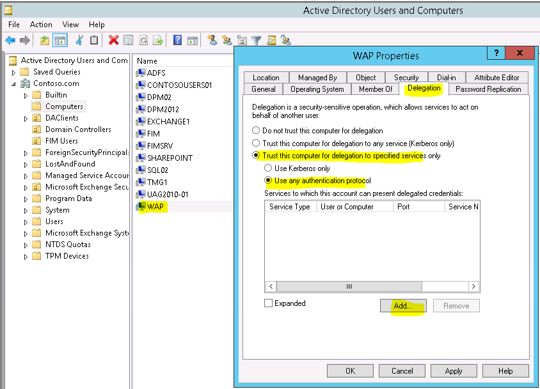
Click on ‘Users and Computers.’ button and enter the name of the Application Pool account under FIM Portal is running. (explained in the 2nd step in the beginning of this article)
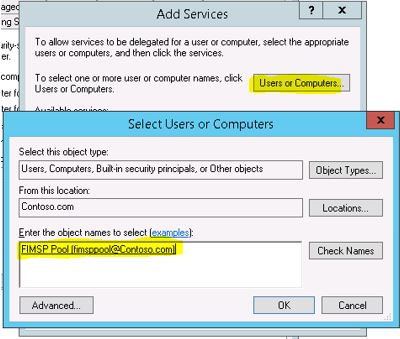
Select the correct SPN (in my case HTTP/fim.contoso.com) and then click OK. Click Apply and OK on the Delegation tab.

Let’s go through the Final Step of Publishing FIM Portal on WAP:
Publishing FIM Portal on WAP
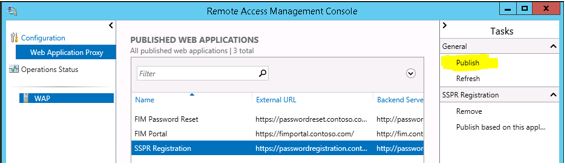
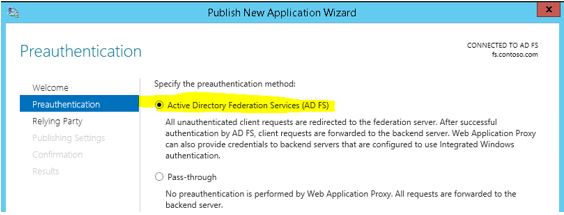
Now we are ready to publish the FIM Portal on WAP. Go to the WAP server and open the Remote Access Management Console. Click on the Publish option on the right hand side of the console.
Select ADFS for the Preauthentcation method.
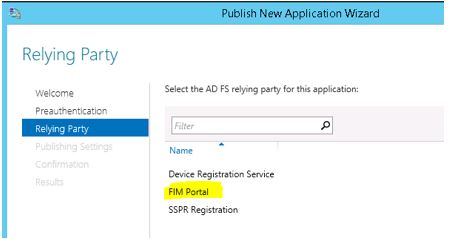
Click Next and it displays you the Relying Parties configured on the ADFS server. Select ‘FIM Portal’ from the list and click
Next.
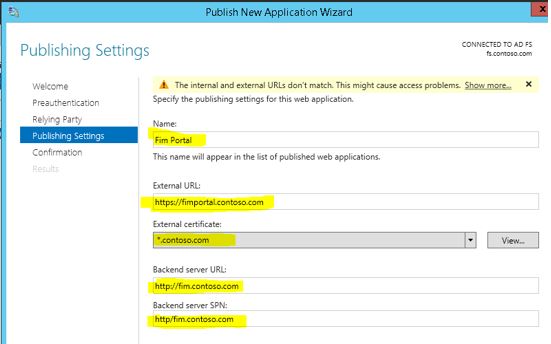
On the next window you need to enter five options.
Name: any name to identify this application (eg: FIM Portal)
External URL: The url you will use to access the FIM Portal from external world or internet (https://fimportal.contoso.com)
External Certificate: Since the site is published over SSL we need to select a certificate for this site. Before beginning this wizard, make sure to obtain and install a certificate which has the external name of your FIM portal.
Backend server URL: this is the URL which you use to access the FIM portal from your Intranet (eg: https://fim.contoso.com )
Backend server SPN: Enter the SPN we registered for FIM portal Application pool. (eg: http/fim.contoso.com)
Click Next, Publish and then Close.
So, now we have published the FIM portal through WAP!
ADDITIONAL INFORMATION:
You may have to do some additional configuration on your external Firewall to direct the traffic coming for FIM portal from the internet to the WAP server IP. Your ADFS url should be accessible from the internet client and this URL should be resolved to the correct IP address (Normally it will be resolved to your WAP server IP).
Once that is done you will be able to access your FIM portal from an external client machine.
Other related blogs:
Publishing FIM SSPR Reset Portal through WAP
Publishing FIM SSPR Registration Portal through WAP
Author:
ANIL GEORGE
Microsoft Security Support Engineer
Reviewer:
NITIN SINGH
Microsoft Security Support Escalation Engineer