Use of Deferred Loading in XAML
Objective of this blog is to demystify the deferred loading concept in XAML.
In order to understand this topic, reader must have basic understanding of XAML and C#.
What is deferred loading?
Why do we need this?
- To improve XAML Performance
- To improve user experience.
- To optimize initial loading.
Where do we need this?
Suppose you have a page which contains 50 controls however the end user only uses 10 control initially, so what is the point of loading rest of 40 control initially and delaying initial loading of your app. The point here is that you load the control when you need it and deferred loading is the technique to do this.
At this time you might be thinking, why not simplify the XAML at first place. I would say, that is easy to say but difficult to maintain in a moderate or complex project. XAML complexity grow along with functionality of the application.
Some of you might be thinking of injecting an elements into the visual tree at run time and improve the performance. I would say it is possible but the code you wrote is difficult to maintain, violate separation of concern principle as your code behind include UI element and you lose a lot of the declarative capability of XAML.
In deferred loading, you keep unwanted control out until their realize (required). Basically you are marking a part of your UI tree with a container or a series of elements that don’t show up until their realized (required). Realized is a manual or sometime an automatic process but basically it is not at the starting. In summary the UI element get realized when you need them, but not before.
Note: There is a cost involved in deferred loading also that is while marking a visual tree with placeholder instead of actual control. A very small lightweight placeholder is used instead of loading expensive big control. Also events are hooked up after realized and binding is completed after realized (Including x:Bind). In nut shell you get benefit if you use it correctly.
Following are the way to realize an element:
- FindName()
- EnsureElementRealized()
- GetTemplatedChild() (for ControlTemplate)
- Storyboard & VisualStates (because of FindName)
Enough theory ! Let’s use this concept in visual studio.
In order to demonstrate this concept, I have created a class “MyGrid” which is derived from Grid class.
Situation: There are five instance of “MyGrid” class and User only uses first Grid and rest 4 Grid required latter. So objective is to load only first grid at the starting.
Here is the class definition of “MyGrid”:
 class MyGrid : Grid
{
    private static int count = 0;
    public MyGrid()
    {
        this.Height = this.Width = 100;
        this.Margin = new Windows.UI.Xaml.Thickness(10);
        this.Background = new SolidColorBrush(Colors.SteelBlue);
        Debug.WriteLine("Created " + count++);
    }
}
In this class we have created a static counter which gets increment on each instance of a class and Debug.WriteLine() is used to print the value of this counter. Note: You can see the outcome of Debug.WriteLine in output windows after running the solution.
Now lets go to xaml page (in my case it is MainPage.xaml) and add refere “MyGrid” control which was create at first place. First ad the namespace of MyGrid class. In my sample solution it is:
xmlns:Common="using:App1.Common"
Here is the XAML code where “MyGrid” class is referred.
 <Grid Background="{ThemeResource ApplicationPageBackgroundThemeBrush}">
    <StackPanel>
        <Common:MyGrid />
        <Common:MyGrid Visibility="Collapsed"/>
        <Common:MyGrid Visibility="Collapsed"/>
        <Common:MyGrid Visibility="Collapsed" />
        <Common:MyGrid Visibility="Collapsed"/>
    </StackPanel>
</Grid>
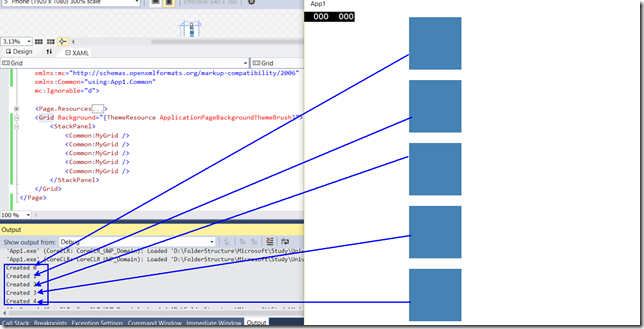
Press F5 and you will get below screen.
You can see in the output window that all 5 grid gets created at run time, although user only required first grid. Here comes the requirement of x:DeferLoadStrategy=”Lazy” attribute
Here is the modified xaml.
 <Grid Background="{ThemeResource ApplicationPageBackgroundThemeBrush}">
        <StackPanel>
            <Common:MyGrid x:Name="grid1" DoubleTapped="grid1_DoubleTapped"  />
            <Common:MyGrid x:Name="grid2" x:DeferLoadStrategy="Lazy"/>
            <Common:MyGrid x:Name="grid3" x:DeferLoadStrategy="Lazy"/>
            <Common:MyGrid x:Name="grid4" x:DeferLoadStrategy="Lazy" />
            <Common:MyGrid x:Name="grid5" x:DeferLoadStrategy="Lazy"/>
        </StackPanel>
    </Grid>
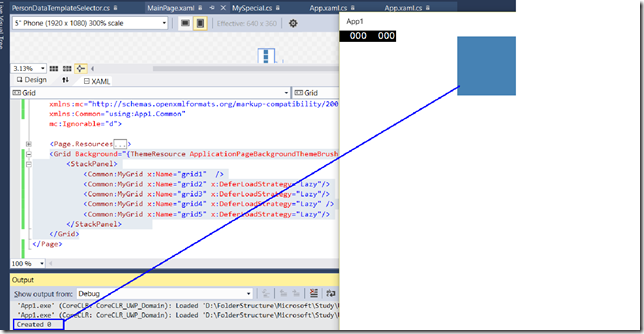
Press F5 and you will see only one instance of MyGrid class gets created.
Note: In order to use DeferLoadStrategy attribute, you must define the name of the control, otherwise compiler will throw error. As you know the name will be used to realize the UI Element (Control).
So far we have understood that how to use DeferLoadStrategy attibute.
Now suppose you want to load second Grid on some event. Lets take grid1 doubleTapped event. So as soon as user double click on gird1 then load grid2.
To complete this requirement we will be using “FindName” method to load second grid instance at run time.
Here are the modification in xaml file.
<Common:MyGrid x:Name="grid1" DoubleTapped="grid1_DoubleTapped" />
Here are the modification in .cs file.
   private void grid1_DoubleTapped(object sender, DoubleTappedRoutedEventArgs e)
        {
            FindName("grid2");
        }
Press F5 and then double click on grid1 control, you will see grid2 realized using “FindName” method. The results of output window are justfying that only two grid has been realized so far.
By now you have understood what is deferloading, where to use, how to use and how to realize deferloading control.
Note: Visibility and Opacity can not be used in place of deferloading as both of them create instance of the UI element in the background and you will not get true benefit of optimum loading which deferloading provide.
If you have any question or suggestion, please provide a comment. I am looking forward for your feedback.

