Getting started with BizTalk Server 2010 R2 CTP in Windows Azure Virtual Machines
To get started, you need access to a Windows Azure subscription. If you don’t have one already, you can sign up for Windows Azure 90-day free trial here.
Create a Virtual Machine running BizTalk Server 2010 R2 CTP
To use this feature and other new Windows Azure capabilities, login to your account and sign up to use the preview features.
It's easy to create a virtual machine that is running BizTalk Server 2010 R2 (CTP) when you use the Image Gallery in the Windows Azure Management Portal. This post will walk you through the steps involved to create a virtual machine running BizTalk Server 2010 R2 (CTP) in the cloud.
To learn more about Windows Azure and Virtual Machines, refer to this blog post.
Management Portal Experience
You use the From Gallery feature to create a custom virtual machine in the Management Portal. When you create this virtual machine, you can define the size of the virtual machine, the connected resources, the DNS name, and the network connectivity if needed.
- Sign in to the Windows Azure Management Portal.
- On the command bar, click New.
- Click Virtual Machine, and then click From Gallery.
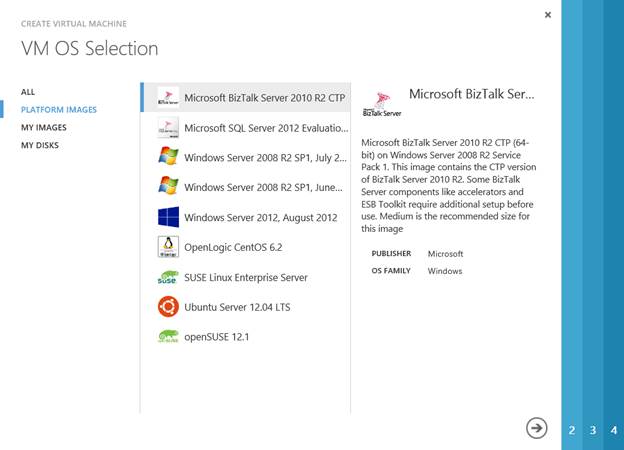
- The VM OS Selection dialog box appears. You can now select an image from the Image Gallery.
- Click Platform Images, select the Microsoft BizTalk Server 2010 R2 CTP image, and then click the arrow to continue.
- The VM Configuration dialog box appears.
- In Virtual Machine Name, type the name that you want to use for the virtual machine. For this virtual machine, type MyBTSVM1.
- In New Password, type a password for the Administrator account on the virtual machine. For this virtual machine, type MyPassword1. In Confirm Password, retype the password.
- In Size, select the size of the virtual machine. The size that you select depends on the number of cores that are needed for your application. For this virtual machine, select Medium.
- Click the arrow to continue.
- The VM Mode dialog box appears.
- You can connect virtual machines together under a cloud service to provide robust applications, but for this tutorial, you are creating a single virtual machine. So, select Standalone Virtual Machine.
- A virtual machine that you create is contained in a cloud service. In DNS Name, type a name for the cloud service that is created for the virtual machine. The entry can contain from 3-24 lowercase letters and numbers. This value becomes part of the URI that is used to contact the cloud service that the virtual machine belongs to. For this virtual machine, type MyService1.
- Select the storage account for the VHD file. For this tutorial, select Use Automatically Generated Storage Account.
- In Region/Affinity Group/Virtual Network, select West US as the location of the virtual machine.
- Click the arrow to continue.
- The VM Options dialog box appears.
- The options on this page apply only if you are connecting this virtual machine to other virtual machines or if you are adding the virtual machine to a virtual network. For this virtual machine, you are not creating an availability set or connecting to a virtual network. Click the check mark to create the virtual machine.
- Windows Azure creates the virtual machine and configures the operating system settings. After Windows Azure creates the virtual machine, it is listed as Running in the Windows Azure Management Portal
How to log on to the virtual machine after you create it
You can log on to the virtual machine that you created to manage both its settings and the applications that are running on it.
1. Sign in to the Windows Azure Management Portal.
2. Click Virtual Machines, and then select the MyBTSVM1 virtual machine.
3. On the command bar, click Connect.
4. Click Open to use the remote desktop protocol file that was automatically created for the virtual machine.
5. Click Connect.
6. In the password box, type MyPassword1, and then click OK.
7. Click Yes to verify the identity of the virtual machine.
You can now work with the virtual machine just like you would a server in your office.
Configure BizTalk Group
1. Log into the machine using the steps mentioned above
2. On first logon, a few start up tasks will be executed. Wait until the SQL Server – Getting Started link is created on desktop.
3. The machine already has all the pre-requisites for running BizTalk Server from SQL Server to BizTalk Server installation to IIS configuration, etc.
4. Launch BizTalk Configuration Wizard
5. Use the basic or custom configuration and apply configuration Settings
6. Once configured, you have a fully configured and running BizTalk Server environment in Windows Azure.
Next steps
The best way to get started with the offering is just to do some experimenting, developing and testing BizTalk Server 2010 R2 CTP on a Virtual Machine. This means you can deploy a Virtual Machine, perhaps as part of your new free trial and install BizTalk Server 2010 R2 CTP.
If you have any issues, problems, or questions, you can always find us on the help forums.