Step-By-Step: Enabling Domain Based Filtering in an Azure AD Connect sync
Microsoft's Azure AD Connect tool can integrate an on-premises Windows Server Active Directory deployment with Azure Active Directory enabling users to connect to a multitude of SaaS applications, Azure Services and of course Office 365. The following video provides an overview of how the Azure AD Connect tool can enable said services:
Several features are included with Azure AD Connect to provide further Active Directory synchronization customization. One of the many customizations offer is Filtering which provides system administrators the ability to select which Active Directory objects are to be synchronized to Azure AD. The standard enablement of Azure AD enables synchronization of users and groups, however filter invoke limits on can based on Organizational Units (OUs), domains, or other attributes.
This Step-By-Step post will provide guidance on how to enable filtering on an already enabled Azure AD Connect implementation.
Step 1: Disabling the scheduled AD synchronization
- On the instance Azure AD Connect is installed on, click the Start Menu and type Task Scheduler then hit enter
- In Task Scheduler, navigate to Task Scheduler Library > Azure AD Sync Scheduler
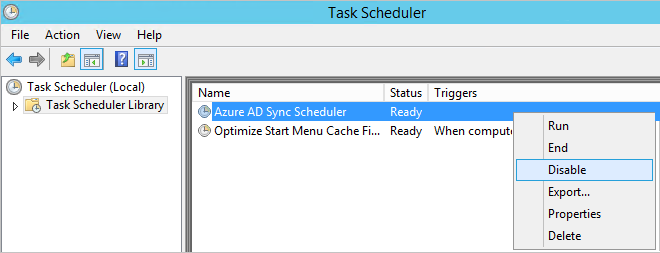
- Right-click Azure AD Sync Scheduler and select Disable
The following filtering configuration changes can now be made once the scheduled AD synchronization has been disabled.
Step 2: Enabling Domain Based Filtering
This option allows for the selection of domains that will synchronize to Azure AD.
Sign on to the instance Azure AD Connect is installed on via an ADSyncAdmins security group account
Click the Start Menu and type Start Synchronization Service then hit enter
Select Connectors
In the Connectors list, select the Connector with the type Active Directory Domain Services
Next from Actions select Properties
Select Configure Directory Partitions
Select / unselect the domains in the Select directory partitions list as required
NOTE: Select the Refresh button to ensure all connected domains are visible
Close the Properties dialog by clicking OK
Back in the Synchronization Services Manager navigate to the Connectors list and from Actions select Configure Run Profiles
Select the run profile and select New Step
On the Configure Step page, in the Type drop-down, select the step type with the same name as the profile being configured and then click Next
On the Connector Configuration page, in the Partition drop-down , select the name of the domain added to your domain filter
NOTE: following steps for each removed domain: Select the run profile > If the Value of the Partition attribute is a GUID, select the run step and click Delete Step
Close the Configure Run Profile dialog and click Finish
Step 3: Enabling the scheduled AD synchronization
- On the instance Azure AD Connect is installed on, click the Start Menu and type Task Scheduler then hit enter
- In Task Scheduler, navigate to Task Scheduler Library > Azure AD Sync Scheduler
- Right-click Azure AD Sync Scheduler and select Enable