Stylizing your Excel worksheets with Open XML 2.0
It’s a long overdue post so I will get right to it. This is not a post about Themes and I probably will never get into it. The class that applies the actual styling is a collection called CellFormats, which holds a number of CellFormat objects, which basically indexes the Ids of defined Fonts, Fills, Borders, Alignments, etc.. There is also another collection called CellStyleFormats that makes the indents in the ribbon control (under styles group box) to show what your styles implement. Filling out this collection is optional. Lets get to coding.
I am going to show how to apply the most commonly used styles, Font, Fills, Borders, and Alignments. I'll leave the rest for you to practice on your own. Try adding a money number format to cell A3. FYI, I am using Open XML 2.0 (April 2008 CTP).
First off, let’s insert your style sheet part to the workbook (check out how to create a workbook):
WorkbookStylesPart stylesPart = spreadSheet.WorkbookPart.AddNewPart<WorkbookStylesPart>();
stylesPart.Stylesheet = GenerateStyleSheet();
stylesPart.Stylesheet.Save();
Now to implement the GenerateStyleSheet method:
private Stylesheet GenerateStyleSheet()
{
return new Stylesheet(
new Fonts(
new Font( // Index 0 - The default font.
new FontSize(){ Val = 11 },
new Color(){ Rgb = new HexBinaryValue() { Value = "000000" } },
new FontName(){ Val = "Calibri" }),
new Font( // Index 1 - The bold font.
new Bold(),
new FontSize(){ Val = 11 },
new Color(){ Rgb = new HexBinaryValue() { Value = "000000" } },
new FontName(){ Val = "Calibri" }),
new Font( // Index 2 - The Italic font.
new Italic(),
new FontSize(){ Val = 11 },
new Color(){ Rgb = new HexBinaryValue() { Value = "000000" } },
new FontName(){ Val = "Calibri" }),
new Font( // Index 2 - The Times Roman font. with 16 size
new FontSize(){ Val = 16 },
new Color(){ Rgb = new HexBinaryValue() { Value = "000000" } },
new FontName(){ Val = "Times New Roman" })
),
new Fills(
new Fill( // Index 0 - The default fill.
new PatternFill(){ PatternType = PatternValues.None }),
new Fill( // Index 1 - The default fill of gray 125 (required)
new PatternFill(){ PatternType = PatternValues.Gray125}),
new Fill( // Index 2 - The yellow fill.
new PatternFill(
new ForegroundColor(){ Rgb = new HexBinaryValue() { Value = "FFFFFF00"} }
){ PatternType = PatternValues.Solid })
),
new Borders(
new Border( // Index 0 - The default border.
new LeftBorder(),
new RightBorder(),
new TopBorder(),
new BottomBorder(),
new DiagonalBorder()),
new Border( // Index 1 - Applies a Left, Right, Top, Bottom border to a cell
new LeftBorder(
new Color(){ Auto = true }
){ Style = BorderStyleValues.Thin },
new RightBorder(
new Color(){ Auto = true }
){ Style = BorderStyleValues.Thin },
new TopBorder(
new Color(){ Auto = true }
){ Style = BorderStyleValues.Thin },
new BottomBorder(
new Color(){ Auto = true }
){ Style = BorderStyleValues.Thin },
new DiagonalBorder())
),
new CellFormats(
new CellFormat(){ FontId = 0, FillId = 0, BorderId = 0}, // Index 0 - The default cell style. If a cell does not have a style index applied it will use this style combination instead
new CellFormat(){ FontId = 1, FillId = 0, BorderId = 0, ApplyFont = true }, // Index 1 - Bold
new CellFormat(){ FontId = 2, FillId = 0, BorderId = 0, ApplyFont = true }, // Index 2 - Italic
new CellFormat(){ FontId = 3, FillId = 0, BorderId = 0, ApplyFont = true }, // Index 3 - Times Roman
new CellFormat(){ FontId = 0, FillId = 2, BorderId = 0, ApplyFill = true }, // Index 4 - Yellow Fill
new CellFormat( // Index 5 - Alignment
new Alignment(){ Horizontal = HorizontalAlignmentValues.Center, Vertical = VerticalAlignmentValues.Center }
){ FontId = 0, FillId = 0, BorderId = 0, ApplyAlignment = true },
new CellFormat(){ FontId = 0, FillId = 0, BorderId = 1, ApplyBorder = true } // Index 6 - Border
)
); // return
}
Finally we apply the styles to the individual cells using StyleIndex:
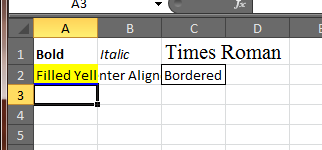
new Cell(new CellValue("Bold")) { DataType = CellValues.String, StyleIndex = 1 }, // Cell A1
You should get the following: